Transflo Command Center QuickStart Guide
for carriers, brokers, shippers, dispatchers, fleet administrators, and accounting staff
** This user guide is also available in a printer-friendly PDF edition. **
TRANSFLO Command Center QuickStart User Guide
Copyright ©2024-2026 Transflo, a Pegasus TransTech Company
All rights reserved. Proprietary and Confidential. Information in this document is subject to change without notice. The software described in this document is furnished under a license agreement or nondisclosure agreement. The software may be used or copied only in accordance with the terms of those agreements. No part of this publication may be reproduced, stored in a retrieval system, or transmitted in any form or any means electronic or mechanical, including photocopying and recording for any purpose without the written permission of Pegasus TransTech. TRANSFLO is a registered trademark in the United States.
Direct any content questions or comments to: (813) 386-6000 or in writing at TRANSFLO 201 N Franklin, Suite 1700, Tampa, FL 33602.
Welcome to Command Center: The TRANSFLO® Command Center web application provides the ability to view, track, and edit loads for carriers and brokers; adjust pickup and drop off locations for stops and deliveries; and manage driver offers and assignments.
Command Center appears in the user interface for all users; however, this dynamic and versatile system is typically marketed to audiences in slightly different ways:
-
Command Center for carriers.
-
Velocity+ Command Center for brokers.
-
Unite Shipper Portal for shippers.
This document is intended to be used as an introduction, onboarding, and basic training guide for internal TRANSFLO Support personnel and new users and requires the setup and configuration of customer users by Transflo administrators using TRANSFLO Express®. Pegasus TransTech reserves the right to make updates and improvements to this information without notice.
Before you start using Velocity+ Command Center, you must register.
-
When you register, the data you see is pre-filled from your broker, carrier, or other registered subscriber and validated against the DOT database.
-
You have the option to make certain corrections; however, you cannot change the DOT number or your registered postal ZIP code.
-
With proper registration, each carrier will enjoy one unified login that is correctly linked to all brokers using Velocity+.
-
Because all carrier registration data is cross-referenced with other brokers, the correct identification of carriers, company names, and DOT numbers is critical. For example, do not enter ABC Trucking if your official name is ABC Trucking Services, Inc. Enter consistent official names and numbers on record.
To register, follow these steps:
-
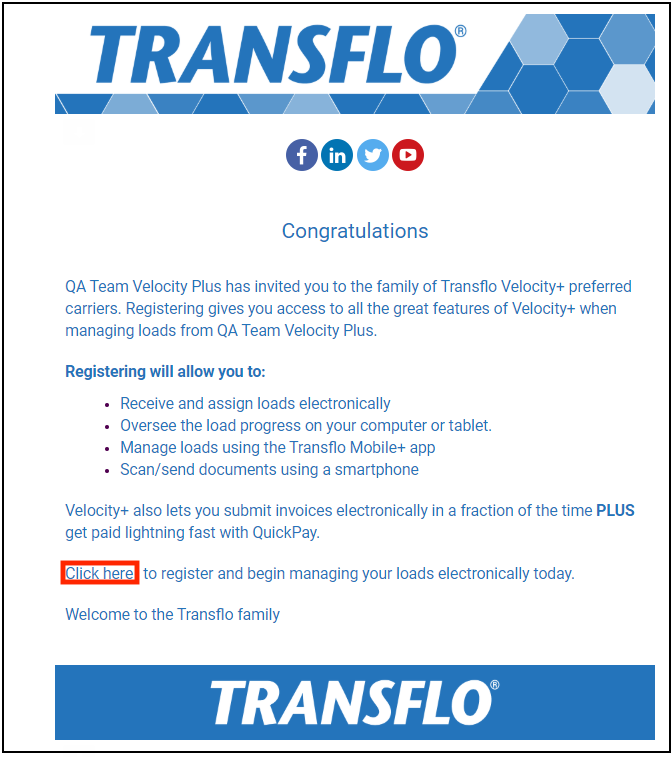
In your e-mail inbox (GMail, Outlook, Yahoo, whatever you use), open the automated registration message from Transflo and click the Velocity+ registration link.
-
As a second option, you might also receive a more personal follow-up email with your fleet ID (recipient ID) as shown in the examples below:


Tip: Provide your drivers with your fleet ID. They need it when they download and register the Transflo Mobile+ app.
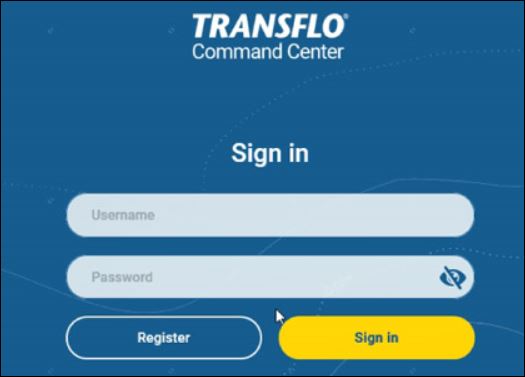
- On the Transflo Command Center Sign In page at https://transflocommandcenter.com/CommandCenter, click Register (if your invitation link was already encoded for you, it might skip this step) or enter your username and password and then click Register.
-
-
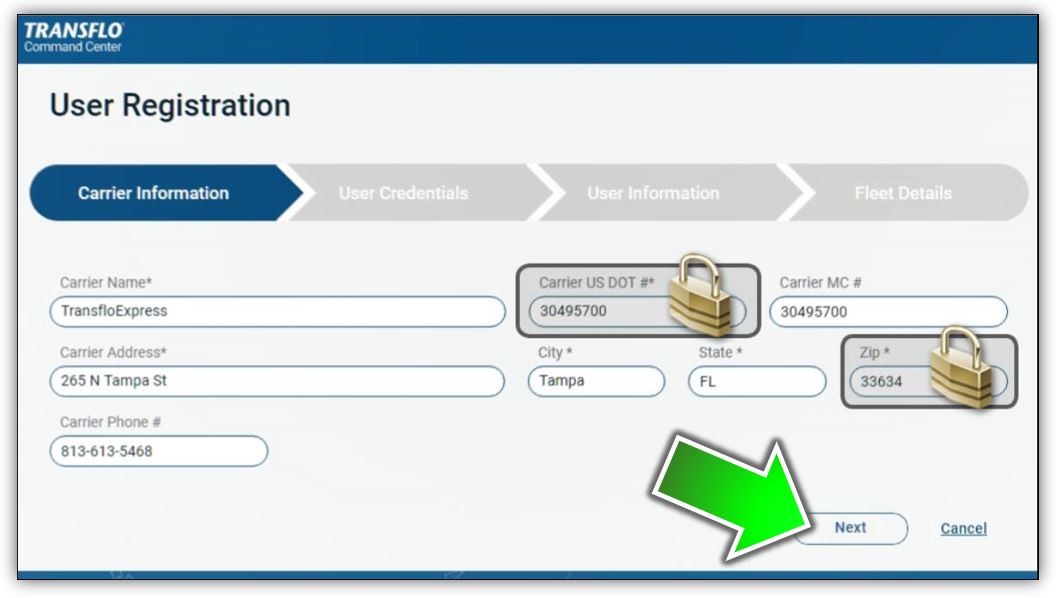
A series of User Registration pages appears. On the Carrier Information page:
-
Verify the pre-filled data. Make only the required corrections. You cannot edit your Carrier US Department of Transportation (DOT) number or registered ZIP (postal) code already on file.

Note: Because all carrier registration data is cross-referenced with other brokers, the correct identification of carriers, company names, and DOT numbers is critical. For example, do not enter ABC Trucking if your official name is ABC Trucking Services, Inc. Enter consistent official names and numbers on record.
-
Click Next.
-
-
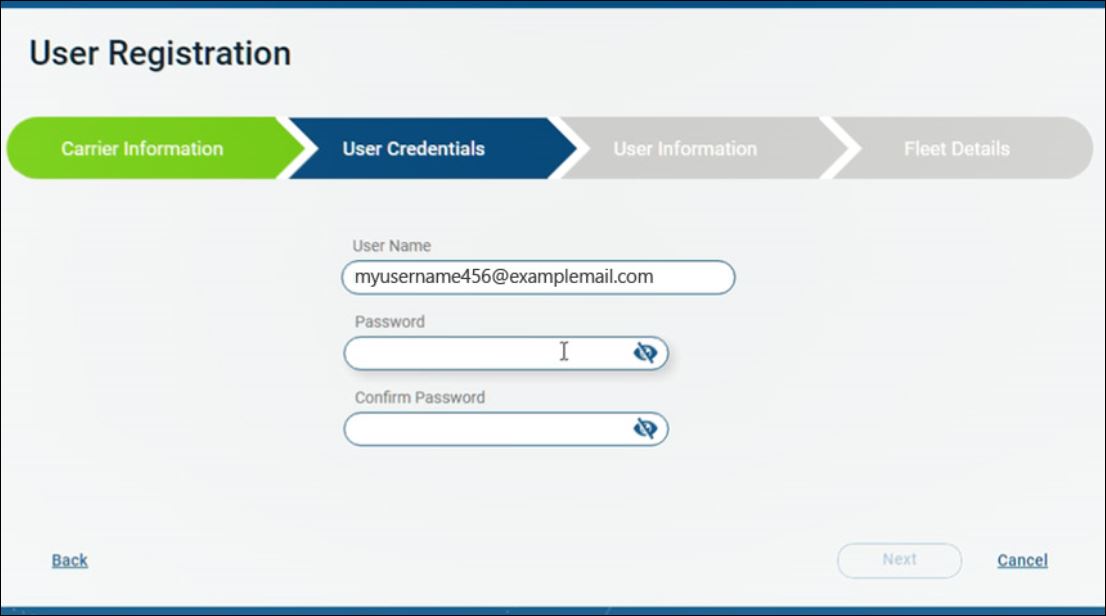
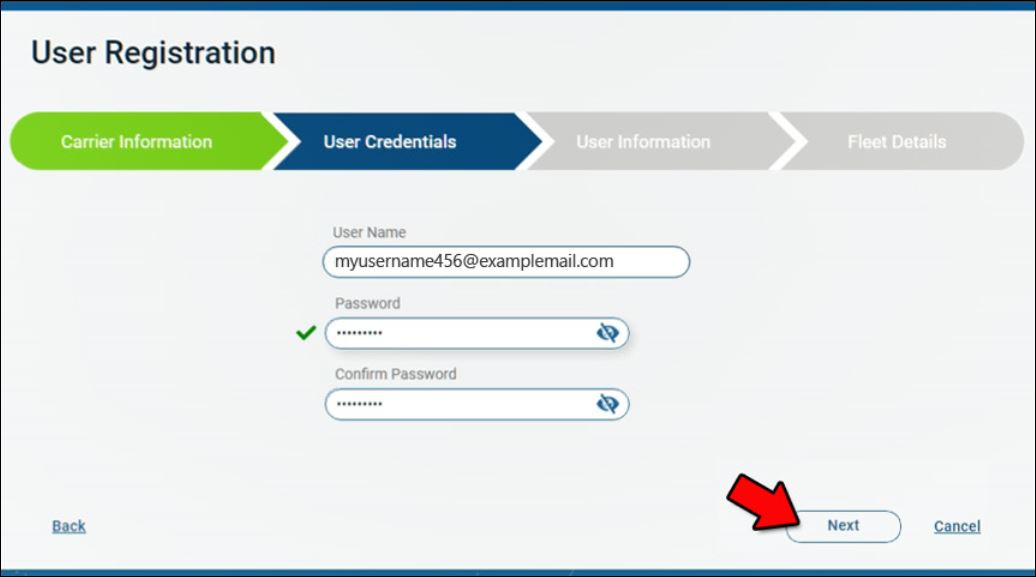
On the User Credentials page:
-
Enter your e-mail address in the User Name field.
-
Create a password and enter it in the Password field. You can make it up on your own or use your own password management software.
Password Requirements: Your password must be at least eight (8) characters long with at least...
-
...one (1) UPPERCASE letter
-
...one (1) lowercase letter
-
...one (1) numeric digit (0-9).
-
You can also use optional special characters such as *!@#%$.
-
-
As a quick test to verify you know your password right now and are going to be able to log in successfully in the future without locking yourself out of your own account, enter the same password in the Confirm Password field. The system alerts you if your password entries do not match.
-
(Optional) For your security, all password entries are hidden (or masked) as bullets ●●●●● (black dots). Press and hold your mouse button down on the
 Hidden Password icon to see the actual characters instead of the bullets ●●●●● (black dots). The icon changes to the
  View Password icon (an open eye) while you press and hold your mouse button down to view the password. When you release your mouse button, the password is hidden again.
 -
When your new password is valid and confirmed, a green check mark appears and you no longer receive alerts about passwords not matching. Click Next.
-
-
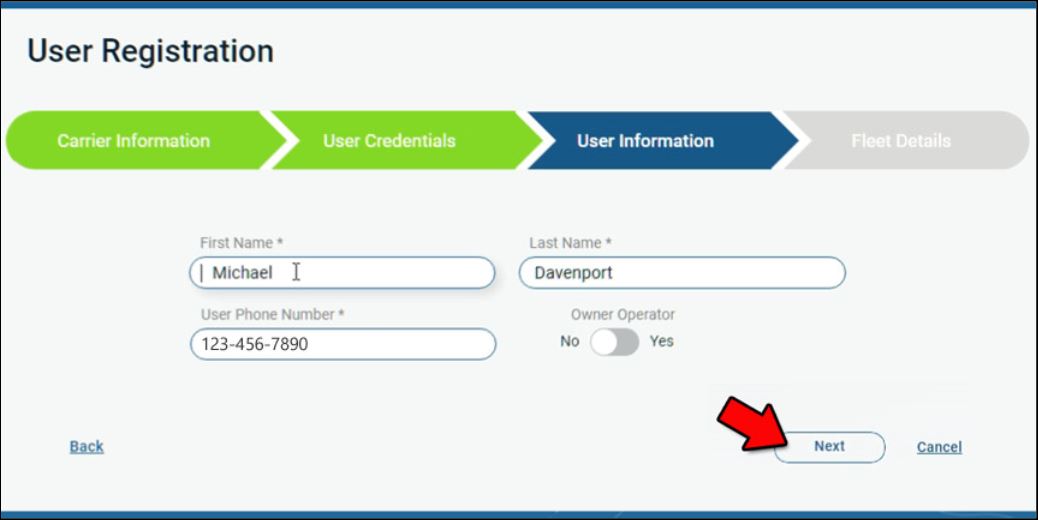
On the User Information page:
-
Enter your First Name, Last Name, and User Phone Number.
-
Click the Owner Operator toggle switch to show No or Yes.

-
When finished, click Next.
-
-
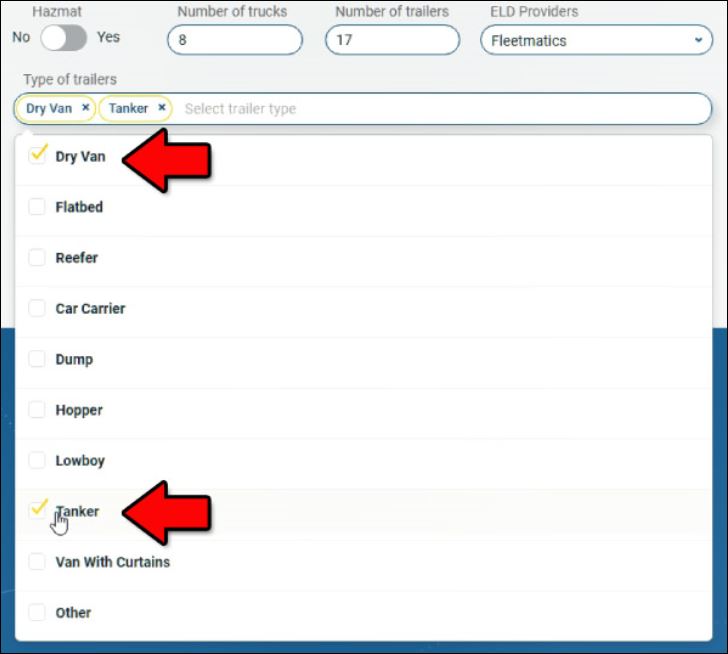
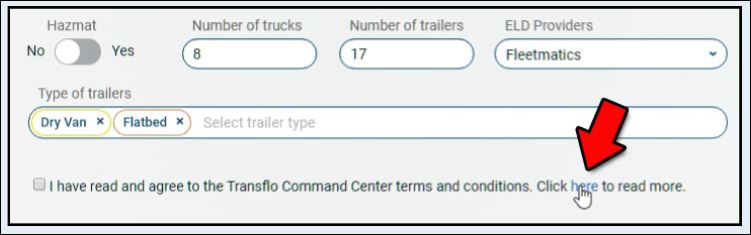
On the Fleet Details page, complete the following information to help brokers understand your capabilities and preferences as a carrier:
-
Click the Hazmat toggle switch to show No or Yes. This setting indicates you are prepared to deliver various classes of hazardous materials.
-
Enter the Number of Trucks and Number of Trailers.
-
In the ELD Providers field, select a value from the drop-down list.

-
In the Type of Trailers field, select one or more values from the list.
-
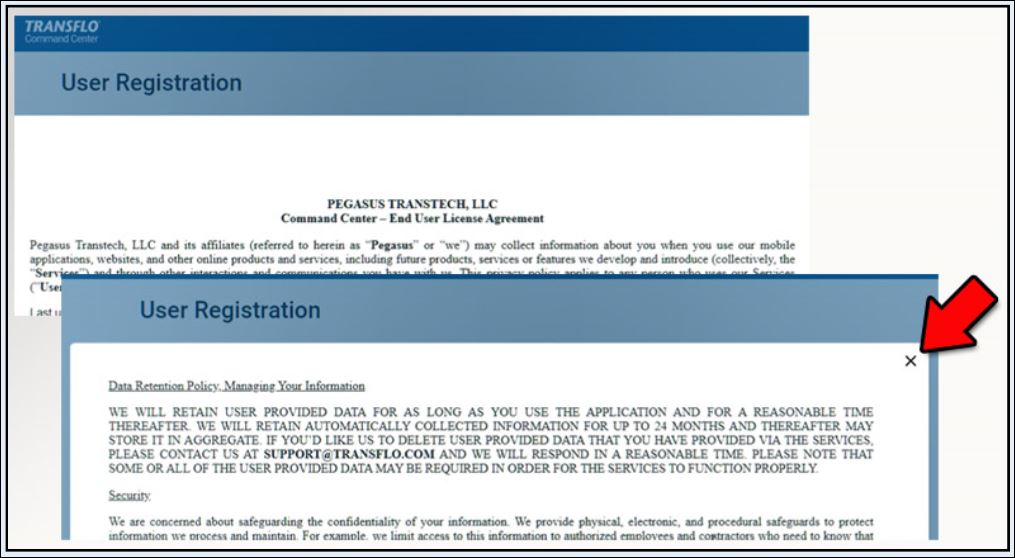
(Required) Click the link to review the terms and conditions.
-
Scroll down the End User License Agreement to read the required terms. When finished, click X Close.
-
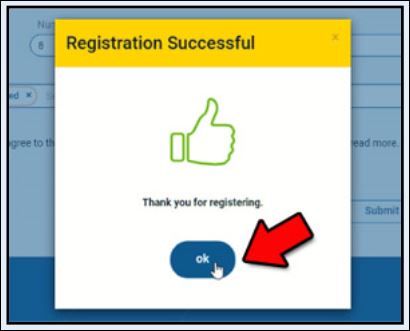
(Required) Select the I have read and agree... check box to confirm you have read and agreed to the license, and then click Submit.

-
-
In the Registration Successful message box, click OK.
-
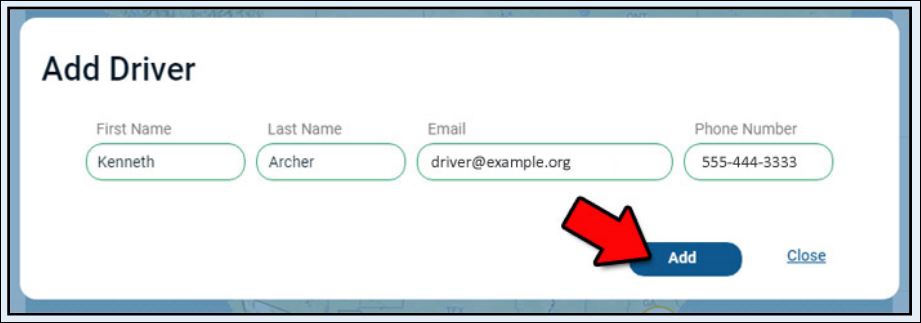
The Transflo Command Center web application opens. As a carrier, you are prompted to add drivers:
-
Enter the First Name, Last Name, Email, and Phone Number for the first driver.
Tip: We recommend that you add at least one driver now so that other application features, online help steps, and examples are more meaningful to you. For example, add a test driver and then offer or assign a load.
-
Click Add.
-
Driver added successfully appears at top right.
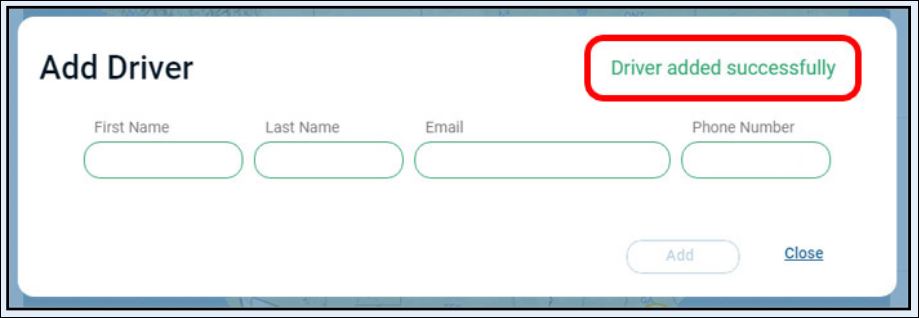
-
To continue adding more drivers, repeat these steps. You can also add more drivers later one at a time or import a list all at once to save time.
-
When you are ready to move on, click Close.
-
-
The Transflo Command Center Home page appears.
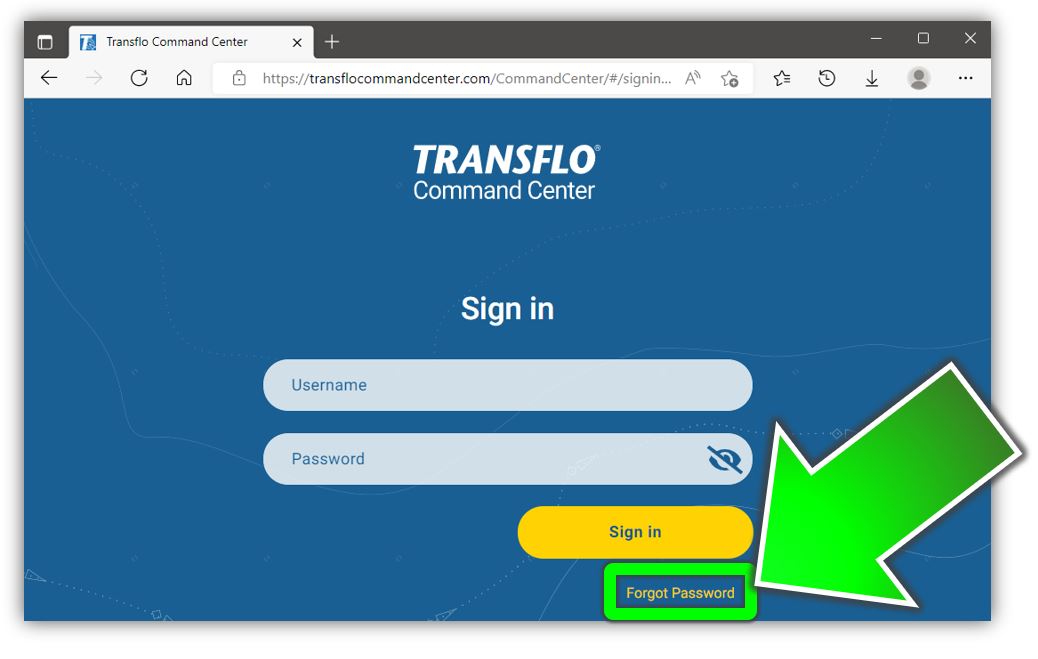
To change your Command Center customer user password or to reset it if you forgot your old password, follow these steps:
-
In a supported web browser, open the Command Center Sign In page at the following link:
-
Click the Forgot Password link below the Sign In button.
-
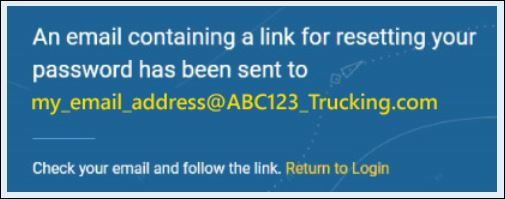
On the Forgot Password page, enter your email address. It must be the same email address that was originally used to process your Command Center registration. Click Submit.

-
An email confirmation message prompts you to check the inbox for that email account where you can now expect to receive a link to reset your password.
Tip: When you forget your password, resist the impulse to discover what it was. Your old password is gone forever. For security, we cannot send you your old password. New users sometimes make that mistake and expect us to provide them with their old password. Instead, for your security, you simply create a new password.
As a security best practice, do not reuse the same old password or share the same password for more than one account.
-
In your email inbox, open the new message from Transflo. The email contains a link for resetting your password. You must use the link within three (3) hours (if it expires, repeat these steps to get a new link sent to you). Click the Reset Password link.

-
The Command Center Reset Password page opens in a new browser tab where you can reset access to your account with a new password.
-
Use a password management app to generate a new password or create your own.
Password Requirements: Your password must be at least eight (8) characters long with at least...
-
...one (1) UPPERCASE letter
-
...one (1) lowercase letter
-
...one (1) numeric digit (0-9).
-
You can also use optional special characters such as *!@#%$.
-
-
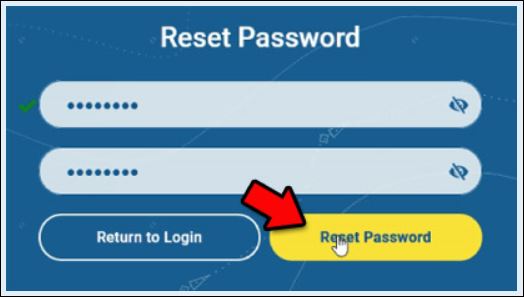
Enter it in the first field.
-
As a quick test to verify you know your password right now and are going to be able to log in successfully in the future without locking yourself out of your own account, enter the same password in the Confirm new password field. The system alerts you if your password entries do not match.
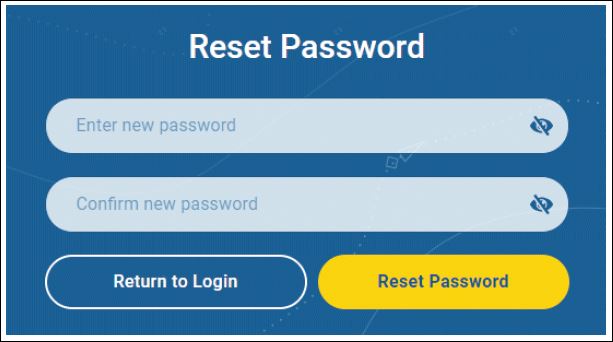
-
(Optional) For your security, all password entries are hidden (or masked) as bullets ●●●●● (black dots). Press and hold your mouse button down on the
Hidden Password icon to see the actual characters instead of the bullets ●●●●● (black dots). The icon changes to the View Password icon (an open eye) while you press and hold your mouse button down to view the password. When you release your mouse button, the password is hidden again. -
Click the Reset Password button.
-
-
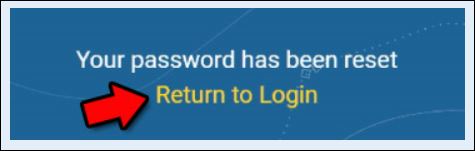
A message confirms Your password has been reset. Click the Return to Login link to go to the Command Center Sign in page.
-
Log in to Command Center using your same username and your new password.
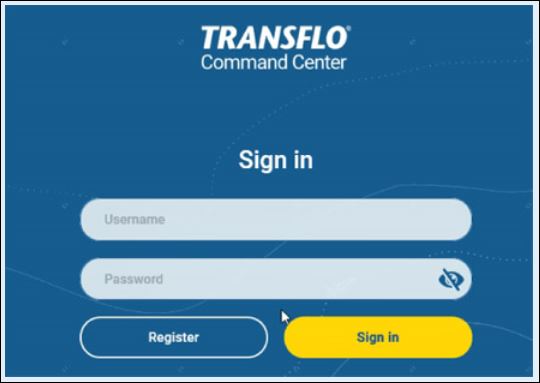
To sign in to Command Center, follow these steps:
-
In a supported web browser, open the Command Center Sign In page at the following link:
-
On the Sign In page, enter the username and password (that you originally configured in the Confirmation Viewer) and click Sign In.
-
The Command Center Home page opens.
-
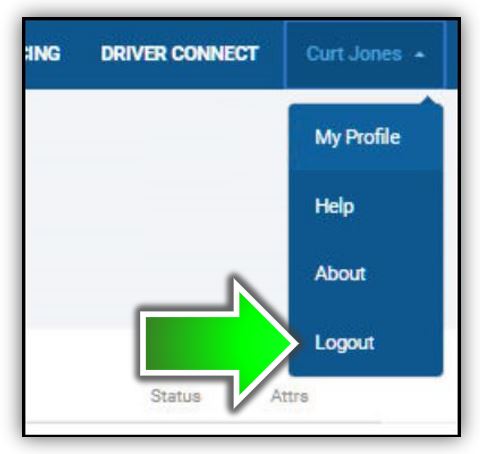
For your security, when you are finished working, click Logout.
The following image shows a typical Home page. Only carriers can view both loads and drivers so the panel on the right looks slightly different for brokers and shippers.
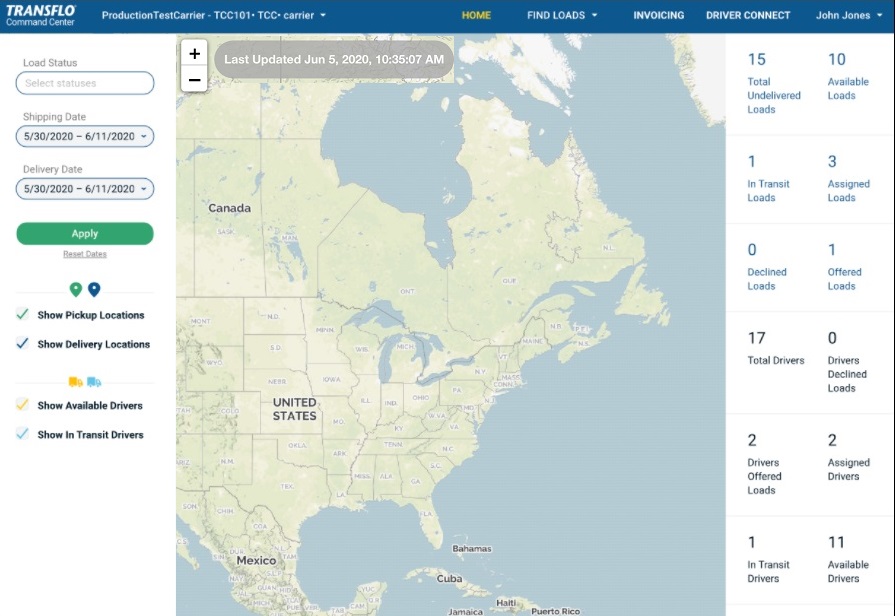
The Home page consists of the following three main sections:
-
Filters (left)
-
Map (center)
-
Loads and Drivers (right)
Tip: Only carriers can view load and driver metrics so the panel on the right looks slightly different for brokers and shippers.
-
On the Home page, work from left to right:
-
Enter your selection criteria and filter values on the left.
-
View the results in the center map showing locations.
-
See a running count of key load and driver metrics on the right. (Shippers do not have access to these features. Brokers can view loads but not drivers. Only carriers can see both loads and drivers.)
-
-
The left panel shows the following load, date, location, and driver options. Use one or more of these fields to search or filter your view of the load data. For example, reduce visual clutter and speed performance by filtering loads based on status and a shipping date range.
-
Load Status: Filter loads by one or more status values. (The default view is all loads.)
-
Shipping Date: By default, this field shows a date range starting from six (6) days before the current date (today) and ending six (6) days after today. You can select your own date range in the drop-down calendar.
-
Delivery Date: This field also defaults to six days before and six days after the current date. A drop-down calendar allows these dates to be changed.
-
Show Pickup Locations: Shows load pickup locations on the map.
-
Show Delivery Locations: Shows load delivery locations on the map.
-
Show Available Drivers: Shows the locations of all available drivers on the map.
-
Show In Transit Drivers: Shows the locations of all drivers in transit on the map.
-
-
Review your criteria. If you need to revert back to the default date ranges, click Reset Dates. When ready, click Apply.
-
The center panel displays a map showing locations for your search criteria.
-
The right panel shows load and driver information.
-
Carriers and Brokers: The top six load tiles are live links to the Loads page.
-
Carriers: The bottom six tiles are view-only and visible only to you as a carrier with one or more registered drivers.
-
-
To open the Loads page, click LOADS in the top menu bar. This page is also known as the Find Loads page.
-
The Status drop-down list allows you to filter loads. Select one or more status values and click Apply. (The default view is all loads but we recommend that you apply filters to save time and focus on the loads that are important to you.)
-
The Parameters field filters loads by an optional load number, BOL number, or attribute that you enter. Click Apply.
-
To view more filters, click More Filters and enter your filter criteria. Click Apply.
Filters are similar to search criteria. For example, to search the Loads page for delivery locations in Florida, select the Destination drop-down list box, select FL from the list, and click the Apply button. The list of loads shows only destinations in Florida. All other loads are hidden or excluded from your current view of the Loads page.
-
To remove all filters, click Clear Filters.
-
To close or hide the additional filters area, click Less Filters.
-
-
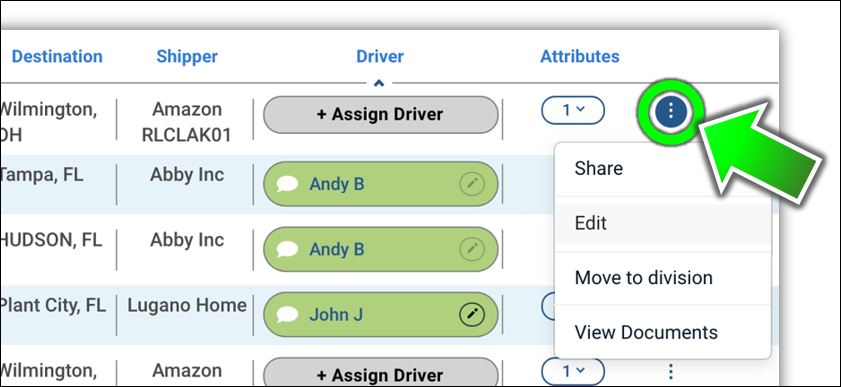
To sort the resulting list of loads, click a column header. For example, sort by Shipping or Delivery dates, Destination location, Broker, or Driver. Click the column name again to toggle the sort order from ascending (A-Z) to descending (Z-A) order.
-
To view more information for each stop, click the circled number under the Stops column. A typical load has just two (2) stops, the pick-up location is the first stop and the drop-off location is the second stop.
-
To assign a driver, click the +Assign button in the Driver column.
-
To view information for a specific row, click in that row to open the Load Details page. See View a Load below.
-
To share a tracking link by email, edit load information, clone load information (deprecated feature), move a load to another division, or cancel (delete) a load, click the
 Options button (three vertical dots) and choose an option in the pop-up menu.
-
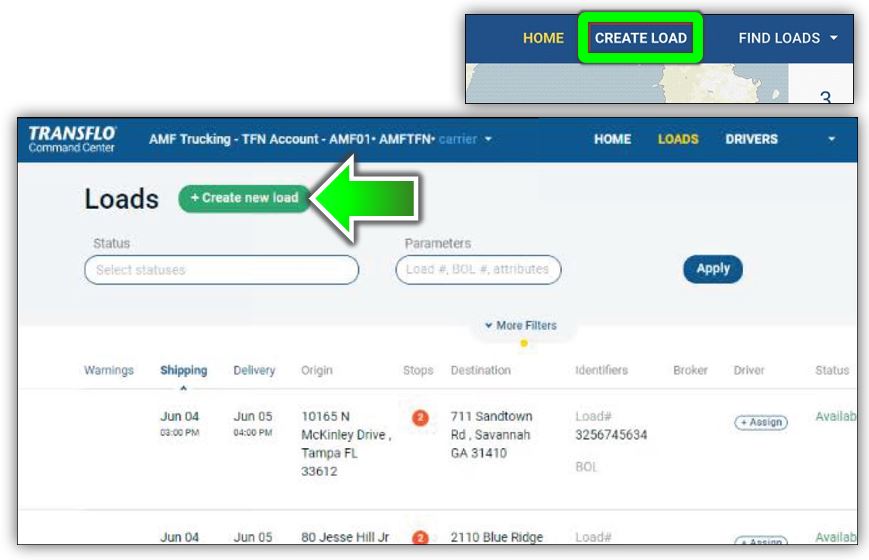
In the top menu bar, click LOADS. In some configurations, you might click FIND LOADS.
-
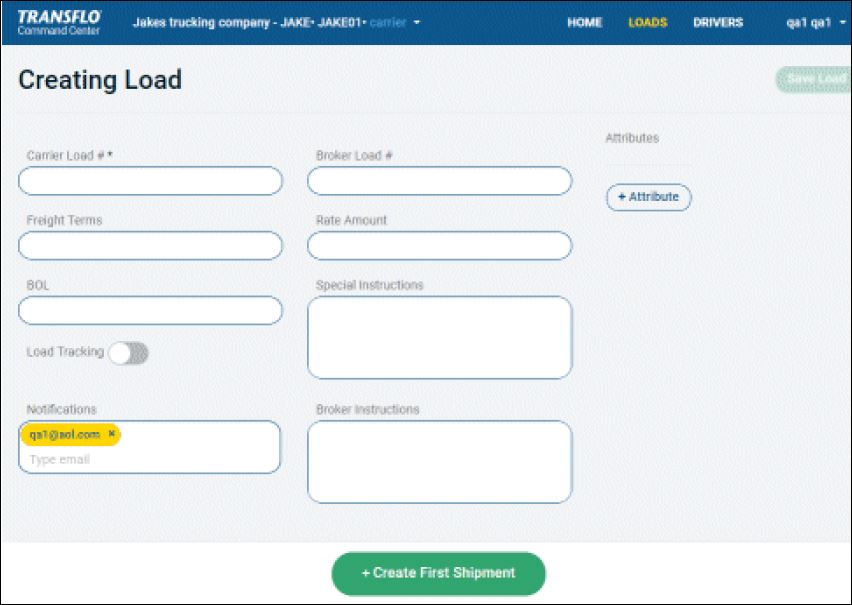
Click the + Create Load button at the top of the Loads page. In some configurations, you might have a CREATE LOAD item in the top menu bar.
-
On the Creating Load page, enter load information into the required and optional fields (the layout of the page varies based on your configuration). For example, complete the Carrier, Broker, Freight, Rate, BOL, Instructions, and Notifications text entry fields. For carriers, the Carrier Load # field is required.
-
As a convenience to you, the currently logged in customer-user, the Notification field is pre-filled with your email address. You can enter more email addresses in this field to have the system send notifications about load status updates.
-
The Broker Instructions field is only for brokers.
-
To add attributes to a load, click the +Attribute button, select fields and values from the dialog box, and click Add.
-
The Load Tracking toggle is visible only if breadcrumbs and load tracking are enabled in the TFX Server Administration tool.
-
To save a new load, click the Save Load button near the top of the page.
-
In the top menu bar, click LOADS. In some configurations, you might click FIND LOADS.
-
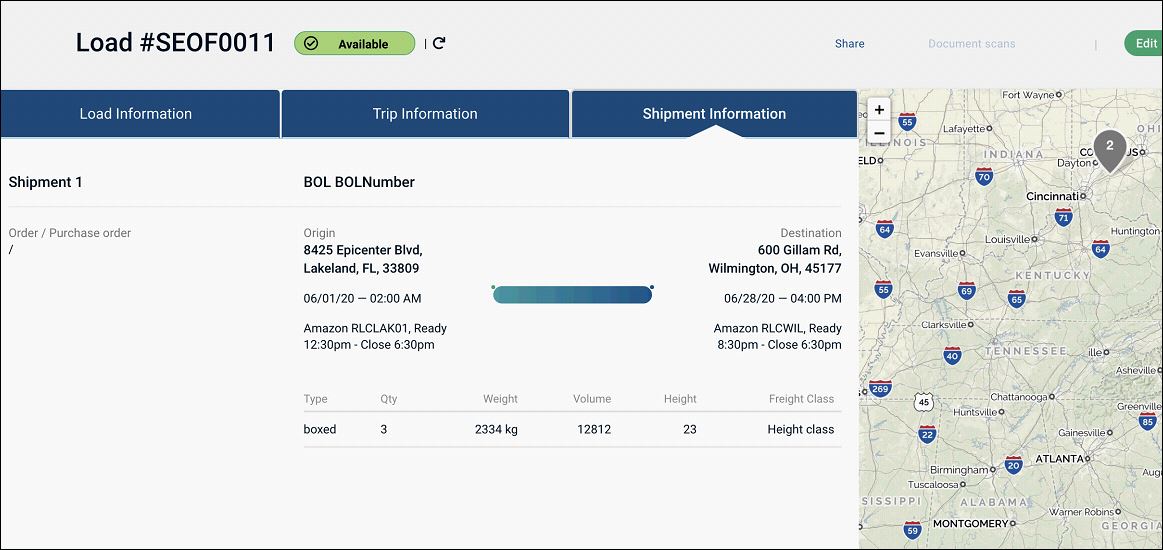
On the Loads page, enter optional filters to find the loads you want and then click anywhere in the row for a load.
-
The Load Detailspage displays the BOL, Origin, Destination, and Driver. A map with pickup and drop off locations appears at right.
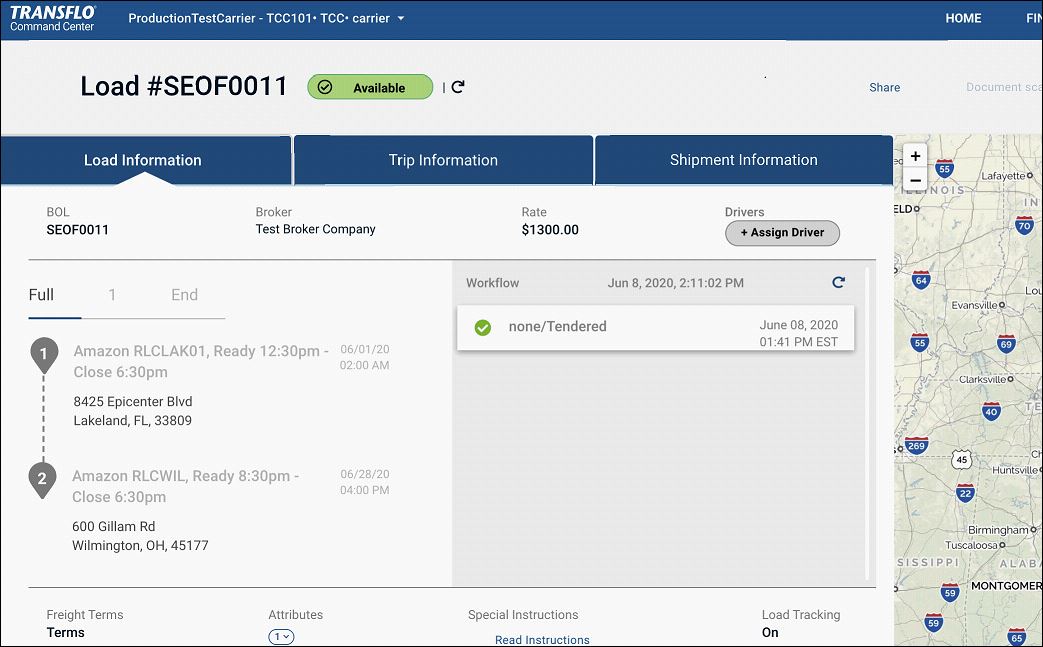
-
On the Trip Information tab, the Pick Up and Drop Off locations are shown along with any other stops.
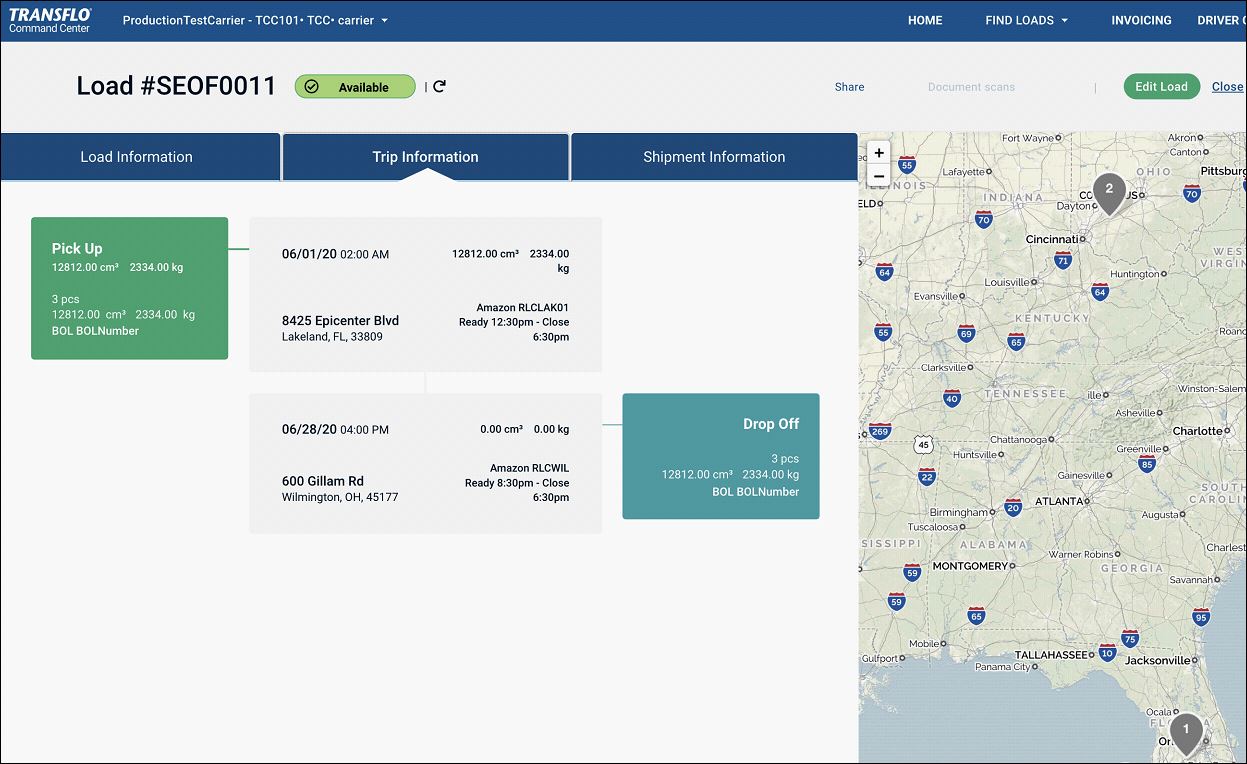
-
The Shipment Information tab shows the stops, BOL, order, and package information.
To edit an available load, click the three vertical dots at the far right of a row on the Loads page, and select Edit from the drop-down list.
The Load Details page is used to add new shipments to the load, modify load data, and modify Pick Up and Drop Off locations.
To move a Pick Up or Drop Off location if you have multiple stops, click the down arrow or up arrow.
To change a Stop, click the edit icon to open the Change Stop page.
Make any changes necessary and then click the Update stop for all shipments button to save the changes.

-
To create a Stop for a load, click the + Create First Shipment button at the bottom of the Creating Load page to display the Shipment page.
-
The Shipment page enables entry of Pick Up, Drop Off, Package, and Order information. (Shipment is synonymous with Stop.)
-
The following fields are required:
-
In the Date fields (required), enter or select the pickup and drop off dates.
-
In the Time fields (required), enter or select the pickup and drop off times.
-
In the Address fields (required), enter the pickup and drop off addresses, names, companies, and phone numbers.
-
To automatically enter an existing address, click Fill fields with existing address.
-
To add up to three lines to the street address field, click the plus sign next to the Address Line 1 field.
-
-
-
To add a package to this shipment, click Add package for each package to be added in the Packages area. Enter/select the package information.
-
To add an order to this shipment, click Add Order for each order to be added in the Orders area. Enter the Order # and Purchase Order #.
-
When all shipment information has been entered, click Add Shipment.

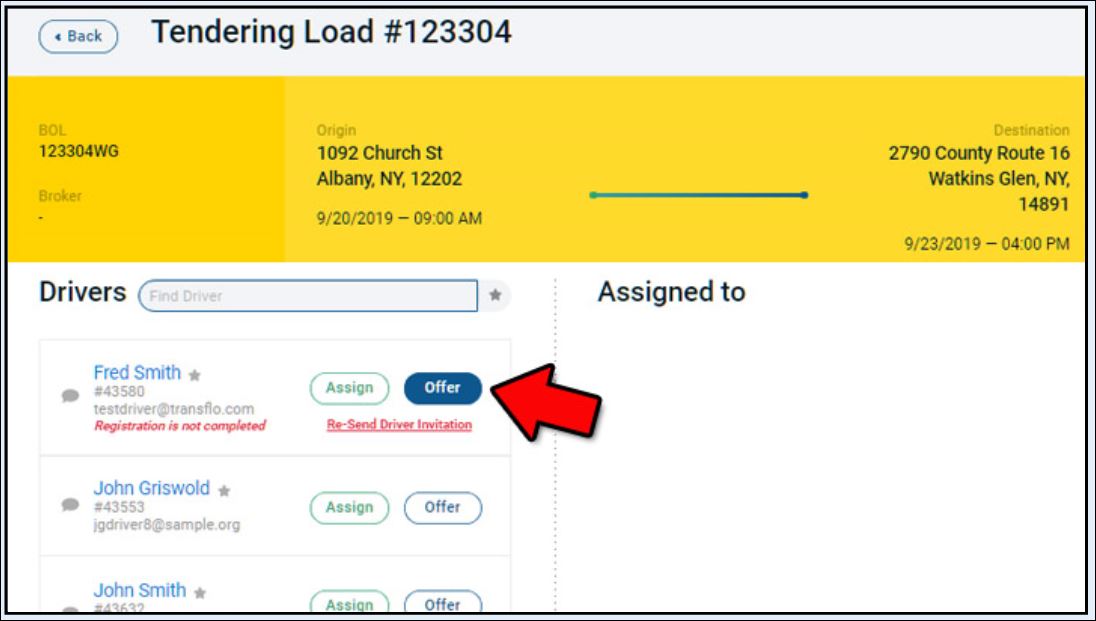
The Tendering Load page is used to offer and assign available loads to drivers.
-
To open the Tendering Load page, click the edit icon in the Driver column of the Loads page. The Load Number, BOL, Origin, and Destination are displayed in the top portion of the page.
-
To find a driver, enter search criteria in the Find Driver text entry field. The list of drivers will be refined to match the criteria entered.
-
To find favorite drivers, click the black star icon next to the search field.
-
You can offer or assign a load to a driver:
-
To offer this load to drivers, click the Offer button for each driver.
-
To assign this load to a driver, click the Assign button for that driver.
-
All the offers are removed and the Assign and Offer buttons are disabled for all drivers.
-
The selected driver is moved to the Assigned To area on the right side of the page and a green ACCEPTED tag appears.
-
To remove the assignment from this driver, click the X in the green tag.
-
-
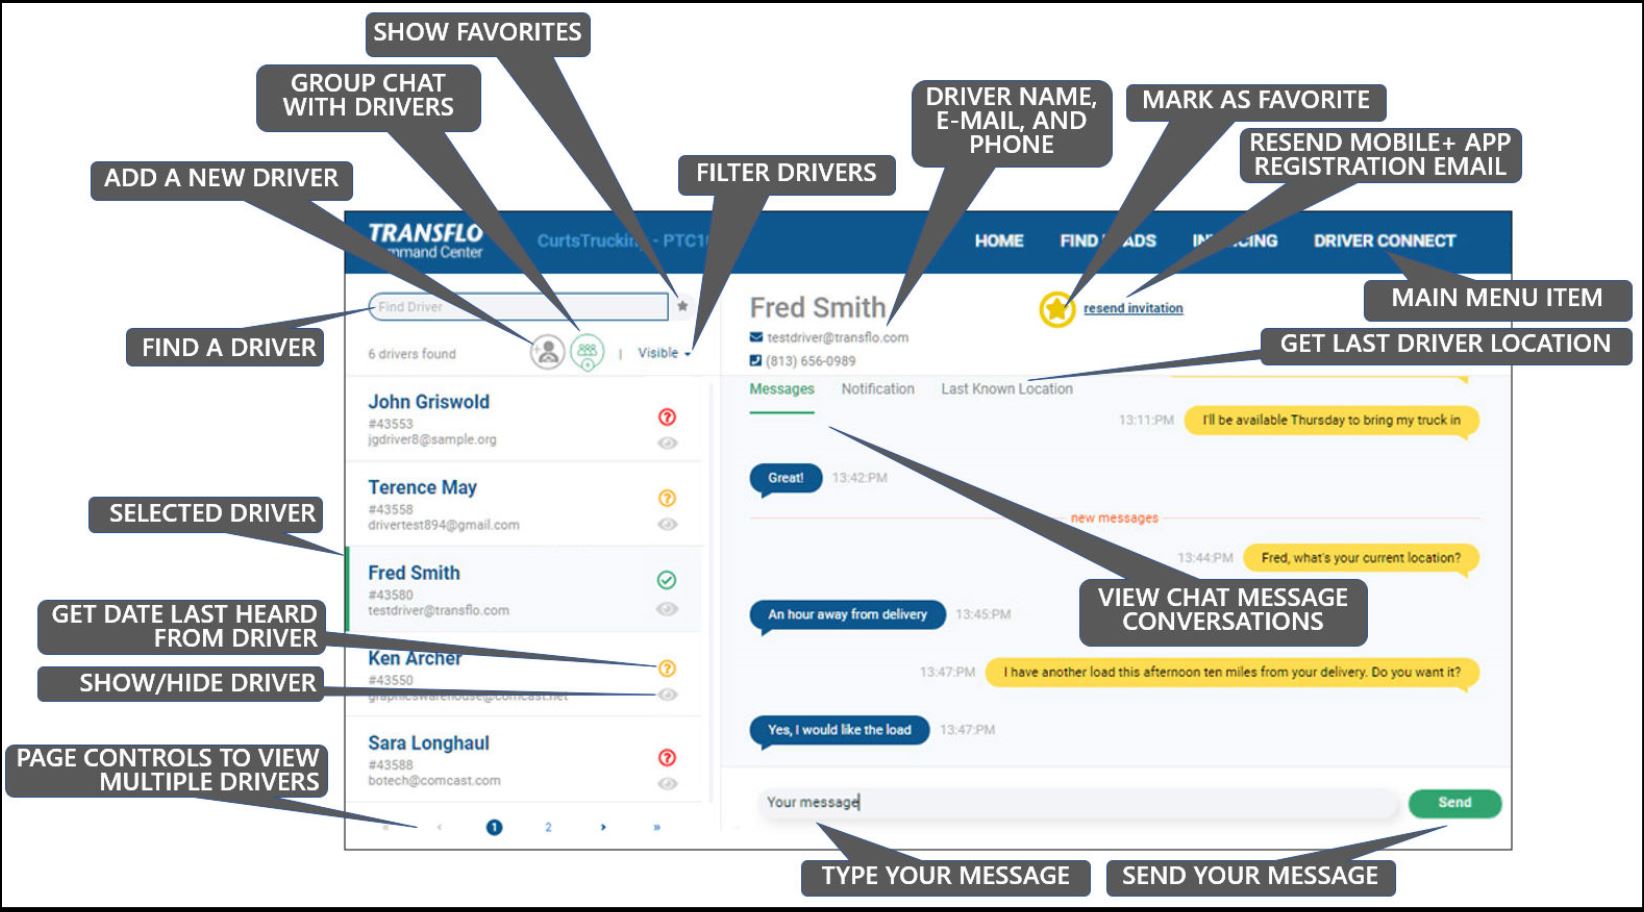
To open the Drivers page, click DRIVER CONNECT in the upper right corner of the Home page. The Drivers panel opens and provides options to send messages and notifications to a single driver or groups of drivers.
-
In the list of drivers in the left panel:
-
To refine the list of drivers, enter search criteria into the Find Driver field.

-
To show only drivers that have been marked as a favorite, click the black star next to the Find Driver field.
-
To mark a driver as a favorite, highlight the driver in the list and click the yellow star icon at the top of the page. The star turns from yellow to white with a yellow background.
-
To unmark a driver as a favorite, highlight the driver marked as a favorite list and then click the white star with a yellow background at the top of the page. The star turns from white to yellow with a white background.
-
To select a single specific driver, click the row in the drivers list panel.
-
To select multiple drivers, click the multi-driver icon and then click on each driver to send a message or notification to.
-
To select all drivers, click the multi-driver icon and then click the Select All link.
-
To unselect all drivers, click the Unselect All link.
-
-
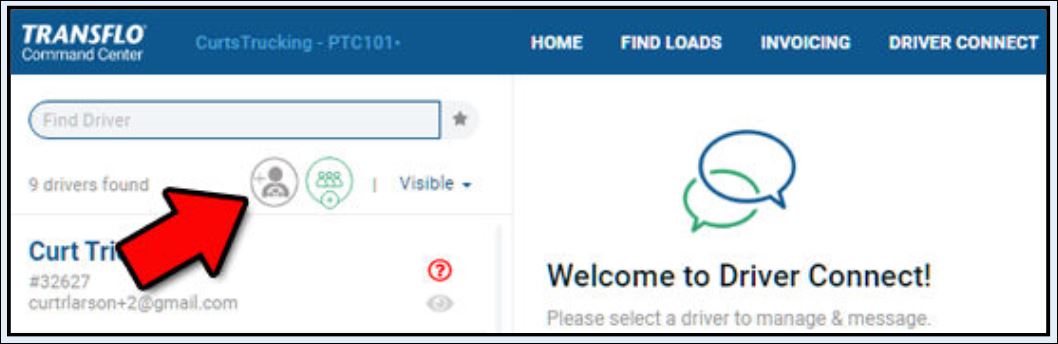
To add a new driver, click + Add Driver.
In the communication panel on the right side: If the multi-driver icon is selected in the drivers list panel on the left, messages and notifications are sent to a group of drivers. If the multi-driver icon is not selected in the drivers list panel on the left, messages and notifications are sent only to the selected driver. To send a message that can be responded to by a driver or group, select the Message tab, enter the message in the text entry field at the bottom of the page, and click Send.
To send a one-way notification to a driver or group, select the Notifications tab, enter the subject and message in the text entry fields at the bottom of the page, and then click Send.
To send an email to the selected driver, click the email icon at the top of the page to open a standard email message box. The email address is automatically inserted. Enter the subject and text, and click Send.
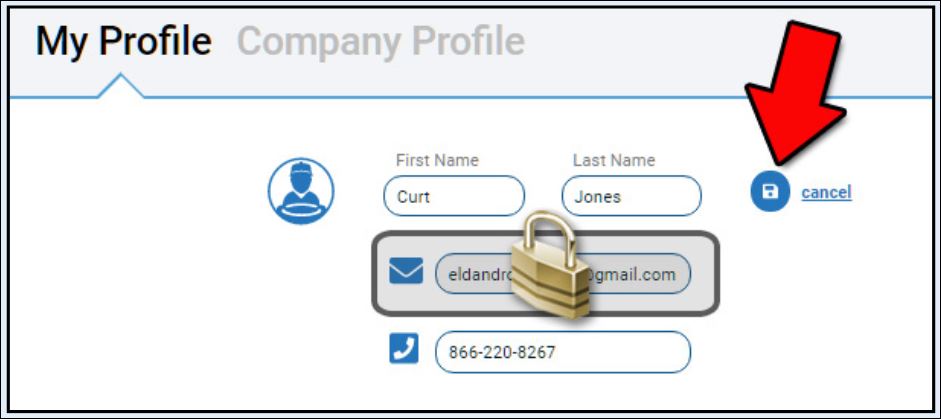
From the drop-down list in the banner in the top right corner of the page, click My Profile.
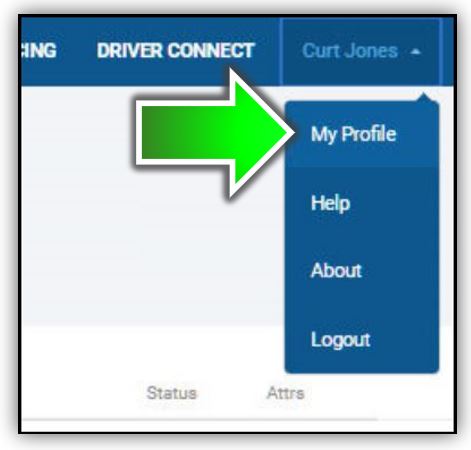
The view-only My Profile page displays name, email, and divisions associated with the customer user currently logged in. If you need to make changes, click Edit.

Make your updates and then click Save.
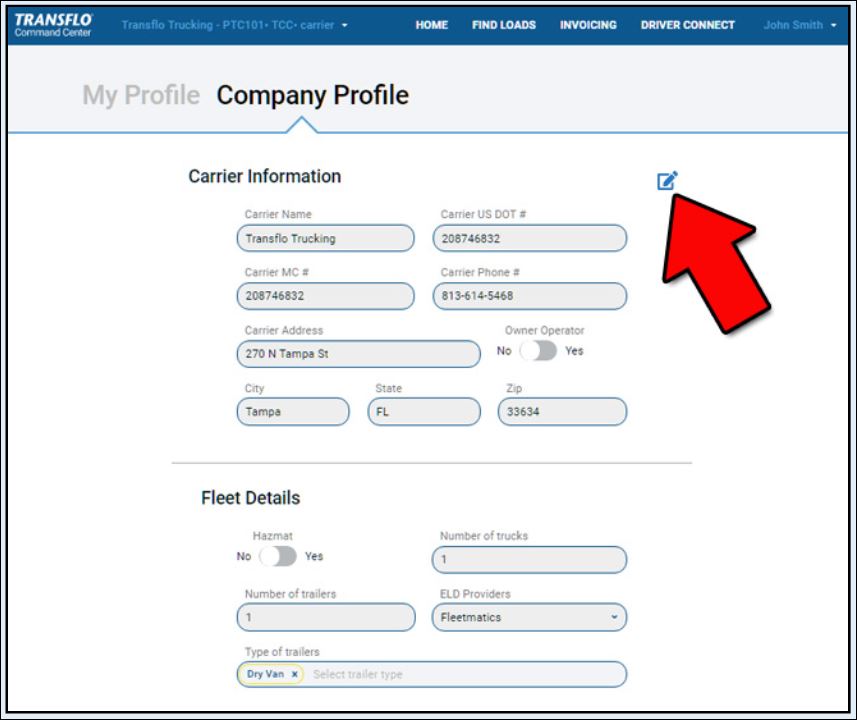
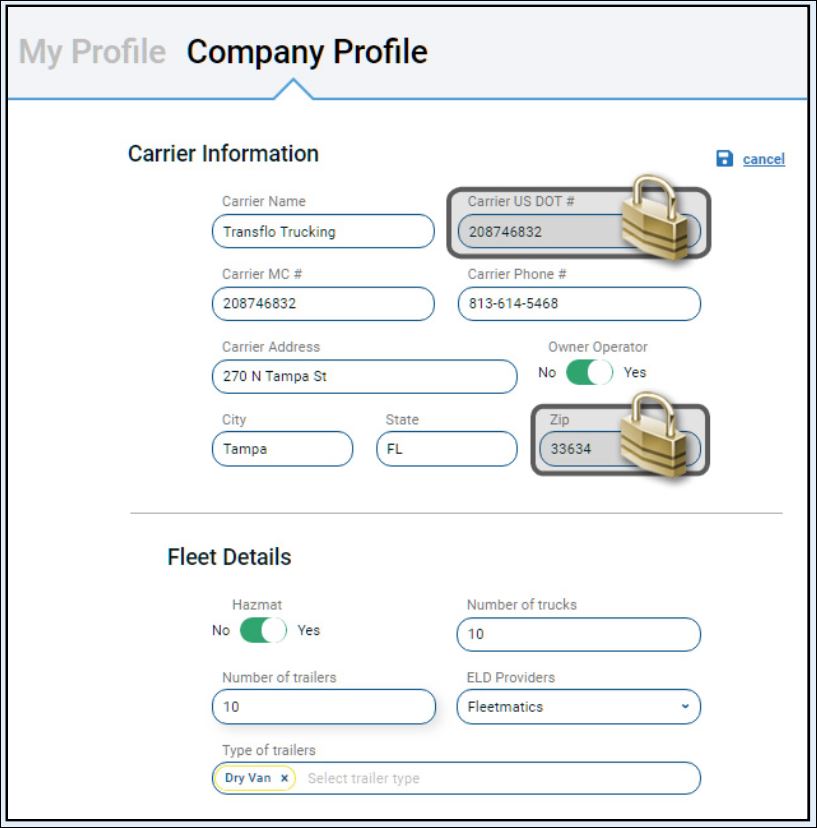
With permissions, you can also click Edit and then Save to update your company profile. Some fields are locked.
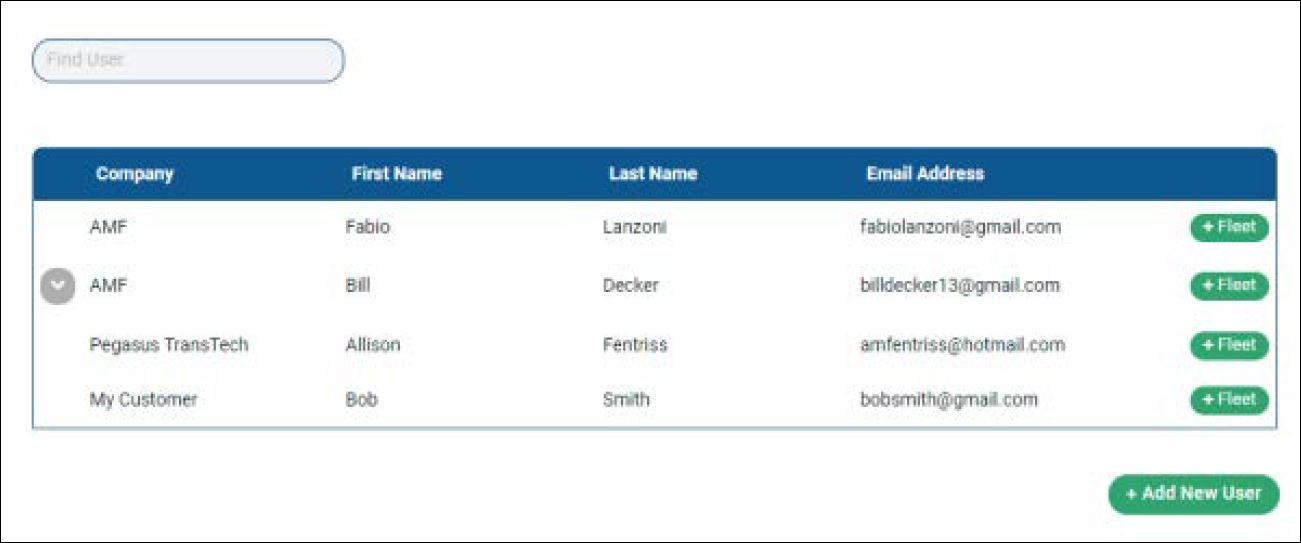
The Customer Access Management page displays available carriers and brokers in a table format for the customer user currently logged in.
-
From the drop-down list in the banner in the top right corner of the page, click Customer Access Management.
-
To refine the list of carriers and brokers, enter a full or partial search string in the Find User field at the top of the page. If there is a down-arrow at the beginning of a row, you can click it to view associated carriers or brokers.
-
To associate a carrier or broker, click the + Fleet button and select a fleet from the drop-down list.
-
To add permissions to a fleet, click the + Permissions button and select/enter attributes and values. The Enabled check box is selected by default; to disable an attribute, clear the check box for that row. Choosing All overrides any other configured permissions and therefore effectively negates all other permissions.
-
To select a state for pickup or delivery, click the + choose states button to open the Select States dialog box, select a state, and then close the dialog box.
-
To save an attribute, click the Save button; to delete an attribute, click the red delete icon.
-
To add a new user, click the + Add New User button, enter a valid email address, and click Search to display a table of fleets. Click the + Associate User button to add the new user.
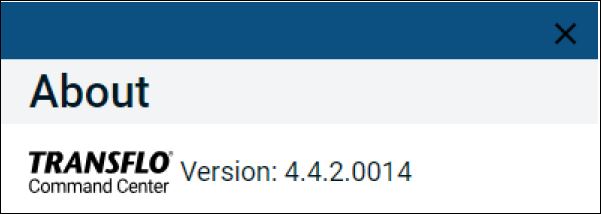
From the drop-down list in the banner in the top right corner of the page, click About.
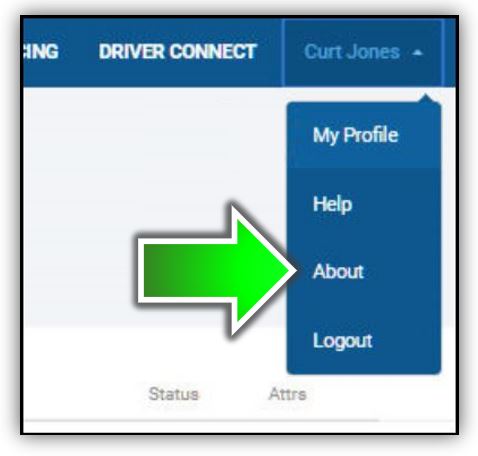
The version number of TRANSFLO Command Center is displayed. Log Out From the drop-down list in the banner in the top right corner of the page, click Logout to exit TRANSFLO Command Center.
As a dispatcher, remind drivers of the importance of using the mobile app to update their load events. When drivers update their arrivals and departures in the mobile app, load event data is automatically sent to the Velocity+ system where it is displayed.
The following screen examples show how real-time load tracking events from the mobile app appear in Velocity+ on the Load Information page.
1. When the driver swipes right on Start Load, the page shows Start with the date and time in the workflow.
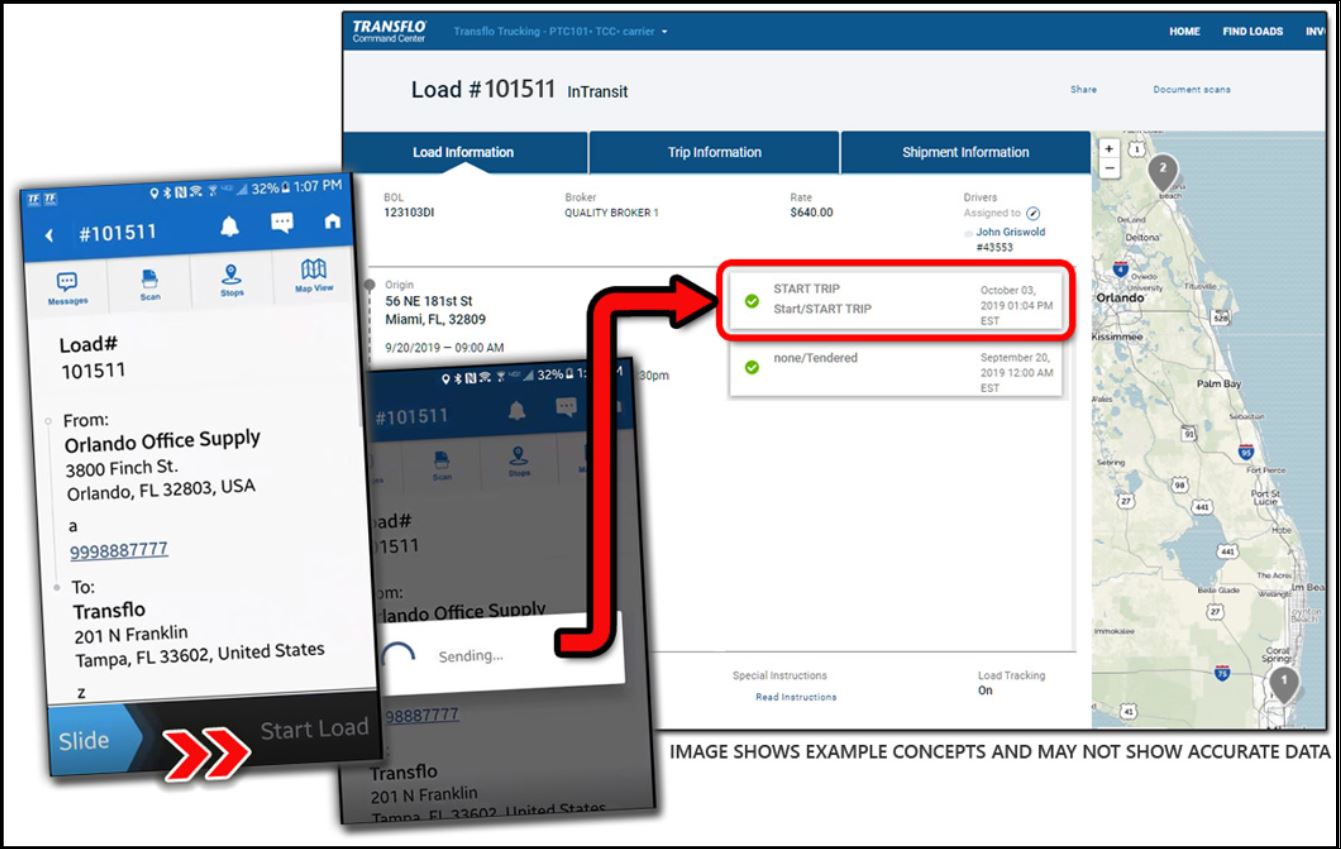
2. Load information also appears for each subsequent event as the driver picks up and delivers the load:
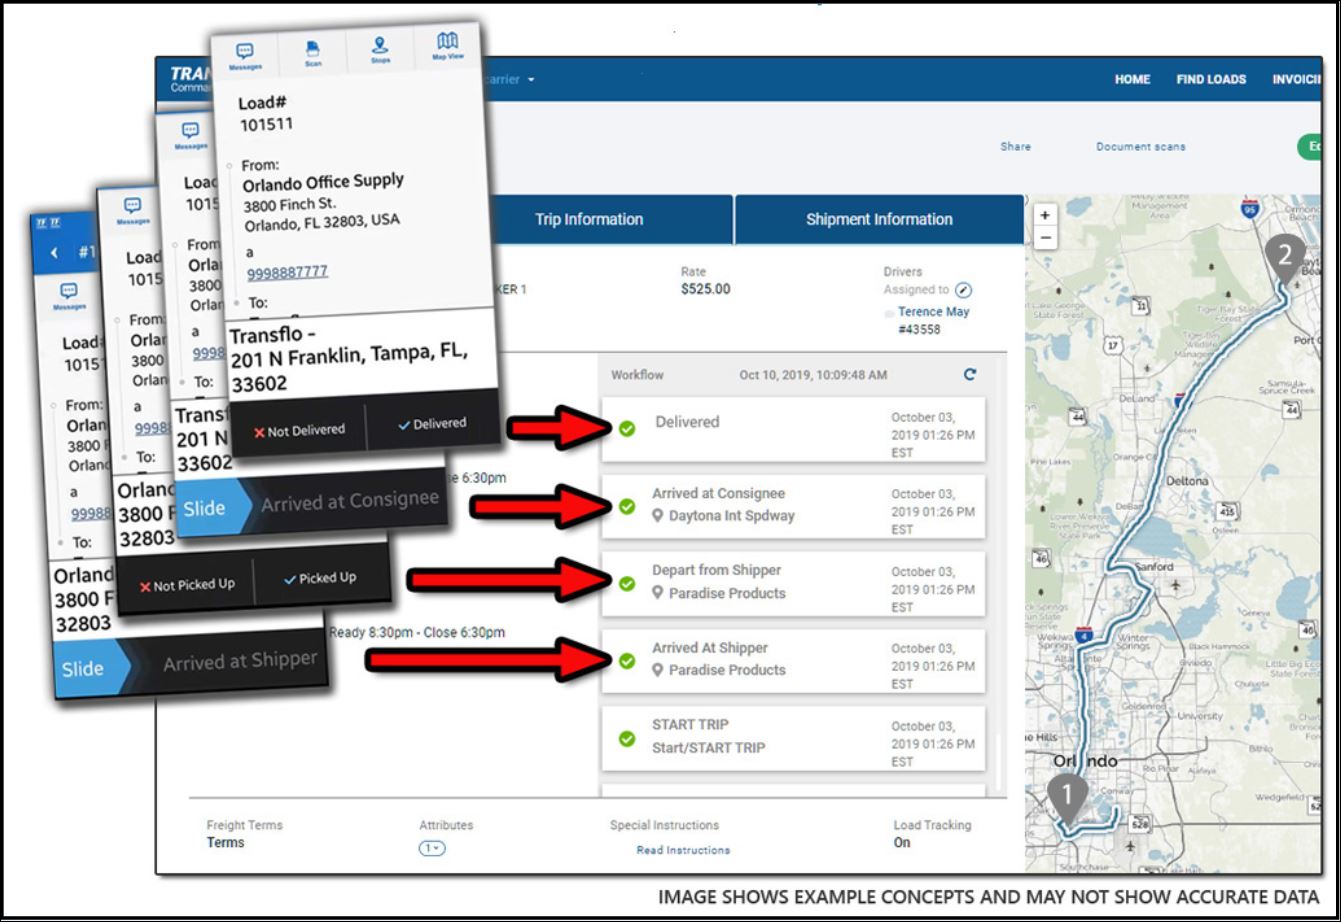
Tip: Location tracking needs to be enabled by drivers on their mobile devices and in the Transflo Mobile+ app settings. See Advanced Features if you're not getting location tracking on specific loads.