System Reports for Transflo DMS Users
The following three (3) system reports provide statistics on the state of your TRANSFLO® system:
-
Detail by Key/Batch ID: The Detail by Key/Batch ID report is used to show all activities such as Accept, Import, or Print related to a particular batch. The report tracks the origin application, the date and time when each activity was performed, and the name of the user who performed it (if applicable).
-
Processing Snapshot: The Processing Snapshot report displays real-time statistics of processing locations in the TRANSFLO® system and is sorted by application. This report tracks the current location of work, the number of Batches in each location, and the number of documents within each batch.
-
Workflow Activity by Key: This report displays Case history for a given Key value pair. It shows all of the cases, the procedures, Procedures Steps, Queues, Activities and Activity date/times for the given key value.
These reports are accessed in the reports menu, located on the left side of the Management Reports interface. If you cannot see this menu, click Home on the toolbar.
Note: If you are not using the Import application to assign an Import activity to a batch, it is important to ensure that the clocks on the TRANSFLO® Server, and TRANSFLO® Database SQL Server are in sync.
This way, the Import activity timestamps will display correctly.
Detail by Key/Batch ID Report
Use the Detail by Key/Batch ID report to view activities such as Accept, Import, or Print related to a particular batch. The report tracks the origin application, the date and time when each activity was performed, and the name of the user who performed it (if applicable). The report can be generated for a particular Key value or Batch ID.
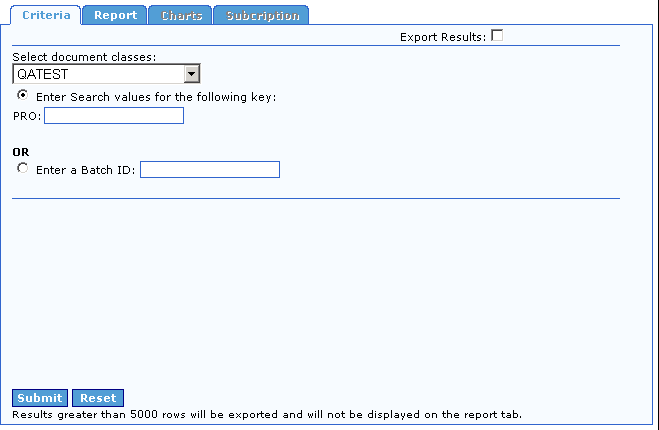
In the report criteria selection, select the document class and enter a corresponding Key value or Batch ID. The resulting report is sorted within each batch, first by Batch ID and then by Document.
To configure and execute a Detail by Key/Batch ID report:
-
On the reports menu, under the System Reports heading, click Detail by Key/Batch ID.
-
The Detail by Key/Batch ID interface opens to the Criteria tab.
-
Choose a Document Class from the Select document classes drop-down.
-
The search criteria open under the Select document classes drop-down.
-
By default, once report criteria has been selected, report data is presented on- screen on the Report tab. An option to export the results to spreadsheet format is available. To export the report as a CSV file viewable with most spreadsheet applications, select the Export Results check box to the right of the date fields.
4. To base the report on a key field, select the Enter Search values for the following key option, and then type the desired search value in the box provided.
The box’s label, along with the field that will be searched, are configured via the Fields interface in TRANSFLO® Administration Tool.
5. To base the report on a Batch ID, select the Batch ID option, and type the desired search string in the Enter a Batch ID box.
This option is selected by default.
6. When you have selected an option and have entered a value in the corresponding box, click the Submit button.
Clicking Submit will yield one of three results:
-
If no matching value is found, a dialog box will appear stating so.
-
If you entered a Batch ID, the Report tab will appear, displaying the Detail by Key/Batch ID report (unless the Export Results check box was selected).
-
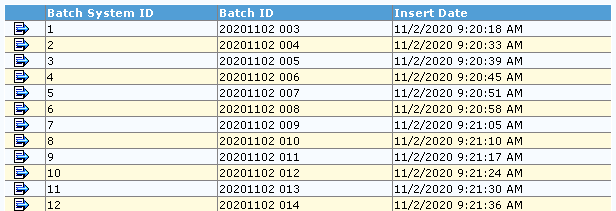
If you entered a key field search value, a table appears from which you must select the desired batch.
Click the arrow button to the left of the desired batch, to access the corresponding report.
7. If you selected the Export Results check box, a Windows dialog box appears asking if you would like to open the file or save it.
If you click Save, you are prompted to select the folder where you wish to save the CSV file.
If you click Open, Windows will attempt to open the CSV file for viewing.
You may be required to specify which application Windows should use to open the file.
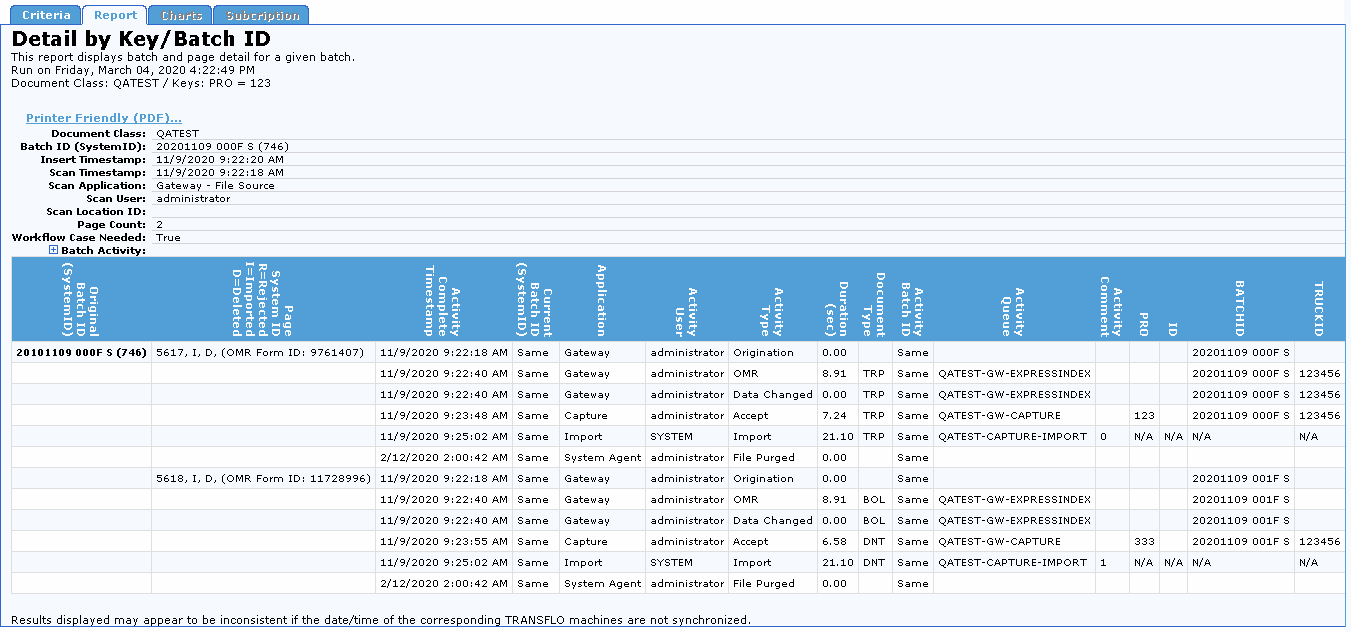
8. If you did not select the Export Results check box, the Detail by Key/Batch ID Report tab appears and displays the report in a structured format similar to the one shown below.
9. Regardless of whether or not you elected to have the report exported in CSV format, you can also view the report in a printable PDF format.
To create a PDF report, click the Printer Friendly (PDF) link on the Report tab.
A PDF report similar to the one shown below appears.
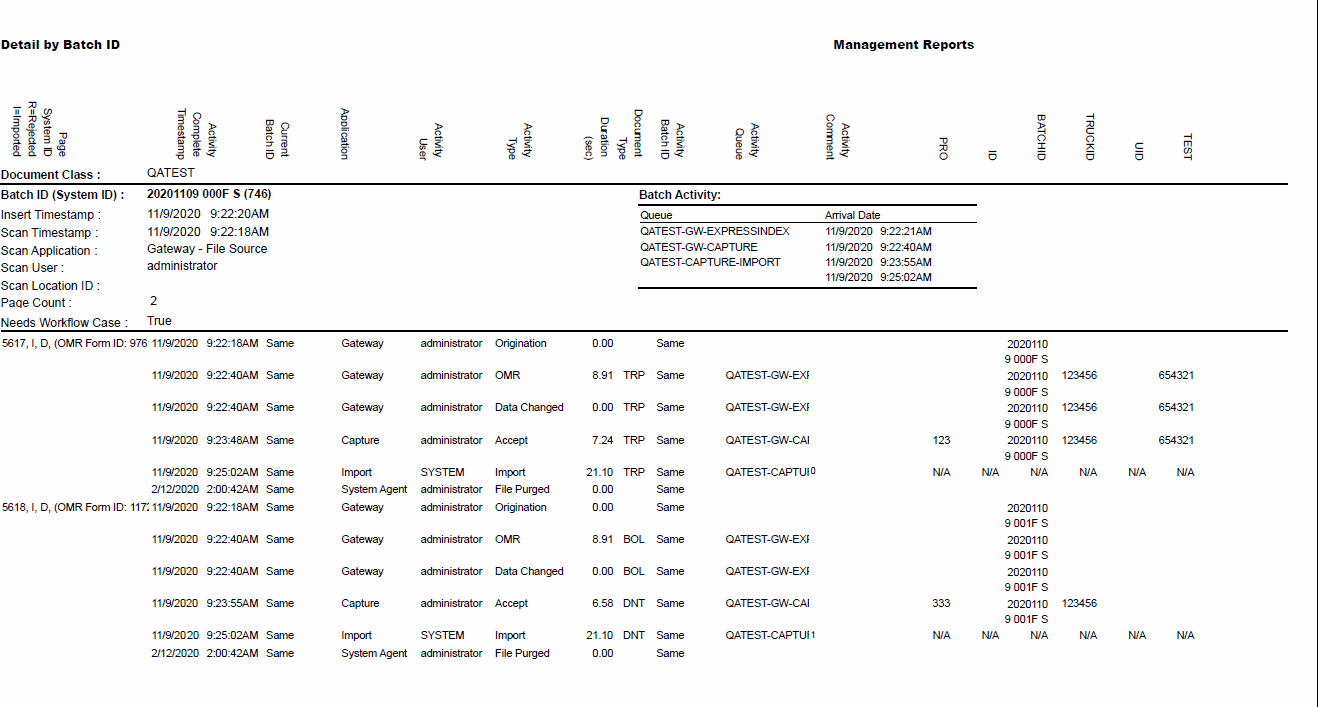
To print this report, click the Print button on the Adobe Acrobat Reader toolbar.
10. To create another Detail by Key/Batch ID report, click the Criteria tab and configure the date and data type criteria for the new report in the same manner as the previous report.
When returning to the Criteria tab after creating a report, all settings from that report are left unchanged, to facilitate making small changes to the report criteria.
To restore all report criteria to their default settings, click the Reset button in the bottom left corner of the tab.
Interpreting a Detail by Key/Batch ID Report
The header of the Detail by Batch ID report displays the report title, a description of the report, and a timestamp indicating when the report was created.
There are several rows of information presented above the report table.
This information details the origin of the batch.
These rows are described below.
|
Row Name |
Description |
|---|---|
|
Document Class |
Indicates the Doc Class that contains the current batch. |
|
Batch ID (System ID) |
The unique identifier of the batch, followed in parentheses by its equivalent unique identifier for the system. |
|
Insert Timestamp |
Indicates the date and time when the batch was inserted into TRANSFLO® Index. |
|
Scan Timestamp |
Indicates the date and time when the batch pages were scanned by the originating Scan Application. |
|
Scan Application |
The Application used to scan the pages in the current batch. |
|
Scan User |
The unique identifier of the User who scanned the batch pages. |
|
Scan Location ID |
The unique identifier of the Location where the batch pages were scanned. |
|
Page Count |
The number of pages in the batch. |
|
Workflow Case Needed |
Indicates whether or not this batch should be processed by the TRANSFLO® Workflow application. |
The report’s data is presented in the form of a table.
The columns and rows of this table are described below.
|
Column Heading |
Description |
|---|---|
|
Original Batch ID (SystemID) |
The original unique identifier of the batch, followed in parentheses by its equivalent system-assigned unique identifier. |
|
Page System ID |
The unique identifier of each individual page in the batch. An R, I, or D in this column indicates that the batch was Rejected, Imported, or Deleted, respectively. |
|
Activity Complete Timestamp |
Indicates the date and time when the activity named in the Activity Type column was performed. |
|
Current Batch ID (System ID) |
The current unique identifier of the batch, followed in parentheses by its equivalent system-assigned unique identifier. If the Batch ID contains the string “_Split”, this means that the batch contains pages that have been split. To determine when the split occurred, see the Activity Complete Timestamp column. |
|
Application |
The application that the activity type took place in. |
|
Activity User |
The unique identifier of the User who performed the activity named in the Activity Type column. |
|
Activity Type |
The type of activity performed on the page, such as OMR, Accept, Reject, or Import. |
|
Duration (sec) |
The length of time in seconds that it took for the activity named in the Activity Type column to be performed. |
|
Document Type |
The Document Type of the Document that was affected by the activity named in the Activity Type column. |
|
Activity Batch Id |
If the Batch Id for the Documents is different than the original Batch Id, the new Batch Id will be listed in the Activity Batch Id column. For example, if the batch was split, the new Batch Id will be listed here. |
|
Activity Queue |
The name of the TRANSFLO® Queue the batch was in when the activity named in the Activity Type column occurred. |
|
Activity Comment |
A comment associated with the activity listed in the Activity Type column. |
|
<OMR Label 1> |
Indicates the type of data shown in this column. “OMR Label” columns represent fields designated as OMR fields by your TRANSFLO® administrator via TRANSFLO® Administration Tool. |
|
<OMR Label x> |
Any additional OMR fields designated by your administrator. |
|
Activity Comment |
Any comments entered by the user indicated in the Acitivy User column. |
Processing Snapshot Report
The Processing Snapshot report displays real-time statistics of processing locations in the TRANSFLO® system and is sorted by application.
This report tracks the current location of work, the number of Batches in each location, and the number of documents within each batch.
Creating a Processing Snapshot Report
To configure and execute a Processing Snapshot report:
1. On the reports menu, under the System Reports heading, click Processing Snapshot.
The Processing Snapshot report interface opens to the Criteria tab.
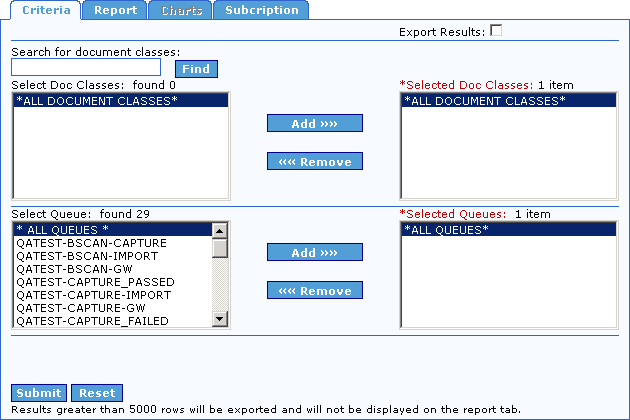
2. To include all Document Classes instead of just one or a few, it is not necessary to make any changes to the default Document Class settings.
If, however, you wish to create a report based on only one, or a handful of Document Classes, you must first execute a search for the desired Document Classes.
This is done via the Search for document classes box.
In this box, type search criteria for the desired Document Classes, and then click Find or press the [Enter] key.
The basic search string rules are as follows:
| String | Result |
|---|---|
|
*(asterisk) |
All available Doc Classes are displayed. |
|
Up to 3 characters, e.g., f, fa, or far |
All Doc Classes whose names begin with the entered string are displayed. For example, the strings f and fa could display the Users falcon and family, but the string far would display neither. |
|
More than 3 characters, e.g., east |
All Doc Classes whose names contain the string anywhere in the name are returned. For example, the string east could display the Doc Classes eastern, northeastern, and southeast. |
The results of the search are displayed in the Select Document Classes box.
3. After the desired search results have been returned to the Select Doc Classes box, the next step before generating a report, is to remove the default Document Class from the Selected Doc Classes box.
This is because the default selection, *ALL DOCUMENT CLASSES*, already includes the individual Document Classes that were returned by your search.
The *ALL DOCUMENT CLASSES* entry is already selected.
To remove it from the Selected Doc Classes box, click the Remove button.
4. Now you can move individual Document Classes from the Select Doc Classes box to the Selected Doc Classes box.
To do this, click the desired Document Classes to select them, and then click the Add button.
The Document Classes now appear in the Selected Doc Classes box.
To move any of these Document Classes back to the Select Doc Classes box (meaning that they will not be included in the report), click the desired Document Classes to select them, and then click Remove
Note: To select multiple consecutive Document Classes at once, click the first consecutive Document Class to select it, and then click the final consecutive Document Class while holding the [Shift] key.
To select multiple non- consecutive Document Classes at once, press and hold the [Ctrl] key while clicking the desired Document Classes.
5. To add specific Queues to your search criteria, select which Queues should be included in the report.
The procedure for doing this is identical to the procedure for selecting Document Classes.
To base your report on all Queues instead of on just a few, it is not necessary to make any changes, since All Queues is the default.
6. You are almost ready to generate the Processing Snapshot report.
The last step before doing so is to indicate how you want to view the report data.
By default, the data is presented on-screen on the Report tab.
However, the option to export the results to spreadsheet format is available.
To have the report results generated as a CSV file viewable with most spreadsheet applications, select the Export Results check box, located to the right of the date fields, before running the report.
7. When you are ready to generate the Processing Snapshot report, click the Submit button in the bottom left corner of the Criteria tab.
8. If you selected the Export Results check box, a Windows dialog box appears asking if you would like to open the file or save it.
If you click Save, you are prompted to select the folder where you wish to save the CSV file.
If you click Open, Windows will attempt to open the CSV file for viewing.
You may be required to specify which application Windows should use to open the file.
9. If you did not select the Export Results check box, the Processing Snapshot report opens in the Report tab.
Note: The Capture entries of Processing Snapshot report will only be the same as the Capture Process Specific list, if the report is run at precisely the same time as the Process Specific list is refreshed.
Since this is a very unlikely scenario, do not expect this report to be an exact match to the Process Specific window in Capture.
10. (Optional) Regardless of whether or not you elected to have the report exported in CSV format, you can also view the report in a printable PDF format.
To create a PDF report, click the Printer Friendly (PDF) link on the Report tab.
A PDF report similar to the one shown below appears.
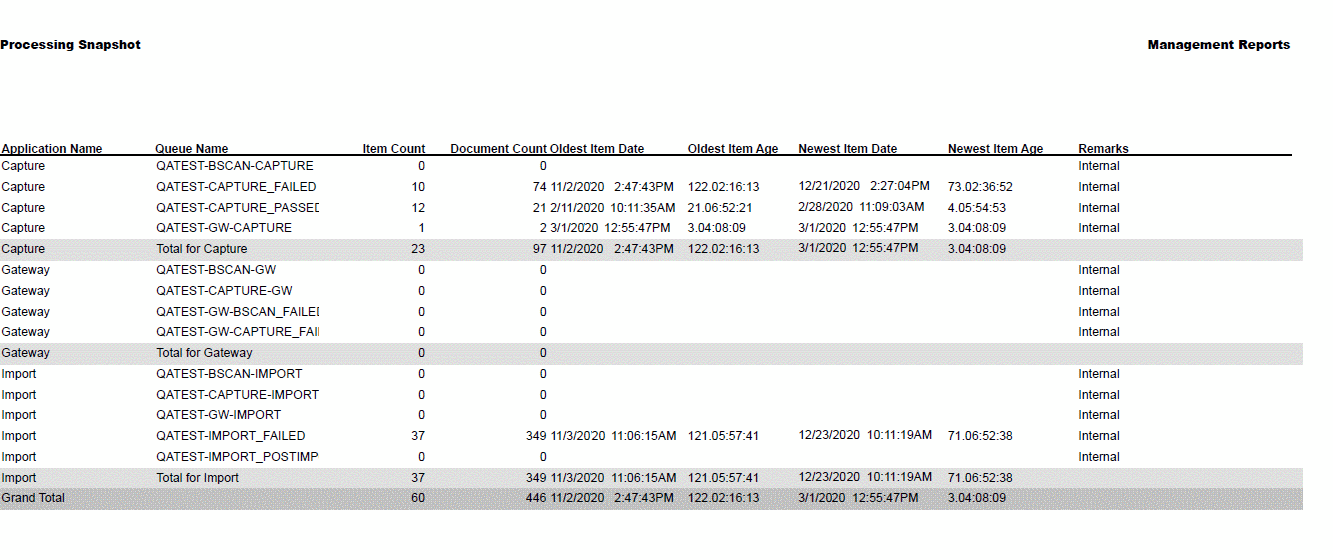
To print this report, click the Print button on the Adobe Acrobat Reader toolbar.
11. To create another Processing Snapshot report, click the Criteria tab and configure the date criterion for the new report, in the same manner as the previous report.
When returning to the Criteria tab after creating a report, all settings for that report are left unchanged, to facilitate making small changes to the report criteria.
To restore all report criteria to their default settings, click the Reset button in the bottom left corner of the tab.
Interpreting a Processing Snapshot Report
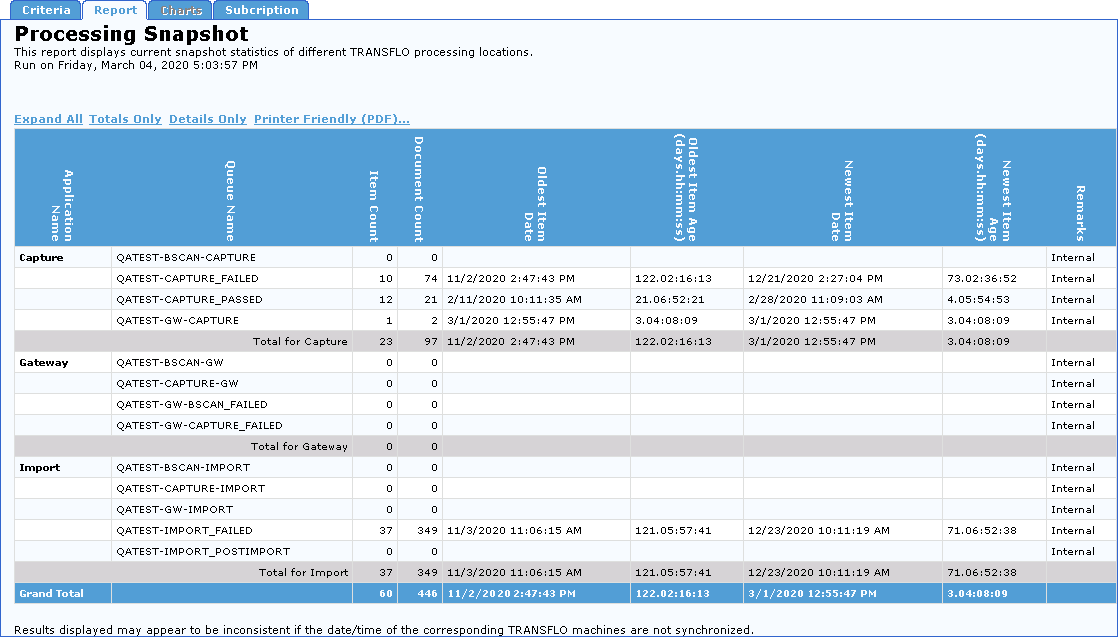
The header of the Processing Snapshot report displays the report title, a description of the report, and a timestamp indicating when the report was created.
The report’s data is presented in the form of a table.
The columns and rows of this table are described below.
|
Column Heading |
Description |
|---|---|
|
Application Name |
The name of the Application to which the report pertains, or to which this section of the report pertains, if there are multiple Applications in the report. |
|
Queue Name |
The name of the Queue to which the report pertains, or to which this section of the report pertains, if there are multiple Queues in the report. |
|
Batch Count |
The total number of batches that are currently in the Application/Queue/Document Class. |
|
Document Count |
The total number of documents that are currently in the Application/Queue/Document Class. |
|
Oldest Batch Date |
The datetime of the oldest batch for the Application / Queue/ Document Class. |
|
Oldest Batch Age (in days) |
The age of the oldest batch for the Application / Queue / Document Class. |
|
Newest Batch Date |
The date of the newest batch for the Application / Queue / Document Class. |
|
Newest Batch Age |
The age of the newest batch for the Application / Queue / Document Class. |
|
Remarks |
System generated remarks |
The Processing Snapshot report contains rows displaying column totals for each TRANSFLO® application individually and for all represented applications as a whole.
These rows are described below.
|
Row Title |
Description |
|---|---|
|
Total for <Application> |
The total batch count, document count, oldest batch date, and age, and youngest batch date, and age for a specific application. |
|
Grand Total |
The total batch count, document count, oldest batch date and age, and youngest batch date and age for all applications. |
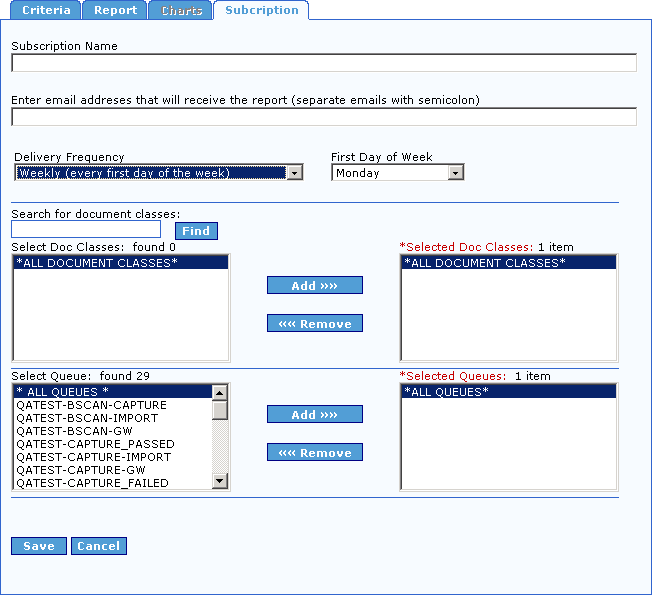
Creating a Processing Snapshot Report Subscription
To create a Processing Snapshot report subscription:
1. Click the Subscriptiontab.
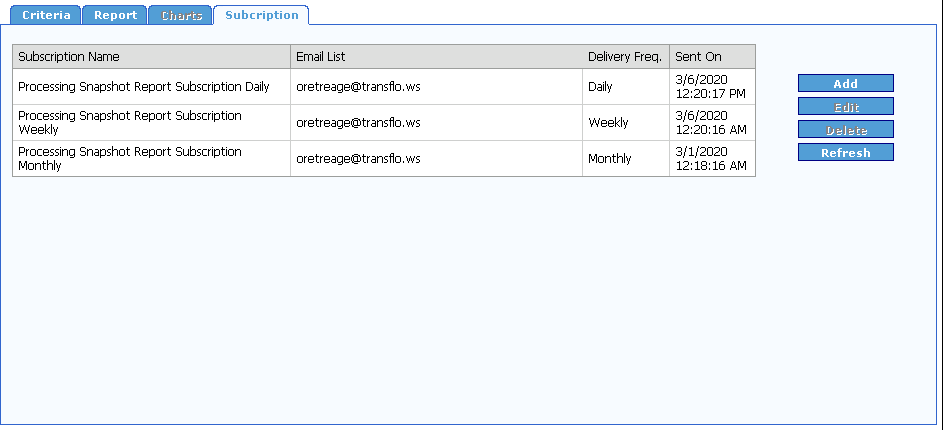
2. Click the Add button.
The Add Subscription form for the Processing Snapshot report opens.
Note: This same form opens when you click the Edit button on the Subscription tab.
3. Enter a name for your report subscription in the Subscription Name box.
4. Enter the list of email addresses separated by semicolons (;) where you would like this report to be sent in the Enter email addresses that will receive the report (separate emails with semicolon) box.
5. Select how often you would like this report to be delivered from the Delivery Frequency drop down.
Your options are Daily, Weekly, and Monthly.
If you choose Daily, the report will be sent every day with data from the previous day, and the report will show an hourly breakdown.
If you choose Monthly, the report will be sent the first day of every month for the previous month, and the report will show a daily breakdown.
6. If you selected “Weekly” from the Delivery Frequency drop-down, the First Day of the Week drop-down is visible.
Select the day of the week you would like the report to be emailed from the First Day of the Week drop down.
The report will be for the previous week, the report will show a daily breakdown.
7. Select Document Classes and Queues in the same manner as described in Creating a Processing Snapshot Report.
8. To save the report subscription click the Save button, otherwise click the Cancel button.
9. The report subscription is added to the Subscription list.
10. To delete a subscription from the list select it, and click the Delete button.
You will not be prompted to confirm you want to delete the subscription.
11. To update your list click the Refresh button.
Workflow Activity by Key
The Workflow Activity by Key report displays Case history for a given Key value pair.
It shows all of the Cases, the Procedures, Procedures Steps, Queues, Activities and Activity dates and times for the given Key value.
Creating a Workflow Activity by Key Report
To configure and execute a Workflow Activity by Key report:
1. On the reports menu, under the System Reports heading, click Workflow Activity by Key.
The Workflow Activity by Key interface opens to the Criteria tab
2. Select a Procedure from the Select Procedure drop-down.
A list of the Key Fields for the selected procedure is displayed below the Select Procedure drop down.
Enter search values for the Key Fields in the corresponding text boxes.
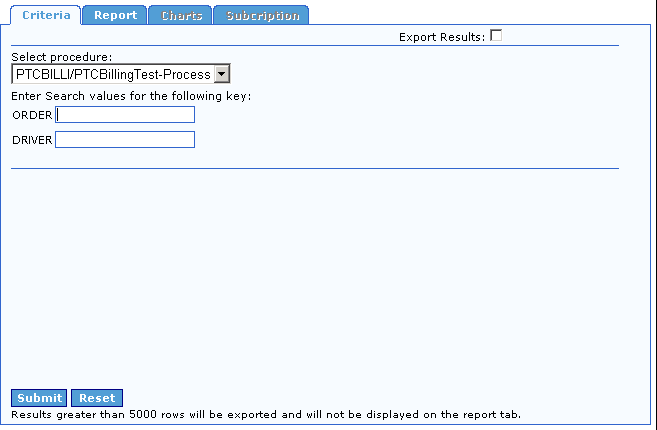
Note: You will only be able to see the procedures in the Select Procedures drop down that belong to Document Classes that you have access to.
3. The last step before generating the Workflow Activity by Key report is to indicate how you want to view the report data.
By default, the data is presented on-screen on the Report tab.
However, the option to export the results to spreadsheet format is available.
To have the report results generated as a CSV file viewable with most spreadsheet applications, select the Export Results check box, located to the right of the date fields, before running the report.
4. When you are ready to generate the Activity by Key report, click the Submit button in the bottom left corner of the Criteria tab.
If you selected the Export Results check box, a Windows dialog box appears asking if you would like to open the file or save it.
If you click Save, you are prompted to select the folder where you wish to save the CSV file.
If you click Open, Windows will attempt to open the CSV file for viewing.
You may be required to specify which application Windows should use to open the file.
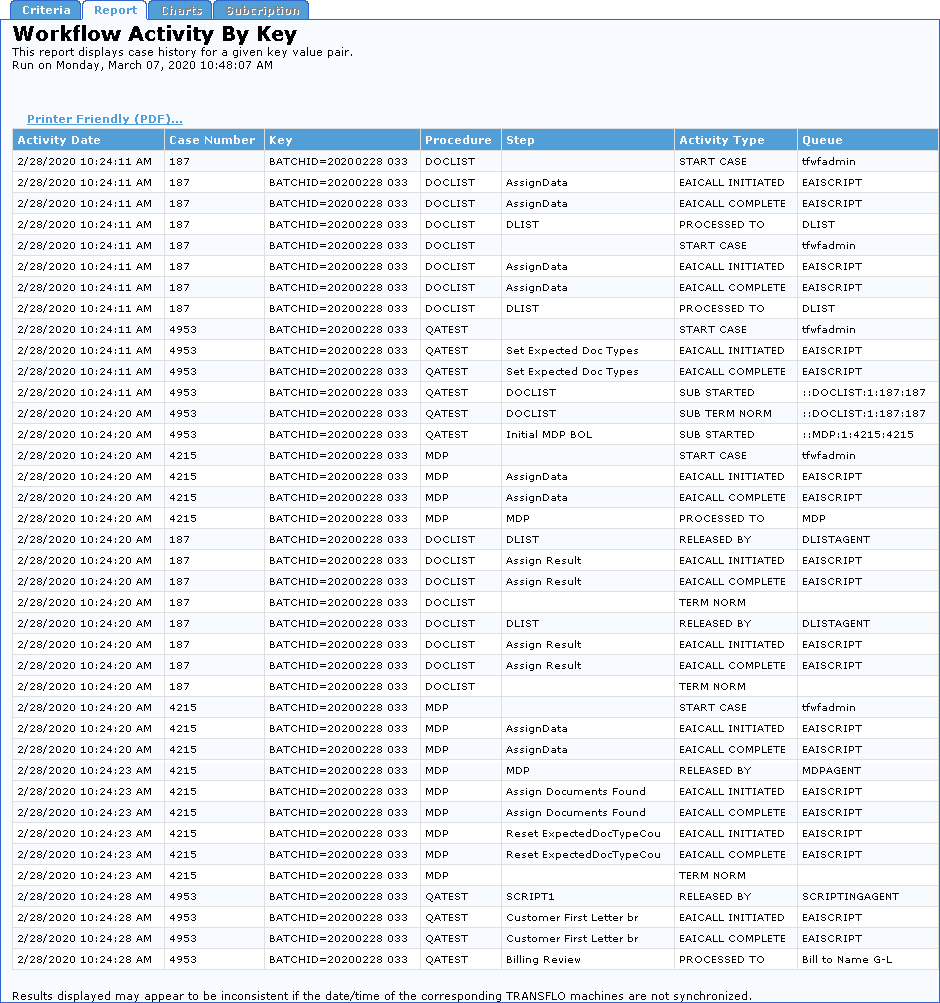
If you did not select the Export Results check box, the Workflow Activity by Key Report tab appears and displays the report in a structured format similar to the one shown below.
5. To view the report as a PDF file, click the Printer Friendly (PDF) link at the top of the report.
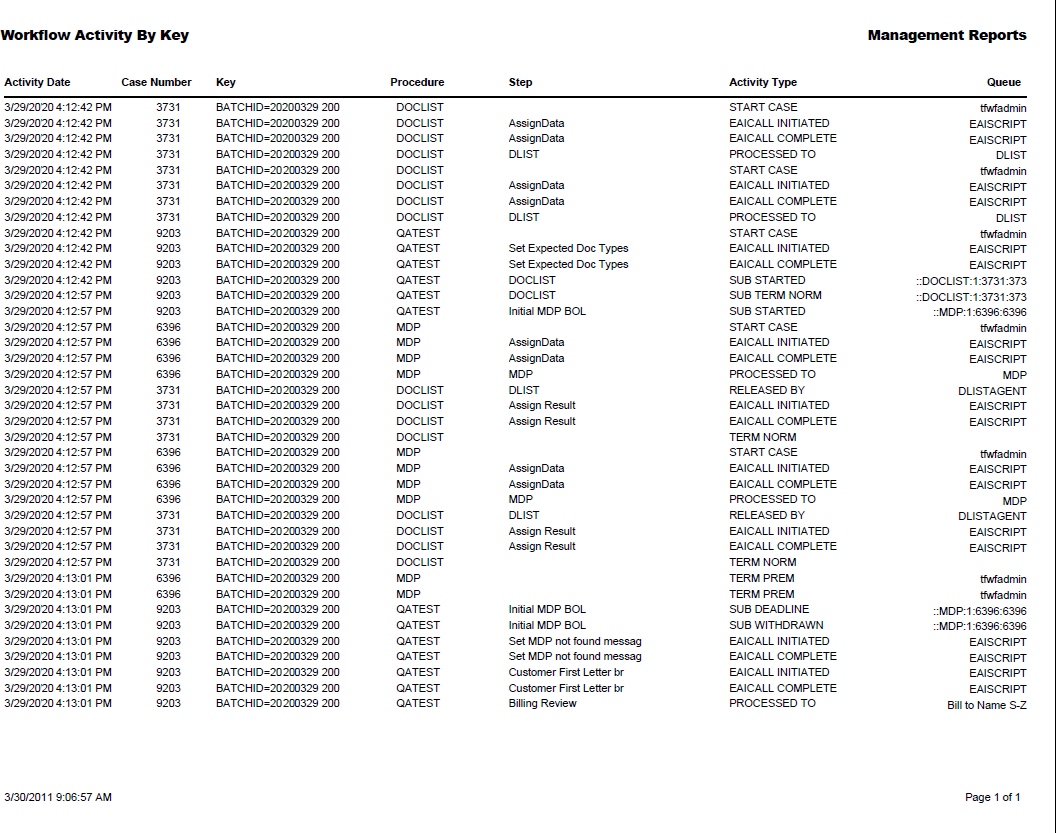
Interpreting a Workflow Activity by Key Report
The header of the Workflow Activity by Key report displays the report title, a description of the report, and a time stamp indicating when the report was created.
The report’s data is presented in the form of a table.
The columns and rows of this table are described below.
|
Column Heading |
Description |
|---|---|
|
Activity Date |
Indicates the date and time when the activity named in the Activity Type column was performed. |
|
Case Number |
The unique identifier of the Case in which the activity named in the Activity Type column was performed. |
|
Procedure |
The name of the Procedure or the Sub-procedure for the activity. |
|
Step |
The Procedure Step that the Case was in when the activity named in the Activity Type column was performed. |
|
Activity Type |
The Workflow activity performed for the Key values selected. |
|
Queue |
The Queue name if the activity happened in a “Human” Step. The Event or Script data if the activity occurred in an automated Step. |