DMS Workflow Web Client
Staff and supervisors in all roles can use TRANSFLO® Workflow Web client to work with your Workflow Queues. You can view and manipulate your cases and their associated images and fields. The workflow web client also has a document list that gives you a list of documents associated with the work items in your queue and a form viewer where you can preview images of the documents.
The following example shows a custom process workflow in Transflo Workflow Web Client designed to automate work queues for staff based on their job function (such as validation team or billing team) whenever a new bill of lading (BOL) document is received:
![]()
Previously limited to Edge, IE, and Firefox browsers, the DMS workflow and workspace browser was updated in early 2024 to support the Google Chrome browser.
Use the Transflo DMS Workflow Web Client
To use the basic functionality of the TRANSFLO® Workflow Web Client do the following:
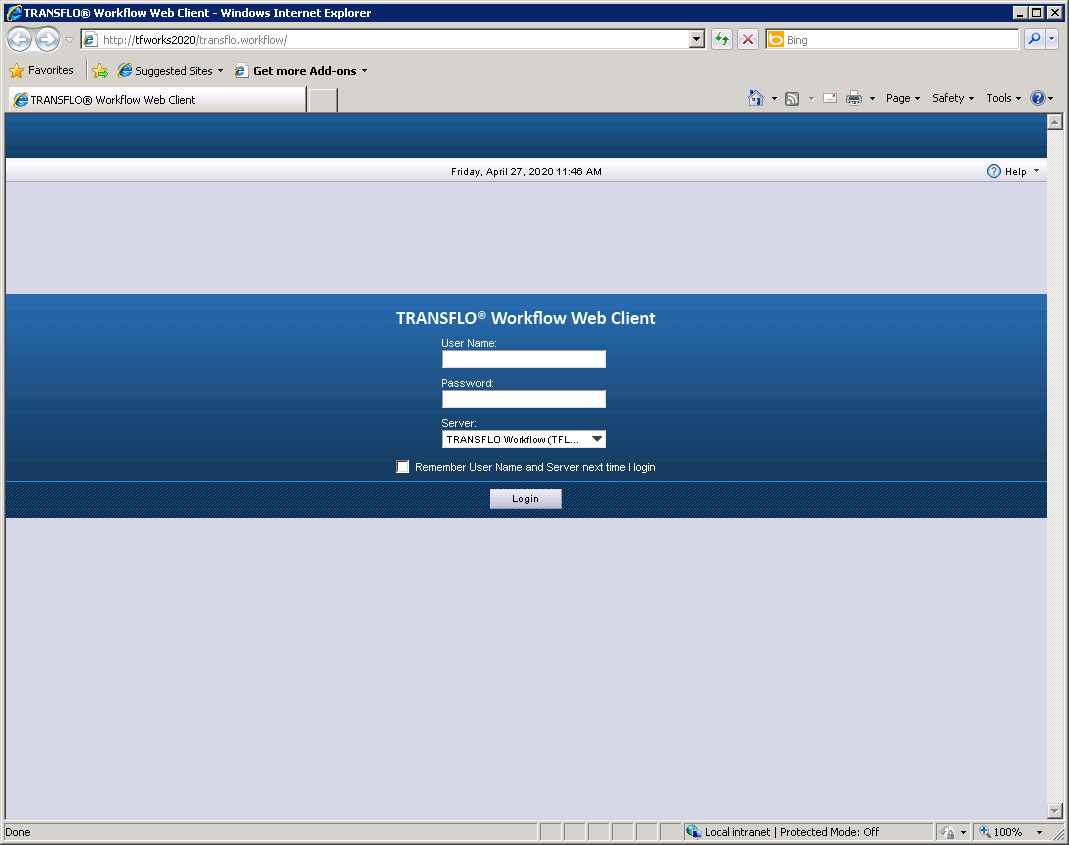
1. Open your browser and type http://<myserver>/Transflo.Workflow in the address bar, where "<myserver>” is the name of the computer that is hosting your TRANSFLO® Workflow web site.
Type Enter.

Note: If you are running the TRANSFLO® Workflow Web Client from Windows® Server 2008, you must add the Transflo.Workflow web site to your Trusted Sites.
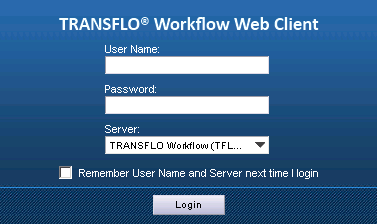
2. Log in to the TRANSFLO® Workflow Web Client.
-
Enter your User Name in the User Name text box
-
Type your Windows® password in the Password text box.
-
Select the TRANSFLO® Workflow server from the Server drop-down.
-
(Optional) Check the Remember User Name and Server next time login check box, so that you don’t have to type in your User Name and select the server every time you log in.
3. The TRANSFLO® Workflow Web Client page opens to the Work Queue view.
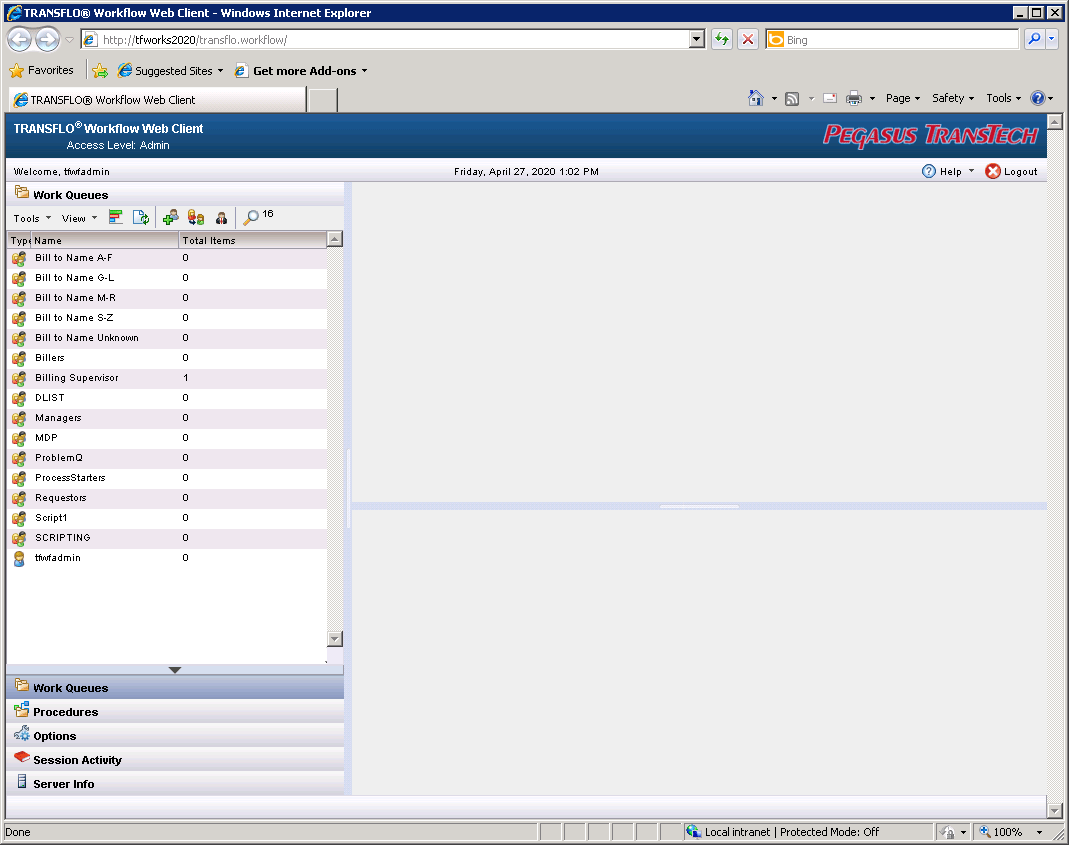
The TRANSFLO® Web Client page has six main sections:
-
Information Bar - Has the Application name, the Pegasus Transtech Logo and the Access Level of the person who logged in.
-
Tool Bar - This has your User Name, the Date and Time, the Help menu and Logout button.
-
Main Menu - A series of buttons on the bottom-left of the page.
This menu controls the five main views, used by the TRANSFLO® Workflow Web Client.
These are also known as the Mode Selection buttons.
-
Summary List Pane - Located above the Main Menu on the left that has summary information.
This is also known as the Primary List.
-
Details Pane - This large area is located at the top-right side of the Workfow Web Client page.
This displays the details of the selections made in the Main Menu or the Summary List Pane.
Another name for this area is the Secondary List pane.
-
Summary Pane - This Pane is directly below the Details Pane and is used to display summary information of items listed in the Details Pane.
This area is also called the Preview Pane.
4. The Main Menu consists of five menu options:

-
The Work Queues menu button displays the Work Queues that you have access to in the Summary List Pane.
-
The Procedures menu button displays the Workflow Processes (Procedures) that you have access to in the Summary List Pane.
The Cases (instances of the Procedures) that belong to each of these Procedures are displayed in the Details Pane.
-
The Options menu button allows you to customize your TRANSFLO® Web Client page in the Details Pane.
You can change display options, apply filters, change the layout options, how you want outstanding items to appear, change session options, including changing your password and how you want sub-procedures to behave.
-
The Session Activity menu button shows a record of the activity of your current session, that is, what you have done since you logged on.
-
The Server Info menu button shows details of the TRANSFLO® Workflow Server that your session is connected to.
Review Your Work Queues
To review your Work Queues, do the following:
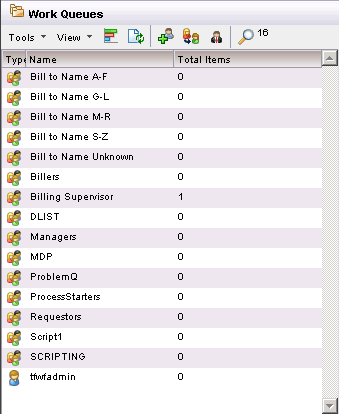
1. Click on the Work Queues menu button.
2. A list of Work Queues that you have access to is listed in the Summary List Pane.
These include User Work Queue and Group Work Queues.
The number of Cases that are in each Queue is shown in the Total Items column and the number of these that were unopened is shown in the Unopened Items column.
The Work Queue Summary List Pane has a Tools menu that gives supervisors the ability to:
-
View a chart of the workload of each Queue. (The toolbar icon
 also displays the chart)
 -
Manage workload, by assigning additional resources to Work Queues. (You can also use the
 toolbar icon)
 -
Redirect Queues to different Users. (This can also be accomplished with the
 toolbar icon)
 -
Assign supervisors to Queues. (The
 toolbar Icon also performs this function)
This Summary List Pane also has a View menu that allows you to:
-
Filter the Work Queue List.
-
Search the Work Queue List. (The Find
 toolbar icon performs the same function)
 -
Select Columns to be displayed in the Work Queue List.
-
To refresh the Work Queue List. (The Refresh
 toolbar icon can also be used to refresh the list)
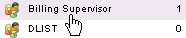
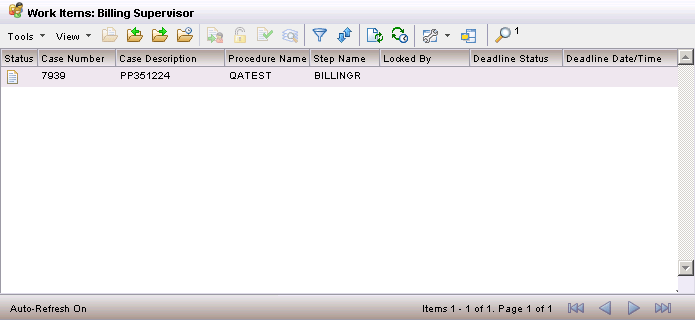
3. Double click on a Queue that has Work Items (Cases) in it.
4. A list of Work Items displays in the Details Pane.
The Toolbar includes a Tools menu and a View menu. Most menu items also have corresponding toolbar icons described in the table below:
| Menu | Option | Icon | Description |
|---|---|---|---|
|
Tools |
Open Selected Work Item |

|
Opens the form of the Work Item that is selected in the Work Item List. Same as double-clicking the Work Item. |
|
Open First Work Item |

|
Opens the first Work Item in the Work Item List. |
|
|
Open Next Work Item |

|
Opens the Next Work Item in the Work Item List. |
|
|
Auto Repeat Open Work Items |

|
Turns on the Auto Repeat feature. This feature automatically opens the form of the next work item in the list, once the current work item is closed. |
|
|
Forward Work Items |

|
Sends the selected Work Item to an available Work Queue of your choice. |
|
|
Unlock Work Items |
Unlocks a work item that is locked by another user. |
||
|
Release Work Items |
Sends the selected Work Item to its next Work Queue. |
||
|
Open Selected Case |

|
Opens a window with details about the Case. This window has a Summary tab, a History tab that shows all of the steps the Case has gone through, an Outstanding tab and a Data tab with the fields and current values. |
|
|
View |
Filter |

|
Opens a Utility to filter your list, by entered values in selected fields. |
|
Sort |

|
Opens a Utility to select fields, to sort your Work Item list. |
|
|
Find |

|
Allows you to search for a Work Item with a specific Field value in a selected Field. |
|
|
Page Size… |
N/A |
Allows you to set the number of items that display on each page in the list. |
|
|
Select Columns ... |
N/A |
Allows you to select the Columns visible in your Work Item List. |
|
|
Preview |

|
Sets options for you to preview your forms. |
|
|
Float Work Item List |

|
Allows the entire Work Item List to open, in a new floating window. |
|
|
Refresh Work Items |

|
Refreshes the list of Work Items for the current Work Queue. |
|
|
Auto Refresh |

|
Gives you the ability to enable automatic refresh of your Work Item List and to set the time between each automatic refresh. |
There is a status bar at the bottom of your Work Item Details Pane that provides information about your Work Item List.
It displays whether or not Auto Refresh is on, the number of items in the Work Queue and the selected item’s position in the List, and the number of pages of Work Items in the Work Queue.
There are also four navigation buttons used to navigate between pages of Work Items.
5. Clicking on a Work Item displays a summary of the work item in the Summary Pane below.

Procedures Menu
To work with your Procedures, perform the following:
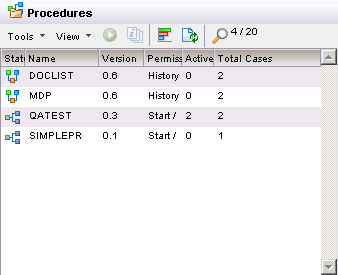
1. Click on the Procedure menu button.

2. A list of Procedures that you have access to appears in the Summary List Pane.
This includes the number of open Cases in the Active Cases column and the Total number of Cases, including those that have been closed, in the Total Cases column.
The Procedures Summary List Pane has a toolbar with a Tools menu and a View menu.
Some of these menu items also have corresponding toolbar icons that are described in the table below:
| Menu | Icon | Description | |
|---|---|---|---|
|
Tools |
Start New Case... |

|
Allows you to start a new Case of the Selected Procedure. |
|
Versions ... |

|
Pops up a history of the versions of the selected procedures, with the currently-released version. |
|
|
Procedure Loading Chart |
|
Pops up a chart of the total number of Cases that have been released for each Procedure and breaks them down by the number of open and closed Cases. |
|
|
View |
Released Procedures |
N/A |
Selecting this option adds all Procedures that have been released to the Procedures List. |
|
Unreleased Procedures |
N/A |
Selecting this option adds all Procedures that have not been released to the Procedures List. New Procedures have a status of Unreleased. |
|
|
Model Procedures |
N/A |
This is the status of recently imported and released procedures that are in test Work Queues. This allows the new version to be tested, before it is deployed to the target system. |
|
|
Withdrawn Procedures |
N/A |
Selecting this option adds all Procedures that are no longer used in the production system. |
|
|
Find |
|
This allows you to filter your list by values, in a selected column. |
|
|
Select Columns |
N/A |
Allows you to add and remove columns in the list. |
|
|
Refresh Procedures |
|
This option is used to update the procedure list, with the latest procedures. |
3. Click on a Procedure in the Procedure List.
A list of all of the Cases that have been associated with the selected Procedure appear in the Details Pane.
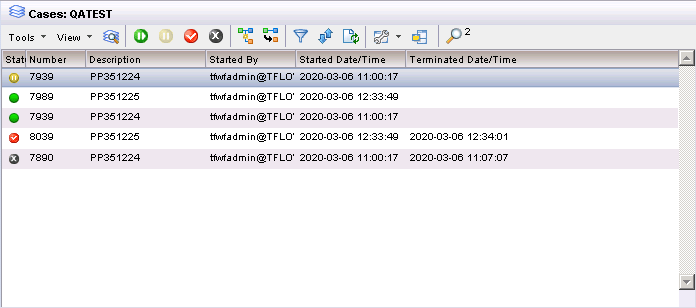
The Toolbar includes a Tools menu and a View menu.
Most of these menu items also have corresponding toolbar icons.
These are described in the table below:
| Menu | Option | Icon | Description |
|---|---|---|---|
|
Tools |
Open Selected Case(s) |
|
Opens a window with details about the case. This window has a Summary tab, a History tab that shows all of the steps the Case has gone through, an Outstanding tab and a Data tab with the fields and current values. |
|
Activate Selected Case(s) |

|
Reactivates Suspended Cases. |
|
|
Suspend Selected Case(s) |

|
Suspends the activity of a Case. Work items for the Case cannot be open. Open work items can be kept, but then the Case is immediately suspended. |
|
|
Close Selected Case(s) |

|
This stops the process flow of the Case. |
|
|
Purge Selected Case(s) |

|
Permanently deletes the case. Upon the next refresh, the Case will no longer be in the list. |
|
|
Trigger Event Steps for Selected Case |

|
Allows you to initiate an event that is defined in the Procedure. You can also Recalculate Deadlines. Trigger Events will Activate Closed Cases and keep Suspended Cases Suspended. |
|
|
Jump the Selected Case to Other Steps in the Process |

|
This option allows you to move an Active Case or a Suspended Case to a specific step. Active Cases are Suspended, before the Process Jump. |
|
|
View |
Filter List Contents |
|
Opens a utility to filter your Case list, by entered values in selected fields. |
|
Sort List Contents |

|
Opens a utility to select fields to sort your Case list. |
|
|
Find List Contents |
|
Allows you to search for a Case with a specific Field value in a selected Field. |
|
|
Select Columns... |
N/A |
Allows you to add and remove columns in the Case list. |
|
|
Preview ... |
|
Sets options for you to preview your forms. |
|
|
Float Case List |
|
Allows the entire Case List to open in a new floating window. |
|
|
Refresh Cases |
Refreshes the list of Cases for the current Work Queue. |
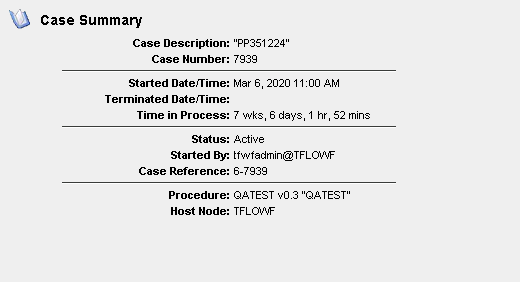
4. Single click on a Case in the Case Summary.
Case summary information is displayed in the Summary Pane.
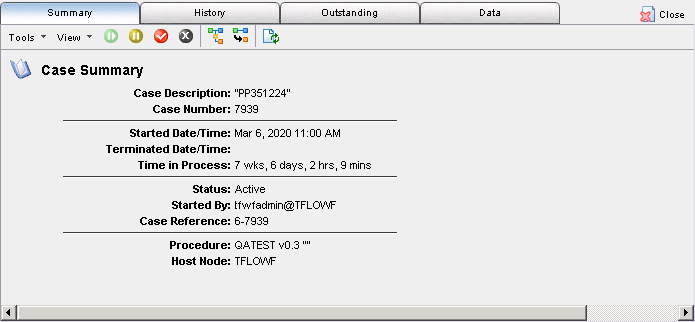
5. Double-click on a Case in the Case List.
The Case Details panel opens on the Summary tab on the Summary Pane.
This tab has a toolbar that allows you to Activate, Suspend, Close, and Purge Cases, Trigger Events, Process Jump, and Refresh the Case information.
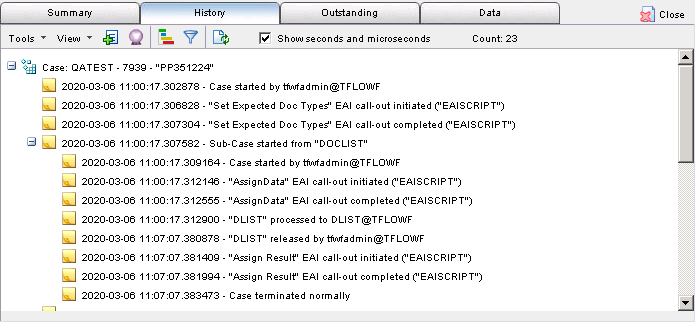
6. Click on the History Tab.
This tab shows you all of the steps and sub-process steps the Case has been through.
It has a toolbar that allows you to manually add entries into the Case History, make predictions about future activity of the Case, display History as a time line chart, and to Refresh the History List.
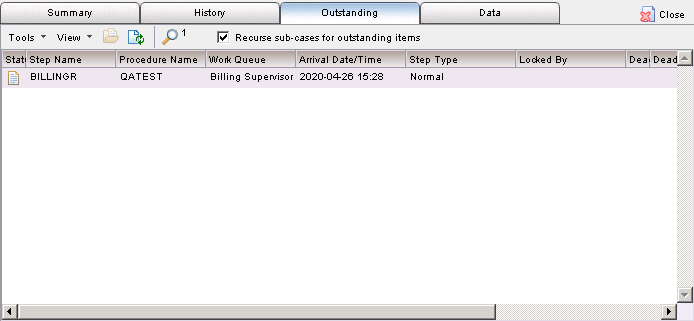
7. Click on the Outstanding tab.
The information on this tab represents the steps, at which the process flow is currently sitting.
The toolbar allows you to refresh the list, find items in the list and select the columns for the list.
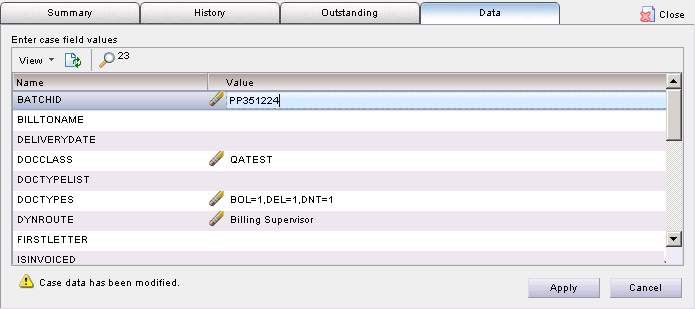
8. Click on the Data tab.
This tab shows all of the Case’s fields and field values.
If you have Edit permissions, you can edit the data of editable fields by clicking on the value, changing the data and clicking the Apply button.
The toolbar allows you to refresh the list and find items in the list.
Options Menu
To review your TRANSFLO® Workflow Options, do the following:
1. Click on the Options menu.
2. The Options Configuration opens in the area normally covered by the Details and Summary Panes.
Make changes to your Display Options.

3. Scroll down to the Filter Options.
Configure your Work Item and Case filters.

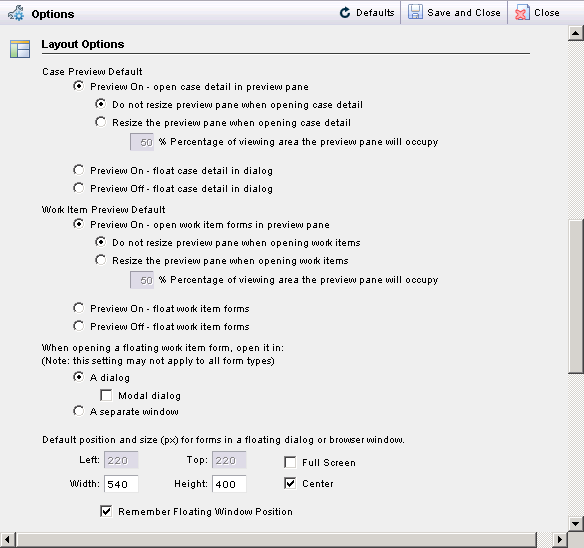
4. Scroll down to the Layout Options.
Configure the initial layout of your Cases and Work Items and the default parameter for floating Work Items.
5. Scroll down to the Outstanding Item Options.
Configure how the items are going to appear on the Summary Tab of the Case Details panel.

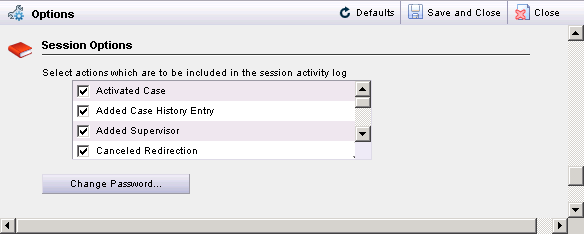
6. Scroll down to the Session Options.
Configure which fields will show in the Session Activity Log.
You can also change your Password.
7. Scroll down to the Sub-Case Version Options.
Configure the order that Workflow searches for sub-procedures.

8. Click the Save and Close button.
Note: You must log out and restart your browser, for your configuration changes to take effect.
Session Activity Menu
To view information about your current session, do the following:
1. Click on the Session Activity menu button.

2. The Session Activity opens in the area normally covered by the Details and Summary Panes.

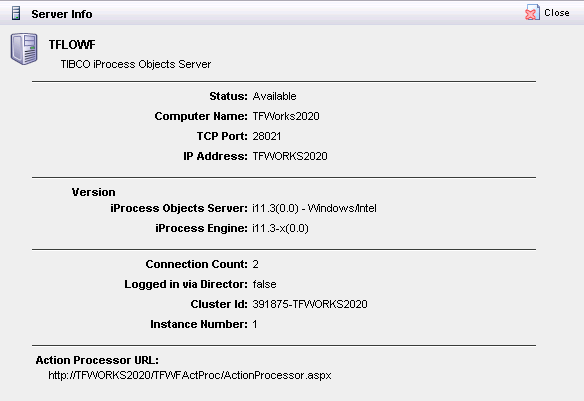
Server Info Menu
To view information about your Workflow Server:
-
Click the Server Info menu button.
-
The Server Info window opens in the area normally covered by the Details and Summary panes. This window shows information about the computer that houses your iProcess Server, the versions of the iProcess Server components that are being used, and connection information.
-
The URL used for administering the iProcess Engine is also provided in the Action Processor URL field.