Transflo Invoice Interface Service for Maddocks TruckMate
The TRANSFLO® Invoice Interface Service for Maddocks is designed to work with the TRANSFLO® Printer Driver to process print jobs created by Maddocks Systems’ TruckMate for Windows transportation and logistics software and make the data available to TRANSFLO® Rendition Print Service.
When a TruckMate invoice is printed using the TRANSFLO® Print Driver, a TIF image containing all pages of the invoice is created.
The TIF file is named using the control number of the TruckMate invoice.
Next, TRANSFLO® Invoice Interface Service reads the TIF filename to obtain the invoice control number and reads an XML file created by the TruckMate software, to retrieve the data associated with that invoice.
Invoice Interface Service writes the retrieved data to a spool (SPL) file and splits the pages of the original TIF file into individual TIF files, keeping them in their original order.
Invoice Interface Service then creates a ZIP file containing the SPL file and TIF files.
Finally, Invoice Interface Service places the ZIP file in a pickup folder from which TRANSFLO® Rendition Print Service can retrieve it.
Once received by Rendition Print Service, the files are extracted and then are ready for storage, printing, emailing or faxing.
For more information about TRANSFLO® Rendition Print Service, see the TRANSFLO® Rendition Print Service System Administrator’s Knowledge Base.
This topic provides basic information about TRANSFLO® Invoice Interface Service for Maddocks, as well instructions for installing the application.
Minimum Hardware Platform
-
Processor: 800MHz
-
RAM: 512MB
-
Disk Space: 5GB
-
Screen Resolution: 1024x768
Recommended Hardware Platform
-
Processor: 1 x 1.8Ghz
-
RAM: 1GB
-
Disk Space: 5GB
-
Screen Resolution: 1024x768
Supported Operating System Platforms
-
Microsoft Windows® 7 (x86 and x64)
Note: This product is backwards compatible for the existing operating systems and hardware configurations on your existing machines.
Any upgrades to hardware and operating systems must meet the requirements above.
Installing Invoice Interface Service
To install TRANSFLO® Invoice Interface Service for Maddocks:
1. Double-click the file TRANSFLO® Invoice Interface for MADDOCKS Setup.exe, on the installation CD.
When it begins running, the setup program checks the installation environment.
If the ideal environment is not found, a dialog box appears indicating suggested changes to the environment.
Read this message if it appears, and click OK.
2. The installation program welcome window opens.
Click Next.
3. The Select Destination Location window opens.
The default installation location is displayed in the box.
To install files to a different location, click the Browse button and navigate to the desired folder.
When you are satisfied with the installation location, click Next.
4. The Ready to Install window opens.
Verify the Destination Location is correct, and click Install.
The installation begins.
5. When the setup process has finished, a message appears stating that TRANSFLO® Invoice Interface Service for Maddocks has been successfully installed.
To complete the setup process, click Finish.
Invoice Interface Service Configuration
Introduction
This topic explains how to configure Maddocks Systems TruckMate and TRANSFLO® Invoice Interface Service for Maddocks, to work with each other.
The first task is to configure the backup document and fax settings, for a Maddocks customer account.
Once this is done, Invoice Interface Service can be configured.
Configuring the TruckMate Installation
The first step in configuring TruckMate and Invoice Interface Service to work together is to configure a backup TruckMate document and associate it with the appropriate user account.
Configuring the Back up Document Field
To indicate which TruckMate field contains backup document information:
1. Start the TruckMate Codes Maintenance program (Codes.exe).
To do this, click the Start button on the Windows task bar, point to Programs, point to TruckMate for Windows, point to Profiles, and click Codes Maintenance.
The Codes Maintenance window appears.
2. The Login screen will open.
Enter your User ID and Password.
3. Click the Imaging tab.
4. In the Imaging Vendor area, select Pegasus.
5. Click the Rendition Print tab.
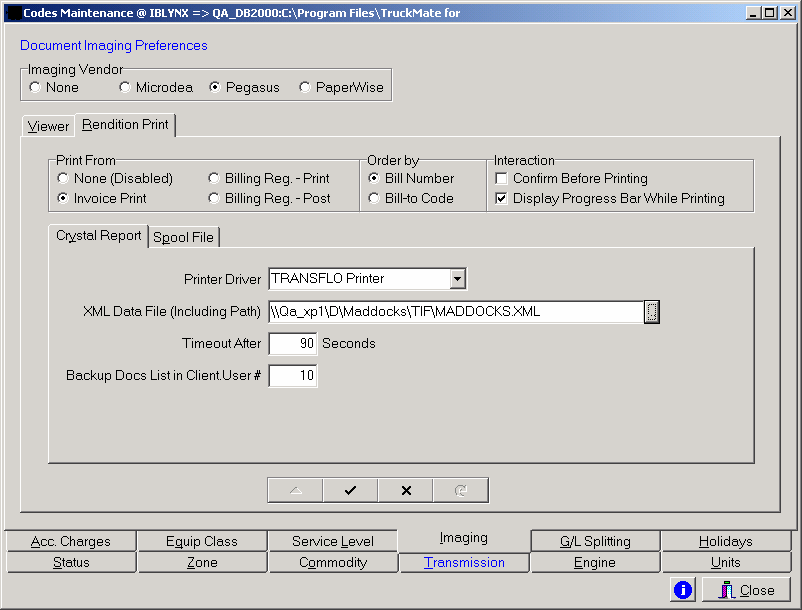
6. In the Imaging Vendor group box, select Pegasus.
7. Click on the Rendition Print tab.
8. In the Print From group box, select the application that the Maddocks software will use to call the TRANSFLO® printer.
Select either Invoice Print or Billing Reg. - Print.
9. If a confirmation dialog box is required prior to printing select the Confirm Before Printing check box, in the Interaction group box.
10. Select the Display Progress Bar While Printing check box in the Interaction group box, to show a progress bar that indicates to the user that the TRANSFLO® printer is creating a print job XML and a corresponding TIF file.
11. Select TRANSFLO® Printer, from the Printer Driver drop-down list.
12. Enter a UNC Pathname for the XML data file in the XML Data File (Including Path) text box. (Ensure that the UNC Path is the same location of either the TIF Path in the TRANSFLO® Print Driver Configuration or the TIF Pickup Directory in the TRANSFLO® Invoice Interface Configuration.)
13. Type the user field number in the Backup Docs List, in the Client User # box.
This is the number of the user field from Profile.exe that will be used, to retain the backup document values for each customer record.
14. Click the check mark button to save the changes, and then click Close.
Setting Up the User Field Label in the Application Configurator
The next step in preparing TruckMate to work with Invoice Interface Service is to set up the user field label, in the TruckMate Application tor.
To do this:
1. Start the Application tor program (Config.exe).
Click the Start button on the Windows task bar, point to Programs, point to TruckMate for Windows, point to Utilities, and click Application tor.
The Application tor window appears.
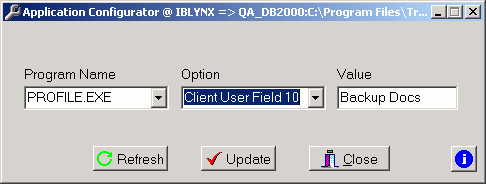
2. Click the arrow button to the right of the Program Name list box to expand the list, and click PROFILE.EXE.
3. Click the arrow button to the right of the Option list box to expand the list, and click the “Client User Field” number that corresponds to the number that was entered in the Backup Docs List in Client User # box in the Codes Management window.
4. In the Value box, type “Backup Docs”.
5. Click Update to save your changes, and then click Close.
Setting Up the Backup Doc Type List for Each Customer Profile
The final step in preparing TruckMate to work with Invoice Interface Service is to indicate which types of documents will be backed up for each customer.
To do this:
1. Start the Customer Vendor Profile program (Profile.exe).
Click the Start button on the Windows task bar, point to Programs, point to TruckMate for Windows, point to Profiles, and click Customer and Vendor Profiles.
The Customer & Vendor Profiles window appears.
2. Use the search feature to locate the desired customer profile.
Consult the TruckMate documentation for instructions if necessary.
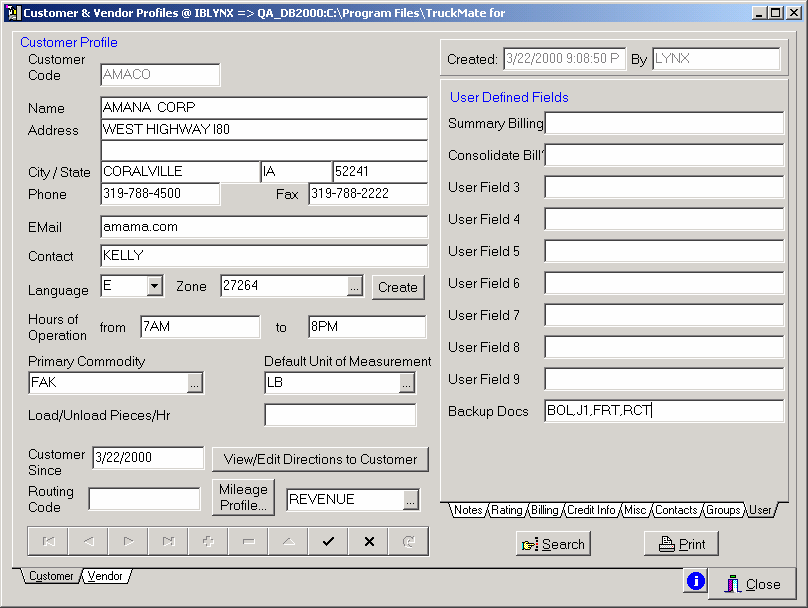
3. In the lower-right corner of the window, click the User tab.
4. In the Backup Docs box, type the abbreviations for the types of documents that should be backed up.
Separate the abbreviations with commas.
5. Click the check mark button to update the customer record, and then click Close.
You should now proceed with the instructions found in the next section, Configuring Invoice Interface Service.
Configuring Invoice Interface Service
To configure TRANSFLO® Invoice Interface Service for Maddocks:
1. Open the Invoice Interface Service application, if it is not already running.
On the Windows task bar, click the Start button.
In the Start menu, point to Programs, point to TRANSFLO®, and click Maddocks Invoice Interface Configuration.
The TRANSFLO® Invoice Interface Configuration window appears.
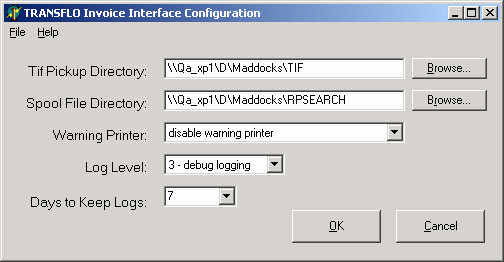
2. In the Tif Pickup Directory box, enter the path of the folder where TRANSFLO® Print Driver places the TIF images that it creates.
Either type the path in the box, or click the Browse button and navigate to the folder.
UNC paths are allowed.
Important: This path must match the path entered in the XML Data File (Including Path) box in the TruckMate Codes Maintenance application.
3. Invoice Interface Service creates zip files containing a spool file and the associated TIF images.
In the Spool File Directory box, enter the path of the folder where Invoice Interface Service will save the zip files that it creates.
Either type the path in the box, or click the Browse button and navigate to the folder.
4. In the Warning Printer list, select a network printer to which any error messages should be printed.
These error messages will alert you to any potential problems.
Click the arrow button to the right of the list box, and click the name of the desired printer.
5. In the Log Level list, select the level of detail that should be written to the log file.
Click the arrow button to expand the list, and click the desired log level.
The available levels are:
-
0 - No logging
-
1 - Critical logging
-
2 - Warnings
-
3 - Debug logging
6. In the Days to Keep Logs list box, enter the number of days that log data should be kept before being purged.
Either type the desired number of days in the box, or click the arrow button and click the desired number of days in the list.
The numbers of days in the list are iterated by 7, ranging from 7 days (1 week) to 63 days (9 weeks).
7. When you have finished configuring the TRANSFLO® Invoice Interface Configuration window, click OK, to save your changes and close the window.
Start the Invoice Interface Service
After you configure the TRANSFLO® Invoice Interface Service for Maddocks, follow these steps to start it:
1. On the Windows task bar, click the Start button. In the Start menu, point to Settings, and click Control Panel.
2. In the Control Panel window, double-click Administrative Tools.
3. In the Administrative Tools window, double-click Services.
The Services window opens.
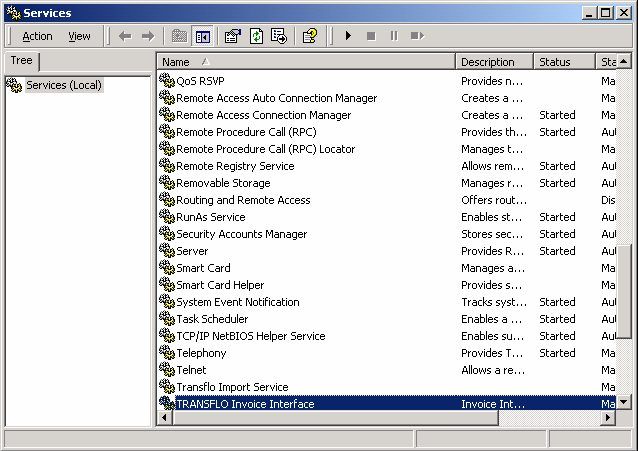
4. In the Services window, locate the service TRANSFLO® Invoice Interface and click it to select it.
5. To start the service, on the Services toolbar click the play  button.
Once the service has been started, it can be stopped or paused by clicking the stop  or pause
  button, respectively.
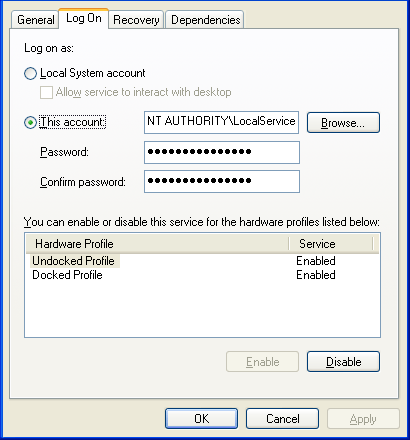
Note: If network paths for the spool file or TIF directories have been configured right-click on the service and select the Properties option from the Menu.
Select the Log On tab and click This account.
Click the Browse button and select a Domain User with access to the configuration directory.