Integrate DMS ezView in Your Website
ezView is a Microsoft ASP.NET MVC application. The Viewer/Hits page is the integration interface into the application. It accepts information passed to it through an HTTP request. The information includes user name, password, Web application name, imaging database name, and query criteria.
Example: The following is an example that can be added to an ASP page to use the Viewer/Hits page:
<%
Dim myEncrypt, target
Set myencrypt = Server.CreateObject("TFEncryptURL.TFEncrypt")
target = myencrypt.Encrypt ("user=lolo1&pass=lolololo&webapp=Sysusr&table=DEVTEST&qry=PRO=1 23&MyLogo.png")
Set myencrypt = nothing
Response.redirect("Viewer/Hits?target=" & target) 'target = myencrypt.Encrypt
("user=lolo1&pass=lolololo&webapp=Sysusr&table=DEVTEST&qry=PRO=1 23&logo=MyLogo.png")
%>
Use one of the following two (2) methods for integrating ezView with your Web site:
-
Add a hyperlink in your site to access ezView.
-
Integrate ezView through the TRANSFLO® API.
To integrate ezView with your website using a hyperlink, follow the steps below for in-house (on-prem) TRANSFLO® systems and TRANSFLO® DMS SaaS/cloud scenarios.
The simplest method for integration is to dynamically create the Web page, providing a hyperlink to the Viewer/Hits page, and include the required information right within the hyperlink.
The following HTML code must be added to a page on your website at each location where a link for viewing images needs to be supplied. Bracketed, italicized text indicates placeholders for information that you supply:
<A href="{site name} ?user={username} & pass={password} & table={document class} & qry={query expression} & logo={name of logo file}">{link text}</A>
| Placeholder Name | Description |
|---|---|
|
site name |
The absolute URL address of the hits.asp page on the ezView Website. This site can be on another web server. If the page is in the same location as the Viewer/Hitspage, this URL can be relative. |
|
user name |
A valid TRANSFLO® user name that has access to the Document Class. |
|
password |
The TRANSFLO® password for authorizing access to the Document Class. |
|
document class |
The Document Class you are accessing. |
|
query expression |
An expression that is used to select and display the proper documents from the entire database of stored images. |
|
name of logo file |
The URL address of a graphics file that contains your company logo. If you choose not to display your logo, simply replace this placeholder with a blank space. |
|
link text |
The text displayed in the link. |
Example: The following HTML snippet displays a View Images link.
When the user clicks the link, the information in the link instructs ezView to query the Shows imaging database of the Shows web application using the user name Shows and the password Shows and displays the g_logo.jpg image.
<A href="http://www.transflo.com/ezView/mypage.asp?user=shows&pass=shows&table=TRIPS&qry=PRONUMBER=12345678&logo=g_logo.jpg"> View Images</A>
Warning: A query using a single Document Class Field against an OpenText (Gauss) repository is translated into a wildcard (*) search that queries the entire library. This can result in a large amount of data being returned, increasing the time to complete and the resources used.
Example:
qry=DOCTYPE=BOL|LOG
To use this type of delimiter efficiently it is recommended to always use at least one additional query field first, as shown in the following example:
qry=PRONUMBER=12345678,DOCTYPE=BOL|POD
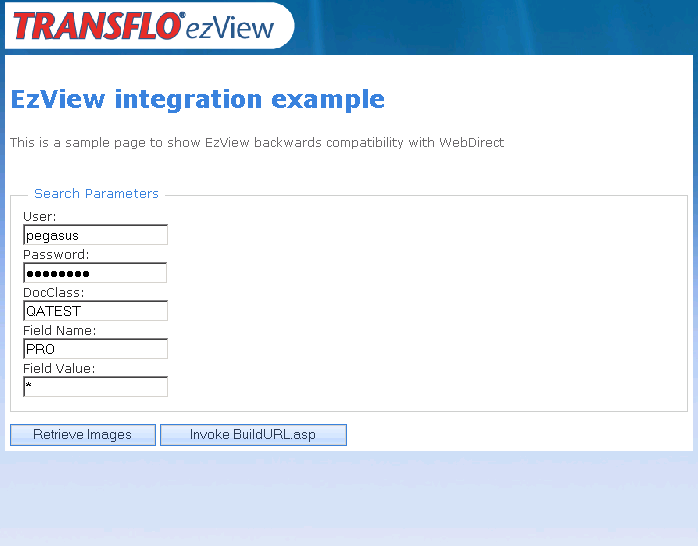
Backwards Compatibility With Web Direct
There are two methods to use your existing links Web Direct links for backwards compatibility:
- Use WebDirect's COM+ methods
- Convert links to use the ezView standard
WebDirect COM+ Methods
Included in the ezView installer package is the TFEncryptURL.DLL from WebDirect.
To use your links without conversion, you will have to register this DLL on your Web Server using Windows® Component Services.
You will also need to use this method for your WebDirect server side scripting to work.
To register the TFEncryptURL.DLL:
1. Run a Windows Command Prompt as Administrator.
2. Change the directory to the ezView\bin folder.
For example:
cd C:\Program Files\Pegasus TransTech\TRANSFLO® ezView\bin
3. Run regsvr32.
For example:
regsvr32 tfencrypturl.dll
The syntax for creating hyperlinks using methods in TFEncryptURL.DLL is:
<A href="{site name} ?user={username} & pass={password} & webapp={web application}&spylink={base name}&qry={query expression} & logo={name of logo file}">{link text}</A>
You can create hyperlinks in applications that support VBScript, such as Rendition Print Service templates and Capture Scripting.
The following is an example of how to create a hyperlink using TFEncryptURL.DLL:
var encryptObj = CreateObject(""TFEncryptURL.TFEncrypt"") var url = "user=user1&pass=test%table=TRIPS&qry=PRO=123" var encryptedURL = encryptObj.Encrypt(url)
//encryptedURL is the value of the query string parameter
//target.
This is an example of a URL:
var fullURL = "http://localhost/transflo.ezView/Viewer/Hits?target=" & encryptedURL
To use the ezView standard, you will have to convert your links from the following WebDirect syntax for hyperlinks:
<A href="{site name} ?user={username} & pass={password} & webapp={web application}& spylink={base name} & qry={query expression} & logo={name of logo file}">{link text}</A>
To convert your links from WebDirect to the ezView standard:
1. Change the {site name} to your Transflo.ezView instance.
2. Replace the {username} parameter with a valid Transflo user name that has access to the Document Class you are accessing.
3. Replace the {password} parameter with the corresponding Transflo password.
4. Insert & table={document class} in the query string after the {password} parameter. The {document class} is the name of the document class you are accessing.
5. Remove & webapp={web application} & spylink={base name} from the query string.
The resulting hyperlink will have the following syntax:
<A href="{site name} ?user={username} & pass={password} & table={document class} & qry={query expression} & logo={name of logo file}">{link text}</A>
The following is an example Web Direct hyperlink:
<A href="http://www.transflo.com/webdirect/mypage.asp? user=shows & pass=shows & webapp=shows & spylink=shows & qry=PRONUMBER=12345678 & logo=g_logo.jpg">View Images</A>
The following is the same link converted to use the ezView standard:
<A href="http://www.transflo.com/Transflo.ezView/mypage.asp? user=transflo1 & pass=tflopass1 & table=TRIPS & qry=PRONUMBER=12345678 & logo=g_logo.jpg"> View Images</A>
Example Pages
We have included three example pages that you can use for reference.
Each example has a redirect to the Viewer/Hits page.
| Page Name | Description |
|---|---|
|
buildURL.asp |
Creates a URL with an encrypted link. |
|
hits.asp |
Invokes viewer.hits the same way that hits.aspworked in WebDirect. |
|
password |
The TRANSFLO® password for authorizing access to the Document Class. |
|
sample.asp |
Combines calls to the hits.asp and buildURL.asp page.
|
Query Expression Format Rules or Syntax
The query expression placed at the location of the placeholder {query expression} is a search criteria that determines which documents are retrieved from the imaging database and displayed in WebDirect's Search Results page.
The query expression needs to have the following format:
category name1 = value1, category name2 = value2, ..., category name n = value n
where category name represents a field in the imaging system, and value equals the value of the field to search for.
Note: You can specify a list of values for a category using the | delimiter.
For example, to display all documents where the PRONUMBER is 12345678 and the DOCTYPE is BOL or POD, the search criteria would be:
qry=PRONUMBER=12345678,DOCTYPE=BOL|POD
A list of values can be specified for only one category.
Any attempt to specify more than one category with a list of values will result in an error message.
This section explains how to integrate ezView with your Website by using server-side code. Contact your Project Manager for a copy of an ASP.NET MVC 3 web application example.
To perform a search to retrieve a document image:
1. Create a web service proxy class.
2. Authenticate to the Web service and establish a session.
3. Search the repository for a list of documents.
4. Get the document images.
Methods
| Method | Description | Parameters - Values | Returns |
|---|---|---|---|
|
Authenticate |
Authenticate to web service and establish a session |
userName as string, password as string, appId as number - use 15, webServer as string, clientCRC as datetime - use now(), out sessionId as string |
out parameter sessionId as string |
|
GetRepository DocumentsData |
Get a collection of Document’s data |
sessionId as string, docClass as string, search criteria of field values and field names, DocOptions as enum - use none |
collection of Document’s data |
|
GetRepository DocumentsBytes |
Get a collection of Document images |
sessionId as string, docIds as array of string - each string is a Document Id |
array of images as binary data |
Step-by-Step Example
The following is a detailed example of how to perform the general steps listed above:
-
Read the search criteria from html form fields.
//Read form fields
string userName = form["userName"]; string password = form["password"]; string docClass = form["docClass"];
string searchCriteria = form["searchCriteriaHidden"]; -
Create an instance of the web service proxy class.
//Create web service proxy class WebService.TransfloWSSoapClient service =new WebService.TransfloWSSoapClient();
-
Authenticate to the Web service and establish a session.
//Start new Transflo Session string sessionId;
DateTime clientCRC = DateTime.Now; service.Authenticate(userName, password, 15, Server.MachineName,
ref clientCRC, out sessionId);
if (string.IsNullOrEmpty(sessionId))
return Content("Error starting Transflo session");
//Store sessionId to be used later in ViewDocument Session[SessionKey.TRANSFLO_SESSION_ID] = sessionId;
-
Populate the web service search fields with data from HTML form fields.
//Populate search fieldPs according to form fields List<WebService.DocumentField> searchFields =
new List<WebService.DocumentField>();
foreach (string searchItem in searchCriteria.Split(','))
{
var docField = new WebService.DocumentField();
docField.Name = searchItem.Split('=')[0];
docField.Value = searchItem.Split('=')[1];
searchFields.Add(docField);
}
-
Search the document repository and display results.
//Invoke web service method GetRepositoryDocumentsData()
var result = service.GetRepositoryDocumentsData(sessionId, docClass, searchFields.ToArray(), WebService.RepositoryDocumentOptions.None);
if (result == null || result.Length <= 0) return Content("Search return 0 items");
//Display results
return View("ShowResults", result);
-
Use the Document ID returned by the web service call to retrieve a Document image.
public ActionResult ViewDocument(string id)
{
//Retrieve previous Transflo session obtained by calling Authenticate if (Session[SessionKey.TRANSFLO_SESSION_ID] ==null)
return Content("Error retrieving Transflo Session");
string sessionId = Session[SessionKey.TRANSFLO_SESSION_ID].ToString();
//Get web service proxy reference WebService.TransfloWSSoapClient service =
new WebService.TransfloWSSoapClient();
//Invoke GetRepositoryDocumentsBytes from the web service
var documentImages = service.GetRepositoryDocumentsBytes(sessionId, new string[] { id});
if (documentImages == null || documentImages.Length != 1) return Content("Error retrieving image from repository");
byte[] imageBytes = documentImages[0].Bytes;
//Show retrieved image
return View("ViewDocument", imageBytes);
}
-
In an HTML <img> tag, display the document image by calling the GetBase64EncodedImage() method.
//GetBase64EncodedImage() method
public static string GetBase64EncodedImage(byte[] imageBytes)
{
if (imageBytes == null || imageBytes.Length == 0) return string.Empty;
return string.Format(@"data:image/jpg;base64,{0}", Convert.ToBase64String(imageBytes));
}
//cshtml img tag call to GetBase64EncodedImage() method
<img src="@TransfloAPI.Controllers.APITestController.
GetBase64EncodedImage(Model)"alt='Documentimage' />