Ancillary Sources for DocClass and Batch Fields
An ancillary source in Transflo DMS is an alternative means of populating the value of a DocClass or batch field. An ancillary source replaces the current value in a field with a new one it generates. The type of value is determined by which type of ancillary source is selected and how it is configured.
Seven types of DMS Gateway ancillary sources are available:
-
Time Stamp
-
Static Pick List
-
SQL Pick List
-
String Generator
-
External Text File
-
Field Copier/Splitter
-
Bar Code Source
Because ancillary sources can be assigned to both DocClass fields and batch fields, it is possible to map a batch field with an ancillary source to a DocClass field with its own ancillary source. To prevent conflicts in this situation, ancillary sources are applied in the following hierarchical order:
-
The batch field in the current queue.
-
That same batch field in the next queue.
-
The DocClass field to which the current queue batch field is mapped.
Multiple ancillary sources can be assigned to a single batch field or a single DocClass field. Each ancillary source has a priority property that is used to determine the order that each ancillary source is applied for a given batch field or DocClass field. By default the priority property starts at 0 for the first ancillary source that you create for a given field.
For each additional ancillary source you create for the field, the priority is incremented in the order that you add the ancillary sources. You can change this order by editing the priority property on the ancillary sources for the field.
The process by which ancillary sources are applied depends upon whether a field has an empty value and whether the ancillary source overwrite setting is enabled.
Tip: If an ancillary source is created for a batch field that also has a field mask constraint, the ancillary source value entered must match the defined mask.
Ancillary sources are applied according to one of two scenarios, depending upon whether the value of the batch field in the current queue is empty or non-empty.
Scenario 1: The batch field in the current queue has an empty value.
-
The value of the batch field ancillary source is applied. The ancillary source value might also be empty.
-
If the ancillary source of the batch field in next queue has an overwrite setting of true or the field value is still empty, the value of that batch field ancillary source is applied.
-
If the ancillary source of the DocClass field has an overwrite setting of true or the field value is still empty, the DocClass field ancillary source value is applied.
Scenario 2: The batch field in the current queue has a non-empty value.
-
If the batch field ancillary source has a non-empty value and an overwrite setting of true, its value is applied.
-
If the ancillary source of the batch field in next queue has a non-empty value and an overwrite setting of True the value of that batch field ancillary source is applied.
-
If the ancillary source of the DocClass field has a non-empty value and an overwrite setting of true the DocClass field ancillary source value is applied.
The Time Stamp ancillary source is used to add a time stamp to a DocClass Field or a batch field.
Creating a Time Stamp ancillary source
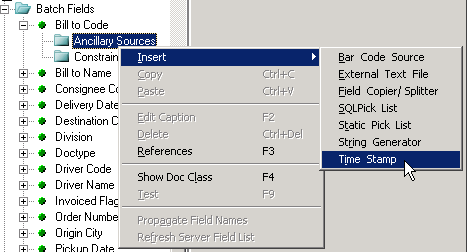
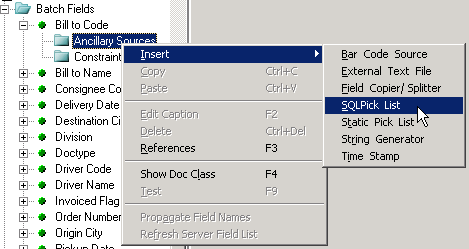
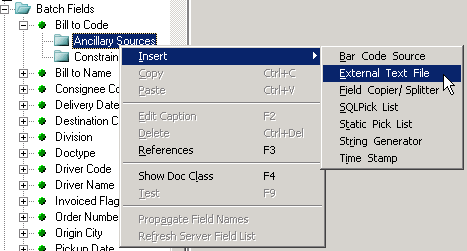
To add a time stamp to a Field, right-click the Ancillary Sources node under the Field’s name in the tree pane.
On the shortcut menu, point to Insert, and then click Time Stamp.
Configuring a Time Stamp ancillary source
The Time Stamp ancillary source has only one configurable setting, which is the option to have the time stamp overwrite the existing value of the Field, if a value is present.
Select True or False from the Overwrite list.

If the Overwrite setting is True, then the Time Stamp ancillary source will overwrite any existing data in the mapped Field; if the Overwrite setting is False, then the Field’s original value will remain untouched.
The default Overwrite setting is False.
To control when the Time Stamp Ancilliary source fires, select a Trigger Mode from the Trigger Mode list.
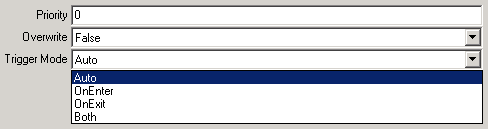
The available Trigger Mode settings are:
| Setting | Description |
|---|---|
| Auto |
If the Ancillary Queue is the first Queue, the ancillary source rule only fires when the Documents exit the Queue. Otherwise, the rule only fires when the Documents enter the Queue. The default Trigger mode is Auto. |
| On Enter |
The ancillary source rule only fires when the Documents enter the Queue. |
| On Exit |
The ancillary source rule only fires when the Documents exit the Queue. |
| Both |
The ancillary source rule fires when the Documents enter the Queue and fires again when the Documents exit the Queue. |
The Static Pick List ancillary source is used to map keys to strings that you define, search for those keys in a specified data source, and then write the matching key’s equivalent string value to the batch field or DocClass Field to which the ancillary source is mapped.
A Key Field, which is actually a DocClass Field, must be defined for the Static Pick List ancillary source.
The Static Pick List ancillary source uses the defined Key Field as its data source.
However, since the Key Field is a DocClass Field, the Key Field’s value actually comes from whichever batch field is mapped to that Key Field.
The result is that the Static Pick List ancillary source reads the value of a batch field, looking for keys matching ones that you have defined for the ancillary source.
If a match is found, then the value that you defined for that key is written as the value of the batch field or DocClass Field to which the ancillary source is mapped.
Creating a Static Pick List ancillary source
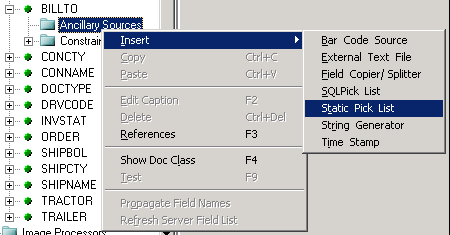
To add a Static Pick List ancillary source to a DocClass Field or a batch field, right-click the Ancillary Sources node under the Field’s name in the tree pane.
On the shortcut menu, point to Insert, and then click Static Pick List.
Configuring a Static Pick List ancillary source
Now that you have created the Static Pick List ancillary source, you can configure its settings via the text boxes on the right side of the window.
These settings are Overwrite, Automate, Separator, Key Field, and Strings.
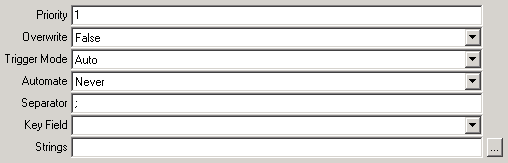
To configure the Static Pick List ancillary source:
1. Click the Overwrite arrow, and then click either True or False in the Overwrite list.

If the Overwrite setting is True, then the Static Pick List ancillary source will overwrite any existing data in the mapped Field; if the Overwrite setting is False, then the original value will remain untouched.
The default Overwrite setting is False.
2. To control when the Static Pick List Ancillary source fires, select a Trigger Mode from the Trigger Mode list.

The available Trigger Mode settings are:
| Setting | Description |
|---|---|
| Auto |
If the Ancillary Queue is the first Queue, the ancillary source rule only fires when the Documents exit the Queue. Otherwise, the rule only fires when the Documents enter the Queue. The default Trigger mode is Auto. |
| On Enter |
The ancillary source rule only fires when the Documents enter the Queue. |
| On Exit |
The ancillary source rule only fires when the Documents exit the Queue. |
| Both |
The ancillary source rule fires when the Documents enter the Queue and fires again when the Documents exit the Queue. |
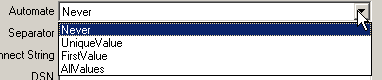
3. The Automate function enables Gateway to decide how to process a list of choices that are returned by the Static Pick List ancillary source.
The available Automate settings are:
| Setting | Description |
|---|---|
| Never |
No choice is selected (the ancillary source returns an empty string). This is not a useful choice in Gateway at present, as it is designed to work with third-party applications. |
| Unique Value |
If there is only one choice in the list, it is used. If there is more than one choice, then no choice is selected (the ancillary source returns an empty string). |
| First Value |
The first choice in the returned list is automatically used. |
| All Values |
If there is more than one choice in the list, then all choices are concatenated together using the Separator value specified for the ancillary source. |
Click the Automate arrow to expand the Automate list, and then click the desired setting.

4. In the Separator box, type the character that should be recognized as the separator in the Batch file.
The default separator is a semicolon (;).
5. Select which Key Field should be used.
Click the Key Field arrow to expand the Key Field list, and then click the name of the needed Field.
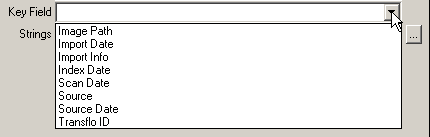
The Fields displayed in the Key Field list are the DocClass Fields that have been created for the current Document Class.
If the needed Field is not in the list, then you must first create the DocClass Field.
See “Adding Custom DocClass Fields”on page 42 for more information.
Note: If you are mapping the Static Pick List ancillary source to a DocClass Field, then that DocClass Field cannot be selected as the Key Field.
Likewise, if you are mapping the Static Pick List ancillary source to a batch field, then the Key Field selected should not be the same as the DocClass Field to which the batch field is mapped.
6. Define the key and string pairs to be used by the ancillary source.
Click the  Browse button to the right of the Strings box to open the Edit Strings dialog box.
Click the first table cell in the Strings column to select it, and then type the first string you wish to enter.
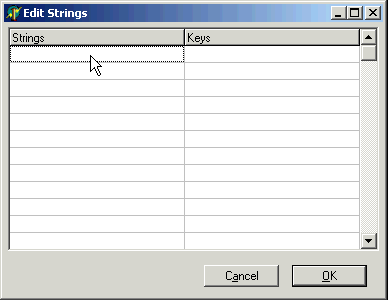
Next, click the first table cell in the Keys column and type the corresponding key for the string that you entered.
Gateway will search for this key in the Key Field you selected.
Continue adding string and key pairs as needed.
Note: As an alternative to clicking each new table cell to select it, you can instead press the [Tab] key to move from one cell to the next.
When you have finished entering strings and keys, click OK.
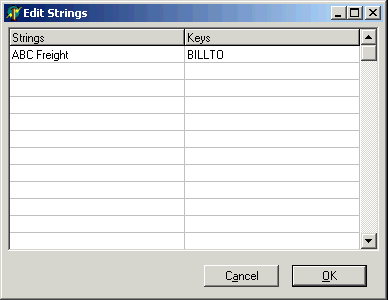
The Edit Strings dialog box closes, and the Strings box now contains the string and key pairs that you entered.

The pairs are displayed in shaded text, in the following format: “key1=string1”,“key2=string2”...
The shaded text indicates that you cannot edit the pairs directly in the Strings box; to edit the pairs, you must first re-open the Edit Strings dialog box.
SQL Pick List Ancillary Source
The SQL Pick List ancillary source is used to execute a SQL statement and write the result as the Field’s value.
Creating a SQL Pick List ancillary source
To add a SQL Pick List ancillary source to a DocClass Field or a batch field, right-click the Ancillary Sources node under the Field’s name in the tree pane.
On the shortcut menu, point to Insert, and then click SQL Pick List.
Configuring a SQL Pick List ancillary source
Now that you have created the Static Pick List ancillary source, you can configure its settings via the text boxes on the right side of the window.
These settings are:
-
Overwrite
- Trigger Mode
-
Automate
- Separator
-
Connect String
- DSN
-
User ID
- Password
-
Connect Options
- SQL
-
Param Delimiters
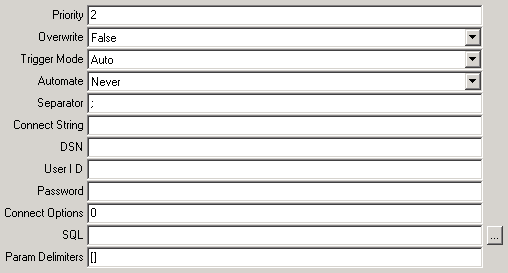
To configure the SQL Pick List ancillary source:
1. Click the Overwrite arrow, and then click either True or False in the Overwrite list
If the Overwrite setting is True, then the SQL Pick List ancillary source will overwrite any existing data in the Field; if the Overwrite setting is False, then the Field’s original value will remain untouched.
The default Overwrite setting is False.
2. To control when the SQL Pick List Ancillary source fires, select a Trigger Mode from the Trigger Mode list.

The available Trigger Mode settings are:
| Setting | Description |
|---|---|
| Auto |
If the Ancillary Queue is the first Queue, the ancillary source rule only fires when the Documents exit the Queue. Otherwise, the rule only fires when the Documents enter the Queue. The default Trigger mode is Auto. |
| On Enter |
The ancillary source rule only fires when the Documents enter the Queue. |
| On Exit |
The ancillary source rule only fires when the Documents exit the Queue. |
| Both |
The ancillary source rule fires when the Documents enter the Queue and fires again when the Documents exit the Queue. |
3. The Automate function enables Gateway to decide how to process a list of choices that are returned by the SQL Pick List.
The available Automate settings are:
| Setting | Description |
|---|---|
| Never |
No choice is selected (the ancillary source returns an empty string). This is not a useful choice in Gateway at present, as it is designed to work with third-party applications. |
| Unique Value |
If there is only one choice in the list, it is used. If there is more than one choice, then no choice is selected (the ancillary source returns an empty string). |
| First Value |
The first choice in the returned list is automatically used. |
| All Values |
If there is more than one choice in the list, then all choices are concatenated together using the Separator value specified for the ancillary source. |
Click the Automate arrow to expand the Automate list, and then click one of the four available options.
4. In the Separator box, type the character that should be recognized as the separator in the Batch file.
The default separator is a semicolon (;).
5. (Optional) If you wish, instead of entering the DSN, User ID, and Password information for your SQL connection separately, you can type the connection string for your SQL Server instance in the Connect String box.
If you do not enter a connection string, then the DSN, User ID, and Password boxes are required.
6. In the DSN box, type the ODBC data service name for your SQL Server instance.
7. In the User ID box, type the login name used to connect to your SQL Server instance.
8. In the Password box, type the password that corresponds to the login name you entered.
9. (Unused Setting) The Connect Options setting is not currently used in Gateway.
In the Connect Options box, accept the default value of 0.
10. (Optional) The default parameter delimiters used by the SQL Pick List ancillary source are square brackets -- [].
To use some other character pair for parameter delimiters, it is best that you make the change now before continuing.
To do this, replace the square brackets in the Param Delimiter box with your preferred delimiter pair.
Only valid SQL delimiters can be used.
Now that you have finished entering your SQL Server connection information, you can test your connection and begin writing the SQL query to be executed by the SQL Pick List ancillary source.
Click the Browse button to the right of the SQL box to open the Edit Host Query dialog box.

The Connect string, DSN, User ID, and Password boxes already contain the settings you entered for the SQL Pick List.
These are the settings used to connect to your SQL Server instance.
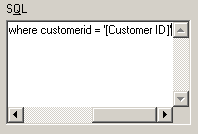
Click in the SQL box and begin typing your SQL query.
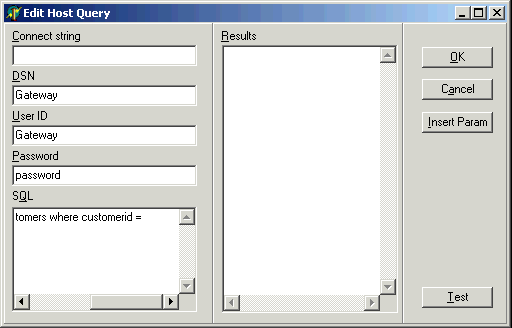
If you need to include the name of a DocClass Field in your query, then rather than typing the Field’s name, you can insert it by selecting it from a list.
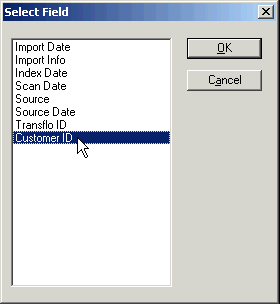
To do this, click the Insert Param button to open the Select Field dialog box, click the name of the desired DocClass Field, and then click OK.
The dialog box closes, and the DocClass Field name is added to the SQL box.
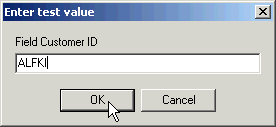
When you have finished writing your SQL query, click the Test button to execute the query.
If you included a DocClass Field as a query parameter, Gateway will prompt you for a string to use to test the query, since no data will be available from the DocClass Field until runtime.
Type this string in the Enter test value dialog box.
Your query results are displayed in the Results box.
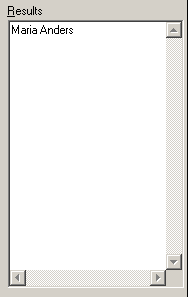
You can modify and re-test your query as many times as necessary.
When you are satisfied with your query, click OK to close the Edit Host Query dialog box.
Your SQL query now appears in the SQL box.
The text is shaded, indicating that you cannot directly edit your query in the box.

To make changes to the SQL query, you must first re-open the Edit Host Query dialog box.
Note: You cannot use a Pick List Field in an insert statement for a Gateway Field SQL Pick List.
In order to extract DOCTYPE (or other pieces of information) from barcode values like these: 1234567BOL and 234567INV the following technique can be used.
Pegasus TransTech created the following SQL Server stored procedure that parses an expression and extracts a substring that matches a certain pattern.
This stored procedure can be invoked from Gateway by using a "SQLPick List" ancillary source.
The following are the steps to do this:
1. Add the following 2 stored procedures.
The second one is just a wrapper around the first one, to make it easy to use in Gateway.
The first stored procedure is generic. It receives as a parameter an expression (e.g. 1234567BOL) from which a piece of information needs to be extracted (e.g. BOL), the pattern to look for and the length of the substring to extract.
It returns null if no matching substring is found, or the matching substring.
The second stored procedure is just a wrapper around the first one to extract three consecutive uppercase letters:
The following will parse a barcode value and return the last 3 characters that match the pattern of uppercase values A through Z for each one of the 3 characters.
Both of the following will return BOL as a result:
exec usp_parse_regex '1234567BOL', '%[A-Z][A-Z][A-Z]', 3 exec usp_parse_regex '234567BOL', '%[A-Z][A-Z][A-Z]', 3
The following will parse a barcode value and return the first 6 characters that match the pattern of numbers only ranging from 0 to 9 for each one of the 6 characters.
This one will find a match of 123456:
exec usp_parse_regex '1234567BOL', '%[0-9][0-9][0-9][0-9][0-9][0-9]%',6
This one will not find a match of because we are asking for 6 characters and there are only 5 that match this pattern:
exec usp_parse_regex '34567BOL', '%[0-9][0-9][0-9][0-9][0-9][0-9]%', 6
To install the stored procedures, copy the following into an SQL Query window using SQL Server Management Studio:
USE TRANSFLO® GO
create procedure usp_parse_regex(
-- Add the parameters for the stored procedure here @Expression varchar(255),
@Pattern varchar(100), @Length int
) AS
BEGIN
declare @PatternPosition bigint
set @PatternPosition = PATINDEX(@pattern, @Expression) if @PatternPosition is null or @PatternPosition = 0
select '' else
select SUBSTRING(@Expression, @PatternPosition, @Length)
END GO
--usp_parse_doctype '1234567BOL'
create procedure usp_parse_doctype(
-- Add the parameters for the stored procedure here @Expression varchar(255)
) AS
BEGIN
exec usp_parse_regex @Expression, '%[A-Z][A-Z][A-Z]', 3
END GO
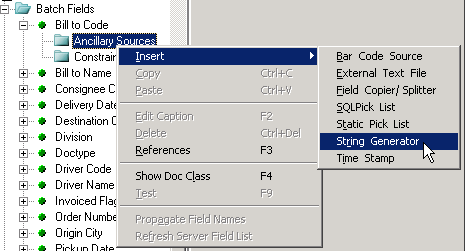
2. Add a SQL Pick List ancillary source to a Field (DOCTYPE in this case) in Gateway, as shown in the screen print below:
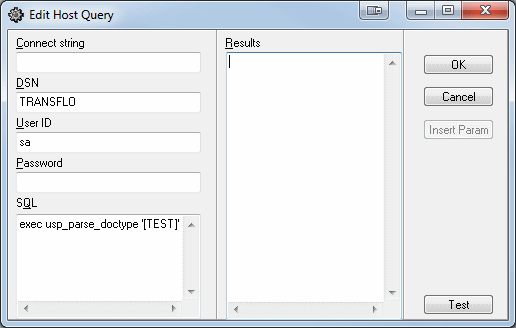
Please note the single quotes around the field [TEST] in the SQL query above.
It will parse the content of the field TEST, which could be the result of a barcode read on the previous queue and try to extract a substring that matches the pattern: '%[A-Z][A-Z][A-Z]'
For more on search pattern syntax see:
http://msdn.microsoft.com/en-us/library/ms187489(v=sql.105).aspx
String Generator Ancillary Source
The String Generator ancillary source is used to create a string value out of system information, DocClass Field values, and literal text.
Creating a String Generator ancillary source
To add a String Generator ancillary source to a DocClass Field or a batch field, right-click the Ancillary Sources node under the Field’s name in the tree pane.
On the shortcut menu, point to Insert, and then click String Generator.
Configuring a String Generator ancillary source
Now that you have created the String Generator ancillary source, you can configure its settings via the text boxes on the right side of the window.
These settings are Overwrite and Mask.

To configure the String Generator ancillary source:
1. Click the Overwrite arrow, and then click either True or False in the Overwrite list.

If the Overwrite setting is True, then the String Generator ancillary source will overwrite any existing data in the Field; if the Overwrite setting is False, then the Field’s original value will remain untouched.
The default Overwrite setting is False.
2. To control when the String Generator Ancillary source fires, select a Trigger Mode from the Trigger Mode list.

The available Trigger Mode settings are.
| Setting | Description |
|---|---|
| Auto |
If the Ancillary Queue is the first Queue, the ancillary source rule only fires when the Documents exit the Queue. Otherwise, the rule only fires when the Documents enter the Queue. The default Trigger mode is Auto. |
| On Enter |
The ancillary source rule only fires when the Documents enter the Queue. |
| On Exit |
The ancillary source rule only fires when the Documents exit the Queue. |
| Both |
The ancillary source rule fires when the Documents enter the Queue and fires again when the Documents exit the Queue. |
3. The String Generator produces a value based on a string mask that you create.
To begin creating this mask, click the Browse button to the right of the Mask box to open the String Generator Mask dialog box.
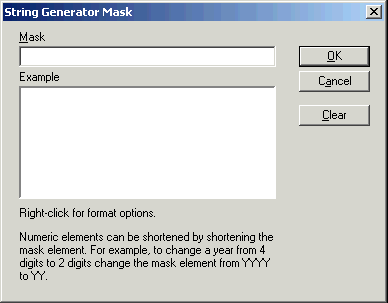
There are ten types of data that the String Generator can mask:
- Literal Text
- Field Value
- Year
- Month
- Day
- Hour
- Minute
- Second
- Millisecond
- Serial Number
4. These masks are inserted by selecting them from a menu.
To open this menu, right-click the String Generator Mask dialog box anywhere but on its title bar.
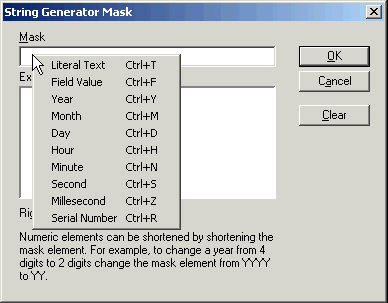
On the menu, click the data type of the mask you wish to add.
5. The majority of the available masks represent system-generated data types.
These data types are Year (YYYY), Month (MM), Day (DD), Hour (HH), Minute (NN), Second (SS), Millisecond (ZZZ), and Serial Number (###).
To select any of these data types, click its name on the menu.
The mask is instantly added to the Mask box in the String Generator Mask dialog box, while an example of that mask is displayed in the Example box.
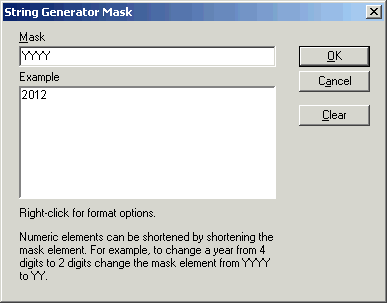
Note: To shorten the Year mask from four digits to two after adding it to the Mask box, delete the first two Y characters in the mask.
Note: The Serial Number mask is only three digits long, displayed as three number signs (###).
If you require more digits, add more Serial Number masks in succession, and then delete any extra number signs.
For example, to create a mask for a five-digit serial number, add two Serial Number masks, and then delete one of the number signs in the string.
6. To add a mask for a DocClass Field, click Field Value in the list to open the Select Field dialog box.
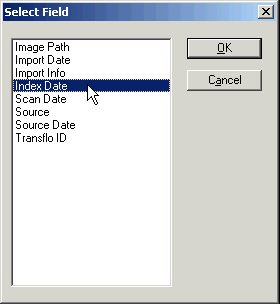
Click the name of the DocClass Field you wish to add, and then click OK.
If the needed Field is not in the list, then you must first create the DocClass Field.
See “Adding Custom DocClass Fields” on page 42
Note: If you are adding this ancillary source to a DocClass Field, the DocClass Field will not be listed in the Select Field dialog box.
Likewise, if you are adding this ancillary source to a batch field, the DocClass Field to which the batch field is mapped will not be listed.
7. To add literal text, click Literal Text in the list to open the Enter literal element dialog box.
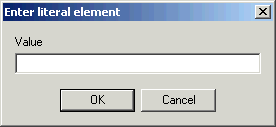
Type the desired text in the Value box, and then click OK.
Alternately, you can type literal text directly into the Mask box in the String Generator Mask dialog box.
This is helpful if, for example, you wish to insert slash characters into a date mask, changing MMDDYYYY into MM/DD/YYYY.
When you enter literal text via either method, the letters D, H, M, N, S, Y, and Z will automatically be prepended with a backslash, e.g., \M.
This is to distinguish these characters as literal text and not masks.
Note: If you add and then delete literal text, take care that you do not leave behind two backslashes in a row (\\).
Doing this will cause a number to appear in the text when it is viewed outside of the String Generator Mask dialog box.
8. When you have finished creating your string mask, click OK to close the String Generator Mask dialog box.
Your string mask now appears in the Mask box.
The text is shaded, indicating that you cannot directly edit your mask in the box.

To make changes to the mask, you must first re-open the String Generator Mask dialog box.
External Text File Ancillary Source
The External Text File ancillary source is used to insert the contents of a plain text file as a Field value.
There is no limit imposed on the number of characters that can be in the file.
Creating an External Text File ancillary source
To add an External Text File ancillary source to a DocClass Field or a batch field, right-click the Ancillary Sources node under the Field’s name in the tree pane.
On the shortcut menu, point to Insert, and then click External Text File.
Configuring an External Text File ancillary source
Now that you have created the External Text File ancillary source, you can configure its settings via the text boxes on the right side of the window.
These settings are Overwrite and Path.

To configure the External Text File ancillary source:
1. Click the Overwrite arrow, and then click either True or False in the Overwrite list.

If the Overwrite setting is True, then the External Text File ancillary source will overwrite any existing data in the Field; if the Overwrite setting is False, then the Field’s original value will remain untouched.
The default Overwrite setting is False.
2. To control when the External Text File Ancillary source fires, select a Trigger Mode from the Trigger Mode list.

The available Trigger Mode settings are:
| Setting | Description |
|---|---|
| Auto |
If the Ancillary Queue is the first Queue, the ancillary source rule only fires when the Documents exit the Queue. Otherwise, the rule only fires when the Documents enter the Queue. The default Trigger mode is Auto. |
| On Enter |
The ancillary source rule only fires when the Documents enter the Queue. |
| On Exit |
The ancillary source rule only fires when the Documents exit the Queue. |
| Both |
The ancillary source rule fires when the Documents enter the Queue and fires again when the Documents exit the Queue. |
3. The external text file that is the source for the Field’s value must be present either on the local computer or on your network.
To select this file, click the Browse button to the right of the Path box.
In the Open dialog box, browse to the text file’s location, click the file name to select it, and then click Open.
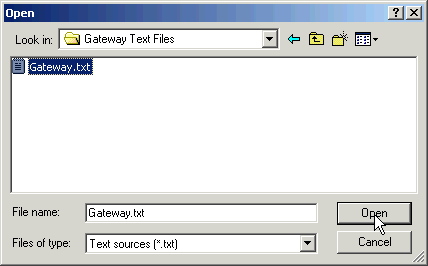
The file path now appears in the Path box, and the External Text File ancillary source is properly configured.

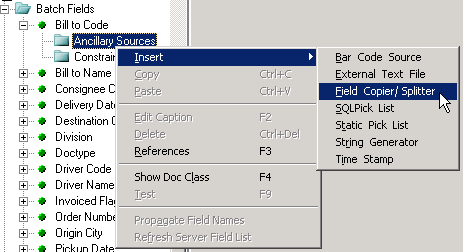
The Field Copier/Splitter ancillary source is used to copy a portion of another Field and write it as the value of the current Field.
Creating a Field Copier/Splitter ancillary source
To add a Field Copier/Splitter ancillary source to a batch field, right-click the Ancillary Sources node under the Field’s name in the tree pane.
On the shortcut menu, point to Insert, and then click Field copier/splitter.
Configuring Creating a Field Copier/Splitter Ancillary Source
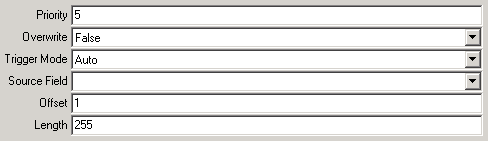
Now that you have created the Field Copier/Splitter ancillary source, you can configure its settings via the text boxes on the right side of the window.
These settings are Overwrite, Automate, Separator, Source Field, Offset, and Length.
To configure the Field Copier/Splitter ancillary source:
1. Click the Overwrite arrow, and then click either True or False in the Overwrite list.

If the Overwrite setting is True, then the Field Copier/Splitter ancillary source will overwrite any existing data in the Field; if the Overwrite setting is False, then the Field’s original value will remain untouched.
The default Overwrite setting is False.
2. To control when the Field Copier/Splitter Ancillary source fires, select a Trigger Mode from the Trigger Mode list.

The available Trigger Mode settings are:
| Setting | Description |
|---|---|
| Auto |
If the Ancillary Queue is the first Queue, the ancillary source rule only fires when the Documents exit the Queue. Otherwise, the rule only fires when the Documents enter the Queue. The default Trigger mode is Auto. |
| On Enter |
The ancillary source rule only fires when the Documents enter the Queue. |
| On Exit |
The ancillary source rule only fires when the Documents exit the Queue. |
| Both |
The ancillary source rule fires when the Documents enter the Queue and fires again when the Documents exit the Queue. |
3. In the Separator box, type the character that should be recognized as the separator in the Batch file.
The default separator is a semicolon (;).
4. The Source Field is the DocClass Field whose value will be read by the Field Copier/Splitter ancillary source.
That value, in turn, comes from the batch field that is mapped to the DocClass Field.
To select a Source Field, click the Source Field arrow to expand the Source Field list, and then click the name of the needed Field.
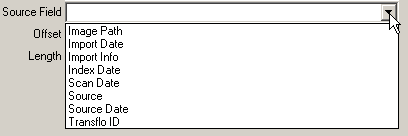
The Fields displayed in the Source Field list are the DocClass Fields that have been created for the current Document Class.
If the needed Field is not in the list, then you must first create the DocClass Field.
See “Adding Custom DocClassFields” on page 42 for more information.
Note: If you are mapping the Static Pick List ancillary source to a DocClass Field, then that DocClass Field cannot be selected as the Key Field.
Likewise, if you are mapping the Static Pick List ancillary source to a batch field, then the Key Field selected should not be the same as the DocClass Field to which the batch field is mapped.
5. (Optional) In the Offset box, type the character number where Gateway should begin copying the value in the Source Field.
For example, if you want to copy the value beginning with the fifth character, type “5” in the Offset box.
In the string ABCDEFGHIJKL, Gateway would begin copying the value at the letter E, the fifth character.
The default offset is 1, meaning that Gateway will begin copying at the first character.
6. (Optional) In the Length box, type the number of characters that Gateway should copy from the value in the Source Field.
For example, if you want to copy four characters from the value, type “4” in the Length box.
Continuing with the example from above, in the string ABCDEFGHIJKL, where Gateway began copying at the letter E, it would copy the value through the letter H, since H is the fourth character copied.
The copied value would be “EFGH”.
This value would then be “split” off from the Source Field and written as the value of the Field to which the Field Copier/Splitter ancillary source was added.
The default length is 255, meaning that Gateway will copy 255 characters, starting with the character entered in the Offset box.
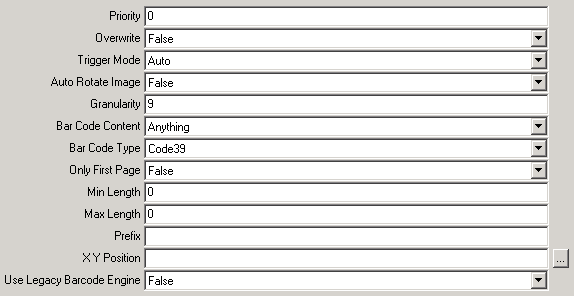
Use a bar code ancillary source to locate a bar code in the image of your form, read it, and write its value to a field. To create and configure a bar code source, follow these steps:
-
To add a bar code ancillary source to a DocClass field or a batch field, right-click the Ancillary Sources node under the field name in the tree pane and choose Insert, Bar Code Source.

-
Configure its settings in the text fields on the right side of the window.
-
In the Overwrite drop-down field, select True or False. If the Overwrite setting is True, the BarCodeSource ancillary source overwrites any existing data in the Field; if the Overwrite setting is False, the original value remains in the field.
Default: False
-
To control when the Bar Code Source Ancillary source fires, select one of the following Trigger Modes from the Trigger Mode list.

-
Auto: If the Ancillary Queue is the first Queue, the ancillary source rule only fires when the Documents exit the Queue. Otherwise, the rule only fires when the Documents enter the Queue. The default Trigger mode is Auto.
-
OnEnter: The ancillary source rule only fires when the Documents enter the Queue.
-
On Exit: The ancillary source rule only fires when the Documents exit the Queue.
-
Both: The ancillary source rule fires when the Documents enter the Queue and fires again when the Documents exit the Queue.
-
-
If your original form is printed in landscape format (that is, the form is printed sideways), but was scanned in portrait format, the BarCodeSource ancillary source can rotate the form’s image back to landscape format so that the form is at the proper angle to have its bar code read. To enable this option, click the Auto Rotate Image arrow, and then click True in the Auto Rotate Image list. The default Auto Rotate Image value is False, meaning that the image is not rotated.
-
(Optional) The BarCodeSource ancillary source allows you to specify the granularity setting for reading bar codes. Granularity refers to the number of horizontal scan lines in the image that are checked for the presence of a bar code. For example, a value of 10 means that every tenth line of the image is processed. A lower value forces the bar code detection function to conduct a more thorough, although slower, search. The default Granularity setting is 9. This is the recommended setting, but if you wish to change it, delete the default value from the Granularity box and type the new value.
-
Select a value from the Bar Code Content drop down.

-
To read any barcode value, select Anything.
-
To only read alphabetic letters, numbers and spaces, select LettersNumbersAndSpaces
-
to only read alphabetic letters and numbers, select LettersAndNumbers;
-
to only read alphabetic characters, select Letters;
-
to only read numbers, select Numbers.
-
-
Click the Bar Code Type arrow, and then in the Bar Code Type list, click the name of the bar code standard used on your forms. The default bar code type is CODE 39.
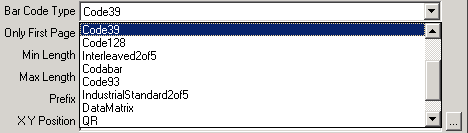
The available bar code types are:
-
Aztec
-
Codabar
-
Code39
-
Code93
-
Code128
-
DataMatrix
-
EAN 8
-
EAN 13
-
IndustrialStandard2of5
-
Interleaved2of5
-
PDF417
-
QR
-
UPCA
-
UPCE
-
-
If your batch has multiple pages, specify whether the bar code should be read from only the first page or from all pages. Click the Only First Page arrow, and then in the Only First Page list, click the proper setting.
-
If the bar code should be read from only the first page, click True.
-
If the bar code should be read from all pages, click False. The default setting is False.
-
-
(Optional) In the Min Length box, type the minimum length of bar code that should be read. A bar code will not be read if it is too short. The default minimum length is 0, meaning that this setting is turned off and any length will be accepted.
-
(Optional) In the Max Length box, type the maximum length of bar code that should be read. A bar code will not be read if it is too long. The default maximum length is 0, meaning that the setting is turned off and any length will be accepted.
-
(Optional) In the Prefix box, type the alphanumeric prefix that should appear at the beginning of all qualified bar codes. Only bar codes with a matching prefix will be read.
-
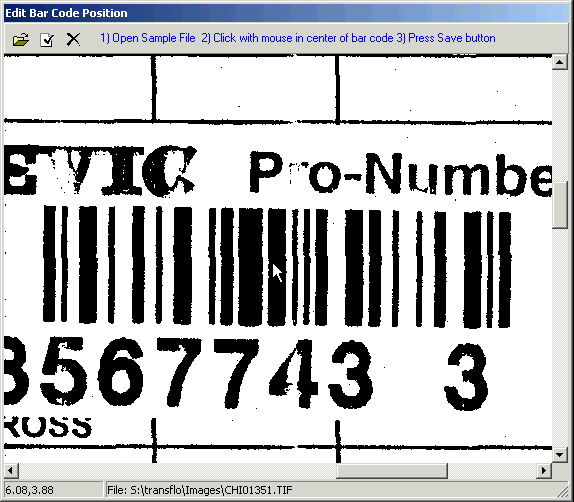
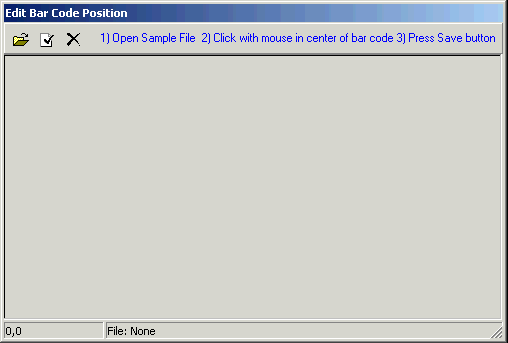
To configure the bar code ancillary source to read the bar code from your pages, specify the coordinates where the bar code is located on the page. Click the Browse... button to the right of the XY Position field to open the Edit Bar Code Position window.
-
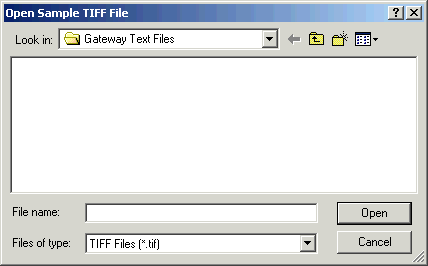
Click the Open Sample TIFF File button
 at the top-left corner.
 -
In the Open Sample TIFF File dialog box, browse to a sample TIF image of the type of form to be read. Click the sample file to select it, and then click Open.
-
Locate the bar code on the page that appears in the Edit Bar Code Position window. You may need to scroll horizontally and vertically in order to locate it. You can also enlarge the viewing area by clicking the bottom-right corner of the dialog box and dragging it to re-size the dialog box.
-
Place the mouse pointer over the center of the bar code, and then click once with the left mouse button. The mouse pointer coordinates are now stored in memory.

-
If you are not satisfied that you clicked at the center of the bar code, or you accidentally click again elsewhere, you can re-click the center of the barcode. Only the final click is stored.
-
To designate these coordinates as the bar code location, click the Save Selected Position button
 . The coordinates now appear in the X Y Position box.
-
-
Select whether you want to use the legacy or existing barcode engine with Use Legacy Barcode Engine drop down.
-
If you select False the existing barcode engine is used to read barcodes. This setting works best for newer barcode types such as the 2D barcode types.
The default is False.
-
If you select True the legacy barcode engine is used to read barcodes. This setting is best for older 1D barcode types.
-