Install the Transflo Import Server Application
TRANSFLO® Import is a server application that imports images and their associated index data into an image repository. The DMS Import application provides the option to merge multiple images containing identical index values before importing to the image repository. As an administrator, you can configure DMS Import to interface with image repositories from Gauss Enterprise, Docubase Systems (no longer supported), or FileNet Corporation.
-
Processor: 2 x 2.5 GHz with Dual Core
-
RAM: 3 GB
-
Disk Space: 500 GB
-
Screen Resolution: 1024 x 768
-
Processor: 2 x 3.0 GHz with Dual Core
-
RAM: 4 GB
-
Disk Space: 750 GB
-
Screen Resolution: 1024 x 768
-
Microsoft Windows® Server 2016, 2019, or newer (x86 and x64)
The following is a list of required third-party software:
-
OpenText Gauss
-
Docubase (no longer supported)
Note: The hardware requirements are based on a single system with no more than 10,000 images per day. Please contact Pegasus TransTech Professional Services for requirements for systems processing a higher volume.
To install TRANSFLO® Import perform the following:
-
Run TRANSFLO Import Setup.exe from your installation CD.
-
The Setup - TRANSFLO® Import Welcome window opens. Click Next.
-
The Select Destination Location window opens. Browse to the folder where you would like Import to be installed. Click Next.
-
The Ready to Install window opens. Click Next.
-
Setup begins installing Import on your computer.
-
Setup has finished installing Import on your computer. Click Finish.
In order for TRANSFLO® client applications to communicate with TRANSFLO® Server, the TRANSFLO® Client Configuration application must be properly configured. If you are experiencing connection problems with TRANSFLO® Server, you should verify the settings via this application.
To access the TRANSFLO® Client Configuration application and verify its settings:
-
Click the Windows Start button, point to Programs, point to TRANSFLO, and click Client Configuration.
-
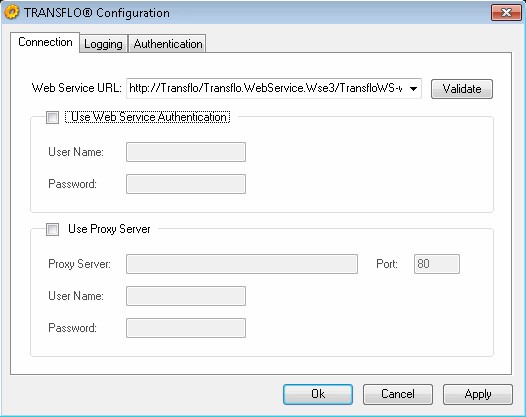
The TRANSFLO Client Configuration window appears.

To configure or verify settings:
-
In the Web Service URL box, type the address of the TRANSFLO® Web service being used for communications with TRANSFLO® Server.
The default address is shown in the above screen capture.
Click Validate to ensure that the connection is active.
-
If your TRANSFLO® Server installation requires authentication, select the Authenticated Access check box and type the appropriate user name and password in the boxes provided.
-
If the local computer connects to the Internet via a proxy server, select the Use Proxy Server check box and type the proxy server address, connection port number, user name, and password in the boxes provided.
-
When you have finished entering or verifying connection information, click Apply, and then click the Logging tab.
-
-
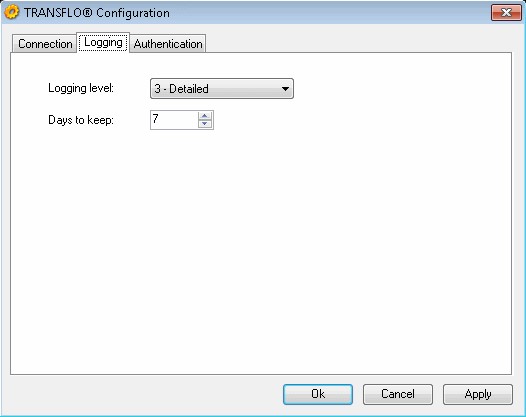
On the Logging tab of the TRANSFLO Client Configuration window, enter or verify the logging settings that should be used for TRANSFLO® applications.

To enter or verify logging settings:
-
Expand the Logging Level list and click the desired level of complexity for logged events.
-
In the Days to keep box, enter the number of days that events should remain in the log before being erased.
When you have finished configuring the logging settings for your TRANSFLO® client applications, click Apply to save your changes.
When you have finished entering your logging settings, click Apply, and then click the Authentication tab.
-
-
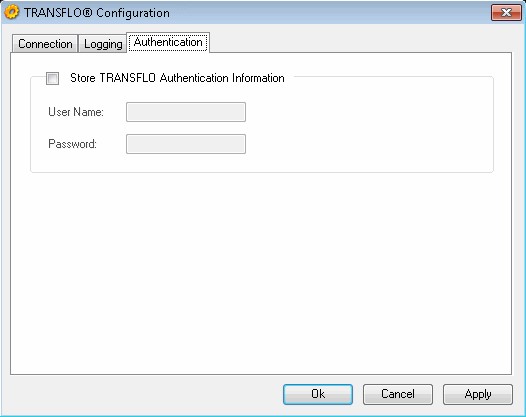
If you would like to use TRANSFLO® authentication, on the Authentication tab of the TRANSFLO Client Configuration window check the Store TRANSFLO Authentication Information check box and enter a User Name and Password in the corresponding boxes.

When you have finished configuring your TRANSFLO Client Configuration, click OK.
For trouble shooting purposes you can temporarily override the Log Level from the file system.
To override the log level:
-
Navigate to the TRANSFLO Client log folder.
This is typically is C:\ProgramFiles\Common Files\Pegasus TransTech\Transflo Client\Logs\Transflo.ClientConfig
-
Create a text file in the log folder and rename it to Log.Config.
-
Open the file with a text editor and add the following line to the file:
<ConfigLogLevel="[Level]" /> where,
[Level] is an integer between 0 and 4 indicating the log level.
The available log levels are:
-
- No Logging
-
- Errors Only
-
- Errors and Warnings
-
- Detailed
-
- Trace
Example: For the log level to be set to Trace the entry in the Log.Config file will be:
<ConfigLogLevel="4" />
-
Save and close the Log.Config file. The log level has changed.
-
To disable this feature and revert to the configured log level, rename the Log.Config file to Log.Config.Old.
You should back up your critical Import files on a regular basis. These files include initialization files and data files.
-
Back up the following files:
-
the import.ini file
-
If you are using a Gauss Enterprise image repository, back up the Document.INI and Spyview.INI files
-
Copy the Import, Failed, and Log folders to a safe location and rename them as copies (this preserves a copy of all the files inside these folders).
-
-
To make a backup of your Microsoft Windows registry settings for DMS Import, export the following registry subkey to a REG file:
HKEY_LOCAL_MACHINE\SOFTWARE\Pegasus TransTech\TRANSFLO\4.2\ Import
For instructions on accessing the Windows® registry and exporting settings, refer to your Windows® documentation.