Loads
This essential TRANSFLO® Mobile+ feature enables the following functionality:
-
Display loads and review detailed load information
-
View offered loads
-
Accept or decline loads
-
View and transition through load states
-
View pickup and delivery options
-
Define the retention period (in days) for loads and messages
When selected from the dial view, the Loads dial will open the app (if configured with App Link), the Loads page (screen), or an SDK such as MyPilot or Loves.
This feature has dynamic text that displays load information in a hierarchical formation on the mobile app:
-
If there are more than zero loads in transit, the text will indicate “You have ‘x’ loads in transit”.
-
If there are no loads in transit, the text will indicate “You have ‘x’ Accepted Loads”.
-
If there are no loads in transit and the status is Accepted, the text will indicate “You have ‘x’ New Available Loads”.
-
If there are no loads with a status of “In Transit”, “Accepted”, or “Available”, the text will indicate “Loads”.
Tip: Some KB articles contain just enough product information to get you started. Advanced details are hidden. Authorized administrators can log in to view both the public and private content. Transflo employees can request access here https://forms.office.com/r/dWg5RMr2fJ to get a Transflo MadCap ID. MadCap Software is our third-party CMS and cloud-hosting provider. Complete this internal web form to request access to the admin-only portion of any Transflo KB article.
This item type is used to allow users of the mobile application to manage load information.

To configure Loads:
-
Enter a name in the Item Title field.
-
Select a default icon.
Changing the default icon by providing an Icon URL or choosing an icon from the Icon Template list.
Select a display option from the Display drop-down list box. You can choose not to show anything or the total item count.
Choosing one of the options from the Filter Options drop-down list box to enable loads to be filtered by State or Status, or not filtered.
The Display drop-down list box enables the total item count to be shown or not shown, and the Filter Options drop-down list box enables loads to be filtered by State or Status, or not filtered.
The capability to show the state on the menu is primarily used to identify items as either read or not read, but it can also be used, for example, to identify only In-transit loads.
Load status is supplied through the integration layer which requires configuration between the customer back-end server and the TRANSFLO® back-end server.
Therefore, you can pass it a special status to use the standard generic behavior for loads.
To view the API associated with the Loads feature:
1. Open the Pegasus Transtech API Documentation web page at http://147.202.82.196/Integration/sdk/index.
2. In the drop-down list at the top of the page, select Transflo Mobile+ Integration API V2.
3. Scroll down to the API you want to view and click List Operations to view a list of methods.
4. Click the method (Delete, Get, Post, Put) to view parameters, response messages, and samples.
The following APIs are associated with loads:
• FullLoads
• FreeformLoad
• LoadMessages
• LoadsMetadata
• LoadState
• SimpleLoad
• LoadAssign
• LoadTender
• Stop
• Stops
The TRANSFLO® Express Server Administrator is used to set up the Loads functionality for the TRANSFLO® Mobile+ Menu Administration Tool as shown in the following illustrations.
-
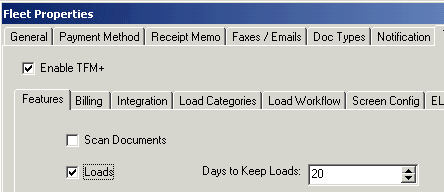
On the Features sub-tab of the Fleet Properties dialog box, select the Loads check box.
-
In Days to Keep Loads, enter or select the number of days to keep loads.
-
Loads and messages older than the Days to Keep Loads value are purged from the system.
On the Load Categories sub-tab of the Fleet Properties dialog box, you can the select the load options that you want to be enabled and configured for the Fleet Mobile+ app.
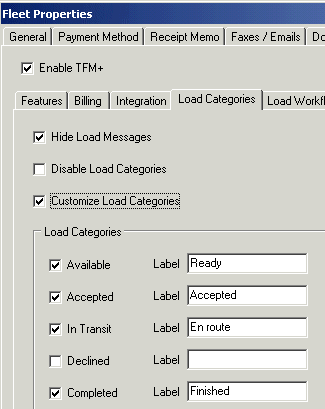
• To prevent the Messages button from being displayed at the top of the load viewer screen of the Mobile+ app, select the Hide Load Messages check box.
• To display loads in list form rather than in category form on the load viewer screen of the Mobile+ app, select the Disable Load Categories check box.
• To open and display the categories configured for this fleet, select the Customize Load Categories check box.
If the Load Categories check box is not selected, the four “standard” categories - Available, Accepted, In Transit, and Completed - are displayed by default in the mobile application.
The labels displayed in the mobile application can be configured for any category. (For example, the "Completed" category could be renamed as “Delivered”.)
When you have finished selecting load options, click OK to save this configuration.
After selecting the Enable TFM+ check box and clicking the Load Workflow sub-tab, the Enable Custom Load Steps for Recipient and Enable Custom Load Messages for Recipient options are displayed.
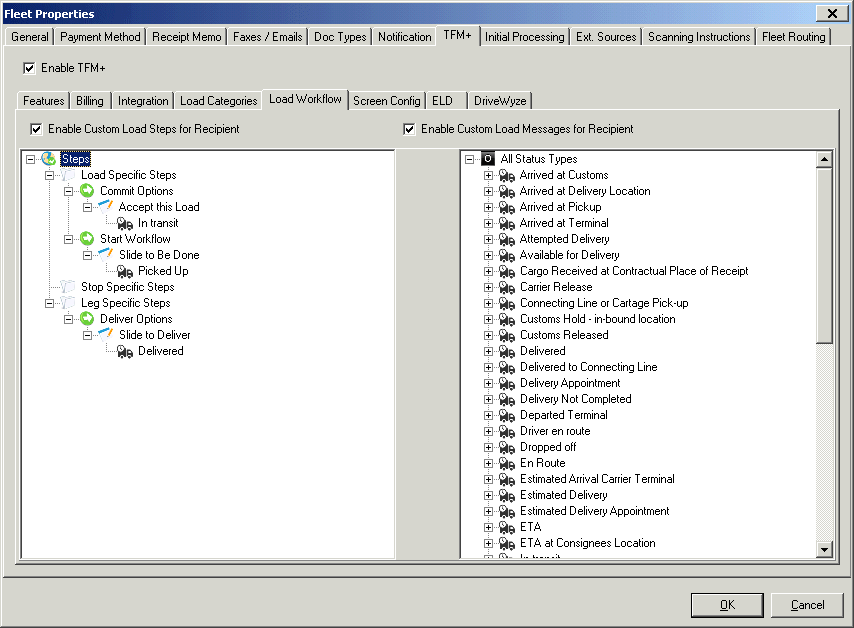
The Load Workflow sub-tab allows the following options (in addition to basic functionality) to be configured for the mobile application:
-
Enable Custom Load Steps for Recipient
-
Enable Custom Load Messages for Recipient
-
New Status Type
-
Modify Status Type
-
Delete Status Type
-
Add Fields to Status Type
From the Load Workflow sub-tab, to select the load workflow custom load steps and custom load messages that you want to be configured for the fleet mobile application, configure the following elements on the TRANSFLO® Server:
To enable custom load steps for a recipient, select the Enable Custom Load Steps for Recipient check box.
The Steps navigation interface opens and allows you to configure Load, Stop, and Leg Specific Steps.
Load steps are generally performed during a stop and can include tasks completed from a checklist (for example, safety checks, filling out forms, submitting documents, etc.).
Leg steps are associated with travel between stops (for example, if a truck stops twice to pick up additional loads before reaching a destination, the driver has made two stops and has accumulated three legs).
An example of the order of steps is:
1. Commit – when the load is accepted or declined
2. Start Workflow – when the load is picked up, in transit
3. Stop Specific Steps – arrive for pickup/drop-off at various locations where part of the load is dropped off or additional items are picked up
4. Depart from Pickup – leaving a pickup/drop point with the remainder of the load
5. Leg specific Steps – pick up additional freight, final delivery of freight (end of workflow)
To enable custom load messages for recipients, select the Enable Custom Load Messages for Recipient check box.
The Status Types navigation interface opens and allows you to configure custom load messages. Load status types are part of a load workflow. Every time the driver performs a load step on the mobile app, a load status type is sent to the server. Therefore, they are configured at the same time.
To create a new status type, right-click All Status Types and click New Status Type from the context menu.
The Status Message Properties dialog box opens and allows you to enter a status type Name and select a Type of either Standard or Web.
When you are finished configuring the new status type, click OK.
To modify an existing status type, right-click the type in the navigation tree, and click Modify from the context menu.
The Status Message Properties dialog box opens and allows you to modify the status type Name and select a Type of either Standard or Web.
When you are finished editing the status type, click OK.
To delete an existing status type, right-click the type in the navigation tree and click Delete from the context menu.
To add Fields to a Status Type:
1. Expand the Status Type node in the tree.
2. Right-click Field Definitions.
3. Select Add Field Definition from the context menu.
The Status Types Field Definition window opens and displays the following fields:
In the Name field, enter the name for this field.
In the Prompt field, enter the label for this field that will appear on the mobile application screen.
In the corresponding Max. length and Min. length drop downs, select or enter the minimum and maximum lengths of this field.
To pre-populate the Registration Field on the mobile application screen, select a field from the drop down.
To set a usage type for this field, select a value from the Usage Type drop down.
From the Data Type group box, select one of the available values: Alpha, Numeric, or All.
To format this field for special data entry, select a value from the Specify Intention drop down. The available values are: None, Date, Address, Yes/No, and Barcode.
If this field is required, select the Required check box.
Click OK, when you are finished adding this field.
The TRANSFLO® Mobile+ Menu Administration Tool shown in the following illustration is used to make the Loads option available on the TRANSFLO® Mobile+ app.

The Loads item type allows Mobile+ users to manage load information.
Configuration consists of:
 Providing a name in the Item Title field which will show both on the Users’ device and the menu label to the left.
 Selecting a display option from the Display drop-down list box. You can choose not to show anything or the total item count.
 Changing the default icon by providing an Icon URL or choosing an icon from the Icon Template list.
 Choosing one of the options from the Filter Options drop-down list box to enable loads to be filtered by State or Status, or not filtered. The capability to show the state on the menu is primarily used to identify items as either read or not read, but it can also be used, for example, to identify only In-transit loads.
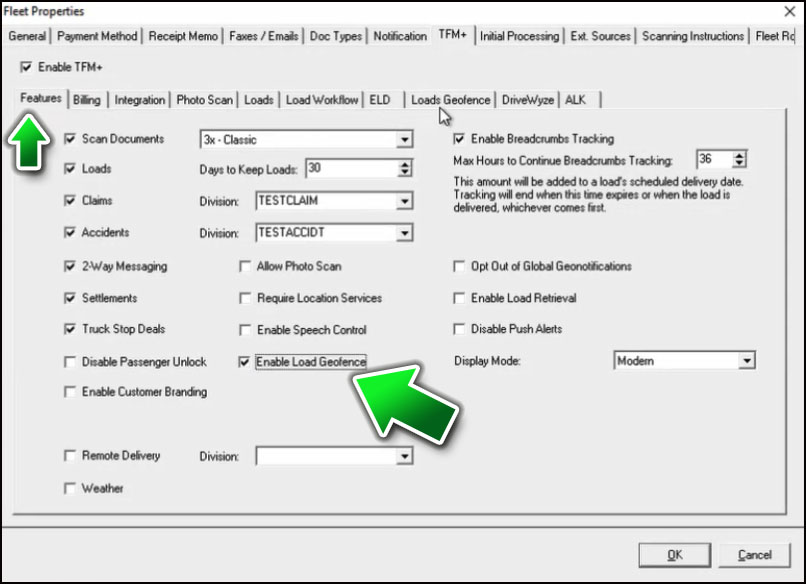
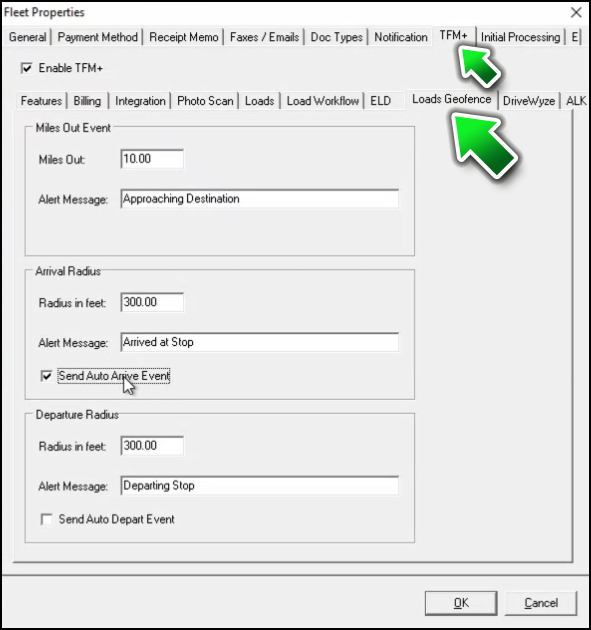
This Mobile+ feature triggers a notification when a driver has reached the edge of a Geofence (a pre-defined distance from a location). This feature also enables the communication of automated arrival and departure data with the TRANSFLO Mobile+ server. If configured, the status of a load can even be automatically advanced when certain geofence events are detected.
-
After selecting the Enable TFM+ check box and clicking the Load Geofence sub-tab, the geographic parameters and message options are displayed. The TRANSFLO® Express Server Administrator is used to enable the geofence capabilities.
-
On the Features sub-tab, select the Enable Load Geofence check box.

-
On the Loads Geofence sub-tab that now appears, configure the fields and options in the group boxes for Miles Out Event, Arrival Radius, and Departure Radius.
-
In the Miles Out field, specify the number of miles from the destination to send an alert message to the fleet mobile app. The message is generated in the mobile app for the driver.
Examples: 10.0 miles, 1.5 miles, 0.5 miles
-
In the Alert Message field, enter the message to be sent when the geofence defined by the Miles Out radius triggers the event.

-
In the Arrival Radius in feet field, specify a distance (in feet) from the destination to send an alert message to the fleet mobile application.
-
In the Arrival Alert Message field, enter the message to be sent when the Arrival Radius event is triggered.
-
To automatically move the load to the next configured load workflow step after the notification of the departure event is triggered, select the Send Auto Arrive Event check box.
-
In the Departure Radius in feet field, specify a distance (in feet) from the destination to send an alert message to the fleet mobile application.
-
In the Departure Alert Message field, enter the message to be sent when the Departure Radius event is triggered.
-
To automatically move the load to the next configured workflow step after the notification of the departure event is triggered, select the Send Auto Depart Event check box.
-
-
To save the configuration, click OK.
Tip: It is possible to override your default TFX Admin load geofence settings with API changes as seen in the following JSON text examples.
Example A: One specific stop that is part of a load
POST {{baseURL}}/integration/api/v1/loads
"IntegrationID": "Stop 1 breadcrumbs",
"GeofenceOverride": {
"radiusMilesOut": ".25",
"radiusArriveFeet": 300,
"radiusDepartFeet": 300,
"milesOutMessage": "You are now a quarter mile away from Stop 1",
"arriveMessage": "You are now 300 feet from arrival.",
"departMessage": "You are now 300 feet away and departing from your last stop.",
"sendAutoArriveEvent": true,
"sendAutoDepartEvent": true,
"milesOutEvent": true,
"arriveEvent": "ArriveGeofence",
"departEvent": "DepartGeofence"
}
Example B: Load with Multiple Stops
"Stops": [
{
"Id": -1,
"Address": {
"Company": "Dominos",
"City": "Lakeland",
"State": "Fl",
"Country": "USA",
"PostalCode": "33811",
"Line1": "5174 S County Line Rd",
"AddressLine2": "",
"AddressLine3": "",
"PhoneNumber": "",
"ContactName": "John",
"Latitude": 27.97222,
"Longitude": -82.05436
},
"IntegrationId": "Stop 1 breadcrumbs",
"GeofenceOverride": {
"radiusMilesOut": ".25",
"radiusArriveFeet": 300,
"radiusDepartFeet": 300,
"milesOutMessage": ".25 miles out stop 1",
"arriveMessage": "300ft Stop Arrival Message",
"departMessage": "300ft Stop Depart Message",
"sendAutoArriveEvent": true,
"sendAutoDepartEvent": true,
"milesOutEvent": true,
"arriveEvent": "ArriveGeofence",
"departEvent": "DepartGeofence"
}
},
{
"Id": -5,
"Address": {
"Company": "Home",
"City": "Plant City",
"State": "Fl",
"Country": "USA",
"PostalCode": "33566",
"Line1": "2603 E Trapnell Rd",
"AddressLine2": "",
"AddressLine3": "",
"PhoneNumber": "300-200-2000",
"ContactName": "Joe",
"Latitude": 27.96461899902478,
"Longitude": -82.07684745359362
},
"IntegrationId": "Stop 3 breadcrumbs",
"GeofenceOverride": {
"radiusMilesOut": ".25",
"radiusArriveFeet": 300,
"radiusDepartFeet": 300,
"milesOutMessage": ".25 miles out stop 3",
"arriveMessage": "300ft Stop Arrival Message",
"departMessage": "300ft Stop Depart Message",
"sendAutoArriveEvent": true,
"sendAutoDepartEvent": true,
"milesOutEvent": true,
"arriveEvent": "ArriveGeofence3",
"departEvent": "DepartGeofence3"
}
}
],
This item type is used specifically for showing a list of loads only to support the scanning function.
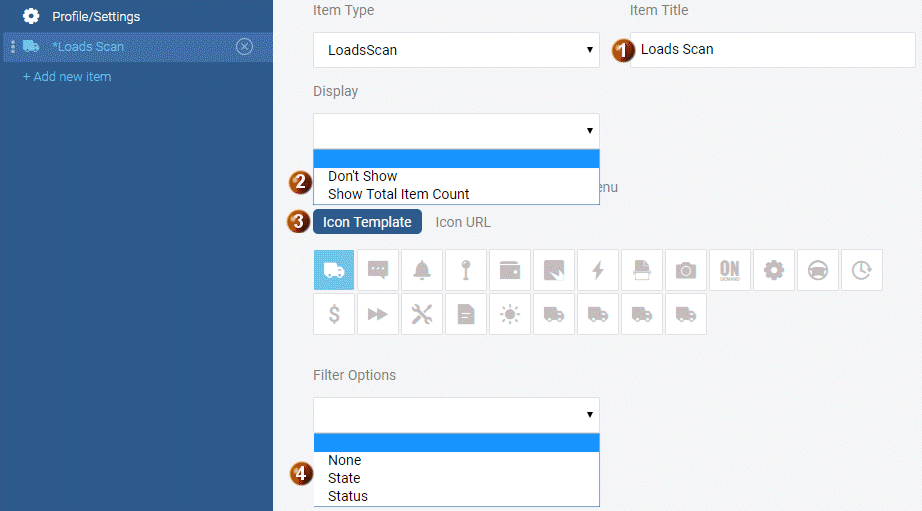
To configure this item type:
-
Enter a name in the Item Title field.
-
Select a default icon.
Configuration consists of:
Providing a name in the Item Title field.
Selecting a display option from the Display drop-down list box.
You can choose not to show anything or to show the total item count.
Changing the default icon by providing an Icon URL or choosing an icon from the Icon Template list.
Choosing one of the options from the Filter Options drop-down list box to enable loads to be filtered by State or Status, or not filtered.
Configuring this function as a menu item allows you to show read notifications versus unread notifications as well as counts.
Therefore, a scan history could be created using this item type.
If desired, the total item count can be displayed and the state or status can be filtered to show the scans.