Faxes and Email Tab
This tab allows you to configure fax and email options for the fleet.
Tip: Some KB articles contain just enough product information to get you started. Advanced details are hidden. Authorized administrators can log in to view both the public and private content. Transflo employees can request access here https://forms.office.com/r/dWg5RMr2fJ to get a Transflo MadCap ID. MadCap Software is our third-party CMS and cloud-hosting provider. Complete this internal web form to request access to the admin-only portion of any Transflo KB article.
-
As an administrator, log in to Transflo Express Server Administrator.
-
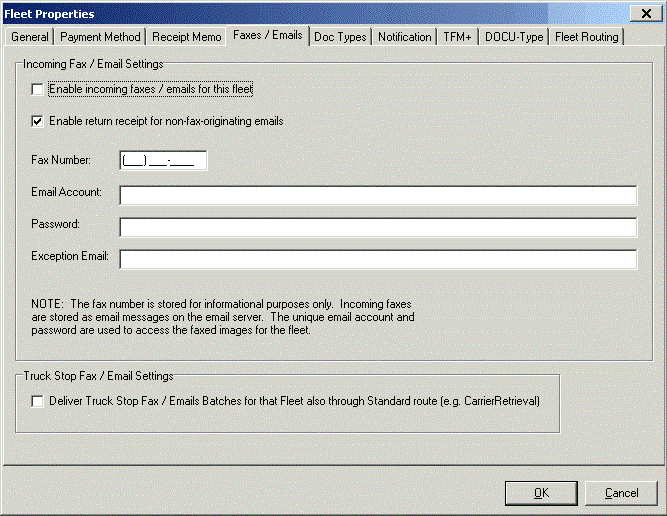
Open the Fleet Properties window for the fleet and click the Faxes/Emails tab.
-
If the fleet is to receive batches as faxes or as images attached to emails, select the Enable incoming faxes / emails for this fleet check box.
-
To send return receipts to senders who sent non-fax emails, select the Enable return receipt for non-fax-originating emails check box. When enabled, this option sends a confirmation email reply every time the system processes mail from the inbox.
-
To record the fax number for the fleet, type the number in the Fax Number field using the mask provided.
-
In the Email Account field, type the email address that will be receiving faxes or email. This is the email Inbox that TRANSFLO® EXPRESS® Inbound Email Service will check for incoming emails.
-
In the Password field, enter the password for the email account.
-
In the Exception Email field, enter the email address that will be receiving exception emails.
-
To deliver truck stop fax and emails by the routing method configured for the customer, select the Deliver Truck Stop Fax / Emails Batches for that Fleet also through Standard route (e.g. CarrierRetrieval) check box.