Transflo Shipper Portal 2023 Release Notes
With the August 1, 2023 re-release of the new Transflo Shipper Portal, Transflo is pleased to announce enhancements to the Transflo Shipper Portal web application and Shipper API including the following features and benefits:
-
New features to support shipper pickup locations.
-
Improved document uploads for shipments with multiple stops.
-
Enhanced shipment views with near real-time driver and consignee signature status.
-
New Transflo Mobile+ app driver claim option for a document (a faster alternative to signing).
-
Updates to the Transflo Mobile+ app eBOL and ePOD search functionality.
-
The new shipper location features carry over to the Mobile+ app where drivers can automatically view shipper documents based on simply driving within the local vicinity or geo-fence of a shipper pickup location.
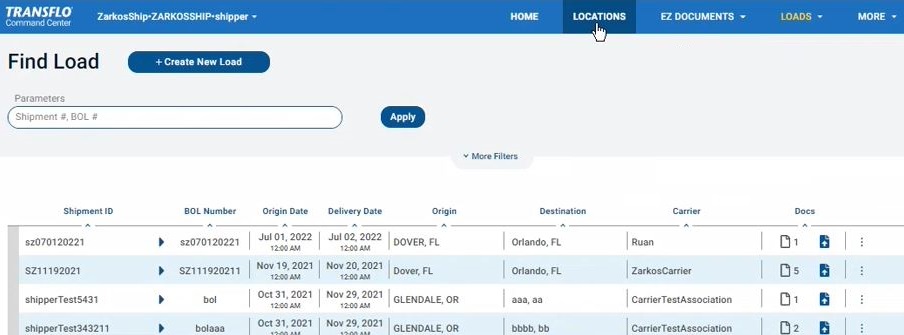
The Transflo Unite Shipper Portal (powered by the Transflo Velocity+ Command Center cloud platform) provides our shipper partners with an efficient way to manually create and manage loads, upload documents such as bill of ladings, record signatures for electronic proof of delivery (ePOD), and share various documents associated with a shipment. The Transflo Unite Shipper Portal provides a convenient and transparent way for shippers to connect their loads and documents with carriers and potentially brokers to better serve their customers.
To learn more about the new features in this release, browse a section below.
Shippers can now add pickup locations and associate them with a load shipment. For example, add locations for vendors, manufacturers, distributors, warehouses, inventory returns, or other preferred consignee locations. The locations you enter in Transflo Shipper Portal are used to geographically filter and display the appropriate eBOL and other documents to drivers based on their current location determined by the Transflo Mobile+ app.
As a shipper, you can set up locations for each division you manage. Shipper divisions can represent separate lines of business, fleets, franchises, brands, or types of shipments. Behind the scenes, the Transflo platform calculates the GPS coordinates for your locations based on their street address. You can then view, select, and edit these locations on a map as seen in the Transflo Shipper Portal or in the Mobile+ app.
As a shipper, periodically review your pickup locations in the Transflo Shipper Portal web application and verify the accuracy of the address and contact information. As a reminder, when future load shipments are associated with these locations, drivers will see them on their Mobile+ app.
-
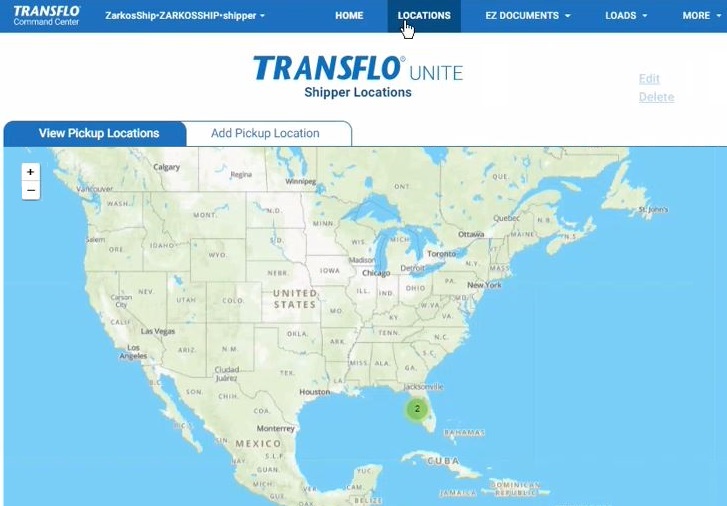
In the top menu bar, click LOCATIONS.

-
Use the view magnification zoom buttons in the top left corner of the map to zoom in or out.
-
Click + Zoom In to see more detailed map data and fewer locations in a local area.
-
Click - Zoom Out to view aggregated map data and more locations spanning a larger region.

-
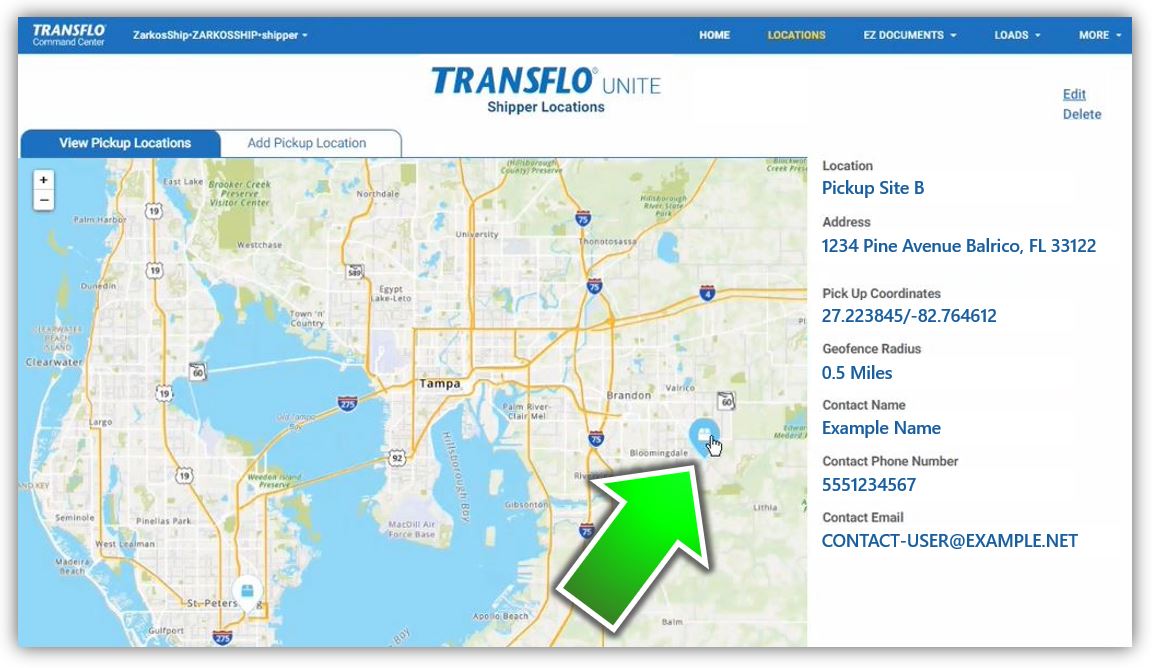
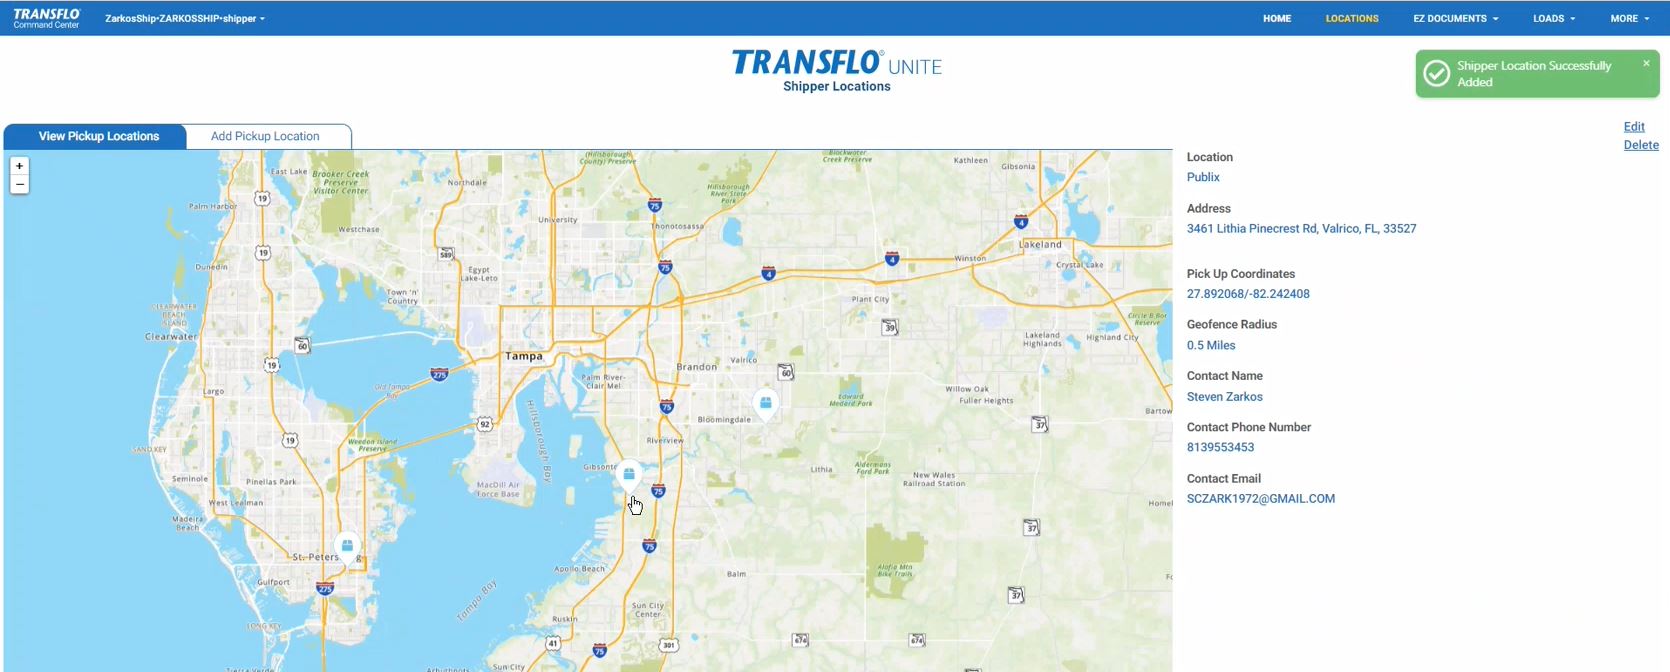
- After zooming in, click a location on the map to view the following information:
Location Name
Address
Pickup Coordinates: The GPS system converts your location to latitude and longitude.
Geofence Radius: The proximity between 0.03 and 0.5 miles (158 to 2640 ft or 0.05 to 0.8 km) that you defined for the location. When drivers enter this range, the shipper location appears on their mobile app map to help them locate the shipment and associated stop, eBOL, and ePOD.
Contact Name, Phone, and E-Mail

When you add a new pickup location, future document uploads can be associated with the location and drivers can easily view it on their mobile app.
To create a new pickup location for future shipments, follow these steps:
-
In the top menu bar, click LOCATIONS.
-
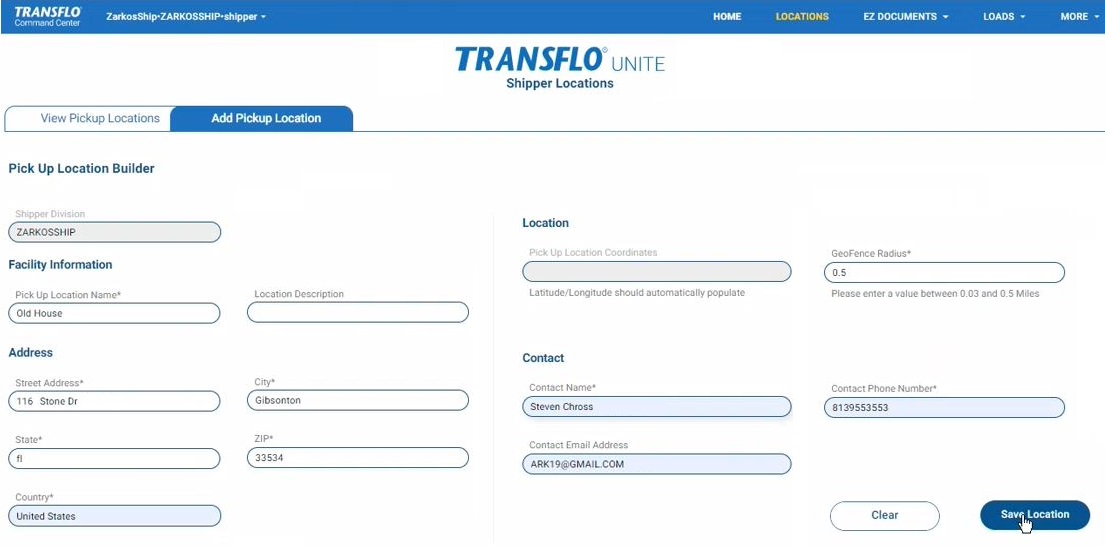
Click the Add Pickup Location tab.
-
Complete the following fields:
-
Pickup Location Name: Enter a name for this location that shippers, consignees, and drivers can recognize. For example, SuperMart Greenville North Pickup Site 1 or simply SuperMart1.
-
(Optional) Enter a short Location Description. For example, warehouse site 23 or Ohio Turnpike Exit 12 or corner of Main St. and Hwy 301.
-
Address: Complete the fields for Street Address, City, State, ZIP (postal code), and Country.
-
Specify a GeoFence Radius between 0.03 and 0.5 miles (158 to 2640 feet, or 0.05 to 0.8 km). When drivers are within this distance of the location, they can view this shipper location on a map on their phone or tablet running the Transflo Mobile+ app. Drivers no longer need to search for the shipper; locations automatically appear based on local proximity.
-
Enter the name, phone, and email address of a representative or contact person for the location to answer common questions about the site or facility such as open hours, weather conditions, maintenance, construction, security, access roads, or special equipment in use.

-
-
Click Save Location.
Result: The Shipper Location Successfully Added confirmation message appears.
-
To view your new location, click the View Pickup Locations tab and select the location on the map. The system has also converted the street address to lat-long coordinates.

-
When you upload documents, you can now specify one of your pickup locations.
It all starts with the documents for a shipment that describe all the detailed information about the load, pick-up location, and drop-off location. With the Transflo Shipper Portal, you can upload eBOL, ePOD, and other document types associated with a single-stop or multi-stop shipment.
As a shipper, you can upload an electronic bill of lading (eBOL) and other pages for a single-stop shipment to the Transflo cloud platform. Drivers can now easily search and find accurate information about the shipment.
-
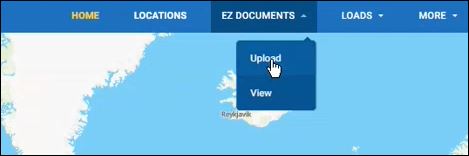
In the main menu, click EZ DOCUMENTS and then choose Upload.

-
In the Upload Documents window, enter the following information:
-
Shipment ID: This unique identifier with alpha-numeric letters or numbers is used to track your shipment.
-
BOL Number: Enter an optional bill of lading number or skip this field if using the same number as the shipment ID.
-
Pickup Location: Select an entry in the drop-down list of your pre-defined shipper locations. If you have only one shipper location defined, the system auto-selects that location by default.
-
Carrier DOT Number: As an experienced shipper, you want to leverage the Transflo platform to connect with brokers, carriers, and drivers. Enter the designated carrier DOT number you want to associate with this single-stop shipment.

Tip: The Transflo Unite platform provides shippers with a seamless, touchless, and secure workflow between brokers, carriers, and their drivers. With 60,000+ carriers and 2.2 million professional drivers, our patented document processing network offers you access to one of the largest digital ecosystems in the global supply chain.

-
-
Verify that the Multi-Stop check box is clear (this document represents a single-stop shipment) and then click the Upload Document button.
-
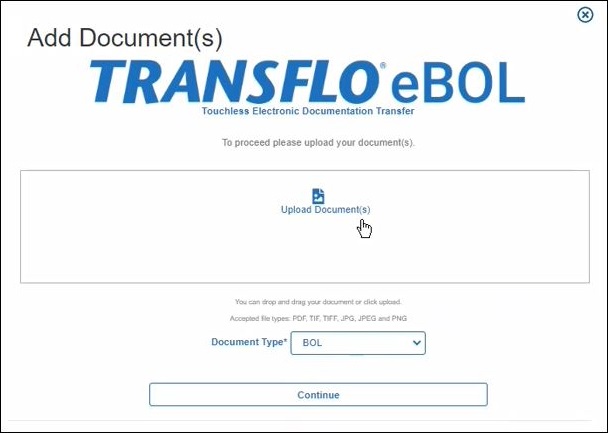
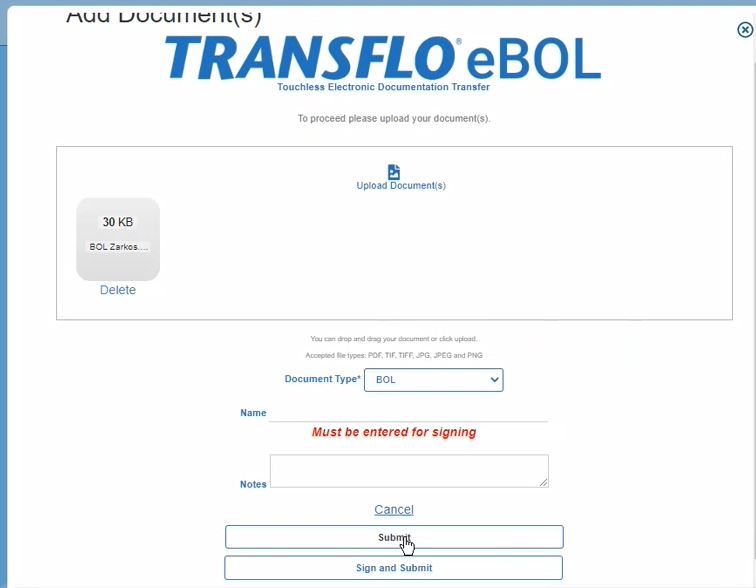
In the Add Documents window, click Upload Document, browse your file system for the document you want to include, and click Open (not shown).

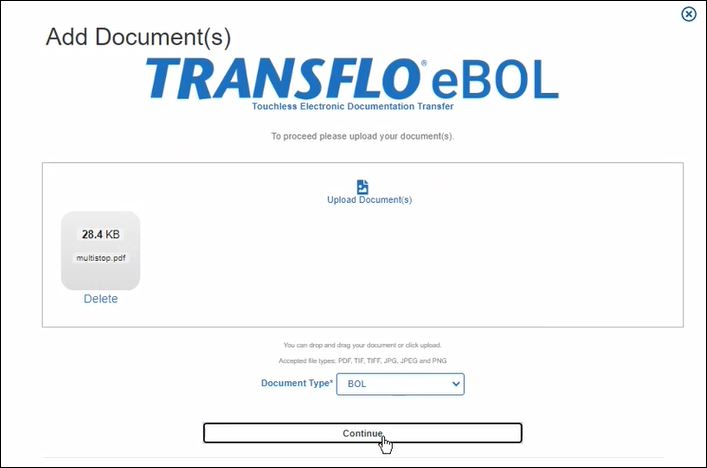
- Your document now appears in the window.
- If you need to remove it, click Delete. Go back to the previous step to replace it or click Close to cancel.
- To keep it, set the Document Type and click Continue.

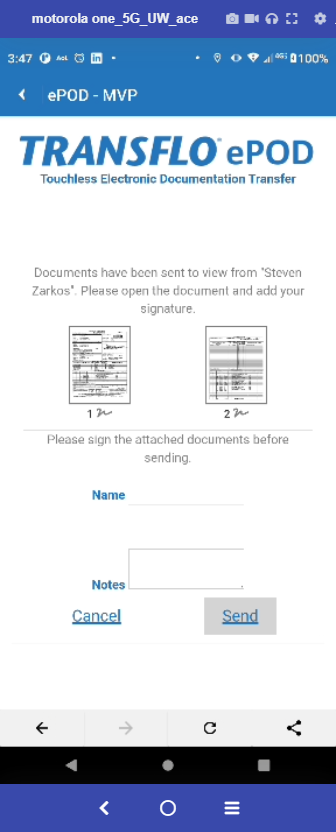
- To defer signatures until later, tap Submit.

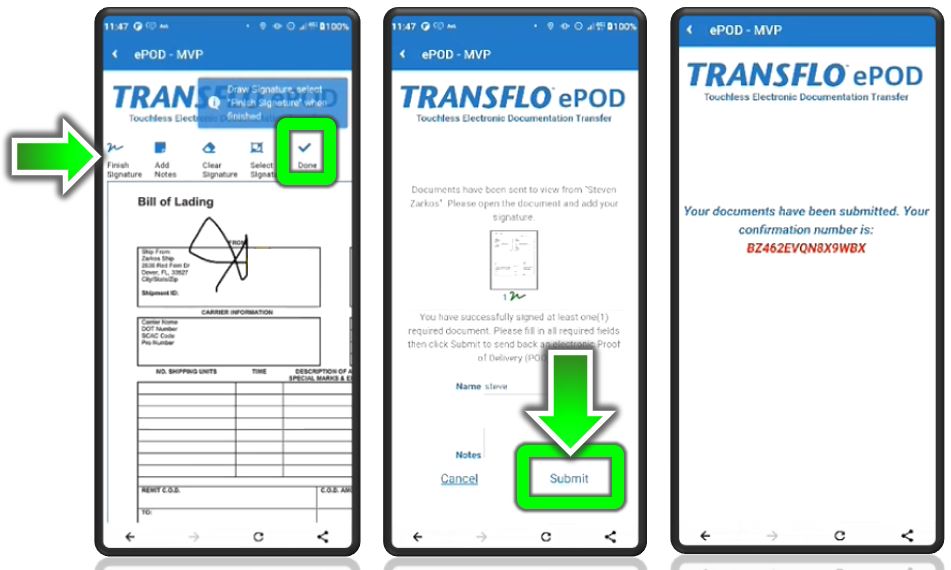
(Optional) To sign the document now, tap it and then complete the Name field, enter any Notes, and then tap Sign and Submit. In a common series of steps not shown again here, select one or more pages, add your signature, tap Done, and then click Submit.
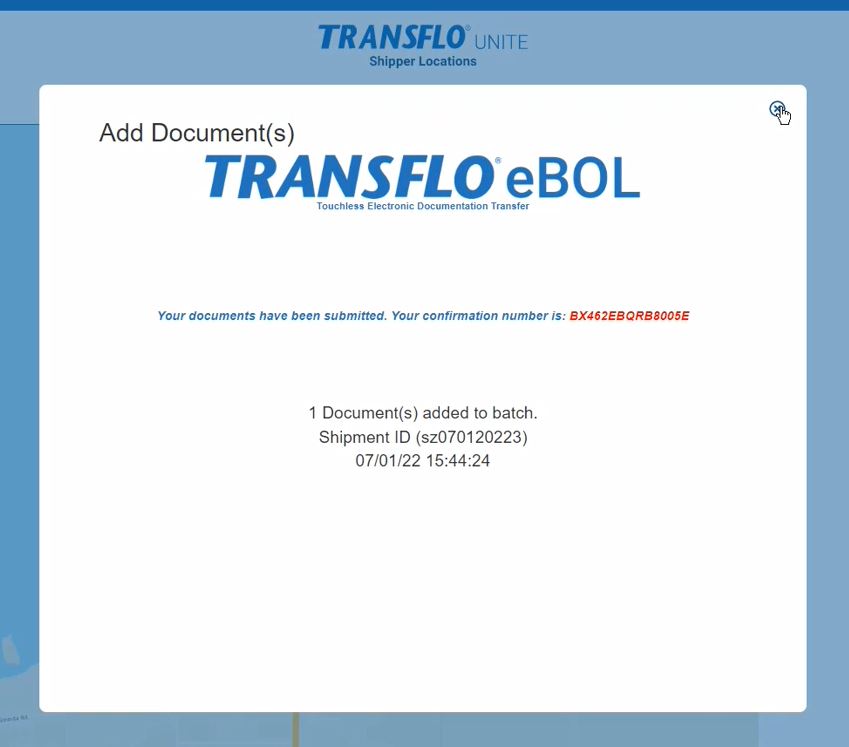
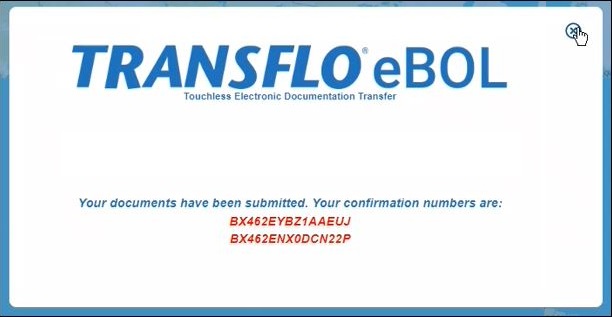
- Either way, after the previous step, your single-stop document confirmation number appears. Click Close.

-
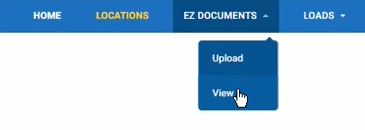
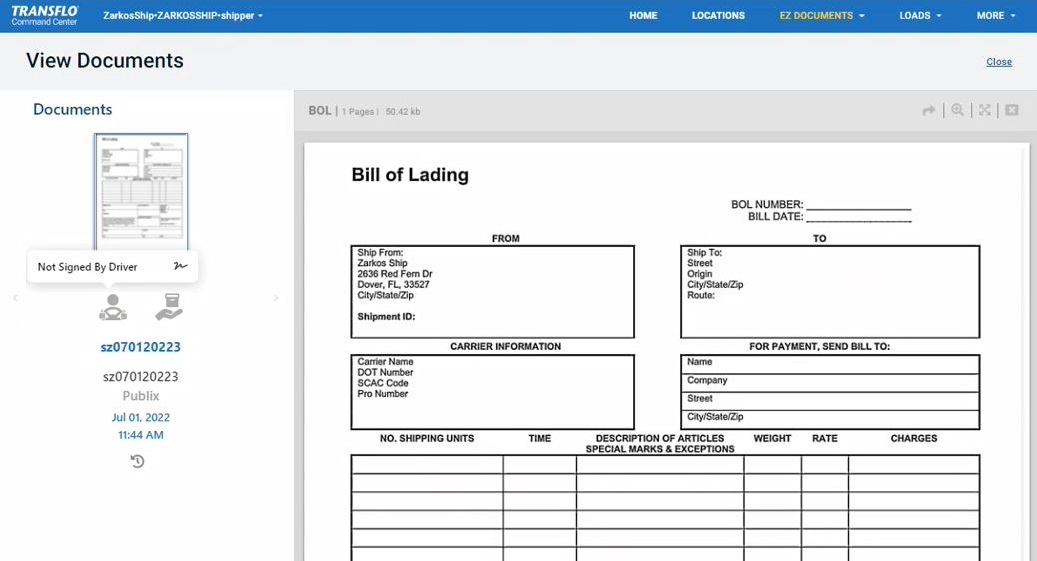
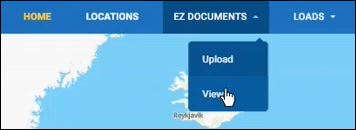
To view the document that you just uploaded and the associated shipment that was created, in the top menu bar, click EZ DOCUMENTS and then choose View.

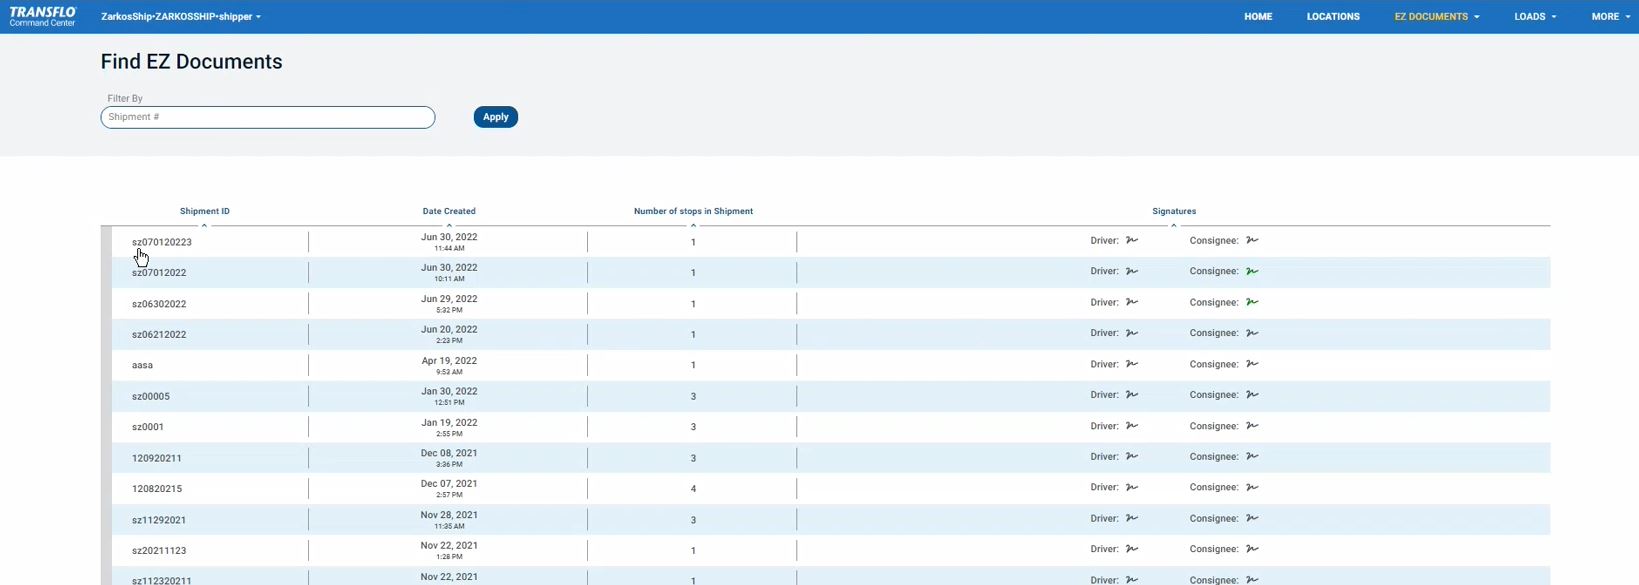
-
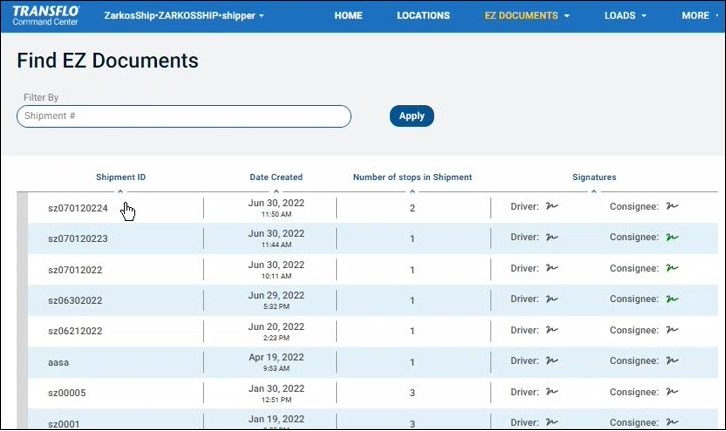
Find the shipment and click on its Shipment ID.

-
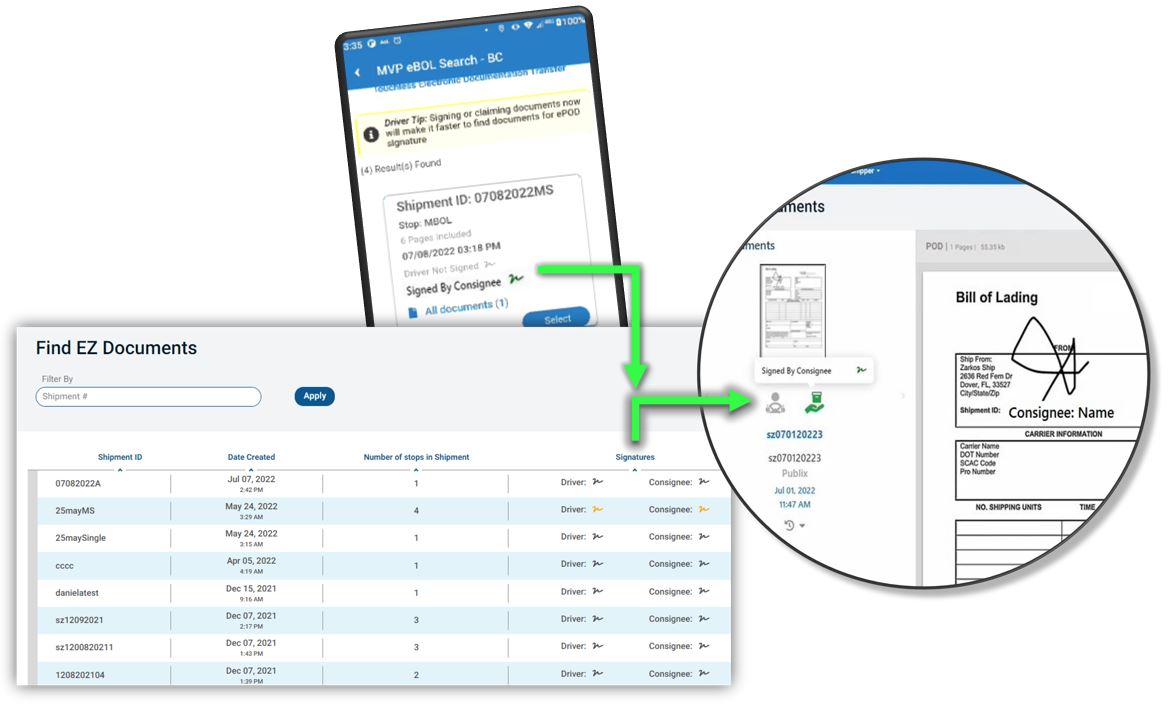
On the View Documents page, as the document is signed by the driver and consignee over the next few hours or days, you see updated signature status with visual indicators.


A Driver Can Now Deliver the Shipment:
-
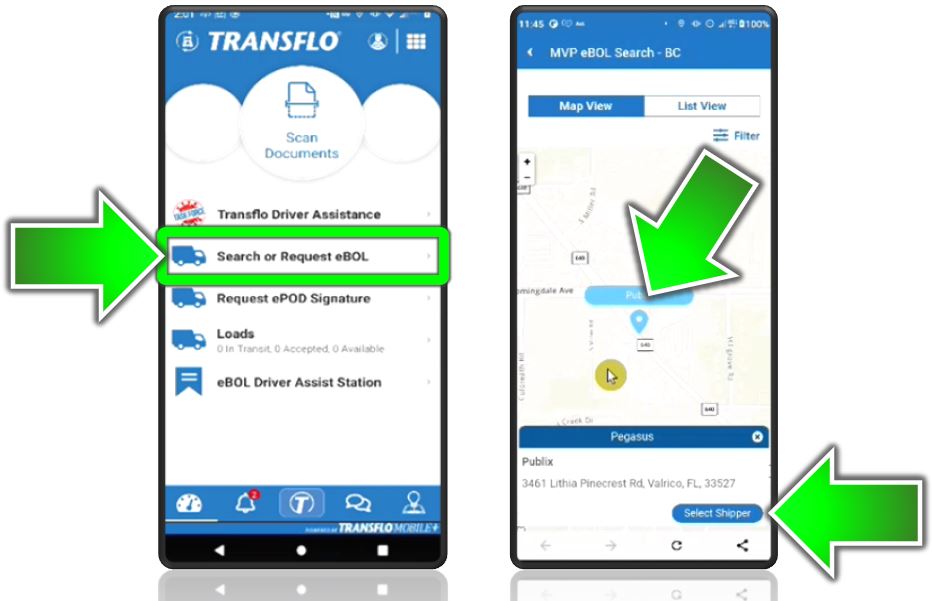
As a driver, click your eBOL Search menu item in your edition of the Transflo Mobile+ App. Based on your current location, one or more shipper pickup locations appear. Tap the shipper location and then tap Select Shipper.

-
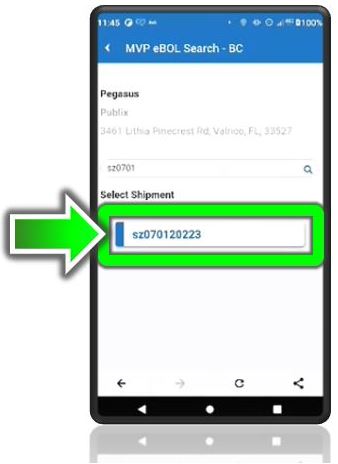
Enter at least the first six (6) characters in the Shipment ID to view matching results.
-
Select the correct shipment ID.
-
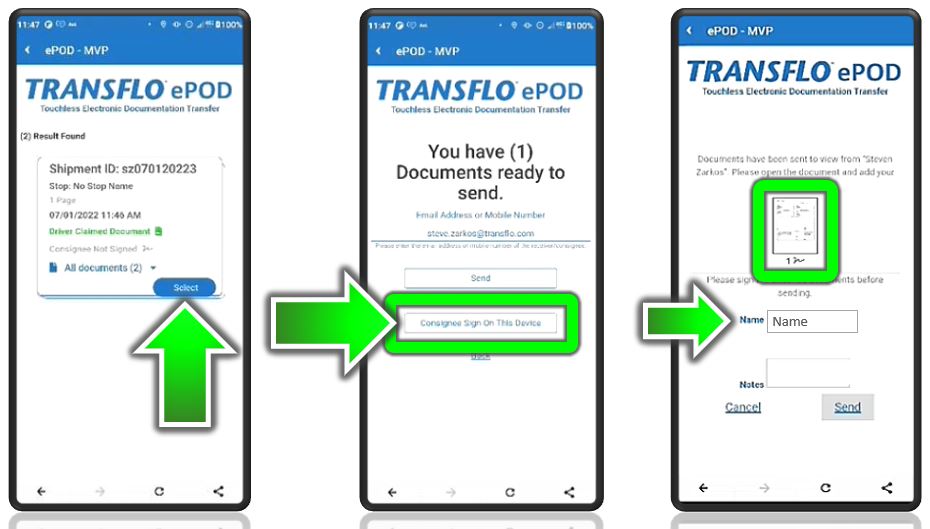
Tap Select and then choose View and Sign or Claim Document.
-
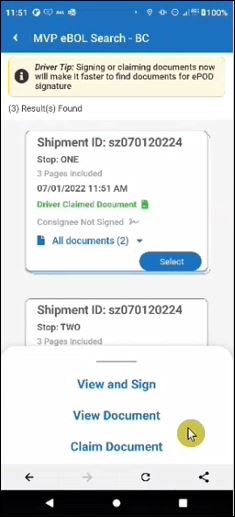
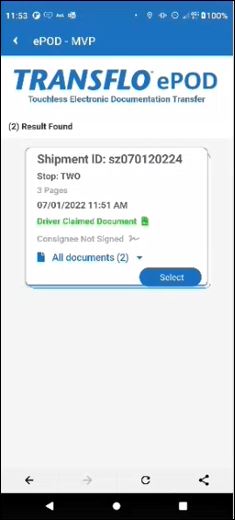
Verify the shipment shows the proper status.
Example: Driver Claimed Document

-
-
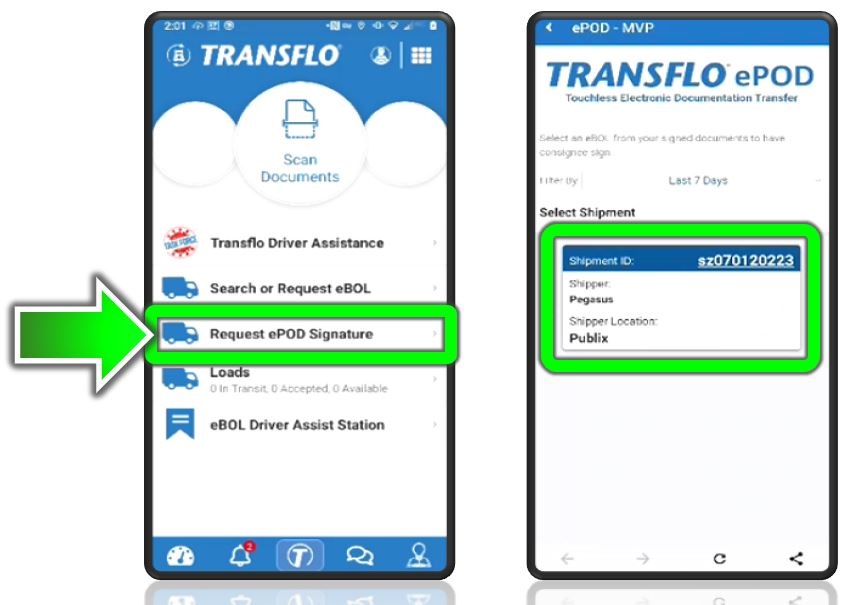
Tap Back and deliver the shipment. When you arrive at the drop-off location, tap Request ePOD Signature.
-
Without searching, based on your location, the app shows appropriate shipments with an active ePOD. Because you claimed (or signed) the eBOL in an earlier step, the Mobile+ app is saving you time and showing your previously claimed (or signed) documents. Tap the shipment.

-
Tap the one and only stop for this single-stop shipment and then tap Select.
-
Tap Consignee Sign On This Device.
-
Ask the consignee for their name and enter it in the Name field or have the consignee enter their name.
-
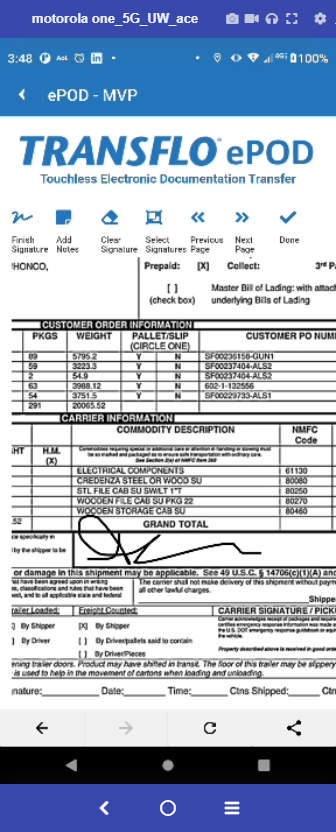
Tap at least one page. Have the consignee add their signature.

-
Tap Done.
-
Tap Submit.
-
(optional) Record your confirmation number. It appears in the mobile app and is also sent by email or SMS text message.

-

Within a Few Seconds, Back in the Shipper Portal:
-
In the top menu bar, click EZ DOCUMENTS and then choose View.
-
Find the shipment and click on its Shipment ID.
-
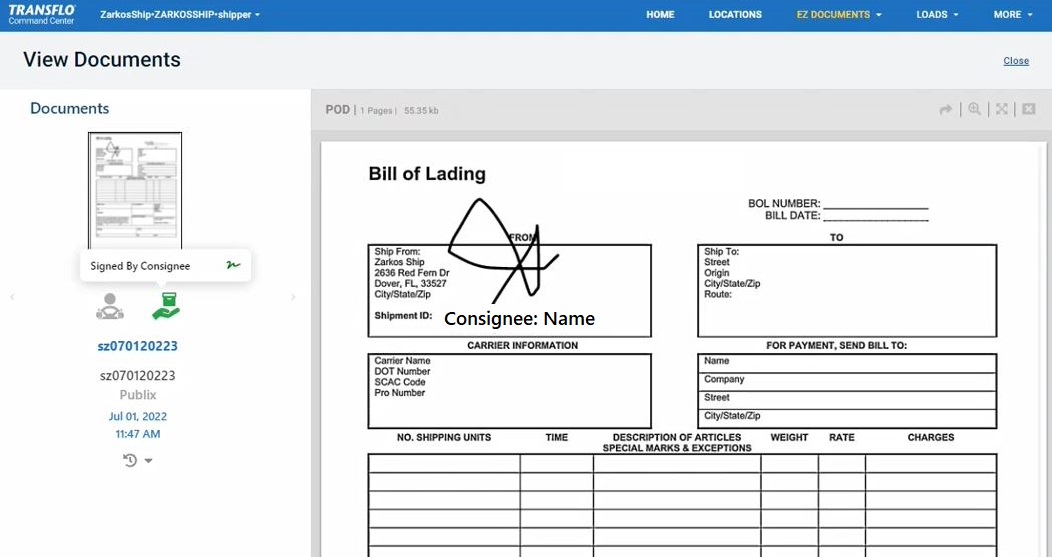
On the View Documents page, mouse over the driver or consignee signature status icons. You can now see that the consignee has signed.

You can upload a document and select the Multi-Stop checkbox to indicate that it applies to multiple stops. For example, you might upload a six (6) page eBOL. Pages 1, 2, and 3 apply to stop 1 of 2, and pages 4, 5, and 6 apply to stop 2 of 2.
-
In the main menu, click EZ DOCUMENTS and then choose Upload.
-
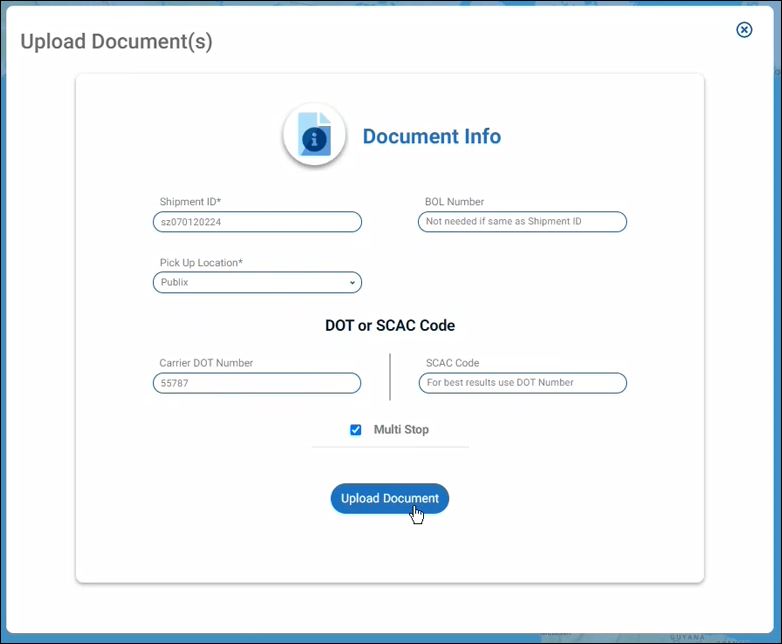
In the Upload Documents window, enter the following information:
-
Shipment ID: This unique identifier with alpha-numeric letters or numbers is used to track your shipment.
-
BOL Number: Enter an optional bill of lading number or skip this field if using the same number as the shipment ID.
-
Pickup Location: Select an entry in the drop-down list of your pre-defined shipper locations. If you have only one shipper location defined, the system auto-selects that location by default.
-
Carrier DOT Number: As an experienced shipper, you want to leverage the Transflo platform to connect with brokers, carriers, and drivers. Enter the designated carrier DOT number you want to associate with this single-stop shipment.
Tip: The Transflo Unite platform provides shippers with a seamless, touchless, and secure workflow between brokers, carriers, and their drivers. With 60,000+ carriers and 2.2 million professional drivers, our patented document processing network offers you access to one of the largest digital ecosystems in the global supply chain.
-
-
Select the Multi-Stop checkbox and then click the Upload Document button.

-
In the Add Documents window, click Upload Documents.
-
Browse your file system for the document you want to include and click Open.
-
Set the Document Type and click Continue.
-
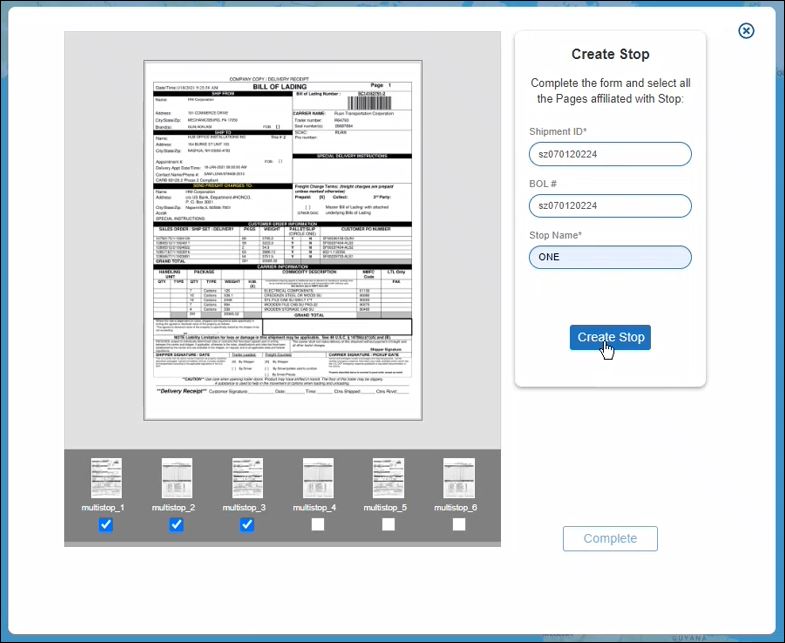
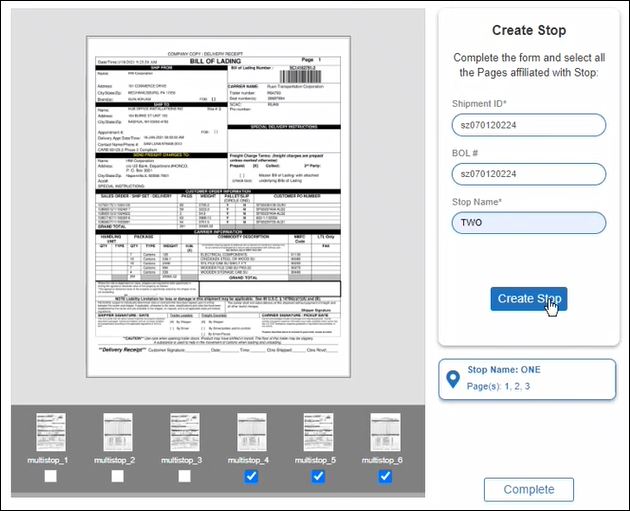
Select one or more pages (check boxes at the bottom), enter a name for the associated stop in the Stop Name field, and then click Create Stop.

-
Select one or more pages for the next stop, give it a name and click Create Stop.

-
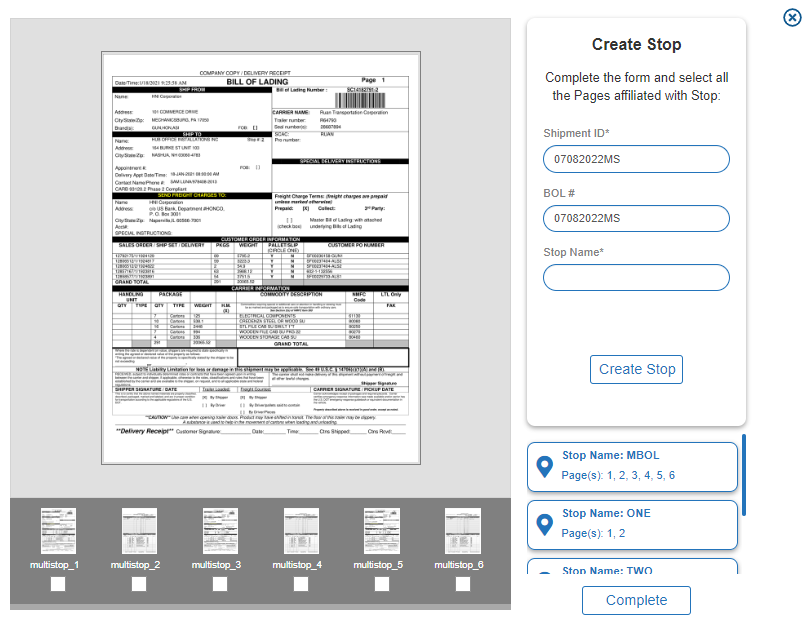
(Optional) To create a master bill of lading (MBOL), you can select all pages (all check boxes).

A master BOL (MBOL) is typically counted as the final stop. For example, after delivery and ePOD signatures are completed for stops 1, 2, and 3, a driver can submit a final MBOL for all three (3). The fourth and final stop can be a real location or a virtual stop.

-
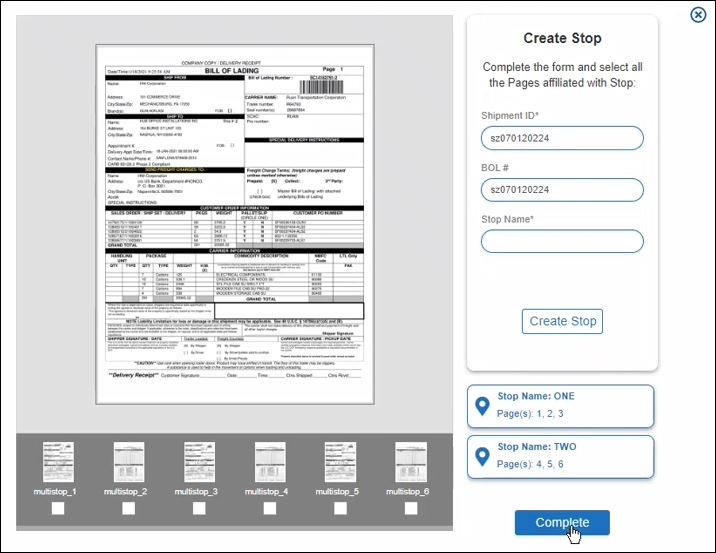
When you have completed the associations between pages and stops, click Complete.

-
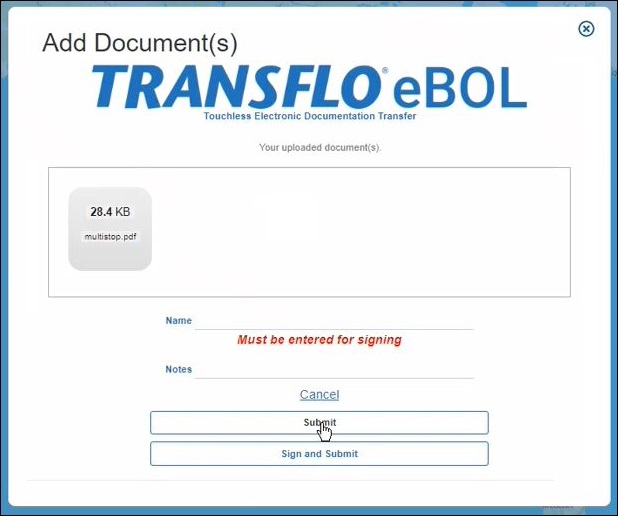
In the Add Documents window, click Submit. As a shipper or driver, you can also enter your name, click the document, and sign one or more pages.

-
Whether you sign and submit or just submit the documents, a confirmation number appears for each stop you defined (effectively splitting your original document into multiple documents, one for each stop). Click Close.

-
In the top main menu, click EZ DOCUMENTS and choose View.

-
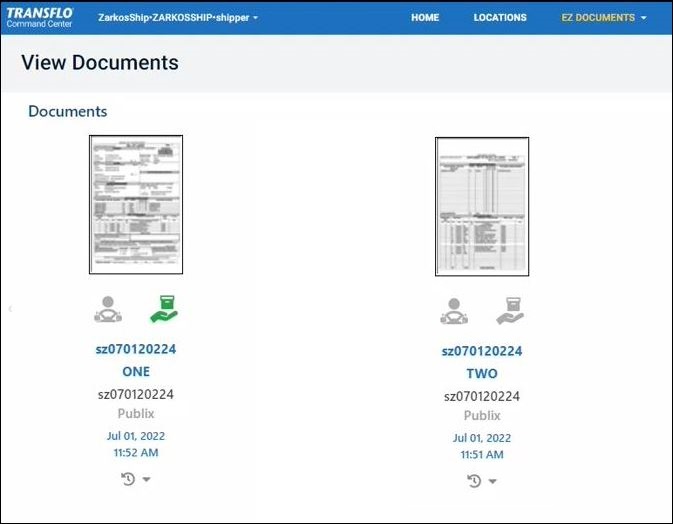
Find your shipment and confirm that it shows the number of stops you just defined. Click the shipment ID or double-click the row to open the documents for the shipment.

-
The View Documents page shows the documents and signature status for each stop.


A Driver Can Now Deliver the Shipment:
-
As a driver using the Mobile+ app:
-
Tap the eBOL Search menu item or tile.
-
Tap the shipper location on the map.
-
Tap Select Shipper.
-
-
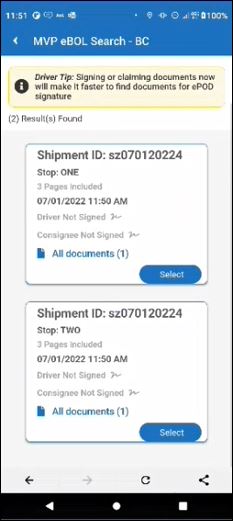
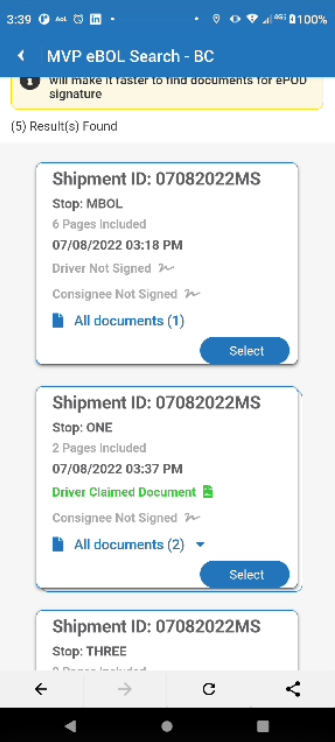
Enter at least the first six (6) characters of the Shipment ID and tap Search to find the shipment. The app hides completed shipments and shows only those shipments that are still active and need to be delivered and signed. Under Select Shipment, tap the shipment.

-
The multi-stop shipment shows each stop. In the first stop, tap Select.

-
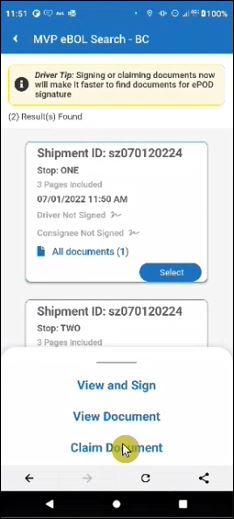
If you are ready to add your signature now, tap View and Sign. Otherwise, tap Claim Document.

-
Repeat these steps to claim (or sign) the second document. Tap Select and then tap Claim Document or View and Sign.

-
Tap the Back button at top left. Continue en route to the shipper location.

-
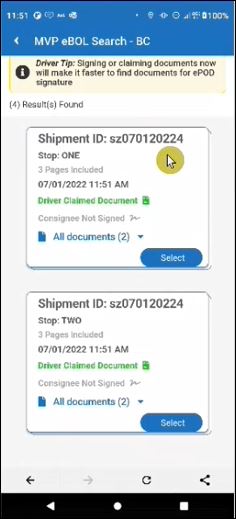
When you arrive, tap Request ePOD Signature. Because you claimed (or signed) documents for the shipment in a previous step, the shipment automatically appears. Tap the Shipment ID card or tile.
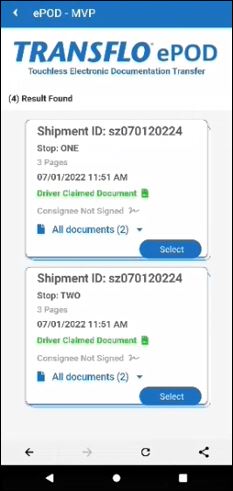
- At this point in our example below, the mobile+ app shows four (4) Results Found. You see two stops for the shipment, two sets of documents you already claimed (or signed), and four (4) pages in total where at least one page at each stop must be signed as an electronic proof of delivery (ePOD).

-
Tap the Select button for the first stop.
-
Enter the consignee e-mail address or mobile number so they can receive a copy of the ePOD.
-
Tap Consignee Sign On This Device.
-
Have the consignee enter their name and tap at least one page to sign.
- The consignee adds their signature.
- Tap Done.
- Tap Submit.
-
Within a Few Seconds, Back in the Shipper Portal:
-
As a shipper in the portal, in the top menu bar, click EZ DOCUMENTS and then choose View.
-
Find the shipment and click on its Shipment ID to open the row.
-
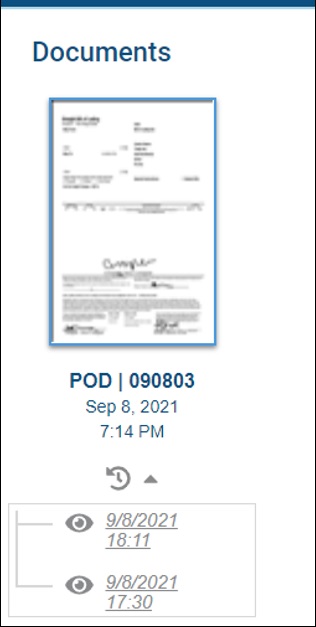
On the View Documents page, click the Refresh button in your web browser and then click the
 History button below a document to view the most recent updated documents and any past versions of the same document.
 Example: In the example below, a new second version of the document appears above an older version. The newer version contains more signatures as the load moves from available to accepted to in-transit to delivered.

Tip 1: The same eBOL document can be signed by the shipper, driver, and consignee to serve as the ePOD.
Tip 2: By default, when you click
Refresh History, the portal updates all documents on the View Documents page and always shows the most current document. - The ePOD for stop 1 of 2 shows that it was signed by the consignee just a moment ago.

-
The driver repeats the same steps when they arrive at stop 2 of 2 to get signatures on an ePOD for that stop.

-
The process is complete when the driver has completed all stops in the multi-stop shipment and all required signatures are saved.
The Transflo Shipper API offers the same functionality as the Shipper Portal, all from the comfort of your own WMS, TMS, or other integrated system. The Transflo Shipper API is a set of REST API endpoints that allows shippers to create single and multi-stop documents to facilitate the delivery of single and multi-stop shipments.
After uploading documents to the Transflo Cloud using the Shipper API, you can view them in the Shipper Portal. You can also retrieve completed documents directly from the Transflo Cloud into your TMS or other system.
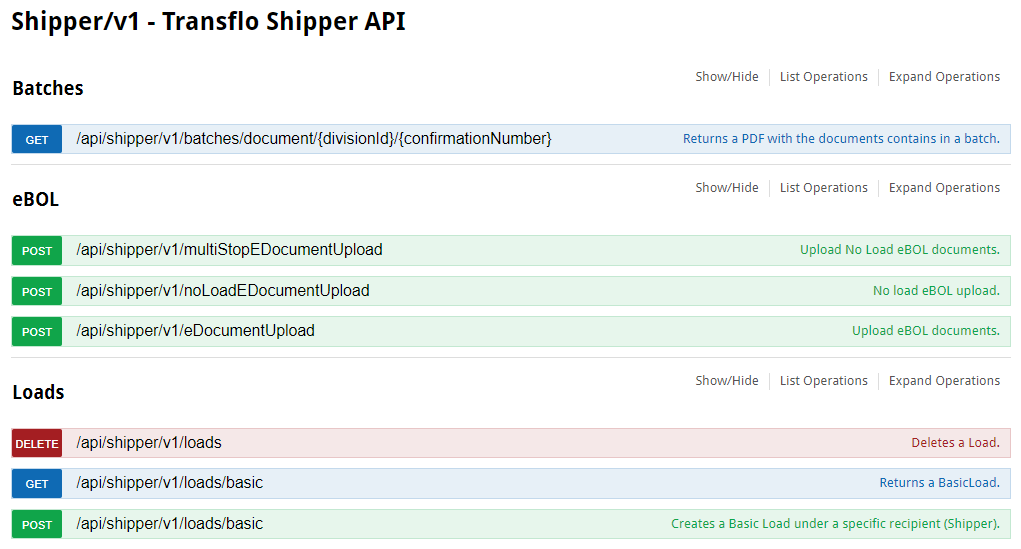
To learn more, visit https://svc.transflomobile.com/integration/sdk.
With the Transflo Mobile Plus app, smart shippers like you are putting the eBOL at the driver’s fingertips. Using a combination of geographic locations and shipper information, Transflo provides drivers with easy access to view, claim, and sign the eBOL.
-
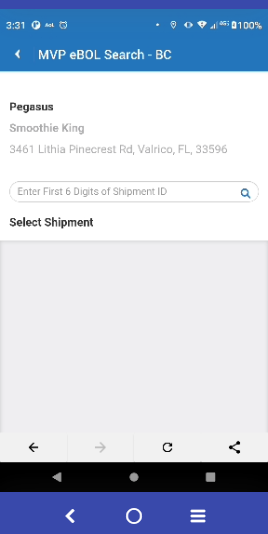
As a driver with an assigned load and shipment ID for a shipper (the current shipper), tap the eBOL Search menu item on your mobile device.
Tip: In many configurations of the customizable Mobile+ app, as you drive toward the shipper pickup location, you receive a geo-fence notification that alerts you when you are near the shipper pickup location by so many feet up to half a mile.
-
In Map View, tap on the local shipper pickup location.
-
Tap Select Shipper.
-
-
Enter at least the first six (6) digits of the shipment ID to view one or more potential matching results.

-
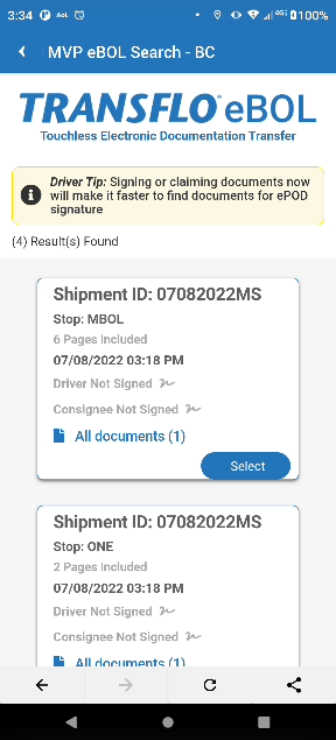
Select the shipment you want.

-
Each stop is represented by a card or tile.

-
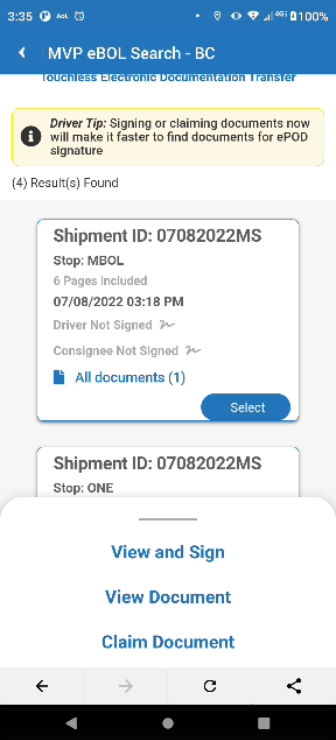
Select a stop (or a master bill of lading or MBOL) and then tap one of the following options:
-
View and Sign
-
View Document
-
Claim Document (recommended to save time)

Tip: Sign the document now if you have time or it is a job requirement. If not, you can just claim it. Either way, if you sign now or claim an eBOL, it is going to be easier to find the ePOD later and bring it up on your mobile device to have it signed later by you (if required) or the consignee.
-
-
In this example, the driver claimed the eBOL for stop ONE and proceeds to the pickup location, gets the load, and drives to the delivery location.


When drivers arrive at the delivery location, retrieving the ePOD for a consignee signature is easier than ever. Because the driver already signed the eBOL or at least claimed it in advance, the documents that are eligible for an ePOD signature automatically appear.
-
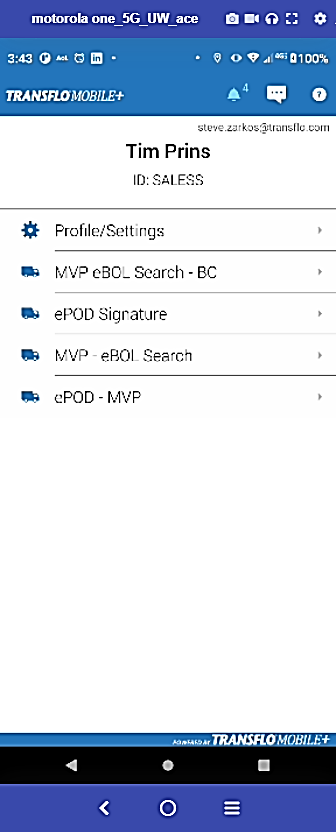
In the Transflo Mobile+ App, tap ePOD Signature.

-
Tap a shipment. You can also enter one or more characters of the shipment ID in the Filter By (Last 7 Days) field to view matching results and then select a shipment.

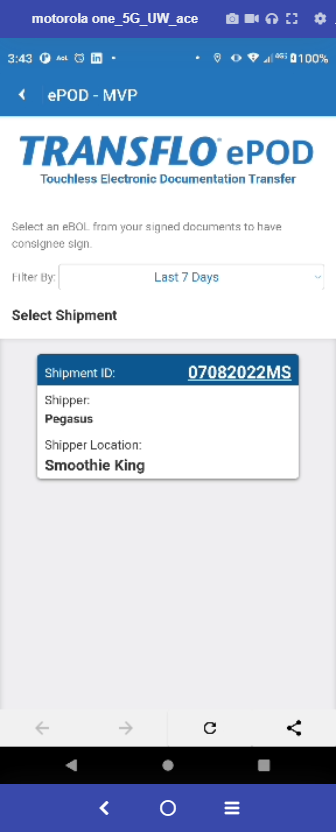
-
The app shows only the ePOD documents for the shipment you selected in the previous step. Multi-stop shipments might show multiple ePODs. Choose the one for your current delivery stop and then tap the blue Select button.

-
Enter the consignee email address or mobile number. Choose to have the consignee sign now on your device or send the documents to them to sign on their own mobile device or in their system such as Transflo Velocity+ Command Center.
-
To send the ePOD, tap Send. The system requests ePOD signatures from the consignee.
-
To get signatures now on your smartphone or tablet, tap Consignee Sign On This Device.

-
-
The consignee (now or later) reviews the pages in the ePOD and adds their electronic signature to at least one page. For example, tap page 1.

-
To continue with our example, review page 1, tap Add Signature, sign on the appropriate line, and tap Done. Repeat for page 2.

-
When finished, the Send button changes to Submit. Tap Submit.
-
Within seconds, the following events are orchestrated for you by the advanced new features in this release of the Transflo Unite Shipper Portal:
-
The driver receives a notification that the ePOD was signed.
-
The consignee receives a link (by email or text message) to a copy of the signed ePOD.
-
The shipper can now view the completed ePOD in the Transflo Shipper Portal.
-
In the Transflo Shipper Portal and systems that leverage the Transflo Shipper API to integrate with Transflo data, the shipper can also retrieve signature status from the metadata in each uploaded document for a shipment.

-

About Transflo Unite Shipper Portal: The Transflo Unite Shipper Portal (powered by the Transflo Velocity+ Command Center cloud platform) provides our shipper partners with an efficient way to manually create and manage loads, upload documents such as bill of ladings, record signatures for electronic proof of delivery (ePOD), and share various documents associated with a shipment. The Transflo Unite Shipper Portal provides a convenient and transparent way for shippers to connect their loads and documents with carriers and potentially brokers to better serve their customers.
-
New Shipper Customers: To learn more, visit Transflo Unite Shipper Portal.
-
Existing Shipper Customers: To learn more about the new features in this release, browse a section above.