Process Documents in Workflows
In Synergize Explorer, you can process a document from one workflow queue to another. Administrators in your company have configured the workflow to allow a document to move through the queues based on certain rules. Sometimes these rules involve adding mandatory information or properties to the document, answering questions, or merely reviewing the document and clicking Process.
Essentially, Workflow is a state machine. Each document can be assigned a queue which is like a state.
-
A document could be in the INBOX queue when it first arrives.
-
It might then move to the READY queue.
-
From there, it could go to the INDEXED queue or maybe the ERROR queue.
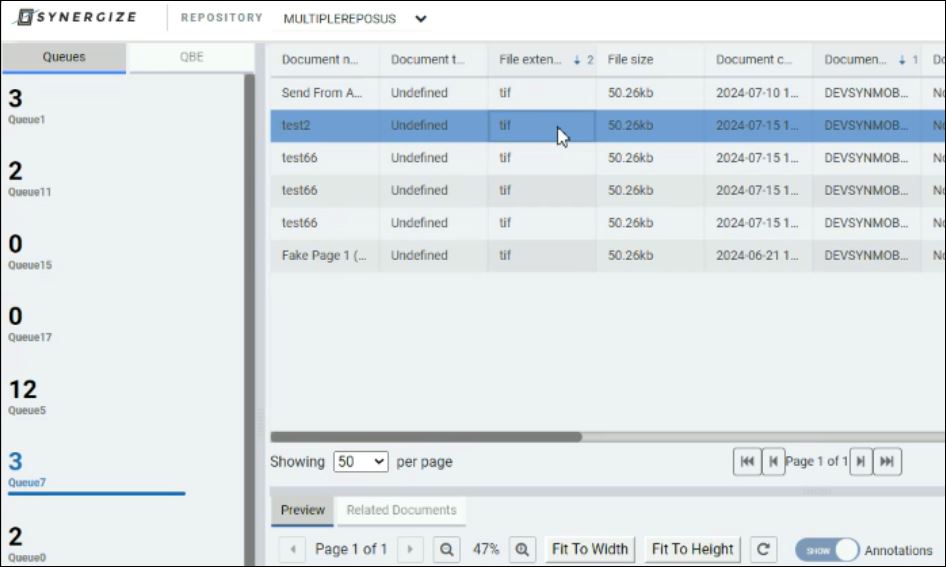
Use the workflow filter to see only your queues or look at documents in specific queues:
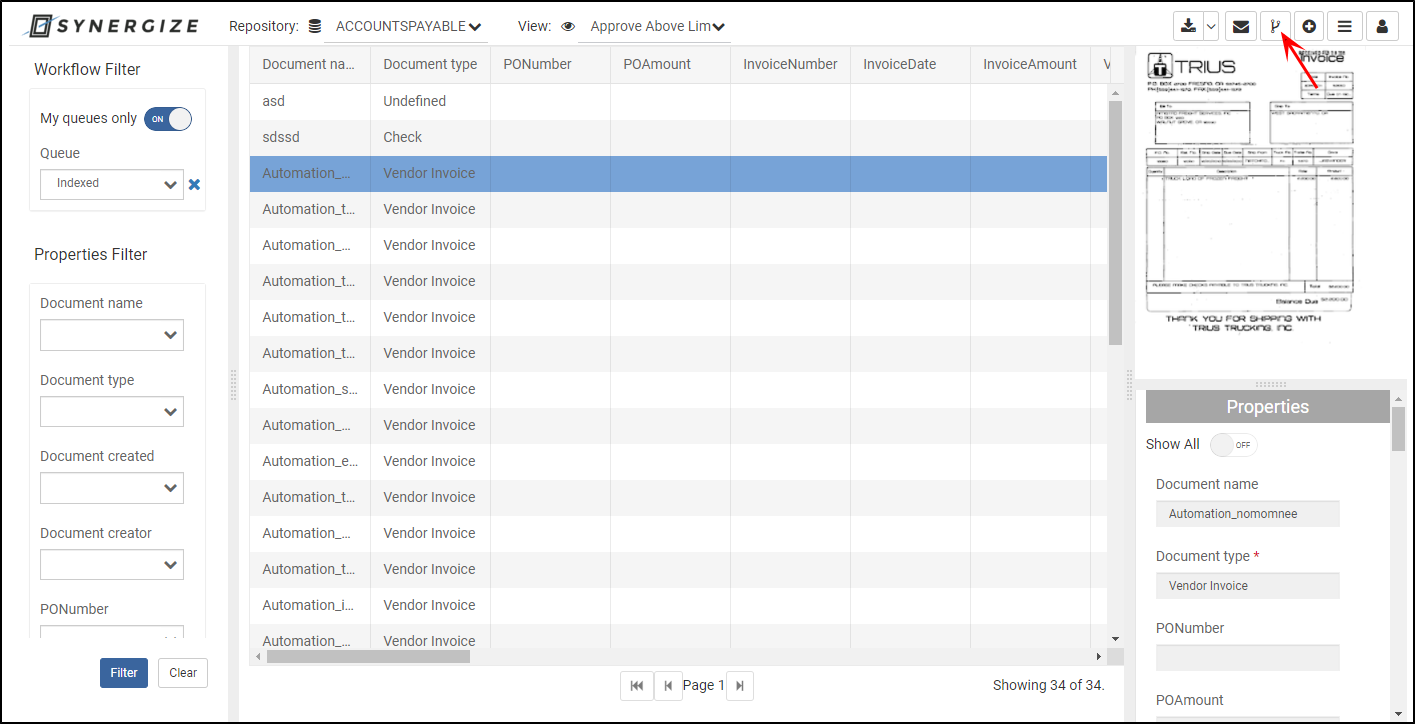
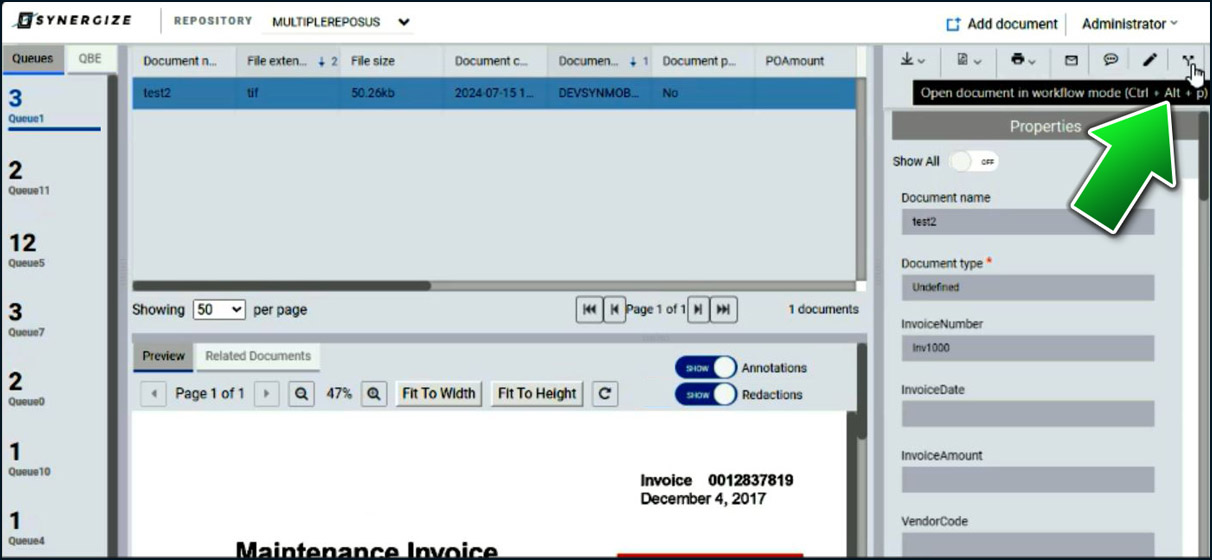
To enter workflow mode, click the workflow  icon:
icon:
Note: Parallel workflow is not supported. If your repository is configured for parallel workflow, you will not see the workflow icon or the workflow filter.
You can only process documents if you have a license for the Workflow module.
With a Workflow License
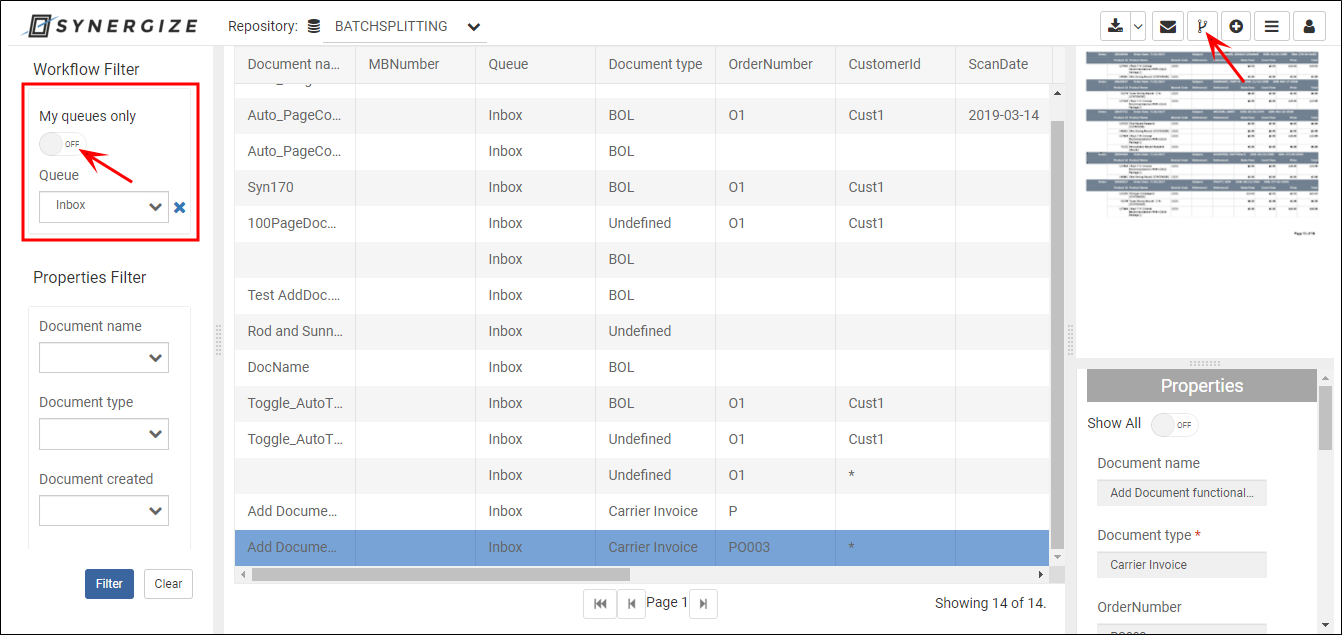
You can see an additional Workflow Filter area where you can specify filters.
This allows you to find documents in a specific queue.
A switch allows you to limit your possible filter to only those queues from which you are allowed to process (My queues only).
Two things to consider for My queues only:
1. Queues that are final queues (from which you cannot process to another queue) do not appear on the queue list.
2. Only those documents which are assigned to you as approver will show up in your approval queues.
To take the selected document into "Workflow processing mode" click on the workflow icon.
If you have opened a document for viewing, you can also access Workflow processing mode from the overlay.
Indexing and Completing Questions
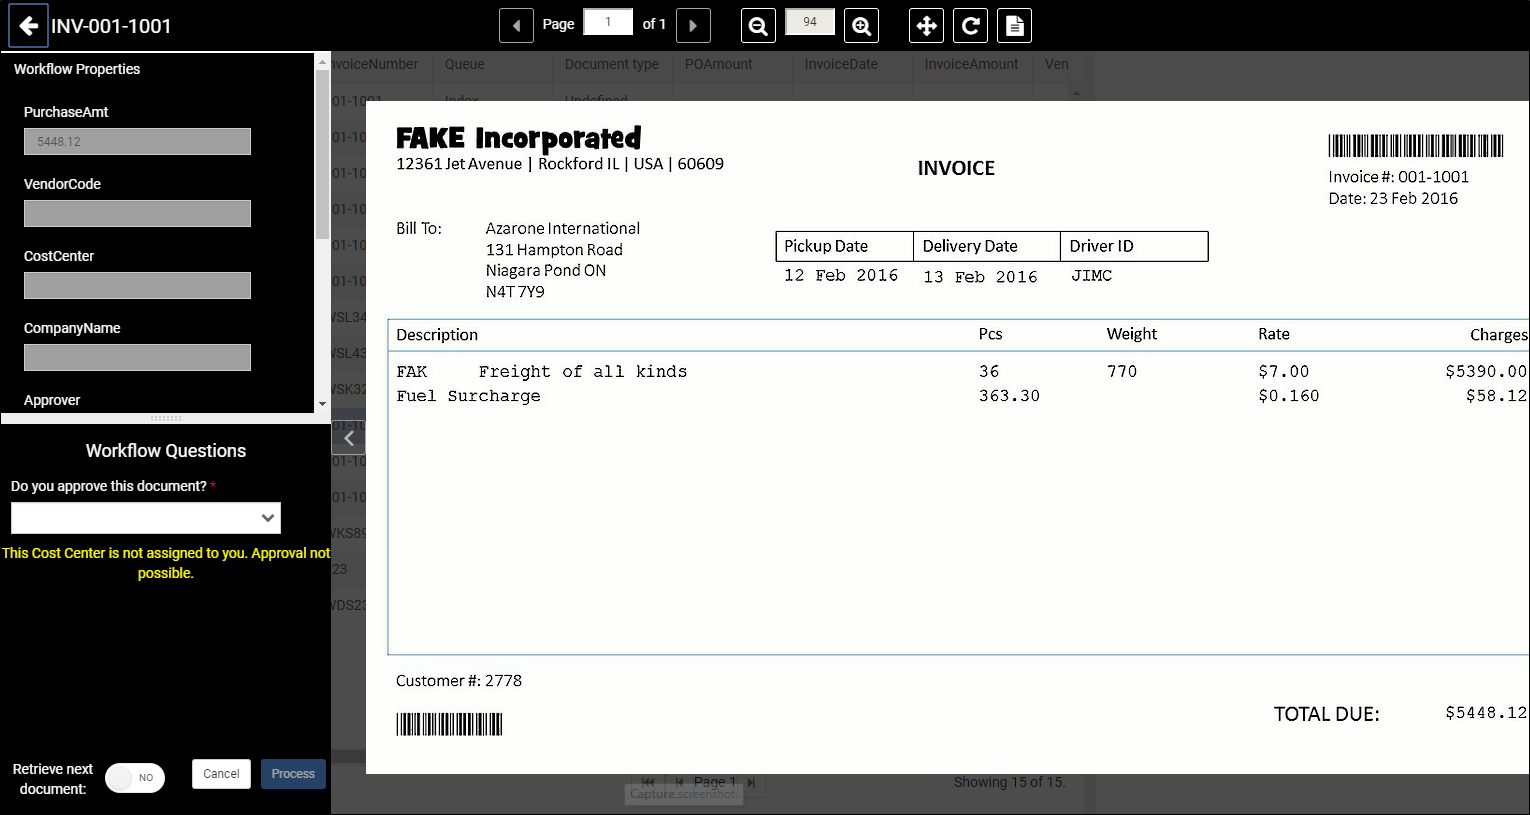
A workflow can be designed to require specific properties before the document can be moved to the next queue. Adding or updating properties is known as "indexing". In addition, the next queue can be determined by asking questions about the document's state or other additional information.
Lookups and Cascading Lookups
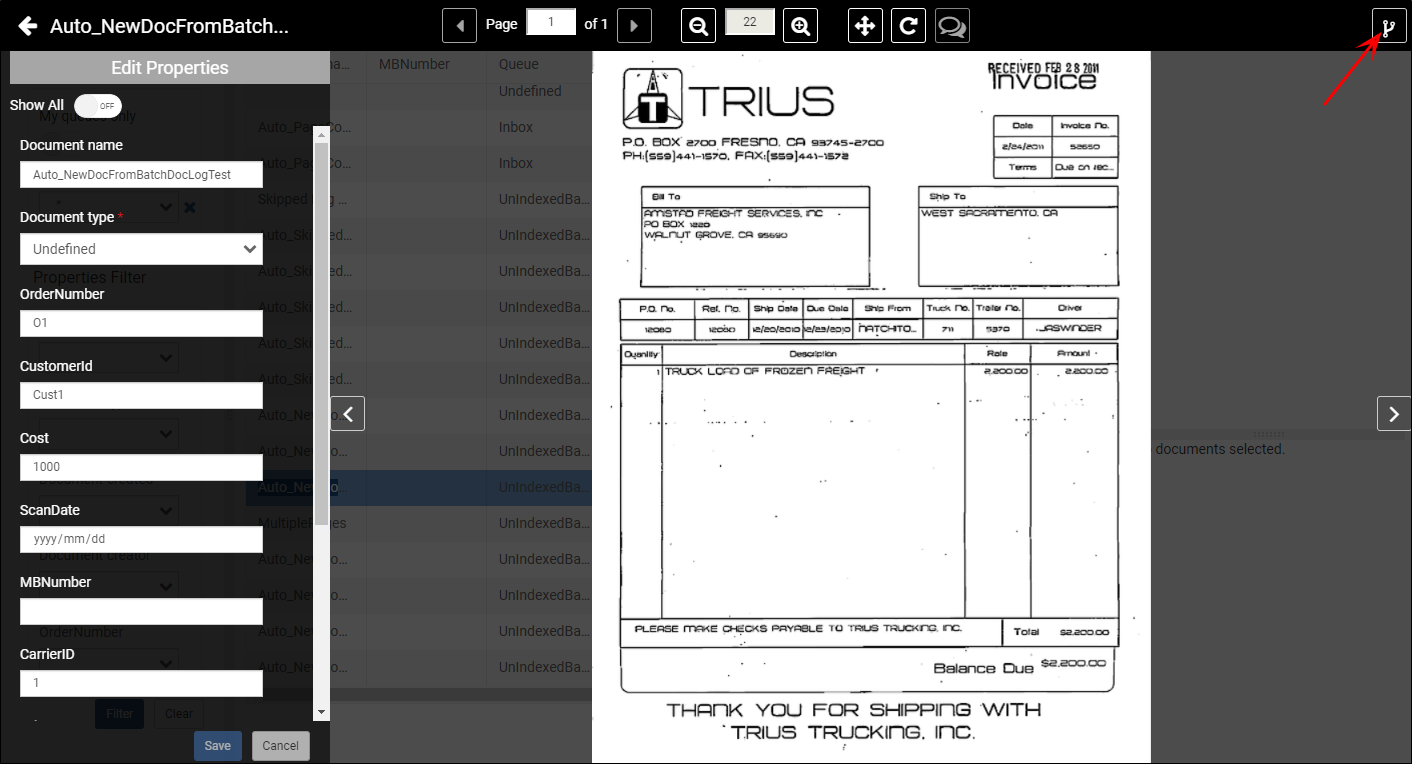
When you enter a value into a field, it may trigger a lookup into the database, which populates other fields on the Workflow Properties pane.
If there is more than one match based on your initial entry, you may be asked to choose the right record to populate the other fields.
In addition, the chosen values may trigger additional lookups (known as a cascading lookup).
Regardless of what values are pre-filled for you from the lookups, you can still provide new or replacement values in each Workflow Properties field.
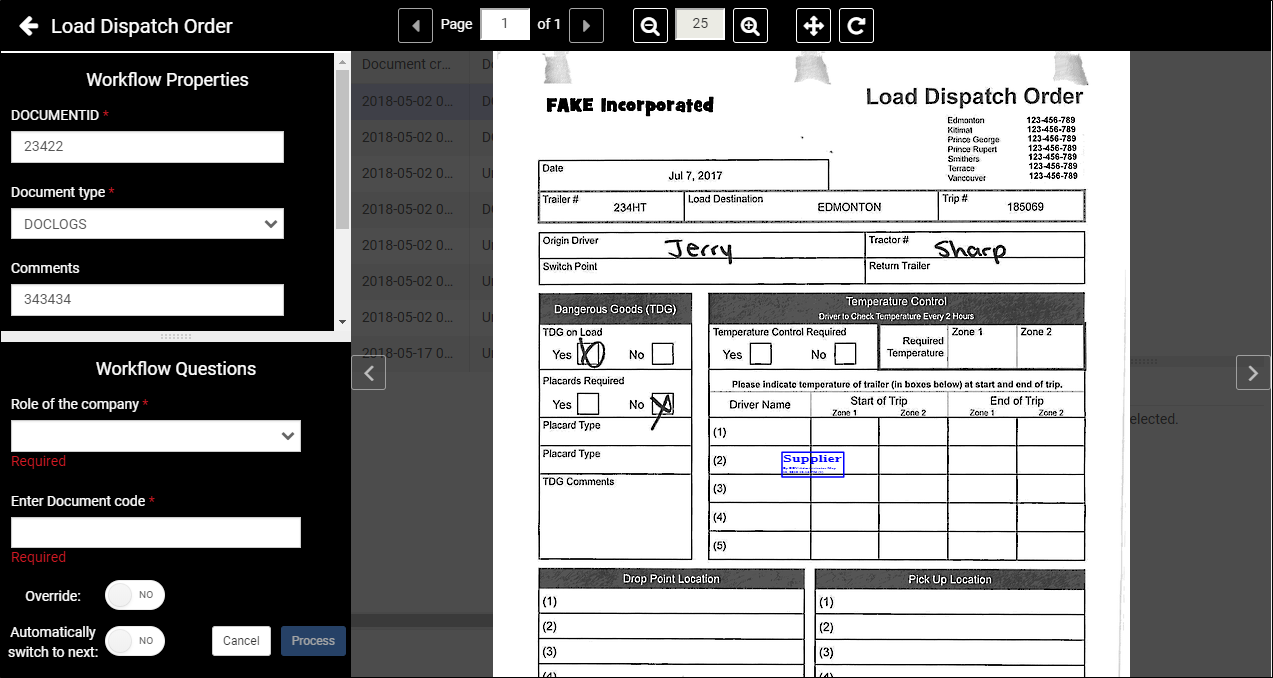
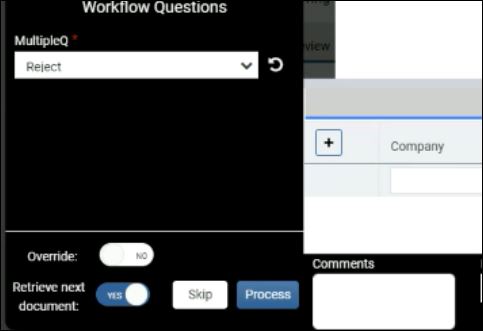
Workflow Questions
Additional information may seem similar to document properties but in the question section the answers are not stored with the document. They are exclusively used to determine the queue to move the document into when Process is clicked.
Overriding and Batch Processing
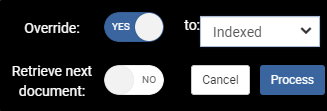
If you have the authority, you can override the destination queue, sending the document directly to a specific queue, like Indexed.
There are two levels of override authority:
-
Queue level override allows you to push a document to any queue that is next in the workflow (either a designated exception queue or a queue following a question branch).
-
Scenario level override allows you to put a document into any queue in the scenario, whether or not it is next in the workflow.
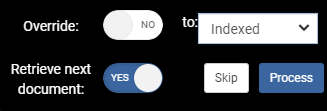
You can also process several documents in a row. The grid on the main view shows the results of your filter. If, for example, you wanted to process all the documents in your INBOX queue, first filter by that queue. Then you can enter the workflow processing mode and turn on the Retrieve next document option. Now you can process one document after another or skip a particular document. (Note that in this mode Cancel switches to Skip.)
When you process the last document on the first page of your result set, the overlay is automatically hidden and your filter is applied again to get a new result set. Remember, if other people are working in the same repository and the same queue, there could be more or fewer documents in the queue than you expected.
Collection Persistence
Introduced in Synergize Explorer 14.1.0 in April 2019, collection persistence can be set up in Workflow Designer by an administrator. While processing a workflow, collection persistence means that property values can automatically be entered based on a previously entered set or properties associated with a collection key.
Example: You are processing several documents for the same trip number. The driver ID, power unit number, and trailer number can all be entered automatically, or persisted from one document to the next.
Only when a different trip number is entered does the system have blank values for those properties. Furthermore, if you change a value while the trip number is the same, the new value for that property will persist from that point on but already processed documents retain the values they had at processing time.
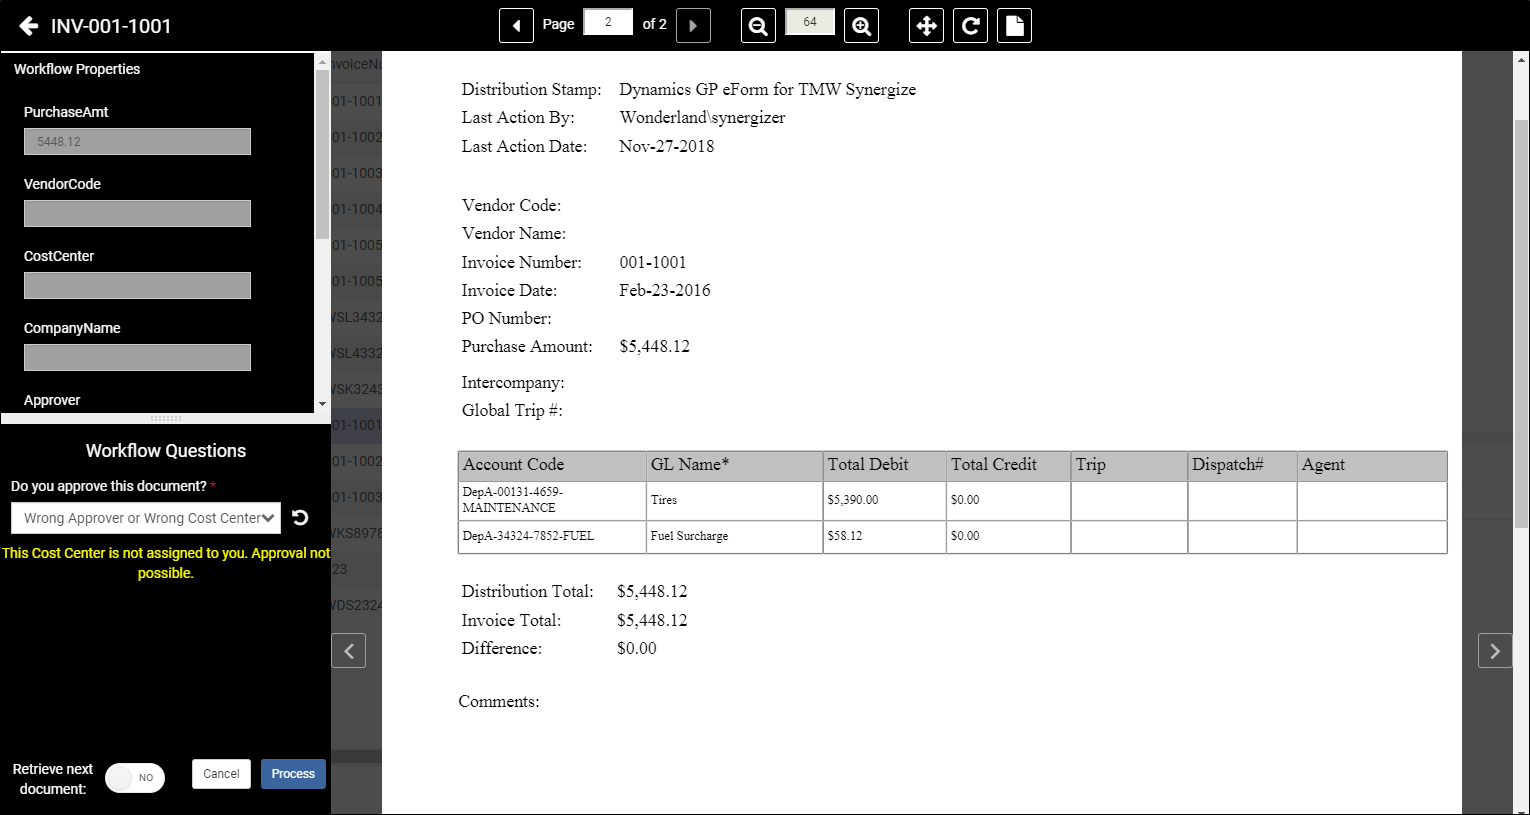
The Synergize Explorer 14.0.0 (Jan 2019) or 15.x (April 2023) Workflow feature allows you to move documents through a business process. With Explorer Accounts Payable (AP), you can enter invoice details onto an AP (remittance) form and send the document into an approval workflow.
For each line item on an invoice, you can enter company, division, department, general ledger code, general ledger name, and amount.
-
Depending on your configuration, you may be able to enter additional information per line item.
-
Initial indexing may have provided the invoice total amount.
-
A calculated field shows whether or not the line item amounts add up to the invoice total.
-
Depending on the way your workflow is designed, you can still process a form if there is no AP form data (no line items entered for the invoice). The approval can be based on the document image itself and the indexed invoice total, with the remittance form entered later.
-
You can see an additional Workflow Filter area where you can specify filters. This allows you to find documents in a specific queue. A switch allows you to limit your possible filter to only those queues from which you are allowed to process (My queues only). Two things to consider for My queues only:
-
Queues that are final queues (from which you cannot process to another queue) do not appear on the queue list.
-
Only those documents which are assigned to you as approver will show up in your approval queues.
-
To enter accounts payable workflow mode for a document while in an Accounts Payable repository, click on the Workflow icon.
The user interface for Accounts Payable workflow is intended for use by a few different types of Users:
-
Indexer
-
AP Data Entry
-
Approvers
Indexer and AP Data Entry
As with any workflow, you can choose to process a single document or a batch of documents. Although each queue can be configured with more or fewer fields, the AP Workflow screen generally looks like this:

-
For batches, turn on the Retrieve next document option (A).
-
You can enter the required properties for the document (B). You can answer the questions that are mandatory before processing. In approval queues, these questions will be about your approval.
-
To begin completing the General Ledger entry table (known as the AP form), you can enter values into the table line by line (C). To get started, you can enter a Vendor code in the properties pane, and if there is a default cost center and GL code associated with that vendor, it will be entered as the first line of the GL entry table. You can use the key combination Alt-Shift-DownArrow, to add a new line to the table. Each line item from an invoice can be entered into the GL entry table.
-
Values for the lines are added up, to provide a total which should match any invoice total entered previously as a property of the document (D).
Approvers
Approval queues can present documents in AP workflow with or without the GL entry table.
If you are an approver and can see the GL entry table, you cannot approve or process an invoice if the total amounts don't match.
Documents in AP Repositories with Forms
Synergize repositories can be special-purpose repositories with specific features summarized on forms. An Accounts Payable repository has the concept of an AP Remittance Form, which serves as a summary of the values exported to the accounts payable system based on the current document.
If you are using an Accounts Payable repository, while the overlay is active, you can switch the show form data setting ON or OFF. If you are an approver and you cannot see the GL entry table, you can still see the remittance sheet form to check the information entered for that invoice.

If you switch it ON, each document that has a form show the form as the last page. For example, if you have a four-page document and you turn forms ON, you may see a fifth page in the preview.
The added page is provided as a convenient way to access and view the remittance form; it does not actually add a page to your document. In other words, if you download or email the document, it will still have its original page count and not include the remittance form.
Signature stamps were introduced in Synergize 16.x in August 2024.
Work with your administrator to set up your official library of signature stamps.
-
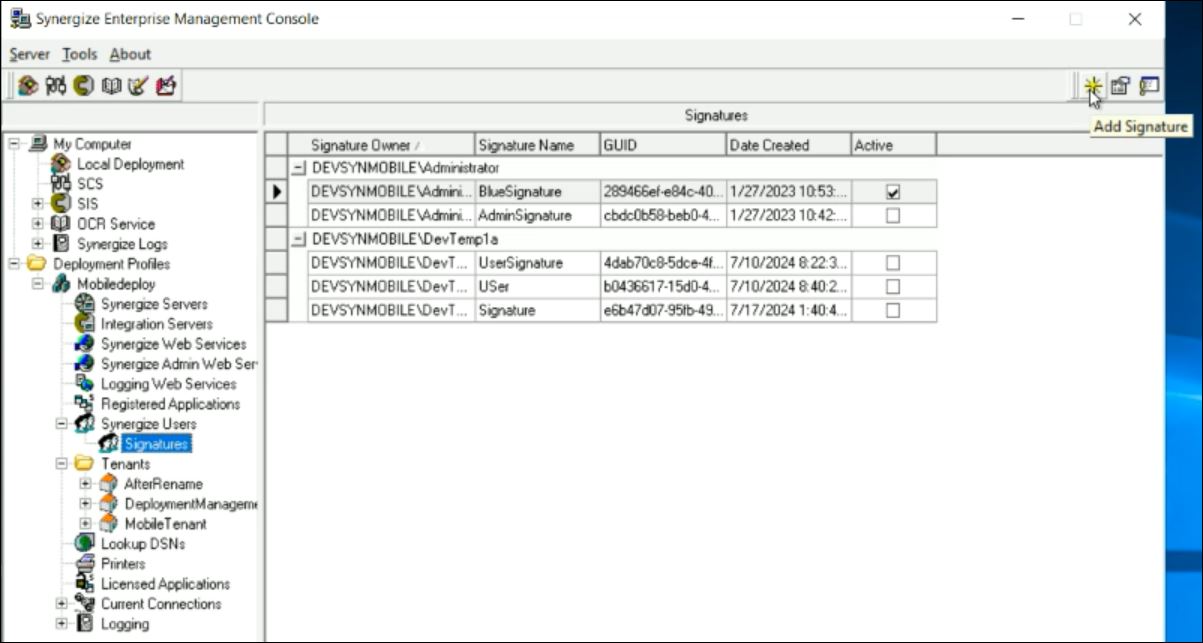
On the Synergize server, launch Synergize EMC as administrator.
-
Expand Deployment Profiles and open a deployment profile.
-
Under Synergize Users, click Signatures.
-
In the Signatures list, click Add Signature.
-
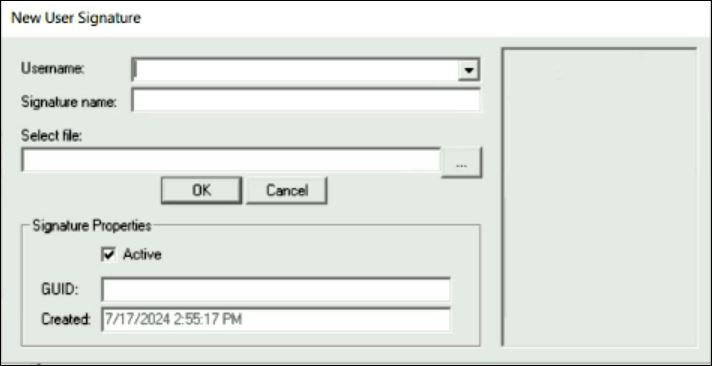
Complete the New User Signature window:
-
Username: Choose a user from the drop-down list.
-
Signature name: Enter a unique name to identify this signature. For example, 2025-JRT-SIGNATURE.
-
Select file: Browse to select an image file to appear on the new custom signature stamp.
-
Active: Select this option to enable the stamp to be used on documents.
-
GUID: The system assigns a globally unique identifier (GUID) to authorize and trace all future instances where this stamp is used.
-
Click OK.
-
-
Launch Synergize Explorer and select a queue.
-
Select a document and open it in workflow mode.
-
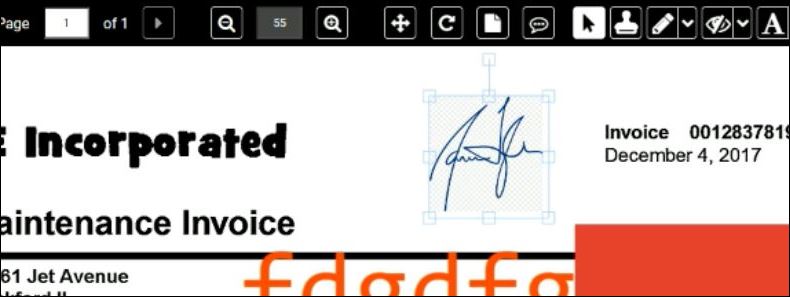
Click
 Signature to add your signature to the current document.
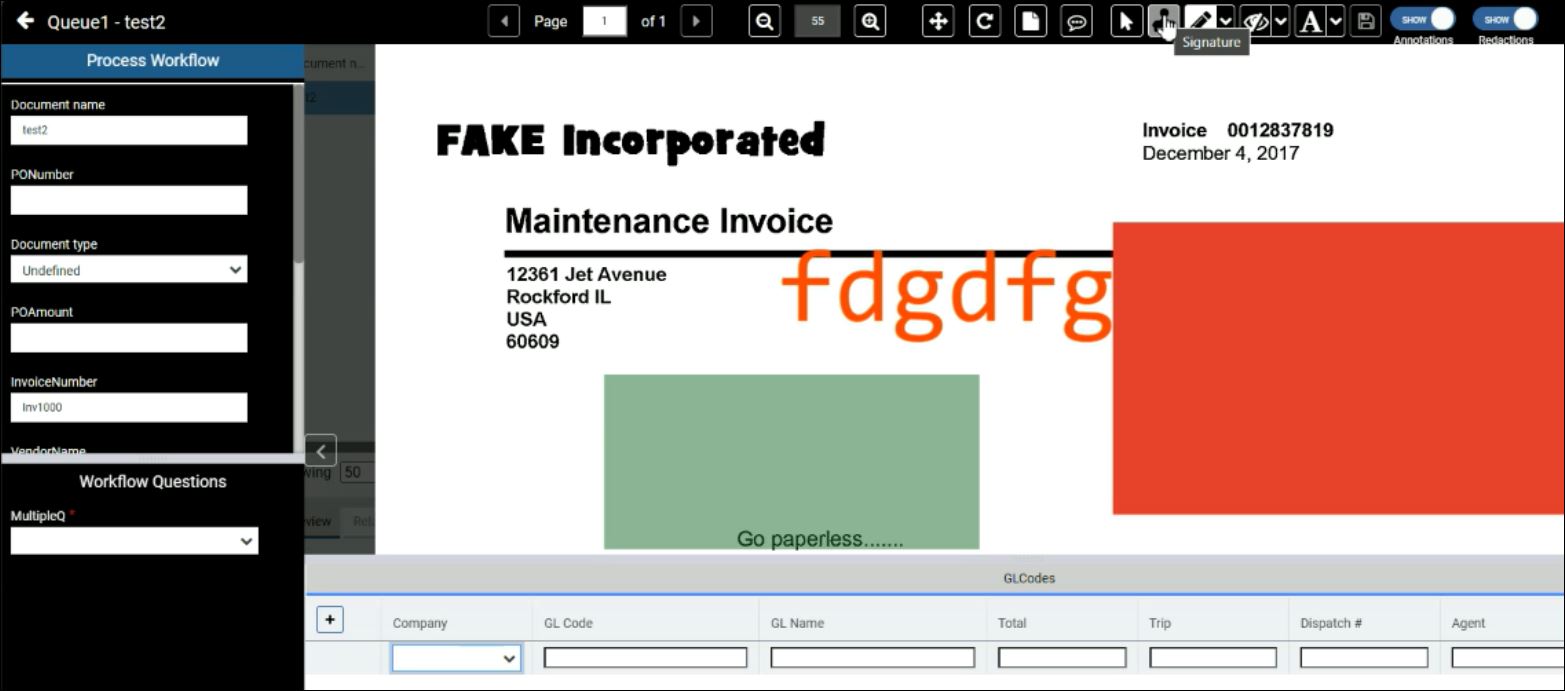
-
Your standard pre-configured signature appears and can be moved or re-sized.
-
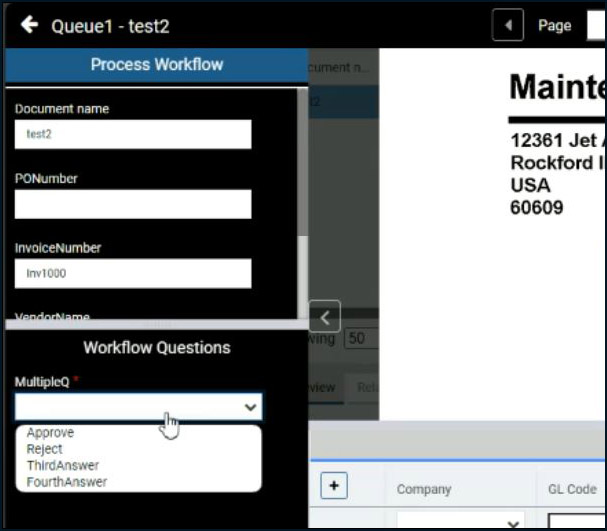
To add your signature as a stamp of approval, rejection, or another custom value, select a value from the pre-defined list for a field with values mapped to your signature stamps under the Workflow Questions section.
-
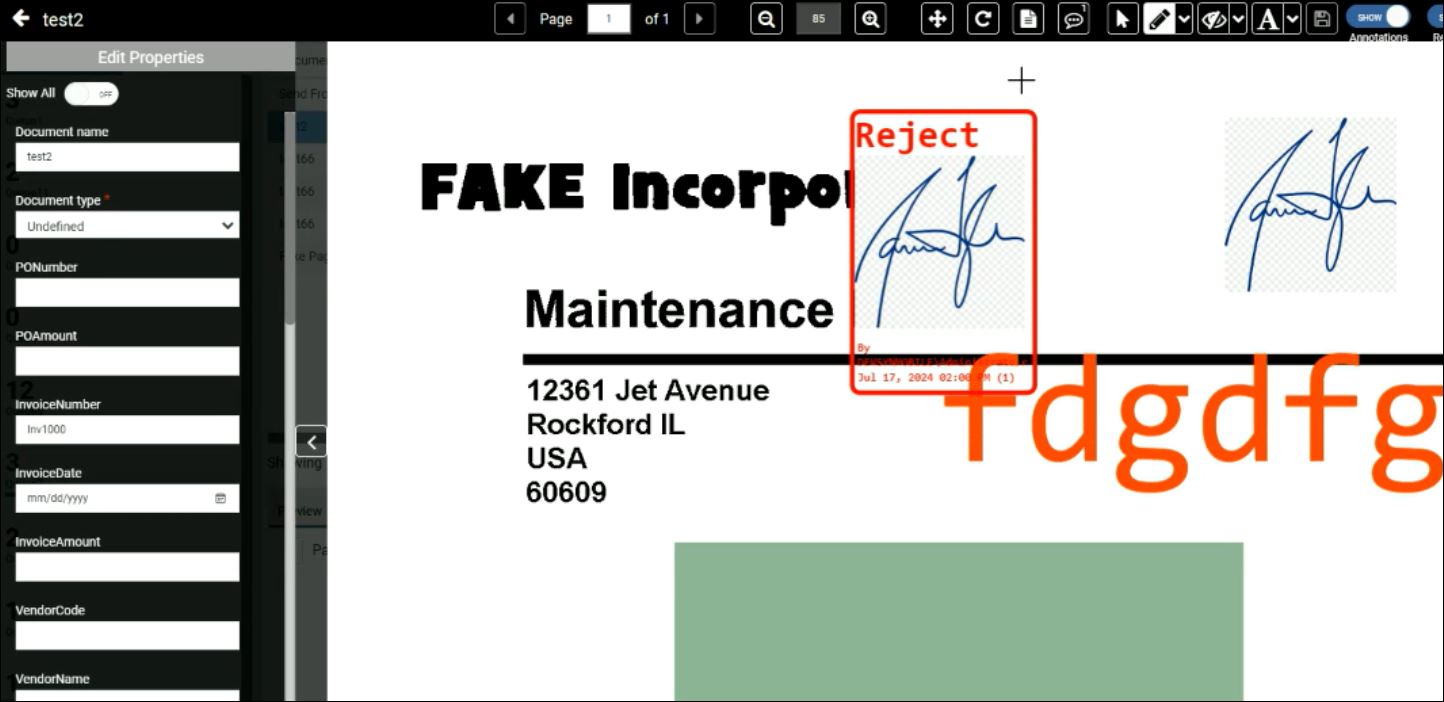
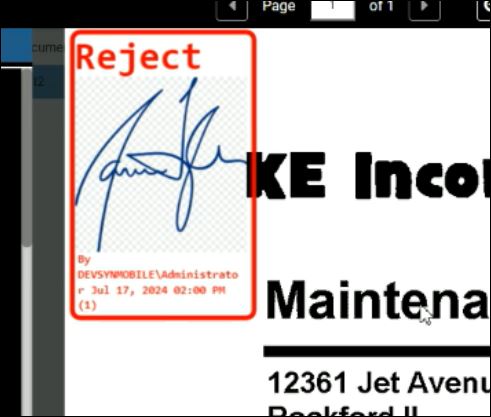
In this example, the user selected Reject to generate a signature stamp to indicate that the document was rejected.
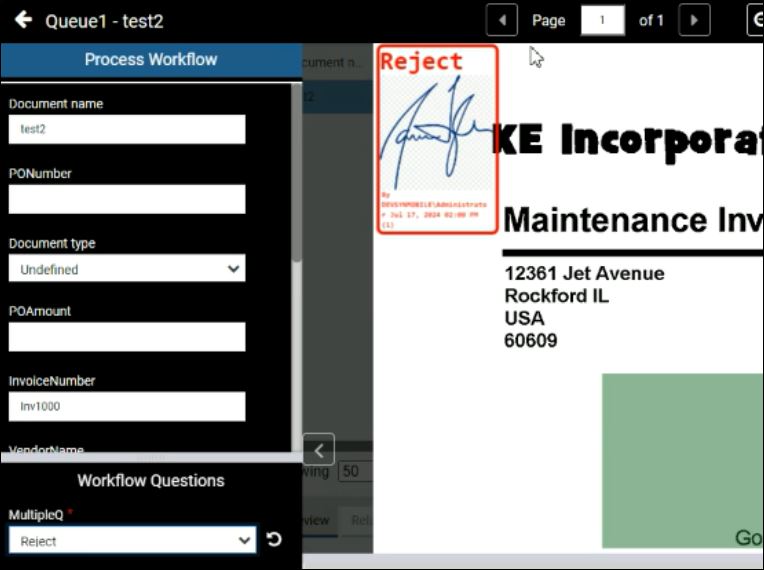
The signature stamp includes the following information:
-
Status: A pre-defined status value such as Approve, Reject, Duplicate, or Unrecognizable.
-
Signature: The signature for a business user or an authorized department head.
-
Signature Name: The name for the stamp defined in the system.
-
Date-Time Stamp: The original date and time when the signature was applied.
-
GUID (hidden): The globally unique identifier is included in the hidden metadata for each instance of an applied stamp.
-
-
To process the documents through the currently active workflow, click Process.
-
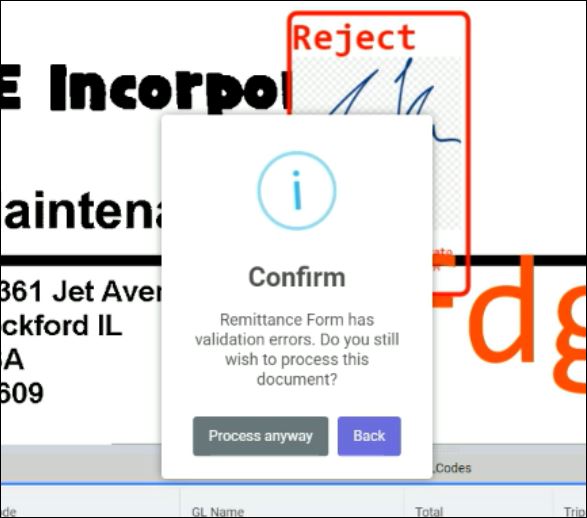
Click Process Anyway or Back if a Confirm message appears. In this example, we clicked Process Anyway to save time and advance to the next step.
-
Locate the queue and open the document.
-
Verify that the processed document continues to display all previously applied signature stamps.