Install and Configure Synergize OCR Form Processing
Form Processing features the following installation types:
Form Processing is most commonly installed without an indexing repository. This works well for small, simple jobs where pre-split documents are already in the target repository and you're adding the doctype and fields to them.
Synergize Process Server (SPS) is used to search the repository for documents to work on, then it identifies and optionally extracts data the documents, and updates them with new information.
Choose to install Form Processing with an indexing repository when dealing with batches and higher volume. This installation type is required for using Form Indexing.
Batches are saved, usually using SPS, to a special Indexing Repository. Multiple worker processes pick up new Batches, process them, and then save the results back to the verification repository (still in batch form). If desired, data can be verified against databases via an SPS process, optionally sent to Form Indexing, then exported to the target repository (for example, ShipDocs).
With this installation type, documents should be directed to the indexing repository before being saved into the target repository. This can complicate existing solutions, which were designed to collect documents in the workflow queues of the target repository, but going forward, new installations should collect documents in the indexing repository first.
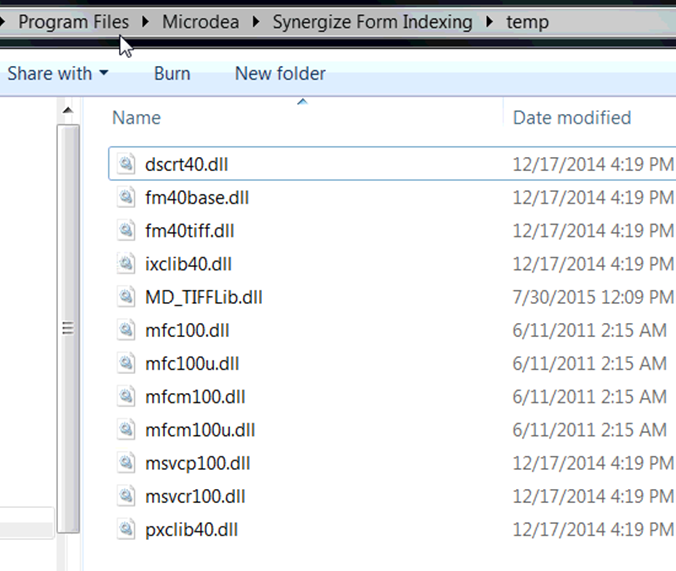
If Form Processing is not working on a 32-bit Windows 7 or Windows 10 installation, check your install directory for the following DLLs and move them to an archive or temporary directory:
-
dscrt40.dll
-
fm40base.dll
-
fm40tiff.dll
-
ixclib40.dll
-
MD_TIFFLib.dll
-
mfc100.dll
-
mfc100u.dll
-
mfcm100.dll
-
mfcm100u.dll
-
msvcp100.dll
-
msvcr100.dll
-
pxclib40.dll
Before you can get started setting up any forms, follow the steps below to configure the OCR Service.
-
Verify you have installed Form Processing 14.0.0.4 or later (March 2018).
-
Verify you have installed the following prerequisites:
-
Synergize Process Server
-
Synergize Server
-
-
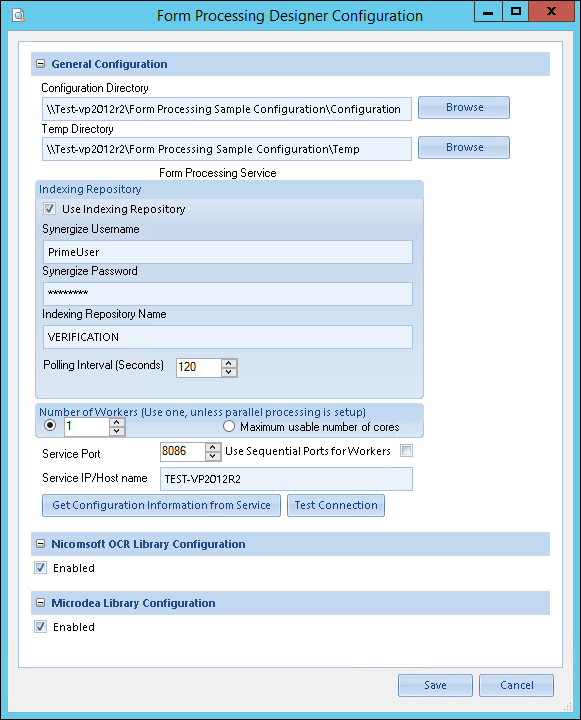
To configure the Form Processing Service, use the Form Processing Designer that is installed on the same machine as the Service. All other client Designers show the Form Processing Service Configuration in read-only mode. To reach the configuration window, select Configuration from the Tools menu.
-
In this window, you can set four distinct things: directories, the indexing repository, service parameters, and engines.

-
Directories: Form Processing requires two directories for operation: a Configuration directory, which stores all of the Form template data (extraction plans, forms, pages, .tif files), and a temp directory, which is used for temporary files, while operating. These directories must be network shared folders. Some OCR engines have maximum path lengths. So, for compatibility, we recommend keeping these paths to fewer than 100 characters. The Configuration directory should be backed up regularly and can be transferred to a different computer in the case of a hardware upgrade.
-
Repositories: As mentioned in the overview, an Indexing Repository can be used for processing incoming forms. The repository must already be setup in a specific format, with expected document types, and workflow queues. If you are using a repository, the service can be set up to use it by entering the information here. The polling interval is how often the form processing service checks the repository for new documents. After processing a document, it immediately checks for the next document, regardless of this interval. So, this is only used once the StartOcr queue of the repository is empty. 30-120 seconds is typical.
-
Number of Workers: The OCR service starts up several “worker” instances that can process documents in parallel. If configured to use an Indexing Repository, then each instance will poll the repository and process new documents independently. Without an Indexing repository, these instances can be set to use sequential ports, so that many SPS processes can each have access to a dedicated OCR instance to serve it. The default is the number of CPU cores, minus 2. It makes sense to tweak this setting, depending on expected throughput.
-
Service Port: The default port for the service is 8086, but it can be switched to use any free port on the system. Make sure to choose the same port in SPS, the client Designer, and Synergize Form Indexing, if this is changed. These various clients "talk to" the Form Processing Service on the specified port.
-
Use Sequential Ports for Workers: If disabled, the system will use random ports for the workers. This is appropriate if an Indexing repository is being used, as we don’t need to communicate directly with the workers (only the OCR Service itself will use these ports). The benefit is that if one worker fails to release this port, when closing down, which occasionally happens, the new worker can simply use a different one. When using sequential ports, the workers will use the ports directly above the service port. That is, with 3 workers and a service port of 8086, one worker will use the default service port (8086), and the remaining two will choose 8087 and 8088.
-
Host/IP: The hostname or IP address where the service is installed.
-
The window should pull values from the service upon loading.
-
As an administrator on the same machine as the Form Processing Service, when you complete the changes to your settings, click Save.
-
The Form Processing Service can have multiple configuration directories. As Administrator, you can set the service to work with only ONE configuration at a time. All client Designers will use the configuration you specify. Specifying a Configuration Directory will do the following upon Save:
-
Choose the shared folder where the configuration is saved.
-
Reload the configuration into this instance of the Designer.
-
-
OCR Library Configuration: Select the engines that you wish to use. Use the Microdea library for doing Optical Mark Recognition (OMR) if you are having trouble with the Nuance engine reading check boxes and other marks. Click Save.