Design a Form in Synergize OCR Form Processing Designer
You may be one of several form processing designers on your team.
Here are some tips and suggestions to get the most out of Form Processing.
-
Multiple Anchors: For the highest chance of identifying a particular form or page, use more than one anchor. By combining the anchors, you can not only get a higher "recognition" rate, but you can also identify specific subsets of form types (like the first and last page of an invoice).
-
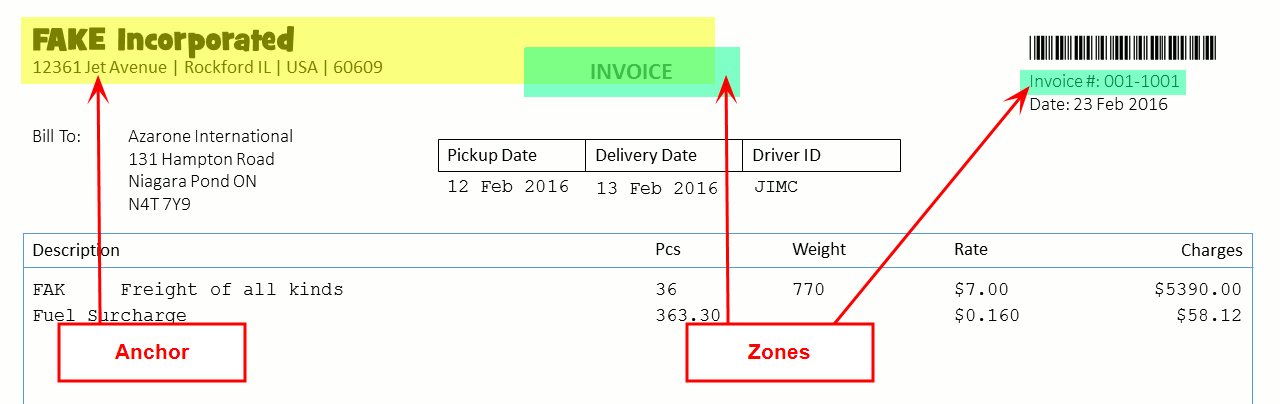
Anchor Proximity to Zones: Always place zones very close to their associated anchors. You can even overlap them. The closer a zone is to its anchor, the less likely that shifting of a scanned document will cause misreading or completely miss the information in a zone.
-
Expected Scan: If everything lines up, then zones that are relatively far from their anchor can still be interpreted.
-
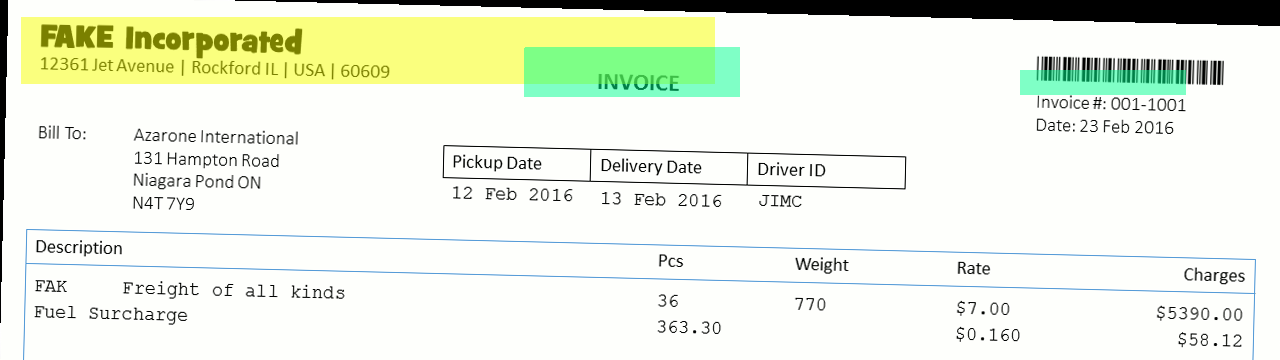
Shifted Scan: When a scan enters the scanner shifted (or worse, shifts while in transit through the scanner), then zones that are far from their anchors can be missed.
-
Extracting Date Values: In Form Processing, dates are always sent as text string values and not in actual date formats. This can result in an error while saving the document: Error Saving Document. Web Service - Save Document - Copy Properties - Conversion from string "2019/11/20" to type 'Date' is not valid.
-
Solve this problem using a value mapping action in Synergize Process Server (SPS).
-
When you know the date format that you're using, it can still be incorrectly interpreted. For example, if your dates are known to be 2019/11/20 you use the format “yyyy/MM/dd”. But what if the date is in slightly different formats like: 2019/11/02 or 2019/11/2?
Examples of Date Mappings: To avoid the problem in the example above, and catch as many variations on a date as possible, use SPS and include the following mapped values as combinations of the known date format:
-
yyyy/MM/dd
-
yyyy/M/dd
-
yyyy/M/d
-
yyyy/MM/d
Enter these separated by semicolons:
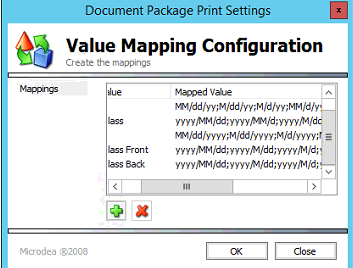
yyyy/MM/dd; yyyy/M/dd; yyyy/M/d; yyyy/MM/d
The SPS action Mappings property might appear as follows:
-
-
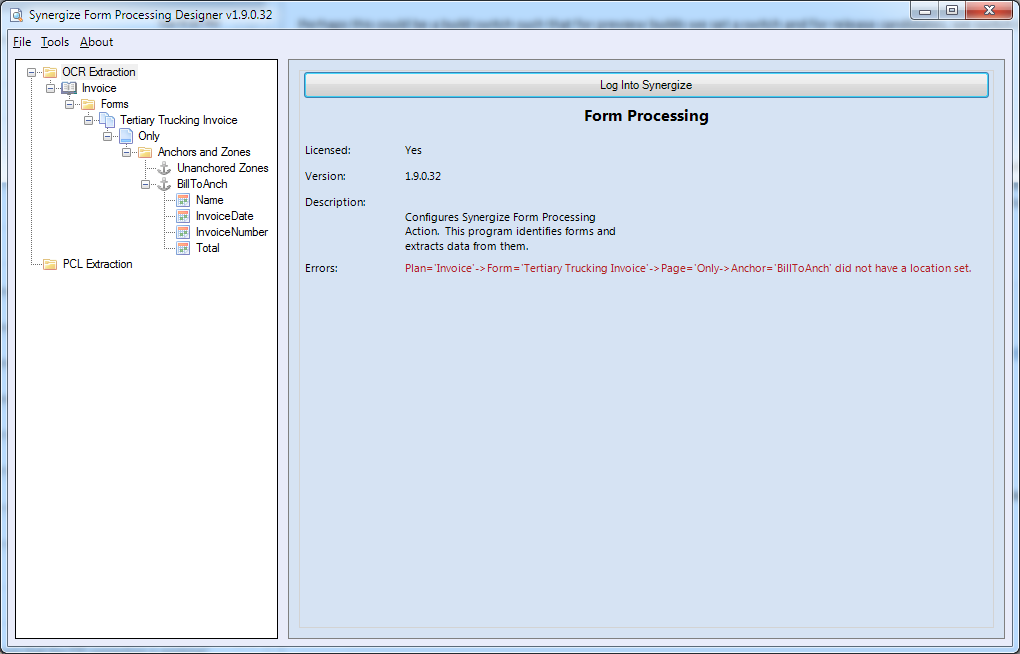
First introduced in 2016 as part of Synergize Form Processing 1.9.0.32 and later releases, the form designer provides an interface for you and other users to build and maintain forms. To set up your own forms, follow these steps:
-
Verify that your administrator has installed the following prerequisites:
-
Synergize Process Server
-
Synergize Server
-
-
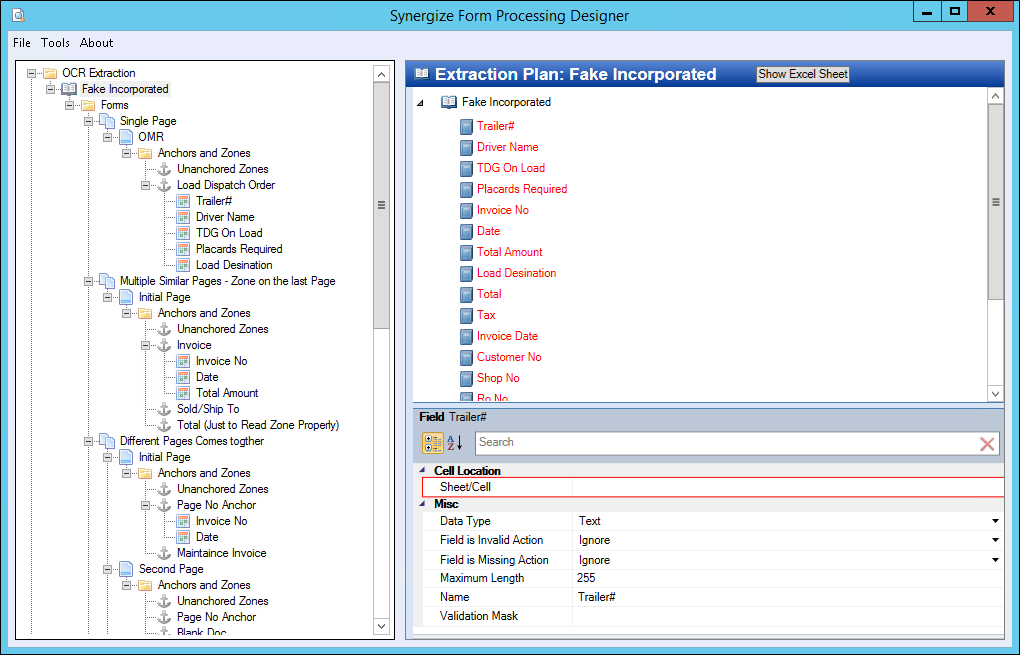
Familiarize yourself with the designer and take a look at each screen or window in the user interface.
The tree on the left side of the window lets you navigate between the various extraction Plans, Forms, Pages, Anchors, and Zones that make up the OCR Configuration, also known as the template configuration.
-
The root OCR Extraction node provides the ability to connect to Synergize and get a list of errors in the current template configuration. Logging into Synergize is optional, but it will populate drop-downs in the designer with document types and fields from the repository, which is often helpful.
-
An OCR solution can be setup to process documents to more than one repository, but the designer can only connect to one repository at a time.
-
The Errors field lists errors in the current template configuration. Its format is a path that you can follow in the tree on the left that shows the plan, form, or page where the error occurs and a description of the error.
-
Extraction Plans are where you set up the common fields and validations for a group of forms.
-
Right click on the OCR Extraction node in the tree on the left side of the screen and choose “Create Extraction Plan”.
-
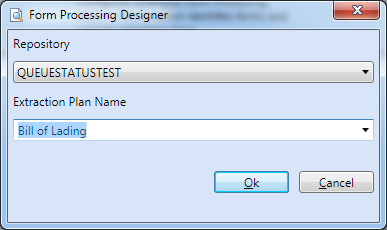
In the resulting window, enter the name of the extraction plan.
Extraction Plans can have any name, but by convention and in the vast majority of cases, Extraction Plans will map to doctypes in a Synergize Repository.
-
If you’ve logged into Synergize, you can choose a repository and then use one of the document type names as an extraction plan.
-
Extraction plans are often called templates. You may encounter the following scenarios when trying to create extraction plans to process different kinds of documents.
Scenario
Comments
Single Page
There's a single form with a single page. The scenario includes OMR for mark recognition.
Similar Multi-Page - Zone on Last Page
An invoice comes in and has a standard header area on each page, with the totals that you're interested in extracting appearing only on the last page.
Different Pages in One Document
A batch of very different pages comes together as a single document. Each must be present for the document to be identified as being a particular type of document.
Line Items
A multi-page invoice could have the line item in which you're interested on any page, for example: in a long list of transactions. This scenario shows you how to create flexible extraction zones that can grab line item data from the list.
The upper-right pane is a tree that includes the extraction plan and the fields that can be read by the OCR engine for this extraction plan.
-
To create a new field, right-click on the extraction plan in this pane and choose Add Field.
-
If you’ve connected to Synergize, you can select a repository and choose from the list of repository fields, or enter your own field.
-
When the extraction plan node is selected, you can edit the properties of the extraction plan, including its name and description.
-
Ignore the Cell Tab Order and Workbook File properties, as these are only used when customizing the excel grid for this plan.
-
If you click Show Excel Sheet, an Excel grid is displayed that is used in Form Indexing. This allows for customization of the way data is presented in the Form Indexing program, for each extraction plan. The recommendation for most users is to skip this and use the default grid.
-
After creating a field, you can choose it as the display field.
-
In Form Indexing, each document in a batch is displayed with a label that just shows its extraction plan name by default. When a display field is selected, it shows the value of this field next to the doctype in Form Indexing, which is helpful when navigating between documents in a large batch.
-
You can also edit other field properties.
-
Select a field to edit its data type, maximum length, name, and its validation mask.
-
The validation mask is a regular expression that will validate the field data. If, for example, the shipping numbers for all this extraction plan’s forms followed a specific pattern, this could be used to validate that a proper shipping number was read.
-
Note that there are also validation masks on zones as well. They would be used for validation rules that aren’t true across all forms. The field validation mask is also run after any zone transformations have happened.
-
When a field is missing (empty) or fails validation (by the field validation mask, conversion to the specified data type, max length, low confidence, or zone transformation regex), the system can flag the form with an error or ignore the failure.
-
If a form has been flagged with an error, it is possible to handle it differently in SPS, possibly by sending it to a different workflow queue, if Form Indexing is not used. In practice, this is rarely used as we expect that errors occur, even when data passes all of these validations, and we generally only process documents to different queues in SPS when we’re confident that they’re error free (at least on the important fields), which is generally done with external validation, such as checking multiple OCR’d fields on the form against records in a database.
-
-
Fields can be deleted by right clicking on the field and choosing Delete Field.
-
Forms can be added from the tree on the left side of the screen.
-
Right-click on the Forms folder under any extraction plan, and choose Add Form.
-
On the General tab, complete the Name field. We recommend giving a descriptive name to each form such as Tri-State Trucking BOL or Standard Invoice.
-
Forms created under a given extraction plan are logically grouped together and will share the same fields as all other forms that are under the plan.
-
Often times, forms won’t have all of the same fields or may have a unique field that the other forms don’t have.
-
When deciding how to group forms into extraction plans, there are no hard rules, but most of the time the extraction plans are the Document Types in a Synergize Repository and the Forms are documents that will have that DocType.
-
-
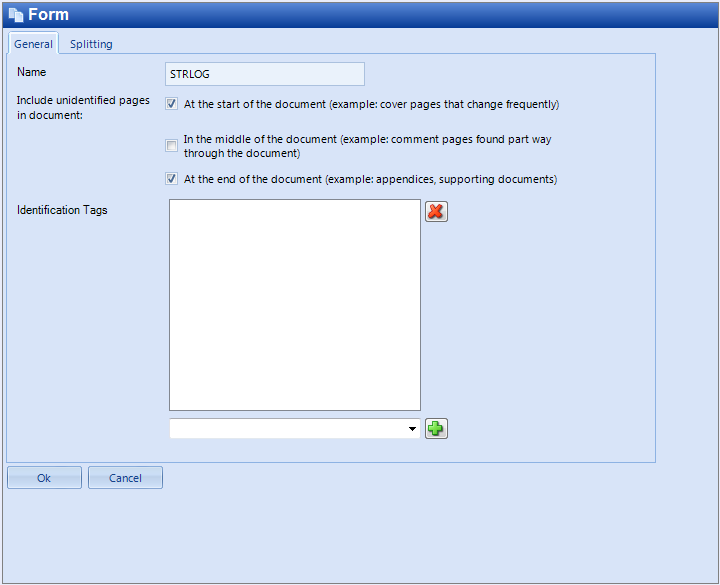
On the General tab, select one or more check boxes to determine how the application will Include Unidentified Pages in Document:
-
With this option, we can choose to add extra pages before, in middle of, or after the current form.
-
Often, documents can have cover sheets or extra paperwork added before, in the middle, or after the document. If we can map all of these extra documents and they just get added to the current form, we should do so, adding them as extra pages. If they are general fax cover pages or documents that can be added to multiple forms or they’re constantly changing, we can handle them as pages that we should include.
-
If we first read a form that supports unidentified pages after it and next read a document that supports unidentified pages before it, all of the pages will go to the prior document. Because these pages are unknown, it’s impossible to know which document they belong to. With this option enabled, valid pages that can't be recognized for whatever reason may be treated as these unknown pages and grouped with the document that follows or precedes it.
-
-
Under the Identification Tags field, add a tag and click Add. Tags are text labels that can be attached to a form or individual page configurations. When identifying a page, a comma separated list of tags can be passed into the search by SPS or the Indexing Repository. Only pages that include one of the tags (or are part of a form that includes one of the tags) are considered, when identifying the image.
Example 1: A set of documents is specific to a regional location like the USA and another set of documents is specific to Canada. If we knew that the incoming documents from a given file folder would only be coming from locations in the USA, we could add a USA identification tag to the USA set of forms and then include the USA tag when identifying these documents. Doing this speeds up the identification times because we won’t waste time considering Canadian documents with a CANADA tag for matches. It can also increase accuracy; considering fewer forms is less likely to result in false positive matches with another form.
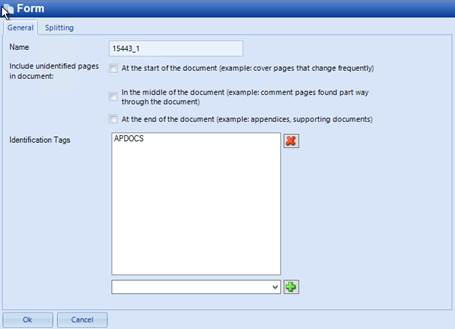
Example 2: The APDOCS tag identifies the form as an accounts payable (AP) form.
In SPS, you can refer to the tag in a Process Batch action's properties:


Tags With #
If the list of tags passed in for identification starts with a # and the tag list finds exactly one page for consideration, the system unconditionally accepts this page as the identity for the incoming image page. In other words, it does not use OCR at all. Using a # with a tag list can be very useful if you know ahead of time what the identity is for a particular incoming image (say from its directory or file name). However, if the batch is identified with a # tag, all documents in that batch will be identified with the associated extraction plan.
Tags Without #
Without the # it still attempts to use OCR to identify a match with the page.
-
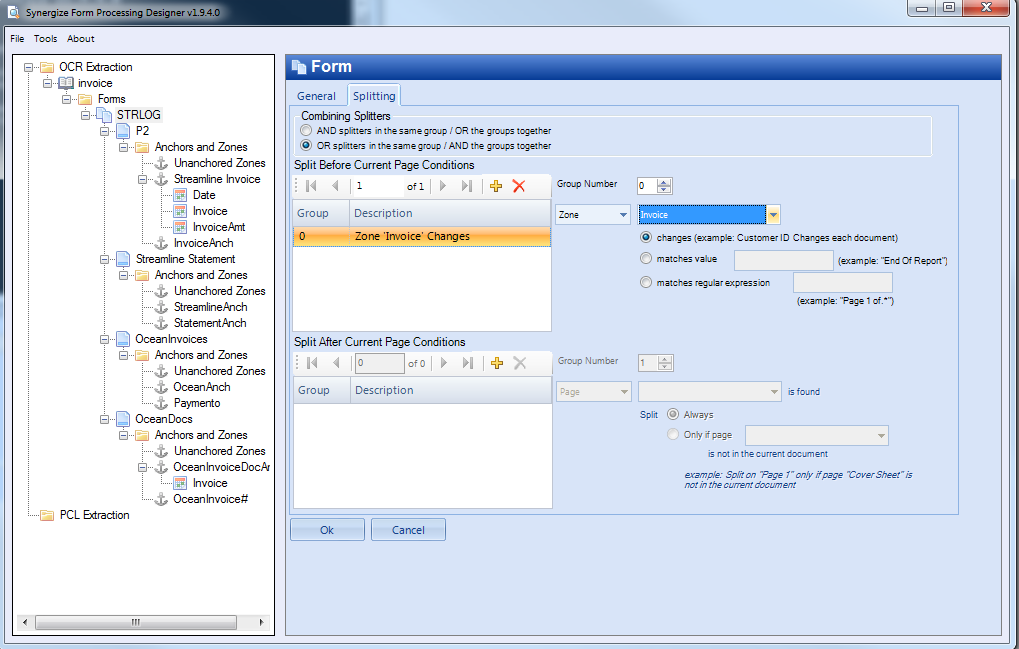
Click the Splitting tab to set the options on this page.
-
When scanning a batch of documents, you need to split them into separate documents. This section mentions the use of Pages, Anchors, and Zones.
-
In a lot of cases, it isn’t necessary to explicitly set split conditions.
-
-
In the Page section, you can set the maximum number of occurrences of a page. For example, if a page has a max occurrence of one, as soon as a second occurrence of the page is found, a split automatically occurs before it. This works well for any form that is only a single page or forms that have a unique first page.
-
For more advanced splitting scenarios, you can configure additional rules.
-
To add a split condition, click the plus (+) icon on either the “Split Before Current Page Conditions” or “Split After Current Page Conditions” toolbar. As expected, conditions in the “Split Before” list will trigger a page split before the current page (the current page becomes the first page of the next document [or the first document, if there is no previous document]), and conditions in the “Split After” list will trigger a page split after the current page (the current page becomes the last page of the previous document).
The “Split Before” and “Split After” lists are completely independent and both are evaluated for each page (you can split both before and after a given page).
-
Looking at each split list, conditions can be divided into Groups. This gives flexibility when combining multiple conditions together.
-
You can set “Combining Splitters” and then select “AND splitters in the same group / OR the groups” to determine how the splitters are logically combined. The other option is to “OR splitters in the same group / AND the groups together”.
For example, if the former is selected we have two conditions in Group 0 and one condition in Group 1, then the condition could be shown as (A and B) or C. That is, either both of the conditions in Group 0 must occur or the condition in Group 1 must occur. You can change the group number of any condition at any time via the Group Number selector.
-
You can split into a new document any time a particular page is found. After a split page, there can be unidentified pages. The unidentified pages can be included at the end of the existing document (after the split) or at the start of the next document. Unidentified pages can also appear anywhere in the middle of a document, away from the split.
You also have the option of only doing so if another page is not in the current document. The example in the GUI is actually the most common reason for using this option: only split on the document’s first page, if there is no cover sheet in the document.
-
-
Zone: You can split any time a zone changes, matches a value, or matches a regular expression. The examples in the GUI are very typical uses.
-
When many of the same documents are back-to-back in a batch and the documents are multiple pages where the pages look almost identical and use the same Page template, you may need to look at the actual data on the form to know when to split.
-
When a Customer’s name or an Invoice number changes on the form, that is a common way to know that a document has changed; in such a case a Split condition before the current page is very appropriate.
-
Checking a zone on the page for static text like “End of Report” or “Page 1 of” are also common techniques. Regular expressions are not needed except in the most complicated cases.
-
-
Anchor: You can split when an anchor exists (is found on the page). This is an alternative to using a zone to find static text on a page, and it’s especially useful when you already have an anchor on the page that you’re using for another reason.
-
Document: You can split when the document gets to a fixed size. If this document is supposed to be two pages long, you could put a Split Before condition to split when it reaches three pages, or a Split After condition to split when the document reaches two pages. We recommend the latter technique, as it seems more natural.
-
For single page documents, we recommend that you set the Page’s max occurrences to one, rather than bothering with this splitting condition.
-
For documents that are another fixed number of pages long, we recommend that you try to split based on some other condition.
-
Consider what happens if one of the pages is missing and isn’t scanned. Every document after that point would be split incorrectly.
-
-
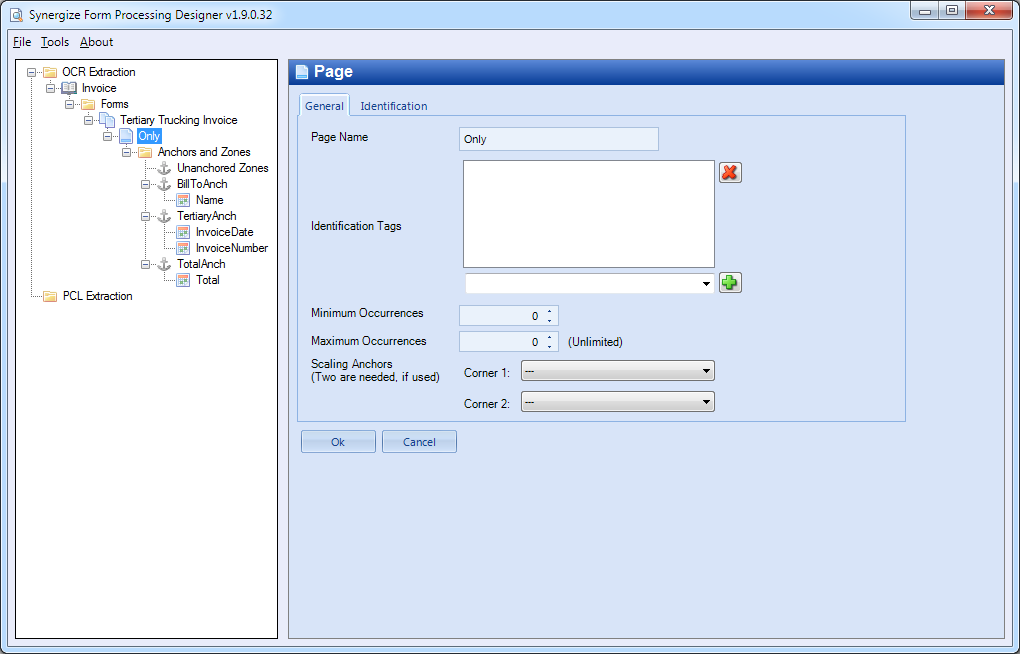
Configure your Page options. Use the Page window to set up the page for identification. A page represents a page template in a document.
Example: If there are five pages in a document, there may only be three page types/templates, also referred to as Pages (with a capital P). The first template could be the first page of a long invoice that includes customer and billing information. The next three pages may all look the same. They might be a long list of invoice items that continues onto each page. The last page template could look mostly the same as the previous invoice items pages but include the SubTotal, Taxes, and Total. There would be a maximum of one “First Page”, any number of “Items Page” pages, and a maximum of one “Total Page” in the document.
-
On the General tab, enter a page name. The previous example includes a good use of page names. They can technically be anything, although each page in a given Form must have a unique name. We recommend a descriptive name where possible and if there is only one Page in the current Form our convention is to use the name “Only” for it.
-
Enter one or more Identification Tags. These were fully described when describing how to configure a Form. The only difference is that Identification Tags configured here will only be for the given Page, while Identification tags configured on the Form will be applied to all Pages on the Form.
-
Always Exists: Select this check box if the page always occurs in the form. If it is an optional page, clear the check box.
-
Is Repeating: Select this check box if the page repeats (or can repeat) in the form. For example, pages 4 through 7 in a form may be identical. If so, you would create one page in the designer, and set it to be repeating.
-
Omit This Page for the Final Document: The page will be used for indexing but not in the repository when it is saved there.
-
To accept the changes, click OK.
-
Next, click on the Anchors and Zones folder.
-
Maximum and Minimum Occurrences Pages: If a page is repeating, you can set the maximum and minimum number of times that it can repeat. On a form, if the number of repeats falls out of this range, you know that either there is a problem with the form or that at least one of the pages is being misidentified. In either case, the action fails to identify the form.
-
Enter the Minimum Occurrences: the minimum number of pages of this Page template that must be in each document (i.e. the “Total Page” must occur at least once). If a document doesn’t include enough occurrences, it will be flagged as invalid (something that can be checked later, when deciding how to handle processed documents).
-
Enter the Maximum Occurrences: The maximum number of pages of this Page template that must be in each document (i.e. the “Total Page” must occur at most once). If processing Batches (not individual documents), as soon as a new page would cause the maximum number of occurrences to be over its set value, a split will occur, so that the document will never violate this constraint. In fact, this is the most common way to control when to split documents.
-
-
Scaling Anchors: Many times, incoming documents will be a much different size than the sample image we’ve configured the Page with (we will cover how to set a sample page shortly). If the width and height are proportionally different, because they were scanned at a different DPI, the system will already handle this case.
A more problematic situation is when the original page is part of a larger image, with potentially uneven space around the original page. This can be caused by a flatbed scanner that scans extra space around the paper. Sometimes when a page is faxed, it’s printed at a reduced size on the same sized paper, with a footer added by the fax machine. In both of these cases, the physical paper is a different size than the size of the original page.
The best way we have found to combat this is to create Anchors, known pieces of text, on opposing corners of the page (top left + bottom right, or top right + bottom left). These Anchors should be much larger than the known text they contain. We will attempt to read these anchors, and if the known text is found, we can scale the page, based on where these Anchors are found on our sample page, compared to where they are found on the incoming page to process. We will attempt proportional scaling before trying to evaluate these anchors, so that a page scanned, say, 3x larger will still be able to have the Anchors places close to the corners.
-
Identification: We identify Pages based on text that appears on the page. These conditions can be combined using the same grouping mechanics as the form splitting conditions.
-
-
Click OK or Save.