Synergize Server
As an administrator, you can configure settings for Synergize server.
Versioning: The concept of keeping track of different versions of your documents is a key part of any document management system. With Synergize, you can manage multiple versions of files you've stored as "assets" or "images".
When you have the checkout directory configured, you can "check out" a file and either replace it in the repository by updating it, or store a new version of the file, keeping the old version as well. Later you can access a specific version of the document, for auditing or legal purposes.
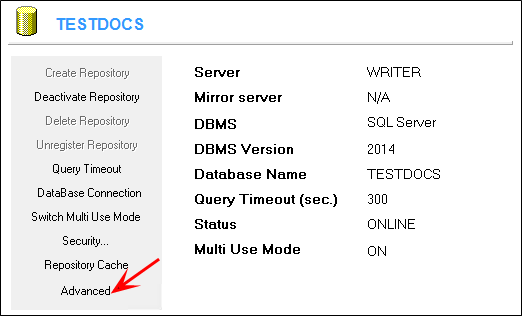
Transformations: When you ask to see an image of the document from the Synergize server, you may see a transformed version of the image. For example, a Word document may be presented to you as a PDF. You can choose to download or view a document in its native form. By default, however, the image viewer will show you the transformed version if one has been defined in the "default transformations" settings.
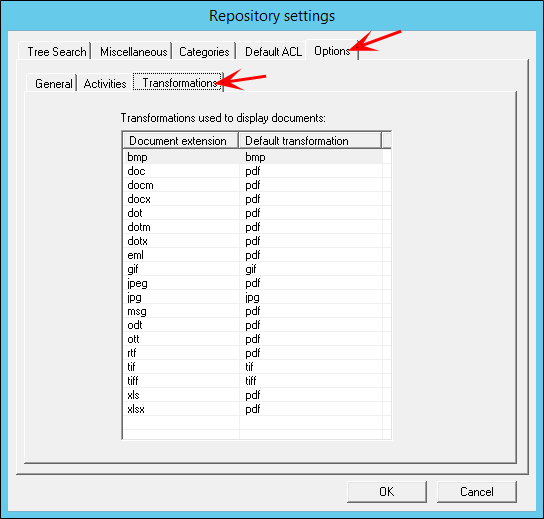
Unless otherwise specified, the image viewer shows the transformed version of a document image if one has been defined in the "default transformations" settings. To map a document extension to one of the available transformations, access the Transformation settings through the Advanced option on the repository panel.
Not all file formats can be transformed into all others; only the possible transformations are offered as options.
Security: Synergize has several repository and application security aspects. Users, user groups, views, application pools, repository security models, as well as security concepts inherited from the operating system. You can tie the Synergize deployment security model to one of several security providers on typical modern networks:
-
Windows
-
Active Directory
-
SUN Directory Services
-
Open LDAP
-
Single Sign-On (SSO)
You can configure Deployment-level security and Repository-level security.
User Groups: User Groups define different security aspects for Synergize Users and groups including:
-
Access to document views
-
Some Synergize Client features
-
Server printers
The following products should be installed and configured before you install Synergize:
1. Windows Server 2012 R2 or 2016.
2. Use Server Manager to configure:
-
Application Server
-
Web Server (IIS)
-
.NET Framework 3.5 (Download)
-
.NET Framework 4.7+ (Download)
-
.NET Core Module 2.1 (Download) Note that our testing shows that.NET Core 2.2 does not work.
-
Message Queuing
3. Amazon Corretto Java and IcedTea-Web.
4. Microsoft SQL Server.
See Synergize Hardware Requirements and Supported Software, for more information.
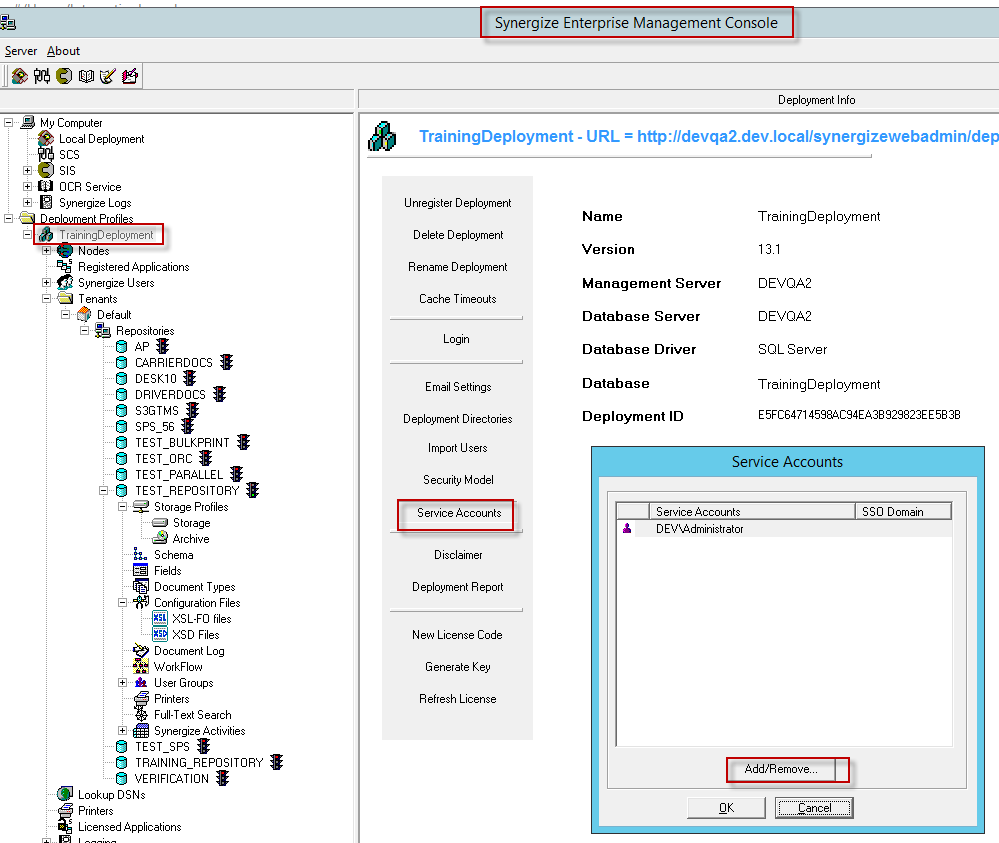
Some Synergize applications use a service account for authorization to use certain system resources. To add a service account, run the Synergize Enterprise Management Console and do the following:
-
Select the appropriate named deployment profile.
-
Select Service Accounts.
-
Click Add/Remove.
-
SSO Domain: The additional setting on the Service Accounts dialog is the SSO Domain. This domain is prepended to any username passed to the system through the service account.
For example, you could prepend an Active Directory domain or a special SSO provider domain.
You could also prepend the domain of a separate third-party system, if that's how individual Users appear in that system. For example, if your Users operate in a domain called TRUCKING, and that is used as the SSO domain, then a user called jsmith would be matched with a user called TRUCKING\jsmith in Synergize.
You can add a user or group that exists in your single-sign on security provider to your repository user group. The users and groups that can be added to a repository user group must be those that already have access to the repository.
If you're unable to add an SSO user or SSO group to a repository user group, please follow these steps:
-
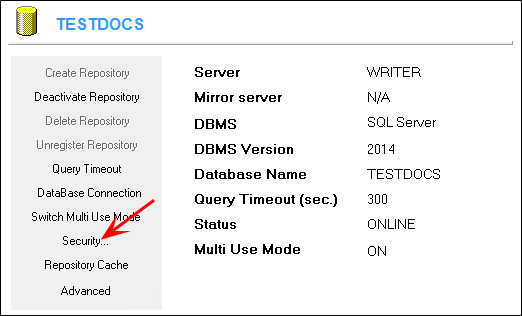
From EMC, select the desired repository, then select Security.
-
Select the Access tab and make sure that you see the SSO group or any SSO users that you would like to be able to add to a repository user group. If the SSO groups or users are shown, then they are available to add to your repository user group.
A document group is a logical association of documents that have a predefined set of values for a configured repository field. There is only one document group field per repository. This field must be a field with a predefined set of allowable values.
Document Type and Workflow are system fields that have a limited number of allowable values and therefore can be used as document grouping fields.
Document groups are used for two Synergize features:
-
Tree searches with a category that uses document grouping as a field
-
Document views definition
Note that a repository can have only one document grouping field configured.
To choose a document grouping field, from EMC:
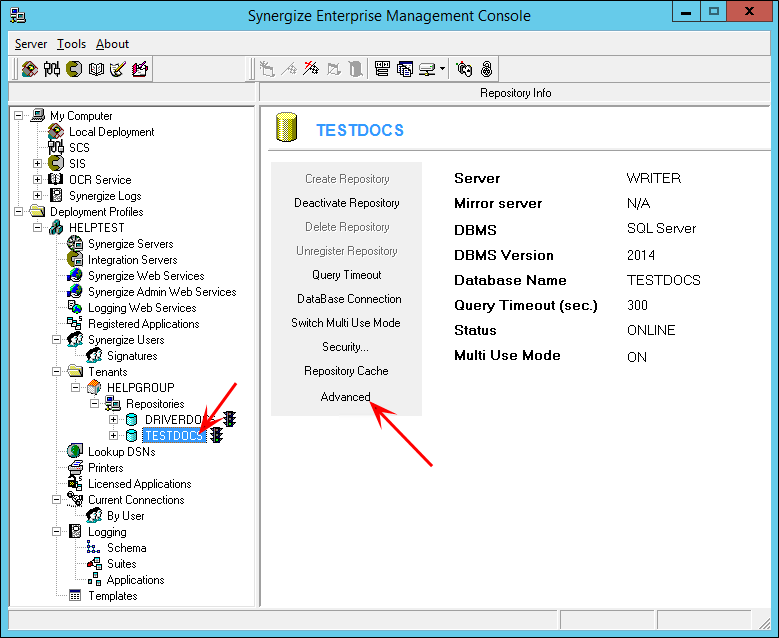
1. Select the repository and click Advanced.
2. Select the Options tab.
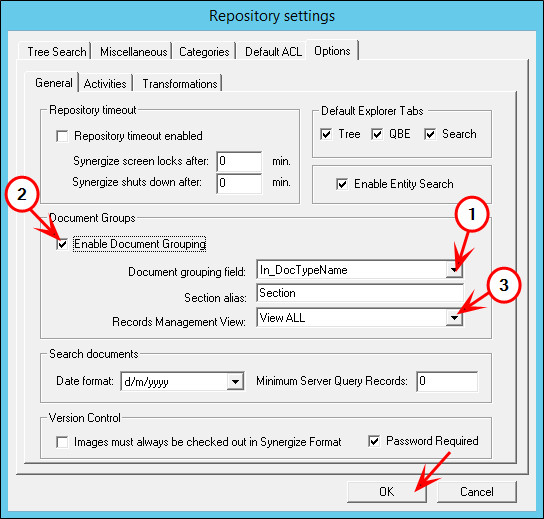
3. In Document Groups, select Document grouping field.
4. Unless you have fully configured document views and user groups, do not check Enable Document Grouping yet.
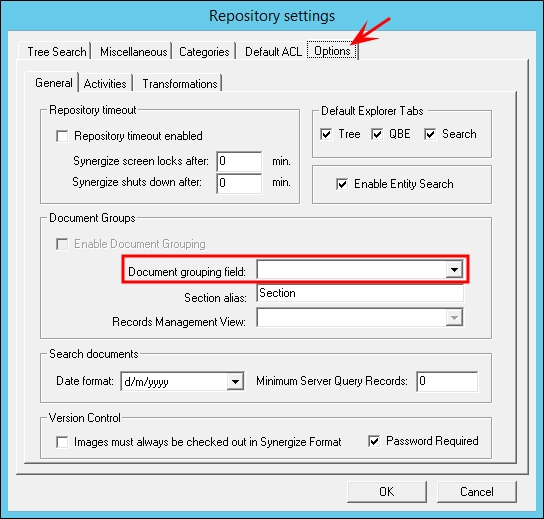
Document grouping should only be enabled, after Document Views and User Groups are fully-configured, to ensure that the repository remains functional.
Once a document grouping field is set, you can start creating document groups even without enabling document grouping.
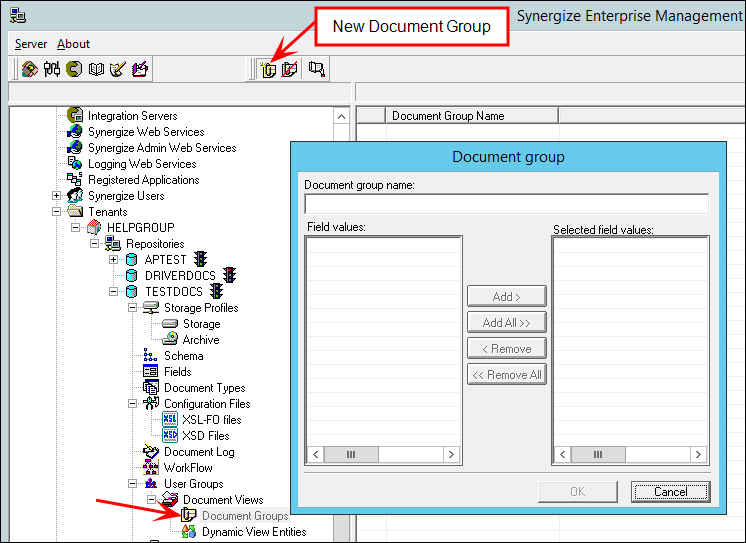
To create a document group, from EMC:
1. Select the repository.
2. Under repository, select User Groups > Document Views > Document Groups.
3. Click New Document Group.
4. Add a name to the document group and add the distinct values that will be included in this group
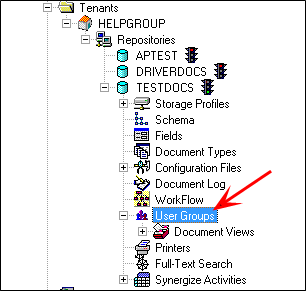
To configure a User Group, from EMC:
1. Select the repository.
2. In the tree, select User Groups under the repository.
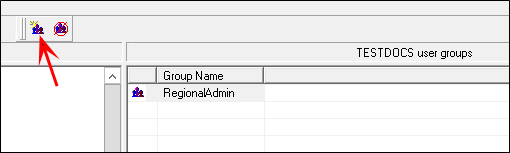
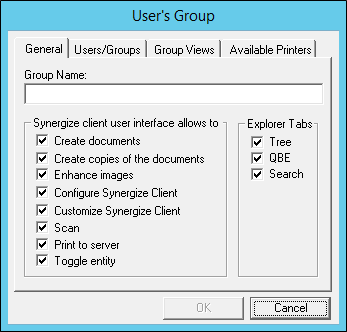
3. Click New User Group.
4. Give the user group a name and assign the appropriate permissions.
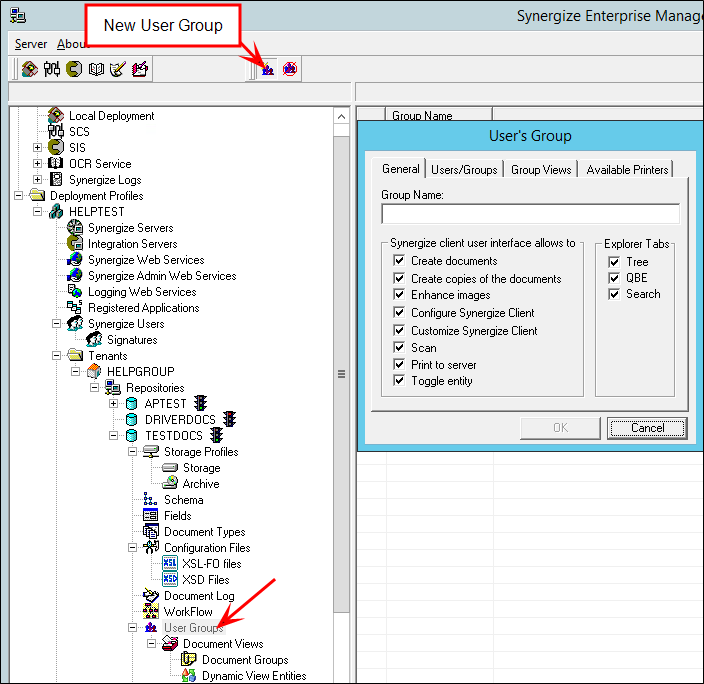
5. On the Group Views tab, assign the document views you have created that you want this user group to be able to see.
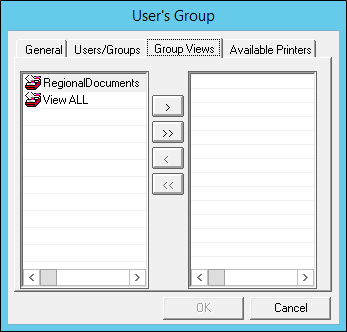
6. Click OK.
Several applications offered by TRANSFLO® are used to interact with various systems. In Enterprise Management Console (EMC) you can define a data source so that other applications can refer to it. In EMC it means a database that you log into and can make queries against.
To configure a data source in EMC:
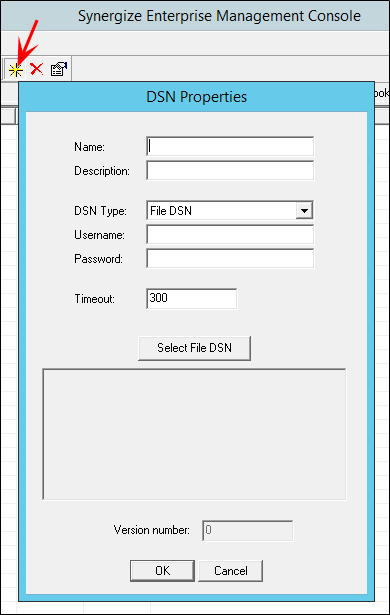
1. Select Lookup DSNs under your deployment profile.
2. Select the New icon to enter new DSN properties:
You can create a document view in EMC:
-
Select the repository.
-
Click New Document View.
-
Provide a document view name and select the desired document groups. You can also provide additional filtering criteria, using the bottom part of the panel that helps you construct a valid SQL statement.
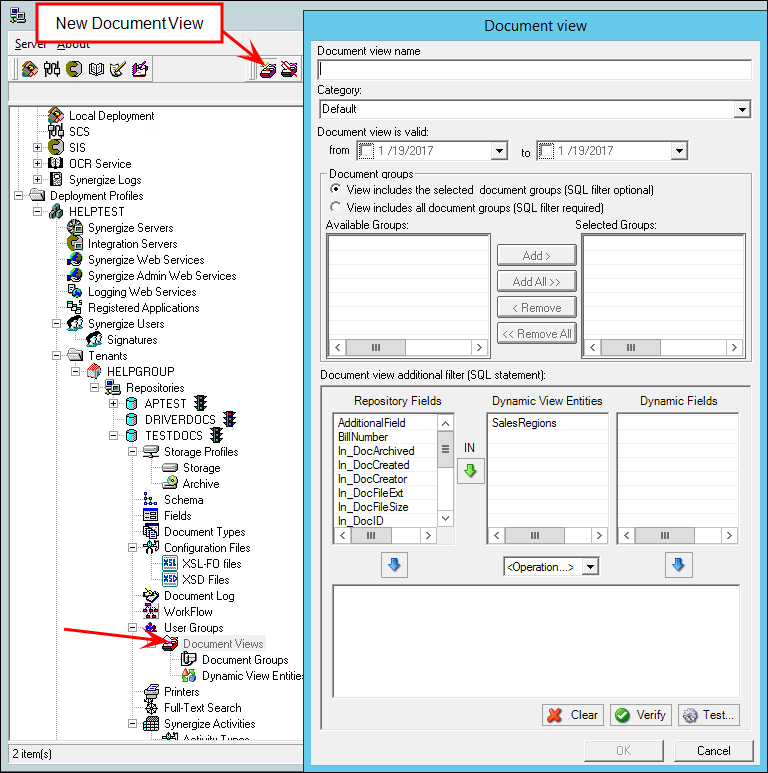
-
When you have completed the panel, click OK.
-
To set up your Repository with document views, do the following:
-
Configure a document grouping field in EMC.
-
Create document groups and views.
-
Create User Groups and assign to them the desired views.
-
Enable document views as described on this page below.
-
Document views are a way to restrict the returned search results from Synergize search queries. They are equivalent to applying an additional filter to the search query.
Document views can be limited in time. They can have a start date and/or an end date.
A document view can be defined with the following parameters:
-
an optional list of document groups
-
an optional WHERE clause that is specific to the database provider
-
the WHERE clause could include special keywords, related to Dynamic Views.
You can turn ON views for any Synergize repository:
-
Open Synergize EMC.
-
Select the repository then select Advanced.
-
Choose the Options tab on Repository settings.
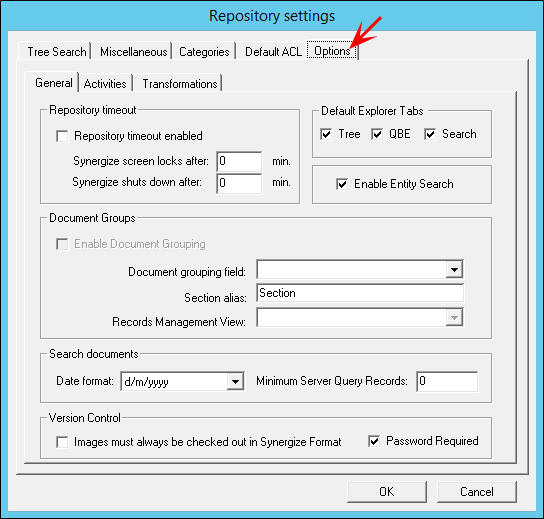
-
Select a Document Grouping Field and then select Enable Document Grouping. Optionally select a Records Management View. Now views are enabled. Click OK.
-
Dynamic Views: A normal or standard view presents the same results from the repository to all users. Dynamic Views allow different groups of Users to see different results from the repository depending on a set of pre-defined business rules.
-
Dynamic Views are a type of view, and all the prerequisites for views also apply to dynamic views.
-
To create a Dynamic View, start with a table that has a field called UserGroup.
-
This table will link the Users to specific field values that show up on documents in the repository.
-
Views must be enabled on each working Synergize repository.
-
-
User-Based Dynamic Views: Dynamic views can be defined to return different documents based on the logged-in user. For example, the logged-in user is a part of Active Directory. The Synergize repository has a UserToProcess field which contains just the username without the domain.
The following view in MS SQL returns all documents destined for that user:
Main.UserToProcess = substring({UserName}, charindex('\',{UserName})+1,len({UserName})-charindex('\',{UserName}))
-
Date-based Dynamic Views: Dynamic views can be defined to return different documents, based on the time that the search is run. For example, if the Repository has a ScanDate field and if the desired behavior is to return the documents that were scanned today, the syntax would look like this:
Main.ScanDate = {Today};
Views can also use SQL expressions (examples below use MS SQL syntax):
Main.ScanDate < dateadd(d,1,{Today}) AND Main.ScanDate > dateadd(d,-6,{Today}) - show documents scanned for the last 7 days
Main.ScanDate < dateadd(d,1,{Today}) AND Main.ScanDate > DATEADD(wk, DATEDIFF(wk,0,{Today}), 0) - show documents scanned this calendar week
MONTH(Main.ScanDate) = MONTH({Today}) AND YEAR(Main.ScanDate) = YEAR({Today}) - show documents scanned this month
The Synergize server can keep track of various things for you in databases and on the file system. If you have a distributed environment, you can set shared network paths for the files related to each Synergize deployment.
The following directories can be set separately:
-
general deployment
-
workflow scenarios
-
registered applications (xml settings for various applications)
-
printing (print jobs)
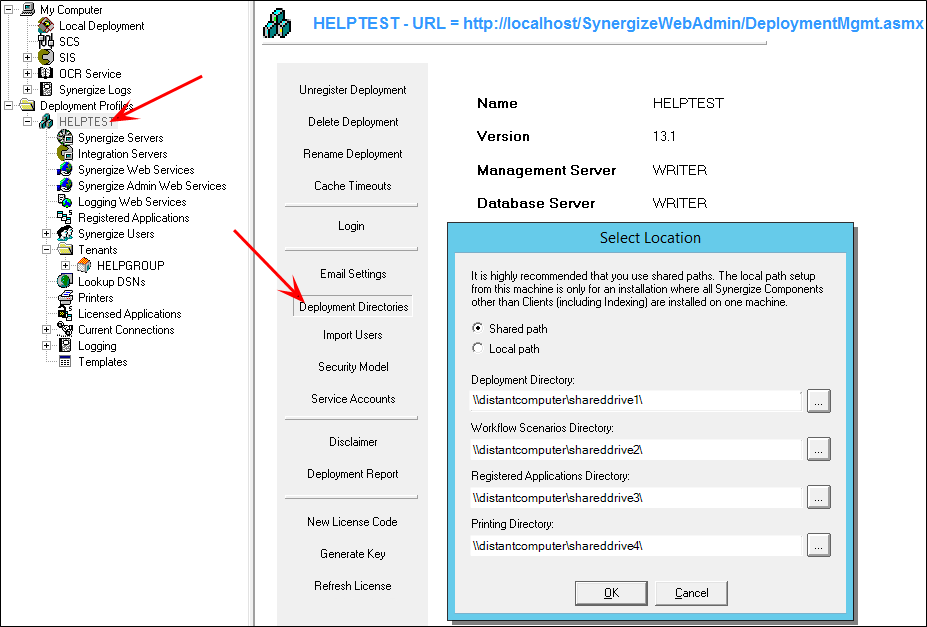
To set the deployment directories:
1. Select the deployment.
2. Select Deployment Directories.
3. Enter the various deployment directories.
We recommend that you use shared directories. Note that mapped drives should never be used. A mapped drive is User specific.
Instead, use a Universal Naming Convention (UNC) descriptor for your network drives.
Example: \\distantcomputer\shareddrive\
The following instructions detail how to set up various aspects of logging in Synergize.
Document Deletion Logs: If you have set up logging of delete actions for documents in Synergize, you need to retain that information in the document log. To set this up, do the following:
1. In EMC, go to the repository node.
2. In the repository branch, select the Document Log node.
3. On the Document Log panel, select Log deletions and preserve history.
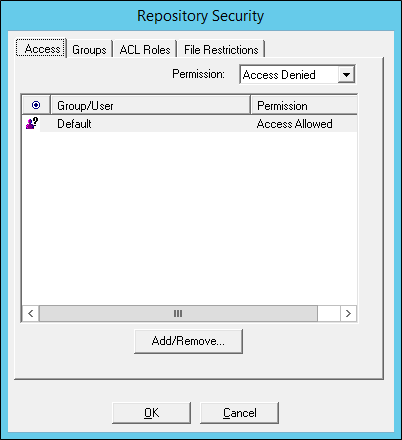
Access repository security settings from the repository panel.
The repository security window has four tabs:
-
Access
-
Groups
-
ACL Roles
-
File Restrictions
The Access tab of the repository user panel allows you to define who can access the repository. Pay special attention to security providers that do not allow retrieval of users and groups.
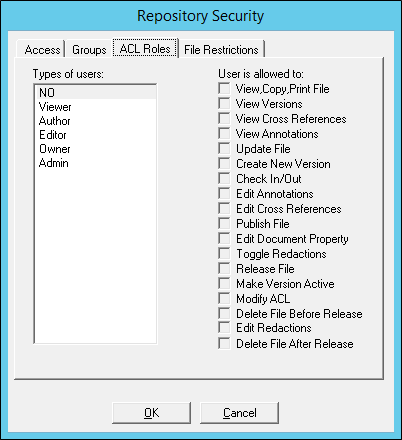
Repository Document ACL
To tell the system what access or authority a user has (what they can do with a document), use Access Control List (ACL) roles. An access control list (ACL) can be defined at the repository level.
-
To use the predefined ACL roles, open the Advanced tab on the repository panel.
-
In the Repository Settings window, select Default ACL.
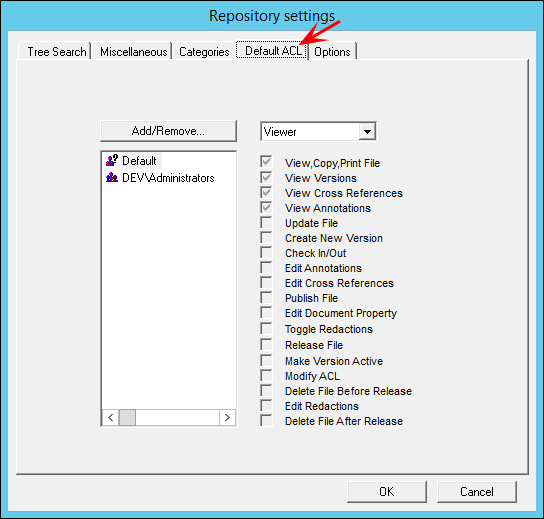
-
Add, remove, or edit an existing user by assigning their ACL role. Click OK.

Repository Views
If you have enabled document grouping, you need to configure the following:
-
Document Views
-
User Groups
-
Assignment of Document Views to User Groups
When a user logs into the repository, a calculation takes place to determine the valid views to use.
To enable repository views, see Enable Standard or Dynamic Views.
Repository User Permissions
Configure repository views, by selecting user groups within a repository.
On the user groups panel, click New User Group.
Enter a new Group Name and select the actions allowed by members of this group.
You can also select which tabs they will see on the user interface.
For additional information about how to configure user groups and views, see Configure Dynamic Views.
To configure the access level for an authenticated user, use the Synergize Users configuration screen in Enterprise Management Console.
Check User is a security provider user, to allow the security provider to handle the authentication of that user.
In this case, no password configuration is required. This is usually done for special deployment permissions.
If User is a security provider user is unchecked, you need to provide a password.
You also need a mapped security provider account, which is used for repository access control lists (ACLs).
You can also define the user roles with the following possibilities:
-
Primary
-
Deployment Admin
-
Records Manager
-
RM Disposition Executor
-
Deployment User
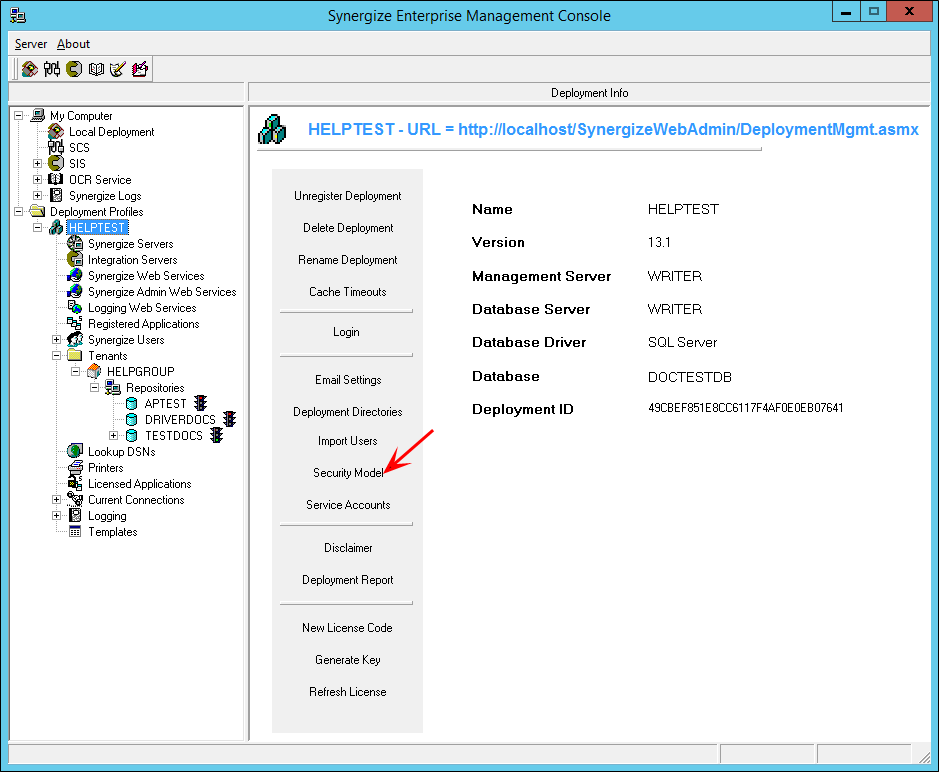
Each Synergize deployment can have specific settings for its security model. These settings are derived from different security providers. As a key foundational principle, all security provider users are valid deployment users.
-
To start, select Security Model from the Deployment Info screen.
-
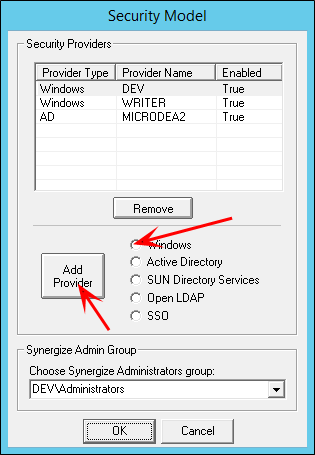
You can set up new security providers and have multiple security providers for a deployment. Select a provider type and then click Add Provider.
-
If you add multiple Active Directory providers (domains), all of them must be available for the groups and user security to function properly.
-
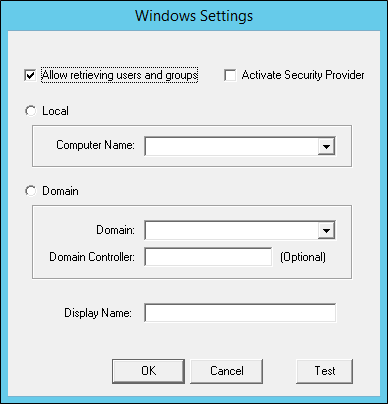
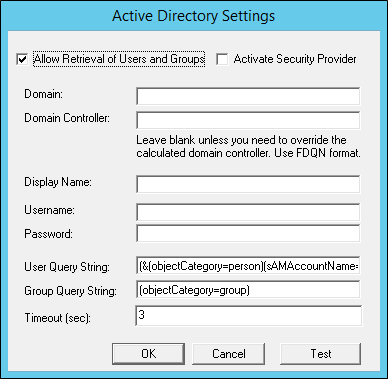
Configure the settings. Here are the screens for each security provider:
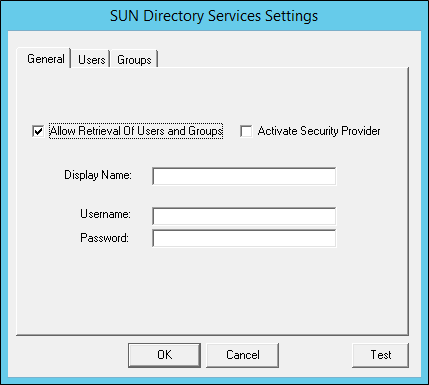

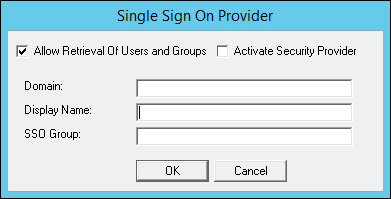
-
If the check box to allow retrieval of users of groups is checked, the list of users and groups is visible for further configuration. When not checked, the list is not visible but names and groups can still be explicitly specified.
Note: When configuring repository security, you can set the default group/user access to "Acccess Allowed". However, if no users or groups are added at the repository level for this provider, then no groups or users will actually have access. For ways to set access for specific groups and users, or to allow all groups for all providers to be included in the default, see Set Security for a Repository.
Workflow is the Synergize mechanism for moving documents through various business process checkpoints. Essentially, Workflow is a state-machine, meaning that the status of each document is carried with the document itself and when it is "moved" along the flow it is actually just assigned a new status or state.
Workflow Designer allows you to design the steps for what the next document state is. This concept topic is an introduction to Workflow with an orientation to administrators who use the Workflow Designer.
Example:
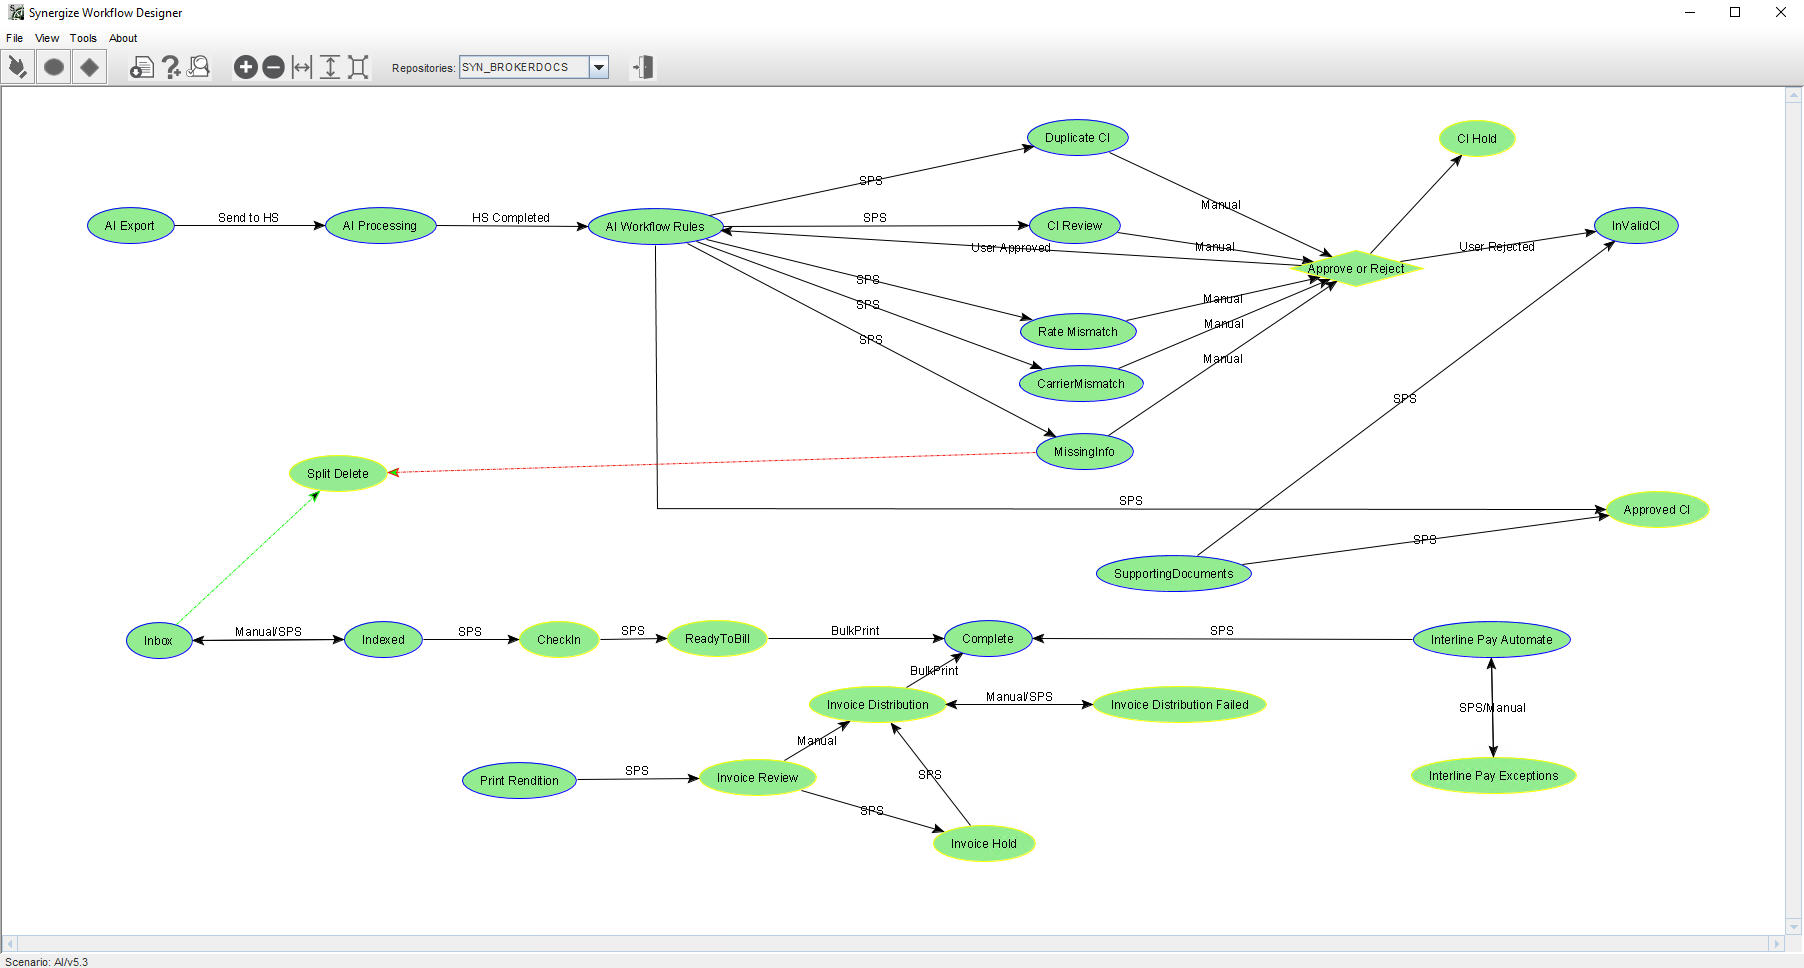
You need Java to use Workflow Designer.
Scenarios
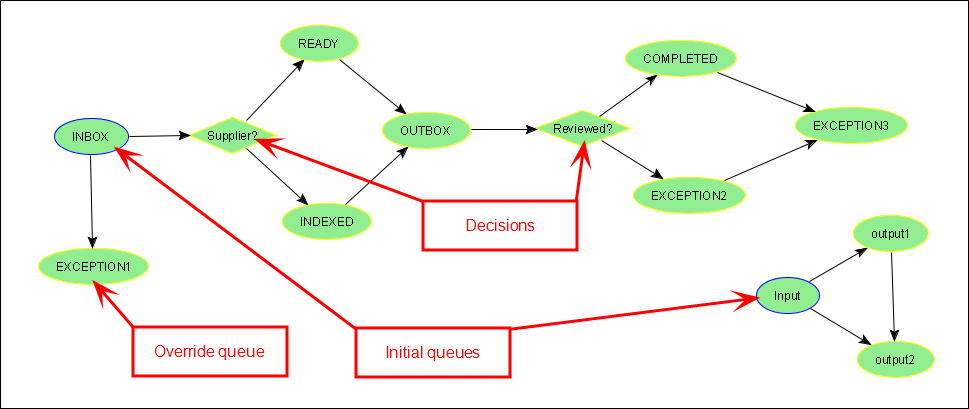
A scenario is a set of business rules that define how documents can move between queues. Not all queues in a scenario need to be linked, but taken together queues and links form a business process. There are different types of queues in a scenario; a single queue can be more than one type.
|
Queue Type |
Definition |
|---|---|
|
Initial |
A queue into which a newly created document can be placed. There can be more than one of these in a scenario. |
|
Input |
A user-specific queue. These are queues from which a user can process a document. |
|
Output |
A queue that can be reached through normal workflow processing. |
|
Override |
A queue that can only be reached if a user has queue override authority. |
|
Final |
A queue that has no "next queue" and represents the end of the process. |
In Workflow Designer, you can create scenarios that include more complex processing rules like mandatory indexing, lookups, user rights, and email notifications. Notifications also include monitoring, so that if a document sits in a queue too long, a reminder can be sent.
A note about user rights: An Access Control List (defined at the deployment level and applied to individual repositories) specifies whether or not a user can edit document properties. You can override this setting for each queue with the Workflow Designer, granting permission for an indexer or approver to update the mandatory fields prior to processing.
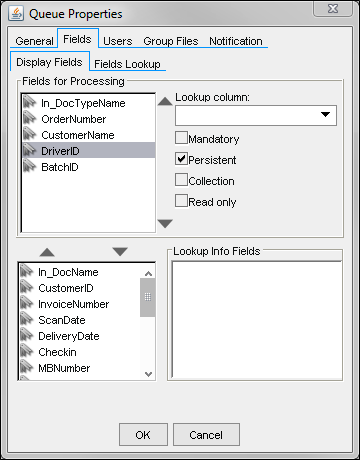
Collections with Persistence
You can set up one or more collection fields. When processing multiple documents, when all collection fields remain the same from one document to the next, then any field marked as persistent will be carried forward from the previous document.
In the following example, BatchID is the collection and DriverID is persistent. While the BatchID remains the same, the DriverID will be automatically carried forward from one document to the next.
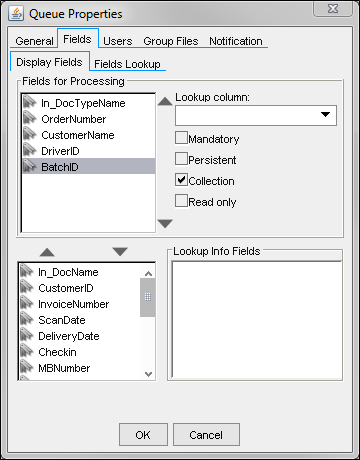
If you change the DriverID on a document, the new value is the one that will be carried forward. If the next document has a different BatchID, the DriverID will not be carried forward.
Lookups
A workflow design can include lookups where a value entered in one field is used to look in a database and retrieve values for other fields.
Notes:
-
Field names cannot have spaces in them. Therefore, your users will get an error if the value used for the field name of a lookup contains a space. Also, document type aliases are not supported for cascading lookups.
-
Ensure that you only map fields with the same datatype. Fields specified through Workflow Designer are not strongly typed. In other words, an integer field could be mapped to a string field without an error showing up until processing.
Conditional Processing
Branches or decision points can allow you to design a workflow that will assign different states depending on certain conditions, including tests for the values of document properties as well as direct user input (typed answers to questions).
Also, some Users can be granted scenario override authority which means they can put a document directly into a queue, irrespective of the next queue in the workflow for that document.
Workflow Splitting
Workflow splitting allows you to direct the new "split-off" documents to different queues.
If you define a queue as a splitting queue and have not defined an output queue where the original batch document will go, then you'll get a warning but can still save the scenario.
Older scenarios that did not have the concept of "splitting" queues but still supported splitting, can be loaded into Workflow Designer.
Upon loading, if there is no output queue for a splitting queue, then the queue will not be defined as a splitting queue.
Specify an output queue, then turn on splitting for that queue.
Output queues for splitting queues are shown with a green arrow in Workflow Designer.
Parallel Workflows
Parallel workflow processing is not supported in Explorer.
You can still view documents from repositories that have parallel workflow turned on, but processing workflow will not be an option.
It is possible for a repository to be enabled for parallel workflows.
If it is, a document may have two "states" at once.
This is useful when two different parties may have to process or approve the document for different purposes, before it can be further processed.
If you are searching for a document, you may see "duplicate" documents depending on the search.
This is because of the multiple states a document may have in parallel workflows.
Unable to Retrieve Data from Custom Fields
You may not be able to retrieve data from your custom field. The field name might conflict with a SQL reserved keyword. Over 800 words used by SQL should not be used as variable or field names. To view a collection of the reserved words, see SQL Reserved Words.
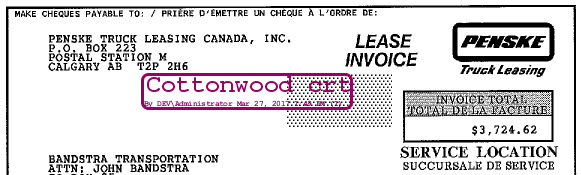
Stamps Appear As a Tall Narrow Box
All stamps are based on the text width of the actual stamp content. Each stamp has a username and timestamp to show who made the stamp and when. Sometimes the username and timestamp is longer than the stamp content and is presented vertically to make it fit.
Examples:
Short content:

Longer content:
After a Database Change, Renewed License Required
If you upgrade your repository database or move your Synergize repository, you need a new Deployment ID, which in turn means you need a new license. Contact TRANSFLO® to acquire a new license. Provide your Deployment ID to get a new license code for this deployment.