Synergize Accounts Payable
The Transflo Synergize Accounts Payable (AP) solution allows you to monitor the flow of vendor invoices and other payable documents through a workflow that specifically supports close monitoring of expenses and approval at various levels organized by cost center.
-
The starting point for the solution is to set up a repository as an Accounts Payable repository. This option is available when you first create the repository and it enables the AP-specific features described in this section.
-
You also need to set up a workflow using Workflow Designer and configure your cost centers and users in the portal application. Portal is a platform where you can install applications called portlets. Portlets include:
-
AP Portlet
-
Driver Recruitment
-
Report Viewer
-
Different pieces are assembled to provide the Accounts Payable solution.
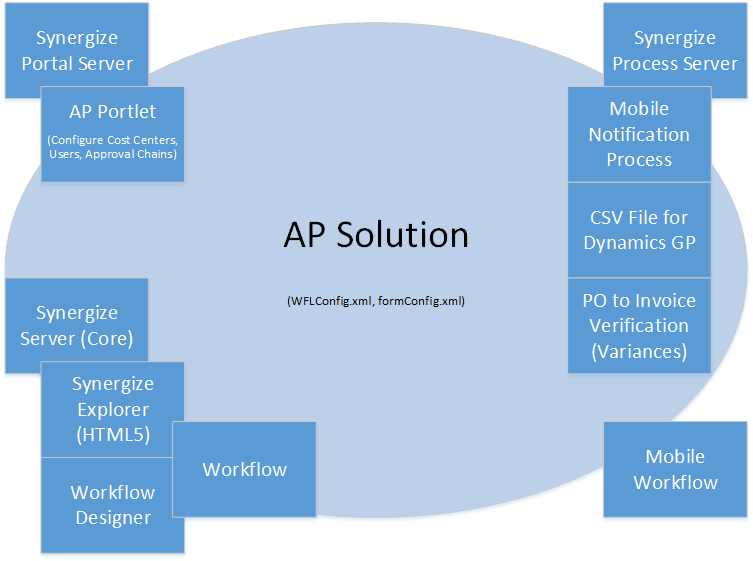
The first step in configuring an accounts payable scenario is to use the AP Portlet to set up Users, approval groups, and cost centers. This configuration can be uploaded into the AP Portlet, from an AP excel format v3.xlsx file.
The accounts payable module itself modifies Synergize Workflow to allow for special processing to move a document to another user (approver), without moving it to the next queue. It also adds the repository forms user interface to enter metadata for documents in the Synergize repository.
In the special AP workflow, you can view the invoice, approve it, approve it (above your limit), change its cost center, or reject it. You can use a special mobile app called Mobile Workflow, to be notified of pending requests for approval and perform the viewing and AP workflow functions remotely.
Finally, Synergize Process Server is used for a variety of processing tasks, including notifications for Mobile Workflow and producing output that can be used with third-party tools like TMT, Truckmate, and Dynamics GP.
Accounts Payable repositories have additional specific logging to keep a snapshot of the important values such as the purchase amount (purchaseAmt) and the Approver Limit at the time of the approval. This logging is particularly useful in situations where approvers approve some invoices and then get their approval limits reduced. Without logging, it may seem like they were able to approve invoices that were above their limits.
Logged information includes the approver, the purchase amount, the cost center code, the cost center group name, the cost center group limit, and the approval answer (approve/reject/etc...). The log entry also references the Workflow Log ID, associated with the workflow processing of the document.
Synergize Workflow Designer is a tool that helps you to create the business steps that you want your invoices and purchase orders to move through, when approvals are used. Some workflows are designed to be as simple as possible: inbox to approved or rejected. Many other workflows have business-specific exceptions and special processing.
-
Users: Users have approval limits and are members of an approval group.
-
Approval Groups: Approval groups can be assigned to cost centers.
-
Cost Centers: A code that matches with the external accounting system or TMS to group costs.
-
Actions: By convention, four (4) basic actions can be performed on any Accounts Payable (AP) document:
-
Approve
-
Approve (above limit)
-
Send back for correction (wrong cost center or user)
-
Reject
-
With the Accounts Payable solution, an action does not necessarily move a document into a new queue, as it would in a normal workflow processing step.
-
Approve could move the document to the next approver in an approval chain.
-
Approve (above the approver limit) means that a secondary approval will be needed, regardless.
-
If a document was indexed incorrectly (associating it with the wrong cost center, for example), the document could be moved into an error queue or it could just be assigned to the indexer for correction.
You can have a company name and other lookup fields auto-filled as default values in your documents. (The following features were introduced in January 2024 in Synergize Explorer 15.3.2.)
-
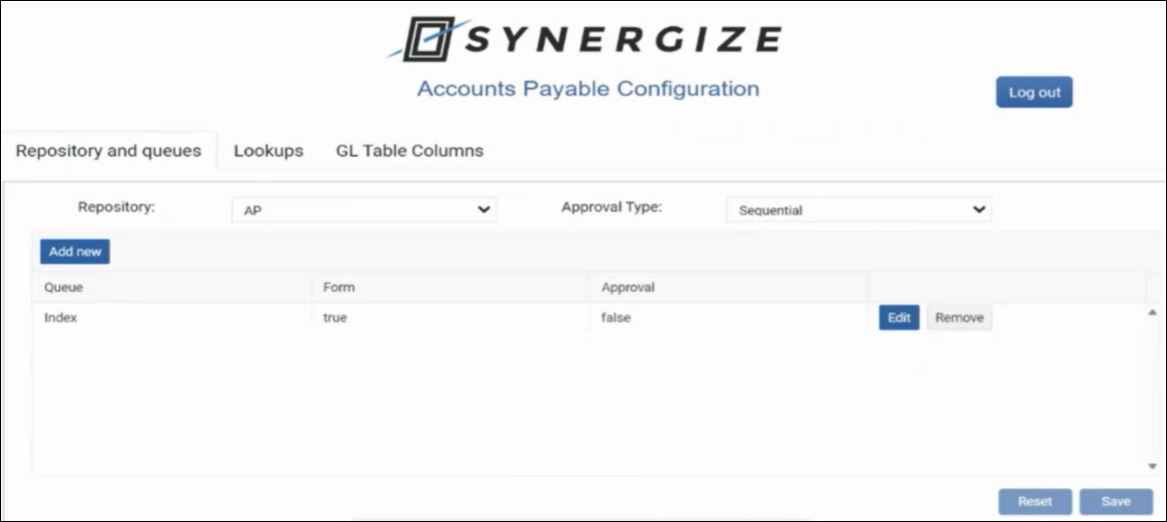
In Synergize Accounts Payable Configuration, click Add New on the Repository and Queues tab. Set up a workflow queue (for example, Index) and set the Form property to true.
-
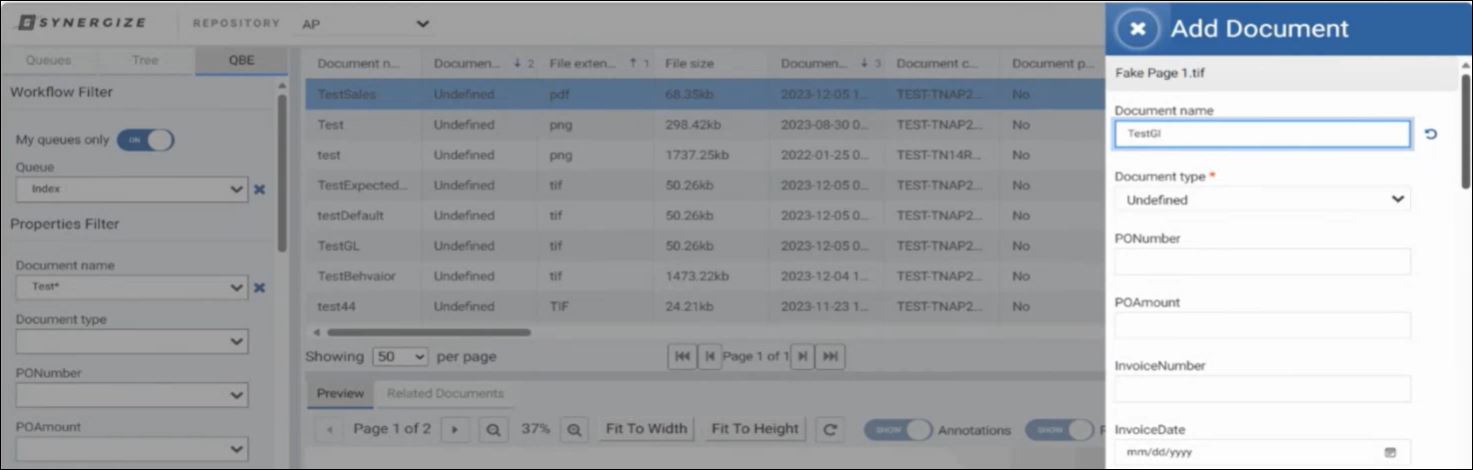
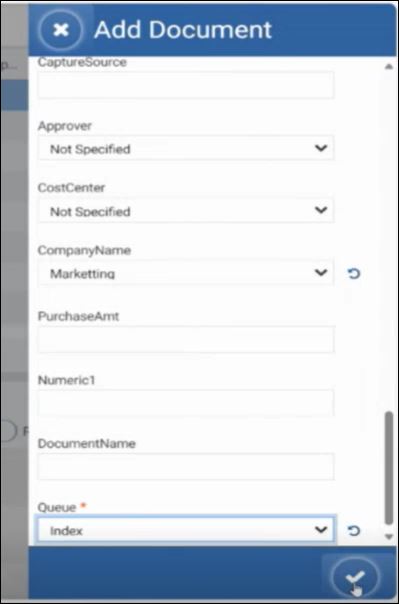
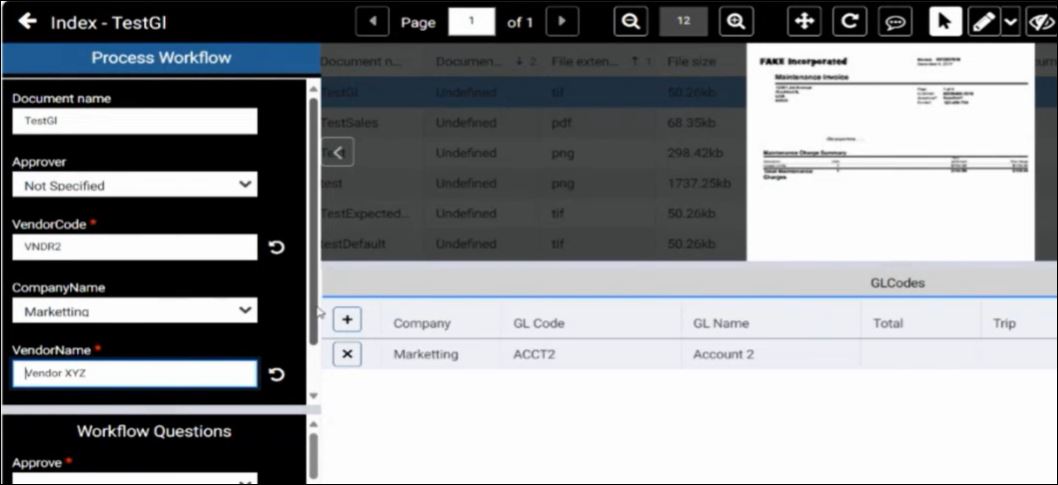
In Synergize Explorer, navigate to the QBE tab and add a new document. Enter a name in the Document Name field.
-
Scroll down and select a value in the CompanyName field and the Queue field. Click Save.
-
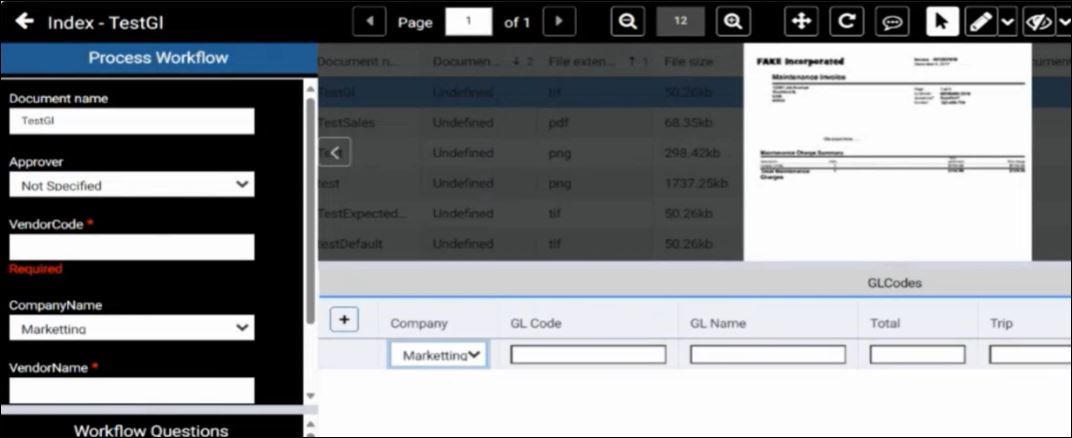
Open the new document.
-
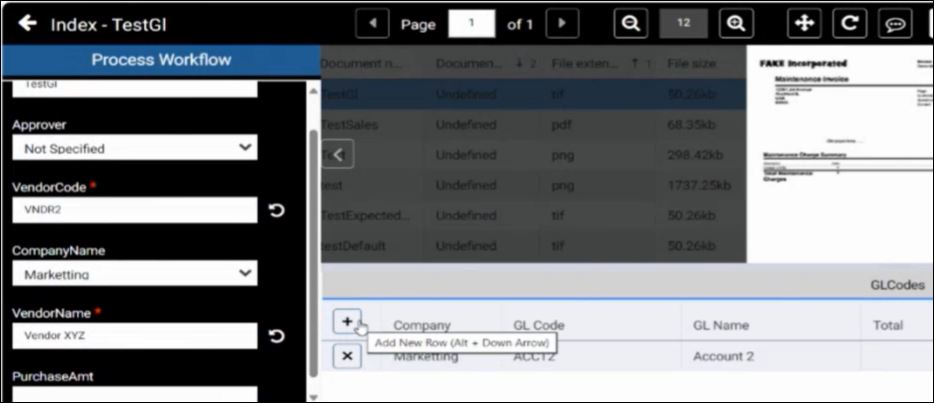
In the GLCodes list, click Add New Row. The CompanyName value (in this example, Marketting) is auto-filled for you. In the screenshot below, the GL Code and GL Name are also pre-filled. To configure those fields, continue the steps in this configuration example.
-
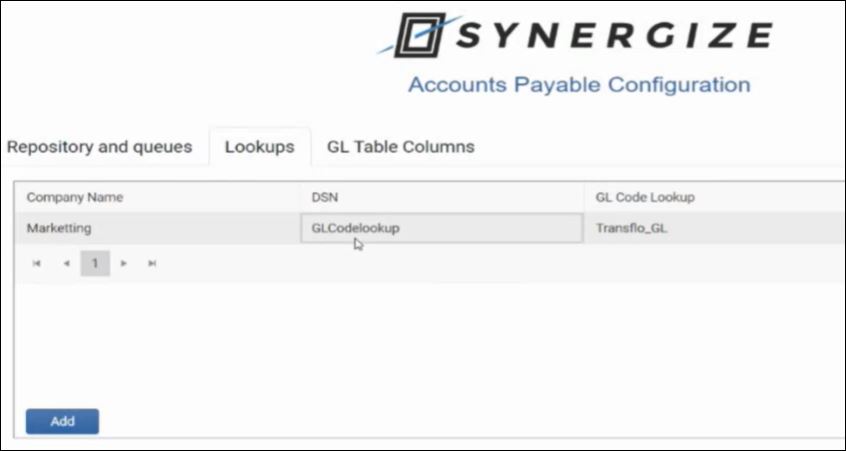
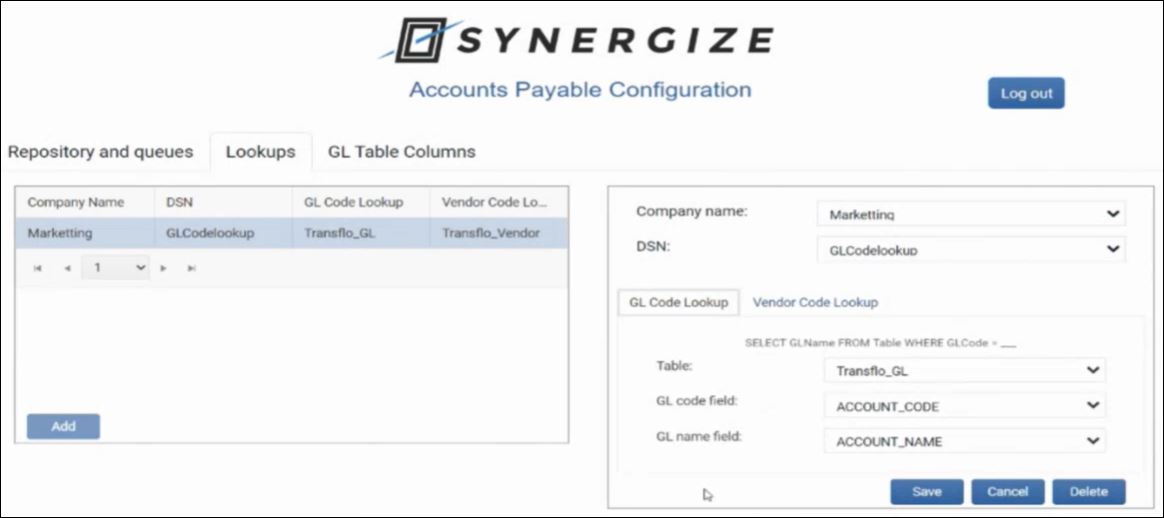
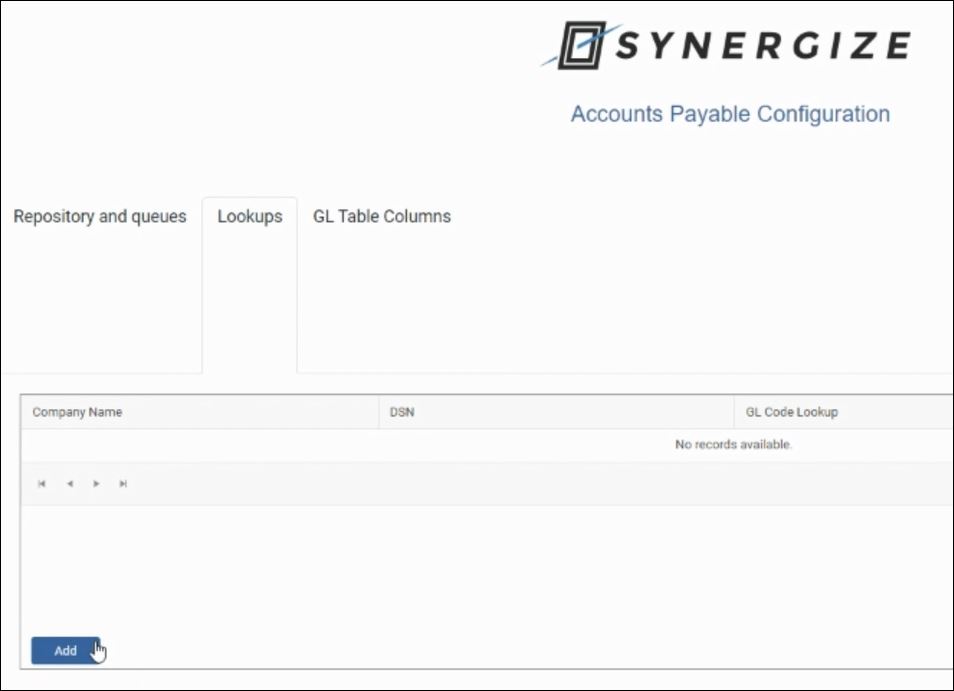
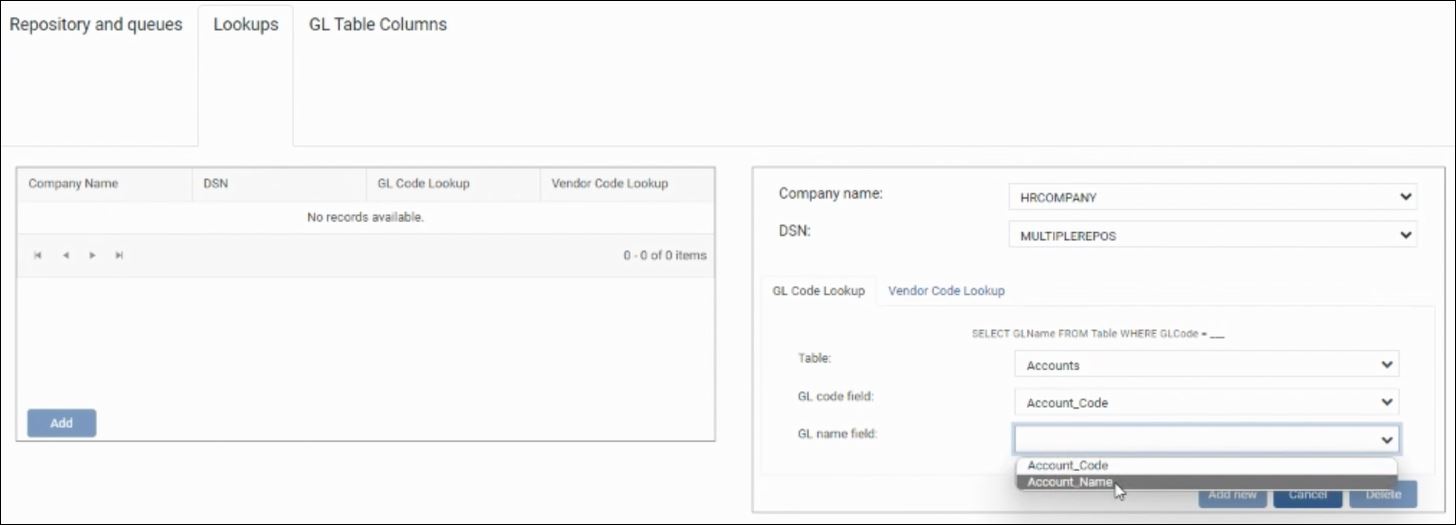
In Synergize Accounts Payable Configuration, click the Lookups tab. To set up default values, click Add and complete the Company Name, DSN, and GL Code Lookup fields.
-
In this example, click the value under the DSN column to open GLCodelookup.
-
At lower right, on the GL Code Lookup tab, set the table and default lookup fields for the GL code and GL name. Click Save.
-
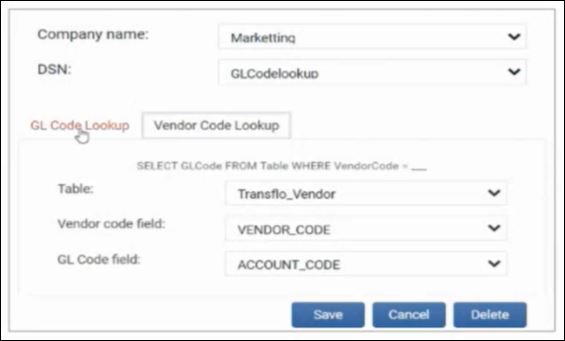
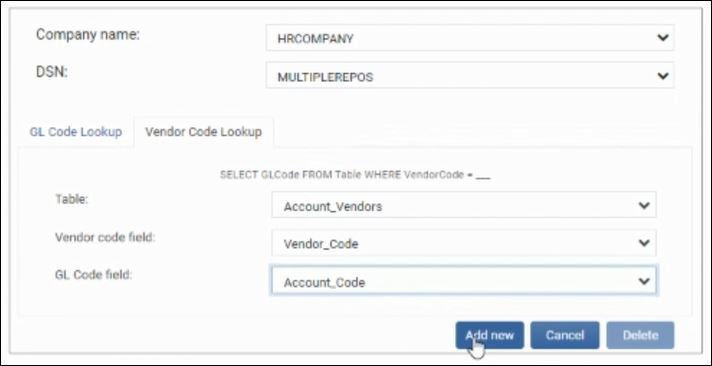
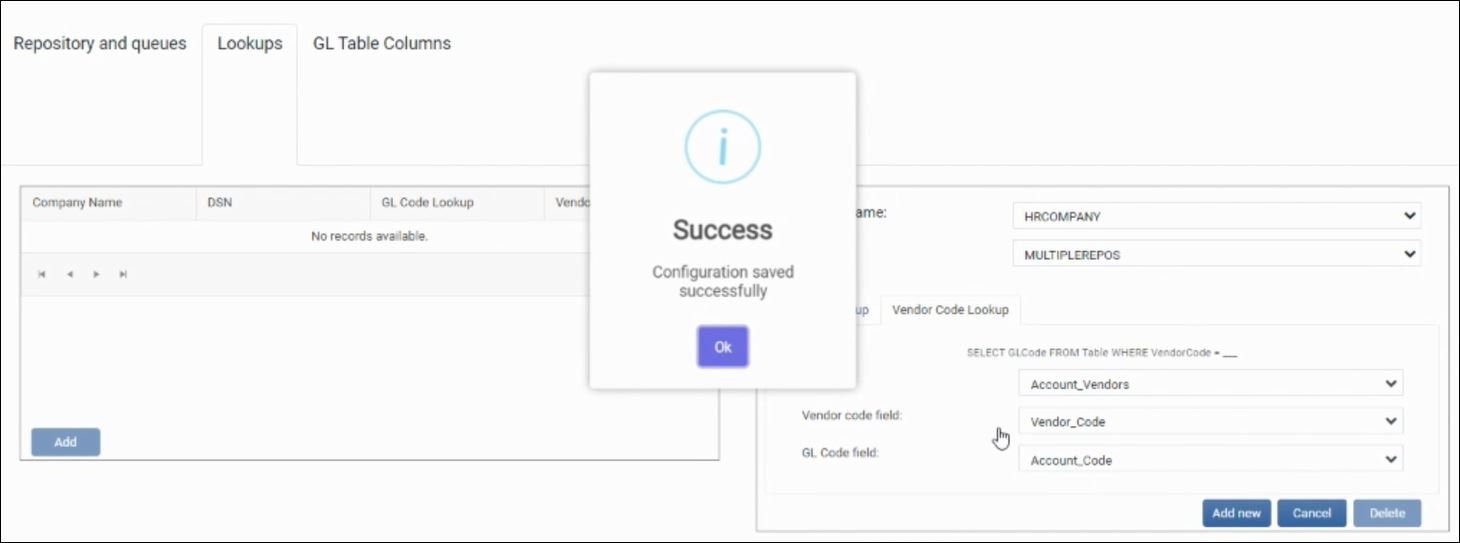
Click the Vendor Code Lookup tab. Set the vendor table and the default lookup fields for the Vendor code and GL Code. Click Save.
-
-
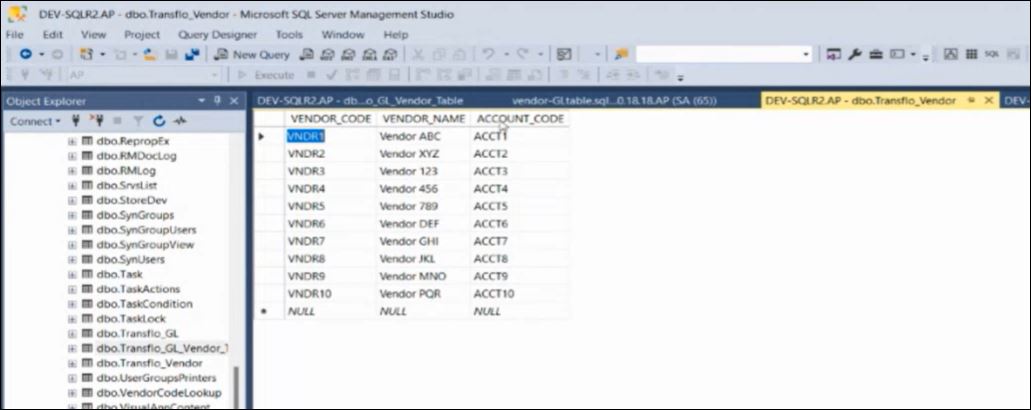
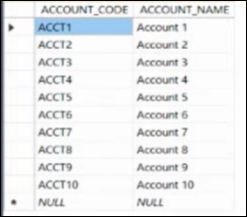
(Optional) As a database administrator, you can verify the new table entries that join the following field data:
-
VENDOR_CODE
-
VENDOR_NAME
-
ACCOUNT_CODE
and
-
ACCOUNT_CODE
-
ACCOUNT_NAME
-
-
Open the AP workflow in Synergize Workflow Designer. Open the Index queue. On the resulting Queue Properties window, click the Fields tab.
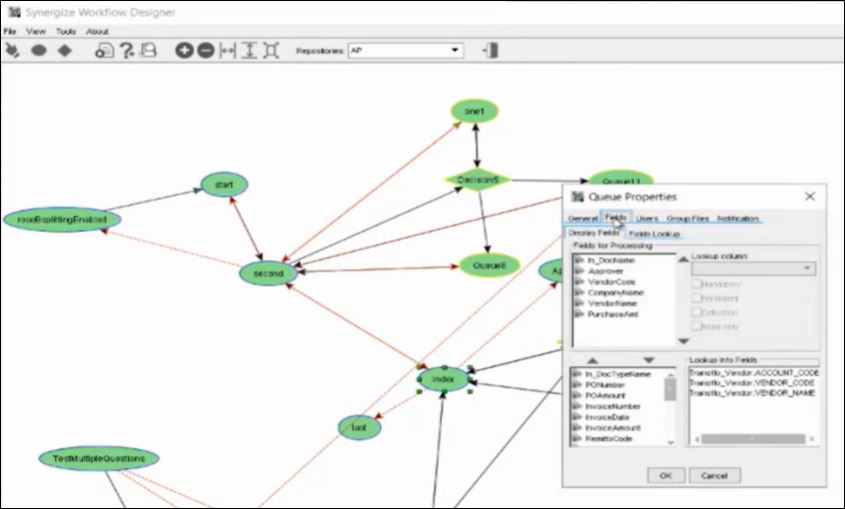
-
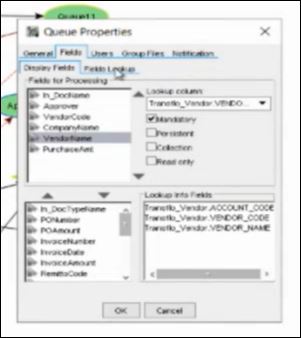
On the Display Fields sub-tab, set the Lookup Column for the VendorName field.
-
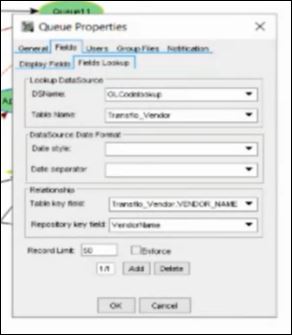
On the Fields Lookup sub-tab, configure the data source and relationship.
-
-
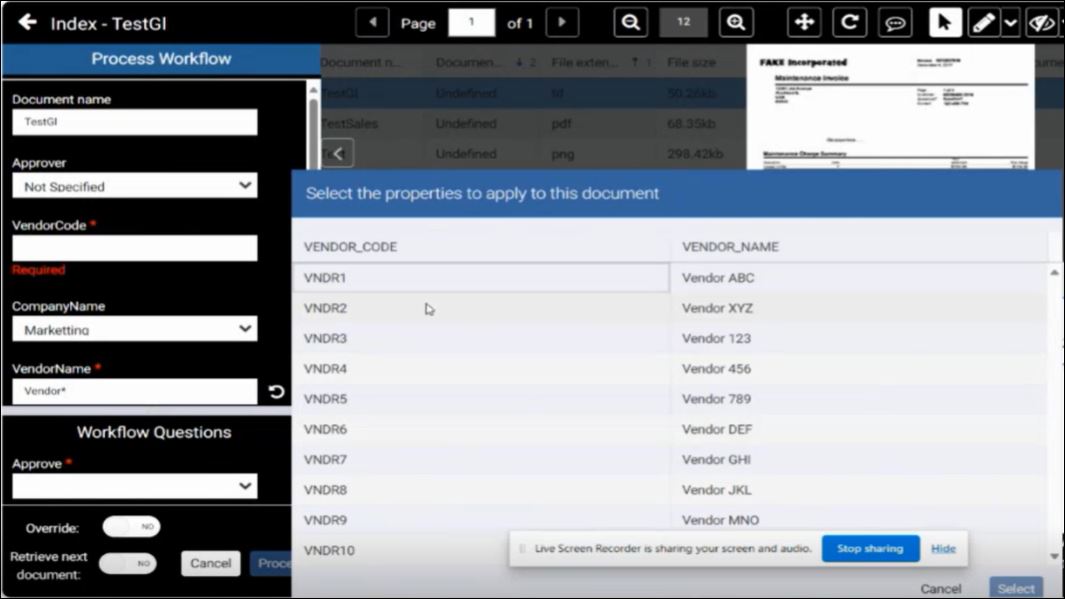
In Synergize Explorer, open a document and enter Vendor* in the VendorName field. Choose a vendor by name or by code. Click Select.
-
The following values are applied to new rows under GLCodes:
-
Company
-
GL Code
-
GL Name
-
As a system administrator working in Synergize 16.x, 17.x, or newer, you can add a second APDOCS repository to handle more documents and meet different department needs. In previous releases dating back before 2025, only one repository was supported.
In 2024-2025, Synergize Accounts Payable Enhancements (2025) in Synergize Release 16.0 and newer releases allow you to maintain an existing APDOCS repository configured with GL coding, approval queues, workflows, and other functionality in your Synergize environment and introduce a second APDOCS repository to enhance system capabilities.
Key Benefits:
-
Dual Repository Configuration: The new HTML5 Accounts Payable Configuration supports the addition and independent configuration of more than one APDOCS repository.
-
Feature Consistency Across Repositories: Both the original and the new APDOCS repositories function correctly with GL Coding and Approval queues, ensuring feature parity.
-
Seamless Repository Switching: Users can easily switch between two or more repositories within the system interface, with clear indicators showing which repository is currently active.
-
Data Integrity and Security: The system maintains data integrity and security for multiple repositories, with appropriate access controls and permissions functioning as expected.
-
Integration and Performance Validation: The addition of a second repository integrates seamlessly with existing workflows and systems, without causing any degradation in system performance or user experience.
To add a second APDOCS repository to enhance system capabilities, follow these steps:
-
Log in to your instance of the Synergize Accounts Payable Configuration application for your environment.
-
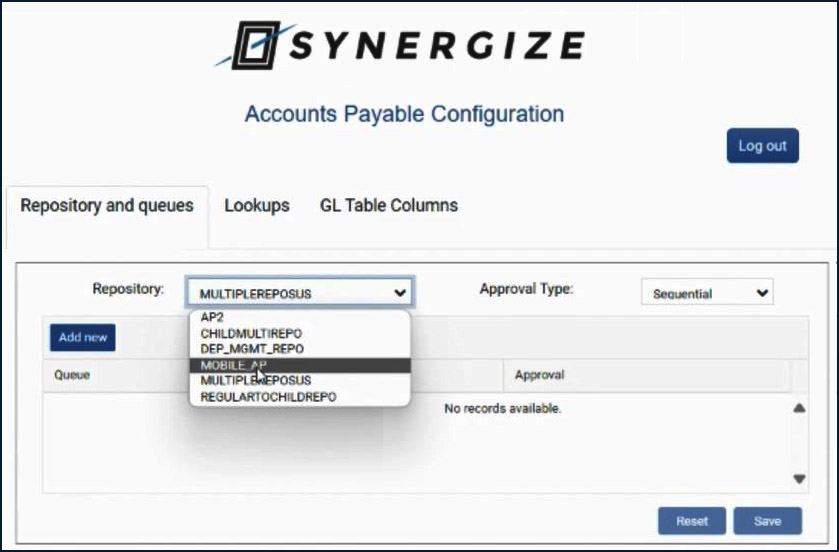
On the Repository and Queues tab, choose a repository in the Repository field drop-down list.
-
To create a new configuration, click Add New.
-
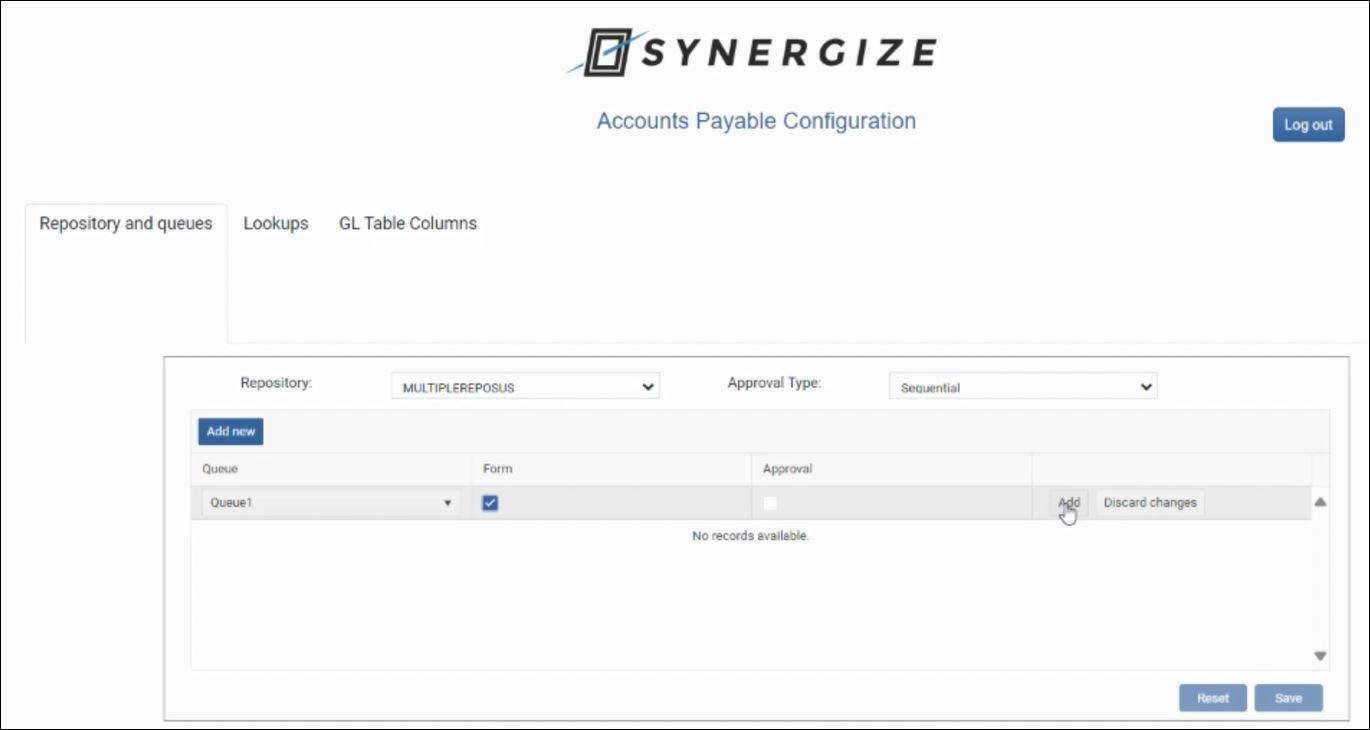
Set the Queue field.
-
To link your new repository configuration to a form, select the Form check box.
-
To require an approval step or workflow, select the Approval check box.
-
To save this new configuration, click Add.
-
Click Save.
-
-
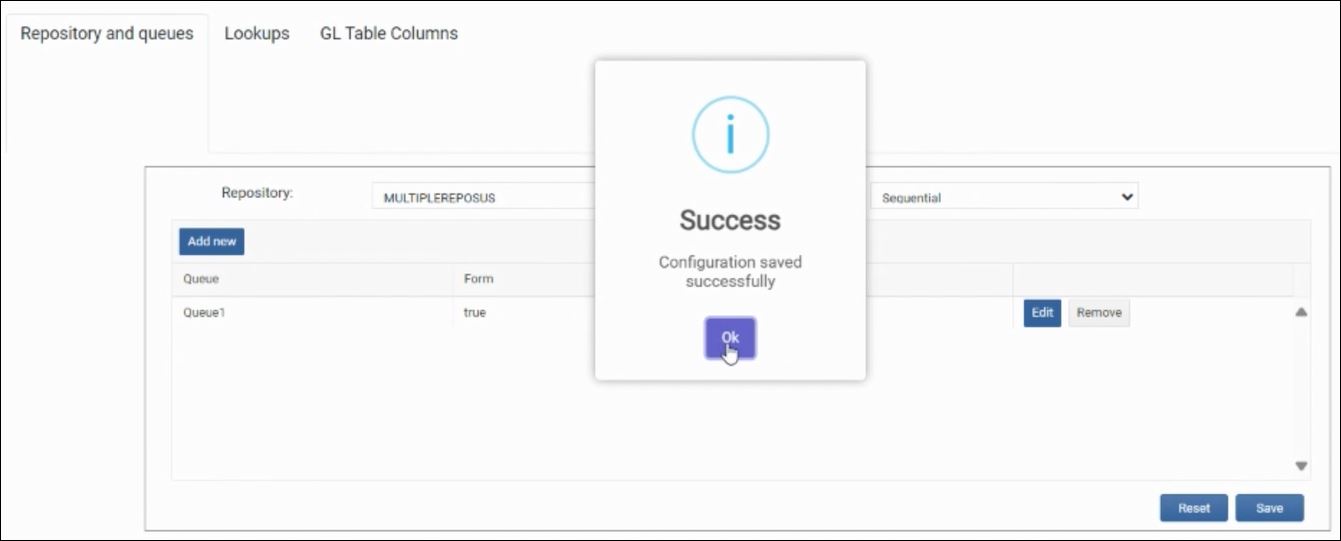
Click OK to close the Success message. Your new repository row shows the selected queue. In the example image below, the Form column shows true. To continue configuring this new repository, click Edit.
-
Navigate to the Lookups tab and click Add.
-
Configure the following fields:
-
Company Name
-
DSN
-
GL Code Lookup fields:
-
Table
-
GL Code Field
-
GL Name Field
-
-
Vendor Code Lookup fields:
-
Table
-
Vendor Code Field
-
GL Code Field
-
-
-
When you are done configuring all fields, click Add New.
-
Click OK to close the Success message.
-
Navigate to the Repository and Queues tab and verify your new repository settings.
-
Open Synergize HTML Explorer:
-
Set the Repository field at the top to your new AP repository.
-
Set the Queue field.
-
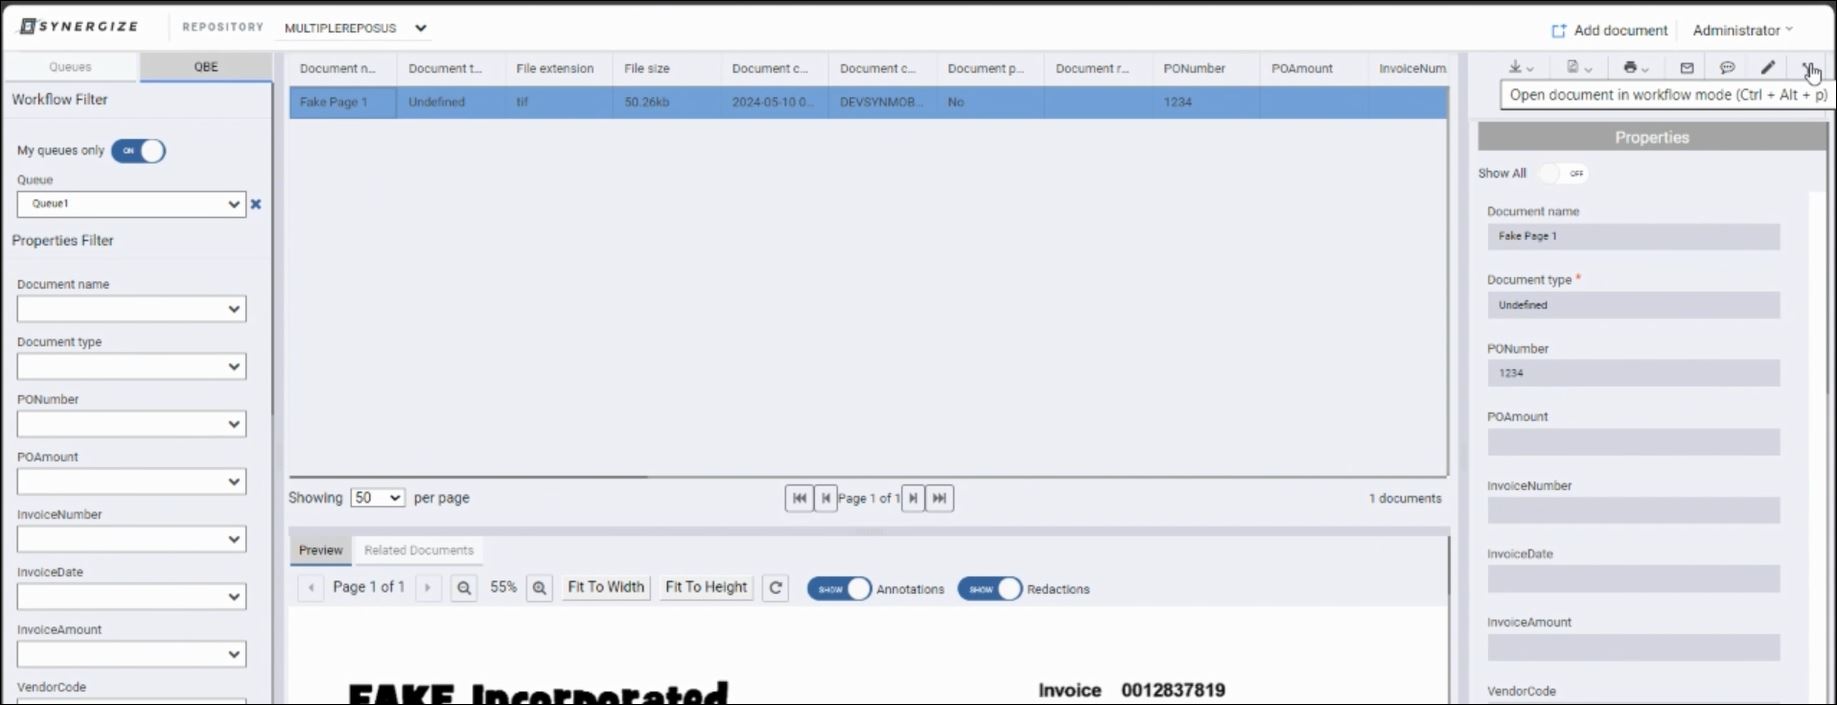
In the resulting list of documents, select one. On the right, click Open document in workflow mode or press the Ctrl + Alt + P keys.
-
-
Review the document properties. Verify you can now select the Company, GL Code, and GL Name at the bottom of the window from lists of values derived from your new AP repository.
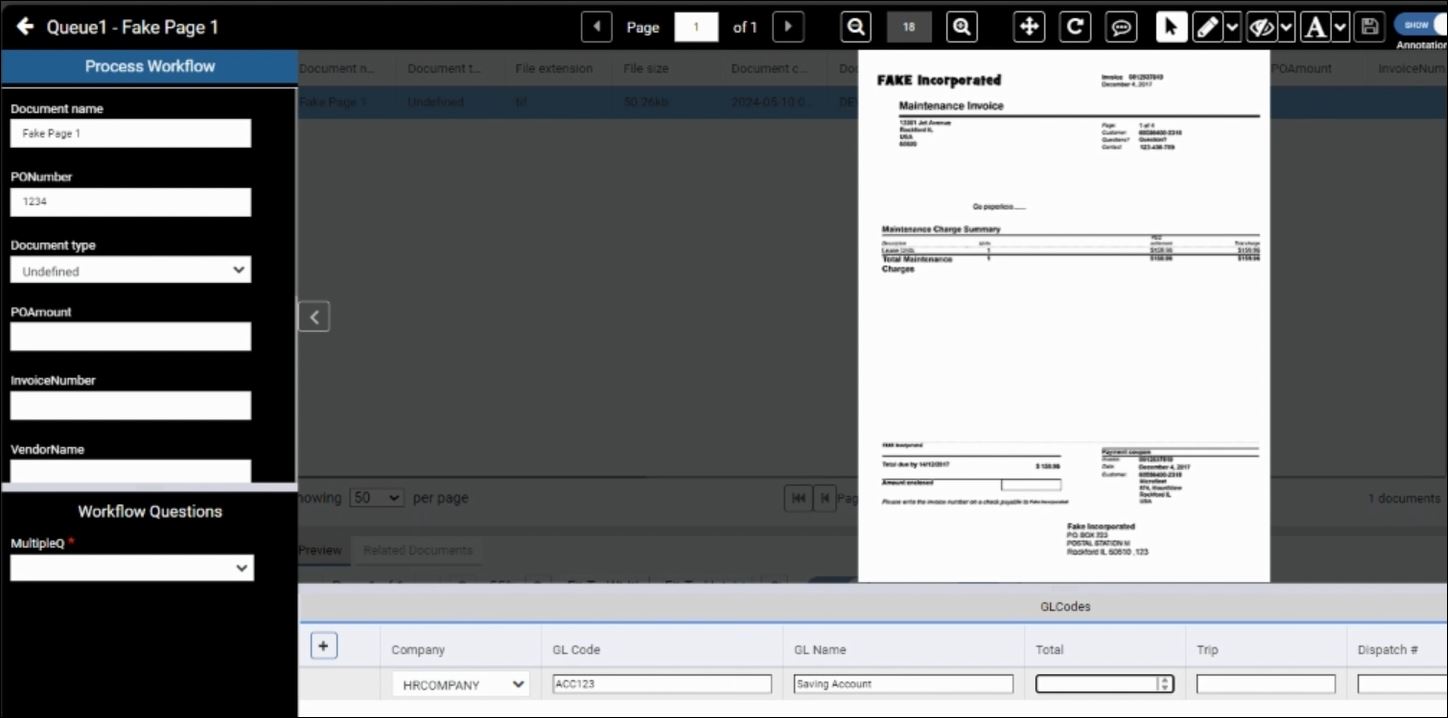
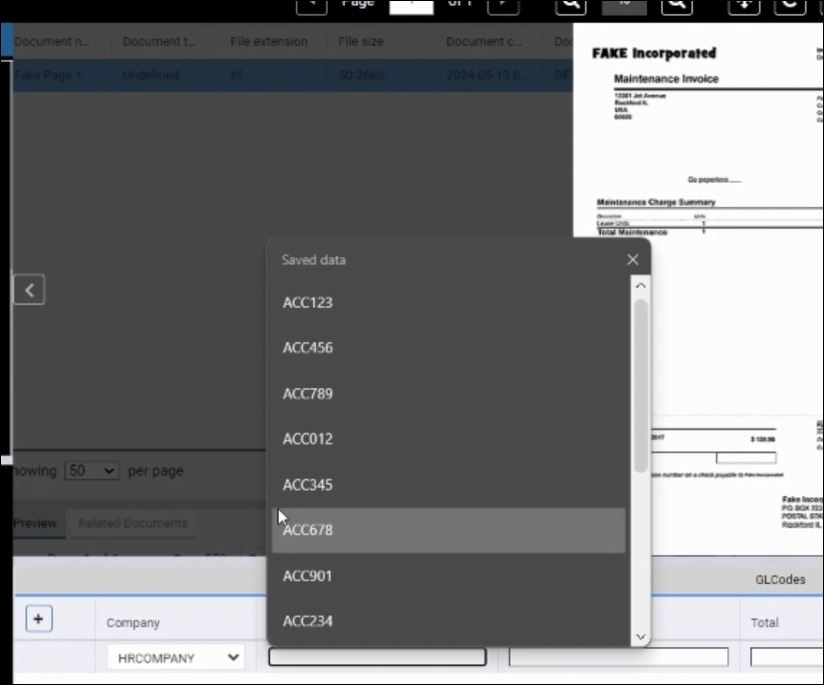
For example, in the image below, only the GL Code values associated with your currently selected AP repository appear in the pop-up list.