Synergize SimpleScan High-Volume Scanning
To quickly capture and index documents, use Synergize SimpleScan. Synergize SimpleScan allows you to scan and transmit documents easily from an initial source to a central processing location. This greatly reduces cycle times, the risk of lost documents, and considerable courier costs.
Simple Scan high-volume scanning has no image volume limit and provides distributed solutions that allow for multiple scanning stations all sending document images to a central location. Scan into a network folder or directly into the Synergize Repository. An easy touch-screen interface allows you to operate the system without training.
Synergize SimpleScan lets you do the following:
-
Take advantage of Kofax VRS and Paperstream image enhancement tools
-
Index documents quickly with fast database lookups
-
Read bar codes with built-in tools
-
Scan, split, and re-scan documents in a batch
-
Control input at the field level for required data and field types (for example, dates and drop-down lists)
After installation, the SimpleScan icon should appear on your desktop. With newer versions of Simple Scan, there are multiple icons, pre-configured with specific command-line options.

-
Right-click on the icon and select Properties.
-
The shortcut Target can be customized with command line flags.
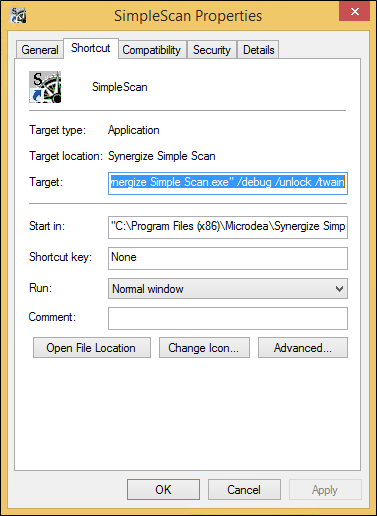
The full list of command line options are as follows:
Option
Effect
/debug
Logs various program output strings to a log file. The log file appears in the following location:
/unlock
Allows the program to launch with a title bar and be closable. Without this option, the program launches in what is known as "kiosk" mode which prevents people from shutting down SimpleScan.
/twain
OR
/kofax
OR
/paperstream
These options represent the type of scanner that you will be using.
NOTE: /paperstream is deprecated. Use /twain instead.
/dnd
Do not distribute. Scanned batches are not sent out but stored locally, so they can be sent later.
-
Launch SimpleScan.
-
Click the Configuration icon in the bottom right corner of the main window.
-
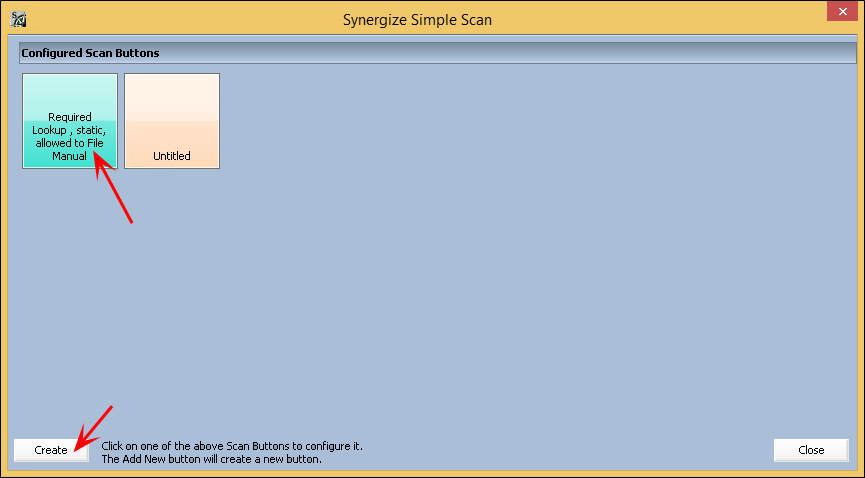
Under Configured Scan Buttons, click on an existing scan button to modify it. To create a new button, click Create.
-
Configure the settings on each tab in the Button Configuration window:
General Settings
-
Title
-
Color
-
Icon
-
Position
Scenario/Location Settings
-
Scan Scenario
-
Output Destinations
Processing Settings
-
Batch Name
-
Split Mode
-
Allow Batch Review
-
Show Indexing Screen
-
Show Batch Info
Miscellaneous Settings
-
Receipt Printing
-