Create a Load
As a carrier with an active subscription to the Transflo Velocity+ Command Center solution including Transflo Mobile+ app for drivers, you can create and manage loads including shipments, stops, pickup, dropoff, drivers, documents, and invoicing. For example, you can create a single load with three (3) shipments and seven (7) total stops.
As a shipper or broker, your configuration might also support the Create Loads feature.
To create a new load, follow these multi-part steps:
-
Choose either method:
-
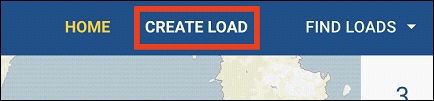
In the top menu bar, click CREATE LOAD.

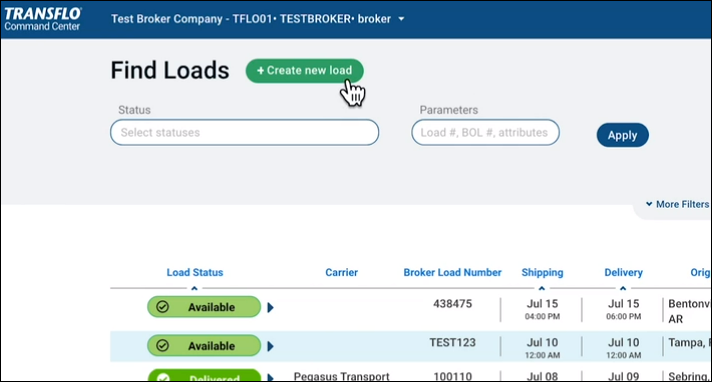
- On the Find Loads page, click +Create new load.

-
-
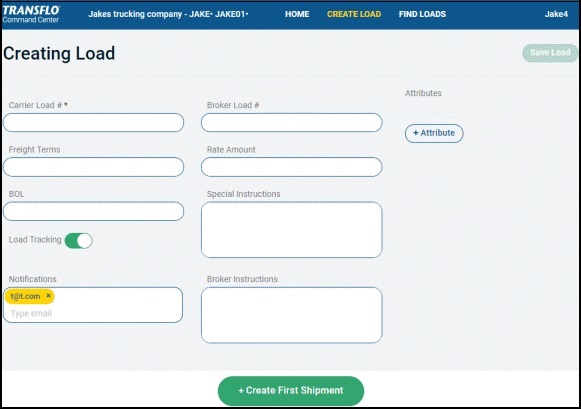
On the Creating Load page, complete the required and optional fields:

-
Carrier Load #: Enter the unique number that identifies this load for the currently-selected carrier shown in the top banner.
Transflo Velocity+ can be configured for carriers or brokers. Depending on whether a broker or a carrier is selected in the top banner, the Carrier Load # and Broker Load # field positions may be reversed.
-
For carriers, the Carrier Load # field is required.
-
In broker configurations, the Broker Load # and Rate Amount fields are required.
-
-
Broker Load #: Enter the unique number that identifies this load for the broker who is the original source of the tendered load.
-
Freight Terms: Enter the preset or negotiated terms for transporting this load.
-
Rate Amount: Enter the rate associated with this load in units of currency.
-
BOL: Enter the bill of lading identifier for this load. The BOL can be any unique alpha-numeric string of numbers or letters or both.
-
Special Instructions: Enter any additional information about this load.
-
Load Tracking: Click the toggle switch slider to turn load tracking ON or OFF. The Load Tracking toggle switch is visible only if breadcrumbs and load tracking are enabled in the TFX Server Administration tool with your active carrier subscription to Transflo One Portal or to Velocity Plus Command Center and the Transflo Mobile+ app.
-
Notifications: As a logged in customer user, your e-mail address appears here so you receive notifications about the status of the load. You can also enter additional recipients.
-
Broker Instructions: As a broker, you can add optional instructions in this field for carriers, drivers, or other brokers.
-
-
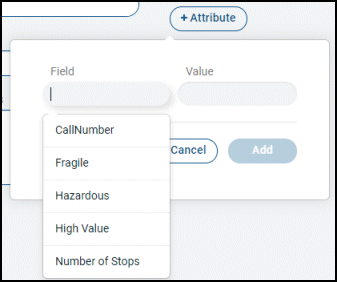
(Optional) Click the + Attribute button to add one or more special attributes about the new load.
-
In the Field box, select a value from the list. For example, Fragile.
-
In the Value field, enter data that quantifies the first field. For example, Fragile with a value of $175,000 or Hazardous and a value of Class 3.
-
Click Add to insert each attribute.

-
-
After you have entered the details for the load, click the green + Create First Shipment button at the bottom of the page.
-
The Shipment page appears.
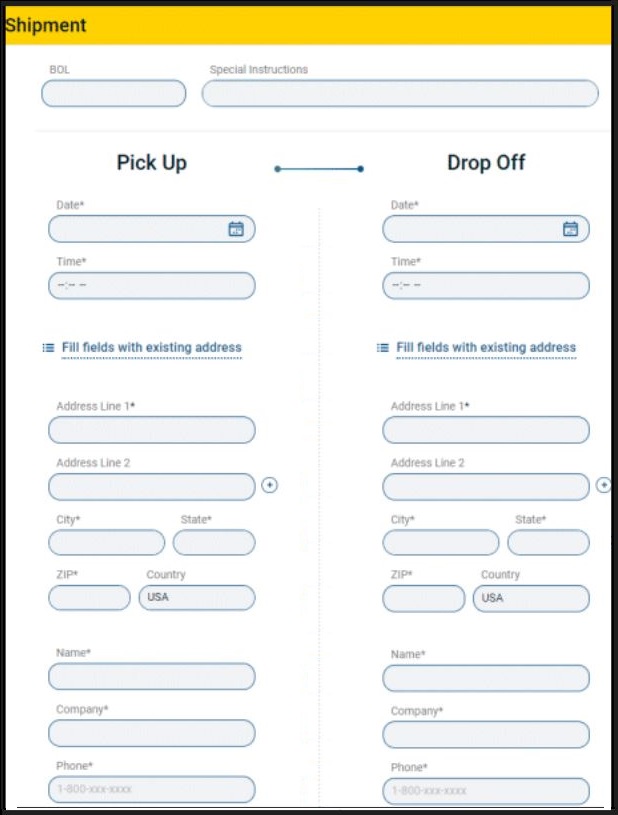
Use the Shipment page to enter pickup, dropoff, package, and order information. Your load can have one shipment with one pickup location and one dropoff location (considered one stop) or it can have more than one shipment with multiple stops.
-
On the Shipment page, complete the required and optional fields:
-
BOL: Enter the bill of lading identifier for this load.
-
Special Instructions: Enter any special instructions about this load.
-
Date: Click inside the Date field to display a monthly calendar to scroll backward or forward to select the pick up and drop off dates. You can also type the date into the field in MM/DD/YYYY format.
-
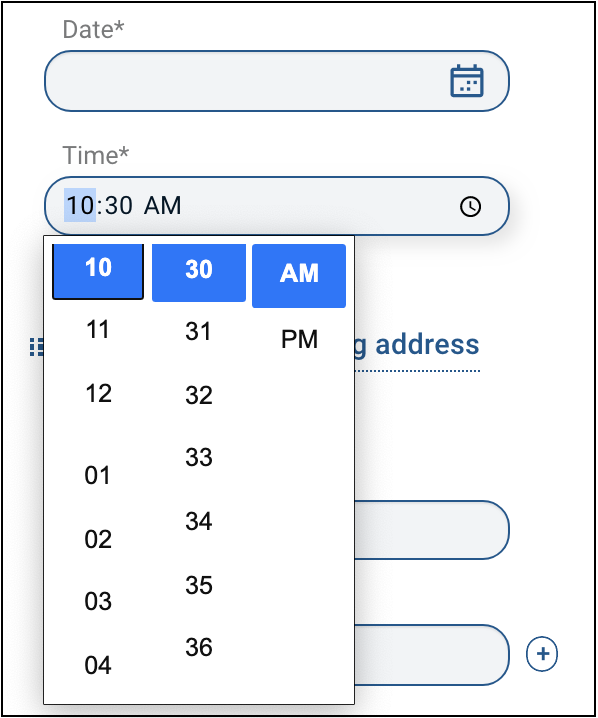
Time: Click on the Hour, Minute, or AM/PM and enter the time or scroll through the numbers.

-
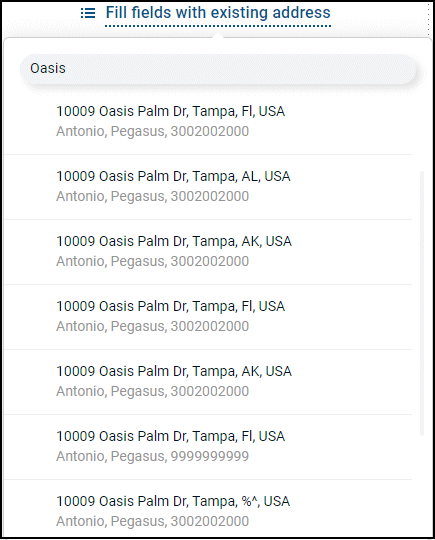
Fill fields with existing address: Click this link to display a list of pickup or drop off addresses that are already stored in the system.
-
Enter a value in the Filter field to limit matching results based on your specified criteria. For example, addresses with oasis in their names.
-
Click one of the matching existing addresses to reuse in the pickup or dropoff locations for the new shipment.
-
-
To add a new address, enter lines 1 and 2, city, state or province, ZIP (postal code), and country in the appropriate fields.
-
Enter a contact person Name, Company, and Phone for the pick-up and drop-off portions of the shipment. Command Center accepts phone numbers in various formats.
-
-
After you enter all shipment information, choose an option:
-
If you are done, click the Add Shipment button at the bottom of the page and go to Part 4.
-
If you need to enter packages or orders, go to the next section (Part 3).

-
To add information about packages and orders for this shipment, follow these steps:
-
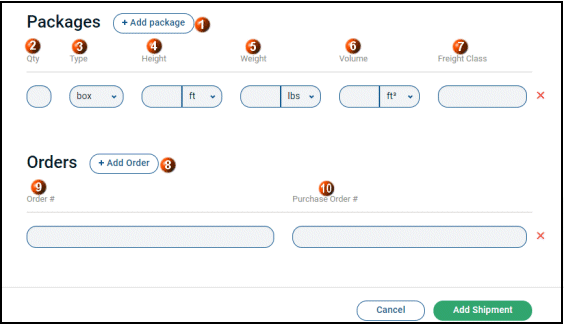
Click + Add package or + Add Order for each package or order you need to add to the shipment.
-
For each package, complete the following fields:
-
Qty: Enter the number of packages for this line item.
-
Type: Select a package type from the drop-down list of values (for example, box).
-
Height: Enter a whole number (decimals are not allowed) and unit of measure.
Example: 8 ft
-
Weight: Enter a whole number (decimals are not allowed) and unit of measure.
Example: 800 lbs
-
Volume: Enter a whole number (decimals are not allowed) and unit of measure.
Example: 27 yd3 or 27 cubic yards (729 cubic feet) for a container that is 3 yards long, 3 yards wide, and 3 yards high.
-
Freight Class: Enter the freight class for each package added to the shipment.
Example: 55
-
-
For each order, complete the following fields:
-
Order Number: Enter the order number for each order you are adding to the new shipment.
-
Purchase Order #: Enter the purchase order (PO) number from the source shipper or broker procurement department for this shipment order.
-
-
To remove a row, click X Delete to the right of the row.
-
When all packages and orders have been entered, click the green Add Shipment button at the bottom of the page and go to Part 4 to review your new unsaved load with one or more shipments.
-
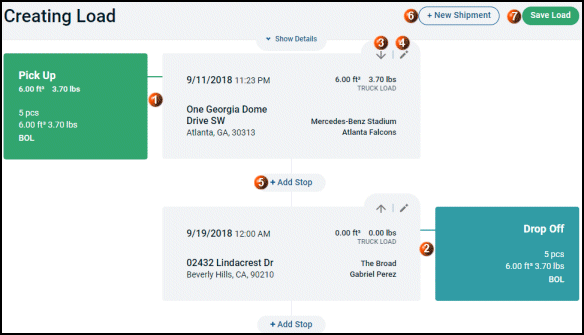
After you click the Add Shipment button, the Creating Load page shows what you have entered so far. Typically, this is a new load with one shipment as shown:
-
Review the following data to confirm it is correct:
-
Pick Up: At top left, verify the Number of Items, Weight, Volume, BOL, Date, and Pick Up location.
-
Drop Off: At bottom right, verify the Number of Items, Weight, Volume, BOL, Date, and Drop Off location.
-
-
(Optional) Other Stops: If you add more stops, you can click the Up or Down arrows to move the sequence of stops in chronological time order.
-
(Optional) To change the details for a stop including the pickup (origin) location and the drop-off (destination) location, click
 Edit.
Edit. -
After you have reviewed all the shipment information you have entered so far, choose an option:
-
If you are done, click the Save Load button at the top of the page (skip ahead to Part 6).
-
If you need to add a stop, click +Add Stop in the appropriate location and go to the next section (Part 5).
-
If you need to add another shipment as part of the same new load, click + Add New Shipment and go back to Part 2.
-
You can add one or more stops to each shipment that is part of a load.
-
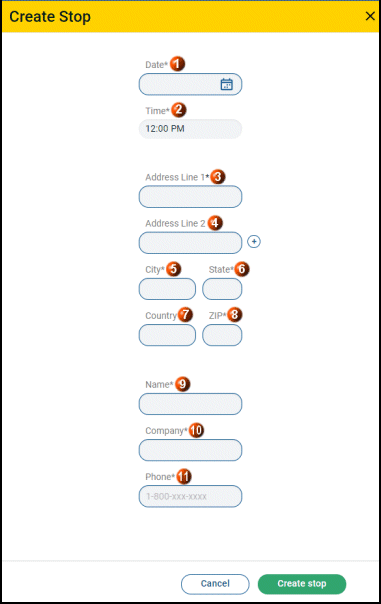
To add a stop, click + Add Stop. If you add the stop out of order, you can move it later.
-
On the Create Stop page, complete the following fields:
-
Date: Select the date of the stop from the calendar.
-
Time: Scroll through to choose the time of the stop.
-
Address Line 1: Enter the street address.
-
Address Line 2: Enter extended address information (such as building, unit, or suite).
-
City, State, and ZIP: Enter the city, state (or province), and ZIP (or postal code) for the stop. The Country is optional.
-
Name, Company, and Phone: Enter the name, company, and phone number for a contact person who can remain available to assist the driver with access or any questions about the stop location. The Command Center application accepts phone numbers in different supported formats; however, as a rule, try to remain consistent.
-
-
After you have completed the stop information, click the Create stop button at the bottom of the page.

-
Review the information one more time to verify it is accurate.
-
To save the new load, including all shipments, stops, packages, orders, and other details, click the Save Load button.
-
Your new load is processed in the system. The Load page appears with three tabs to manage all the Load, Trip, and Shipment information.
Next Steps:
Offer the load to one or more qualified carriers. If configured, carriers, drivers, and even other brokers can begin to accept your new tendered load or counter-offer to win the load assignment.
![]() View a demonstration of these steps in one or more Transflo videos:
View a demonstration of these steps in one or more Transflo videos: