Transflo DMS Enterprise Deployment Administrator
Since most Transflo applications are distributed systems, keeping all machines running the same version can be challenging. The TRANSFLO® Deployment Administrator server application service reports the current versions of the TRANSFLO® Applications installed on each machine and communicates with clients running the TRANSFLO® Deployment Agent to identify and deploy new versions of the applications to your network systems.
As a system administrator, the Deployment Administrator and Agent simplify your job by deploying new versions of the applications and giving you the ability to control how updates and new applications are deployed. When you install a Transflo application, the installer verifies that the deployment agent is installed. If not installed, the system attempts to install it.
Since all of the TRANSFLO Server configuration is performed using the TRANSFLO® Administration Tool, it is logical to provide the means to launch the TRANSFLO® Deployment Administrator from the TRANSFLO® Administration Tool.
It is also possible to install the Deployment Agent on client machines with the TRANSFLO® Deployment Agent Setup.msi file. This should only be used on the initial installation of the Deployment Agent. The Deployment Administrator must be used to deploy future versions of the Deployment Agent.
TRANSFLO® Deployment Administrator is compatible only with Microsoft Internet Explorer or Microsoft Edge.
To start the TRANSFLO® Deployment Administrator:
-
In the tree menu click the Deployment Administrator link under the Utilities node.
-
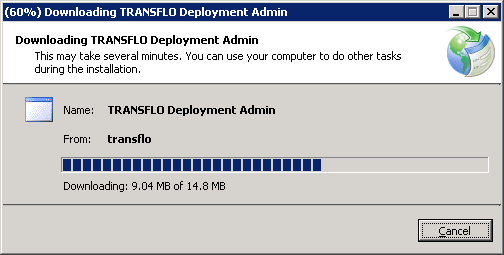
The Deployment Administrator is downloaded to your computer.
A progress bar appears the first time you open the Deployment Administrator.

-
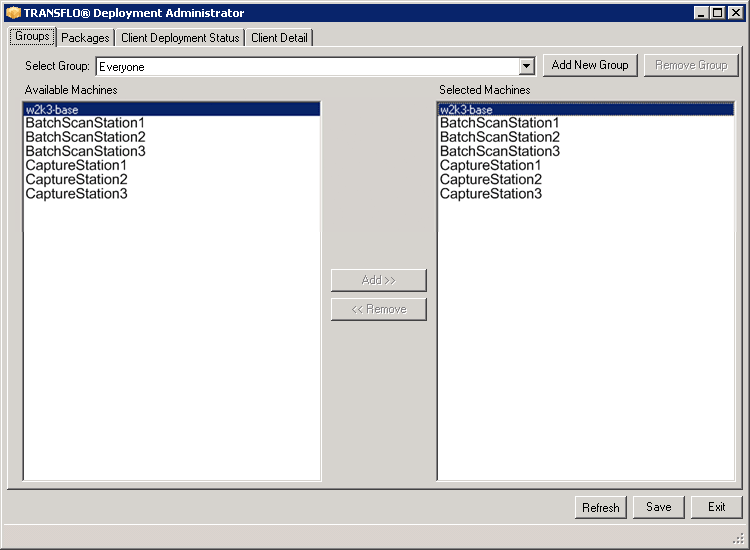
The Deployment Administrator Groups tab appears. All of the machines that have the Deployment Agent installed on them appear in the Available Machines list and also in the Selected Machines list.
Under Selected Machines is a list of machines that will receive the updates.
By default the Everyone group is selected.

You can group a set of installation packages to be deployed to a set of machines. The Everyone group is used to deploy packages to all TRANSFLO® machines on your network. The package files must be copied to the following folder:
<Transflo Server>\TRANSFLO® .WebService\Deployment\
<Transflo Server> is the location of your TRANSFLO® Server.
-
When you create a new group, Deployment Administrator creates a sub-folder with the name of your group in the following folder:
<Transflo Server>\ TRANSFLO® .WebService\Deployment\Overrides\
-
You must copy the setup files to this folder.
-
Each setup file in the Overrides sub-folders must be either the same version as the corresponding setup files in the Everyone group or a later version.
To create a new group:
-
Click the Add New Group button in the top right corner.
-
Enter a name for your new group in the Please enter new group name text box in the pop-up window.
Result: Your new group is selected in the Select Group drop-down list.
-
To add one or more machines, select the machine names in the Available Machines list, and click the Add button.
Result: The machine is added to the Selected Machines list.
-
To remove one or more machines, select the machine names in the Selected Machines list, and click the Remove button.
-
Click Save.
Note: You cannot add or remove systems from the Everyone group. The Everyone group is a list of all TRANSFLO® machines reporting a deployment agent.
As your network evolves you may want to remove a group of machines from the TRANSFLO® Deployment Administrator and then add new groups.
-
Select a group from the Select Group drop-down menu.
-
Click the Remove Group button next to the Select Group drop-down.
-
In the Delete Group message box, click Yes.
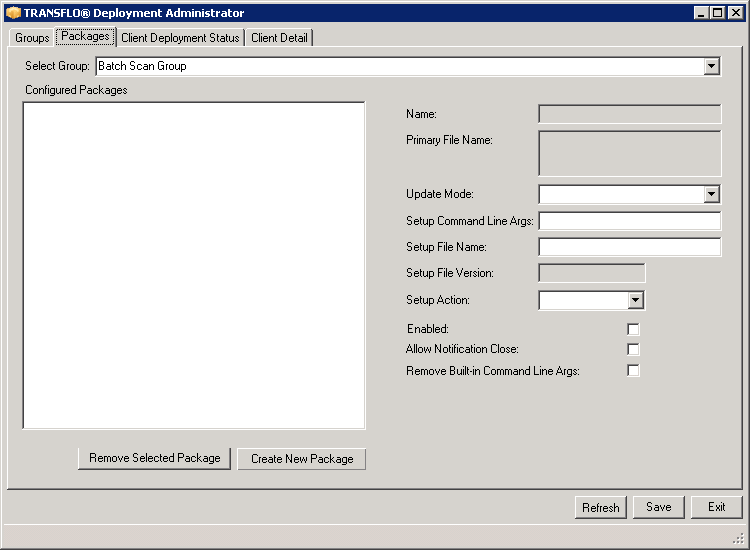
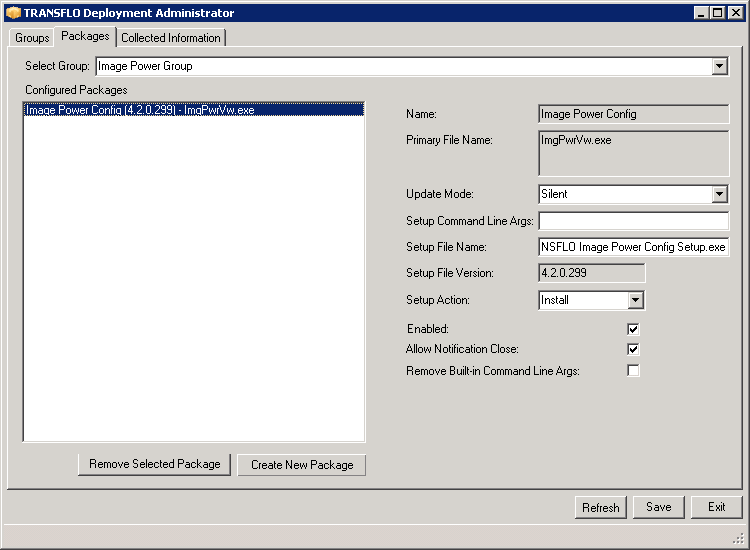
Packages are groups of files that you pre-configure to be deployed to the machines in a group. After you create a group and assign machines to it that will receive updates, you can create new packages.
Packages are available in three types:
-
Builtin
-
ImagePowerConfig
-
QuickView Screen Scrape Config.
Built-in packages are pre-compiled installation packages, whereas ImagePowerConfig and QuickView Screen Scrape Config packages are compiled and deployed when you create the package.
-
Click on the Packages tab at the top of the Deployment Administrator window.

-
Click on the Create New Package button below the Configured Packages list.
-
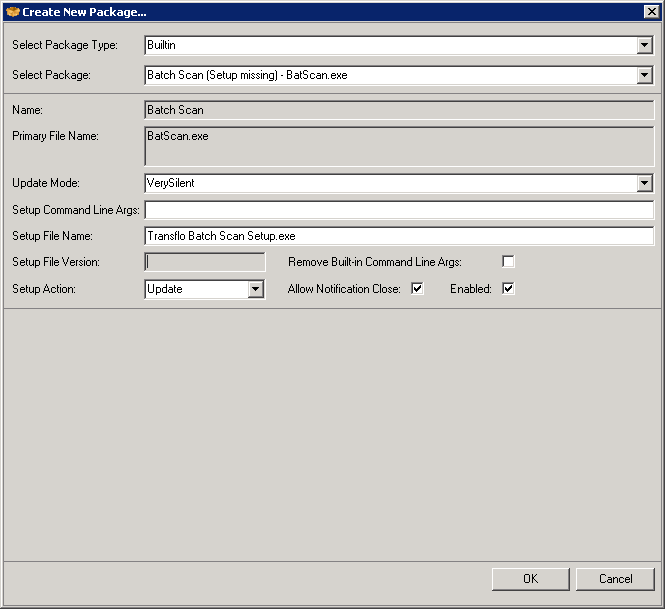
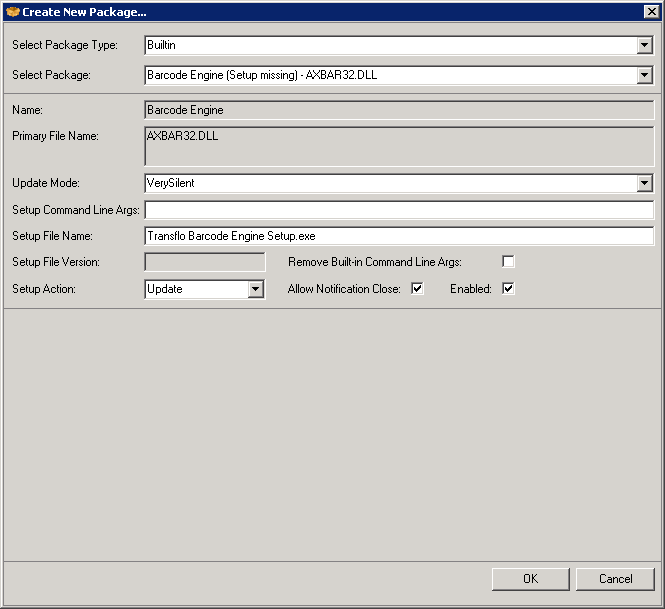
Complete the fields on the Create New Package dialog box.

-
Select Builtin from the Select Package Type drop down. (Builtin is the default package type.)
-
The Select Package drop down has a list of the available packages that can be created and their version number. Select a Package from the list.
-
The general name for the package is pre-filled in the Name field.
The main executable file for the package is pre-filled in the Primary File Name field.
For Built-in Package Type packages, these values cannot be changed.
-
In the Update Mode drop down, select an update mode.
-
If the package installation normally requires command line arguments they will be displayed in the Setup Command Line Args field. If you would like to add optional command line arguments, list them in the Setup Command Line Args field.
-
The setup file name is automatically detected and shown in the Setup File Name field. To use a different setup file, enter the new file name here.
Note: Do not put a path in this box. To deploy to a different path or drive on the client machine, you will need to make the change in the web.config.xml file.
-
The setup file version number is shown in the Setup File Version field.
This cannot be edited.
-
The action that will be taken by the installation package is shown in the Setup Action drop down. The possible values are Update and Install.
-
To clear the built-in command line arguments check the Remove Built-in Command Line Args check box.
-
To give the end user the ability to close the tray window that provide notification that an update is pending check the Allow Notification Close check box.
-
To allow the installation package to run on the group’s selected machines check the Enabled check box.
-
-
Click the OK button to save the new Package and close the Create New Package... dialog box.
Note: Standard and Silent deployment packages are pushed out to the client machines but do not automatically notify the user that a package is available for installation.
There are three different methods that can be used to trigger the notification:
-
Reboot the client machine.
-
Log off and log on.
-
Restart the Deployment Agent service on the client machine.
-
TRANSFLO® DMS 2012 R3 does not ship with Image Power, since TRANSFLO® QuickView is intended to replace Image Power. However, Image Power Configuration packages are still supported so you can deploy legacy Image Power versions.
Unlike BuiltIn packages which contain pre-compiled installation packages, ImagePowerConfig packages are compiled and deployed when you create the package.
Before you can create an ImagePowerConfig package or a QuickView Screen Scrape Configuration package, you must first install the Inno Setup tool on your server. You must install Inno Setup isetup-5.4.3.exe and ispack-5.4.3.exe from your installation CD, accepting all of the defaults for the isetup-5.4.3.exe but only selecting the Install Inno Setup Preprocessor check box from the ispack-5.4.3.exe installation .
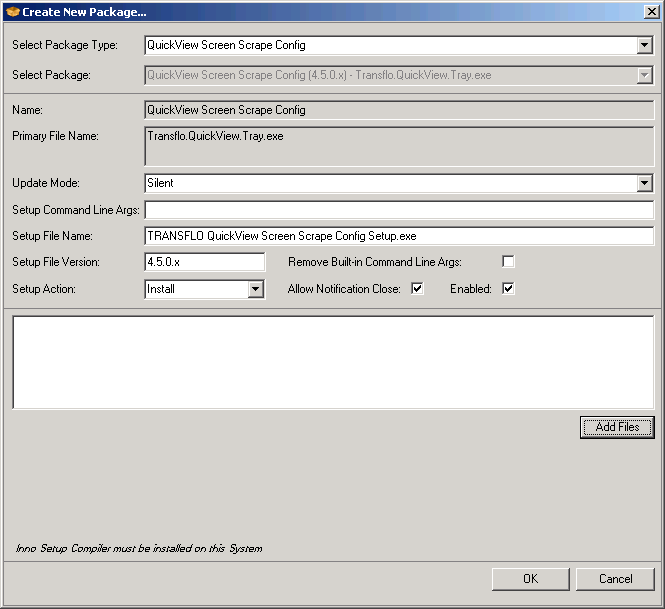
To create a new ImagePowerConfig Package:
-
Click on the Create New Package button below the Configured Packages list on the Packages tab.
-
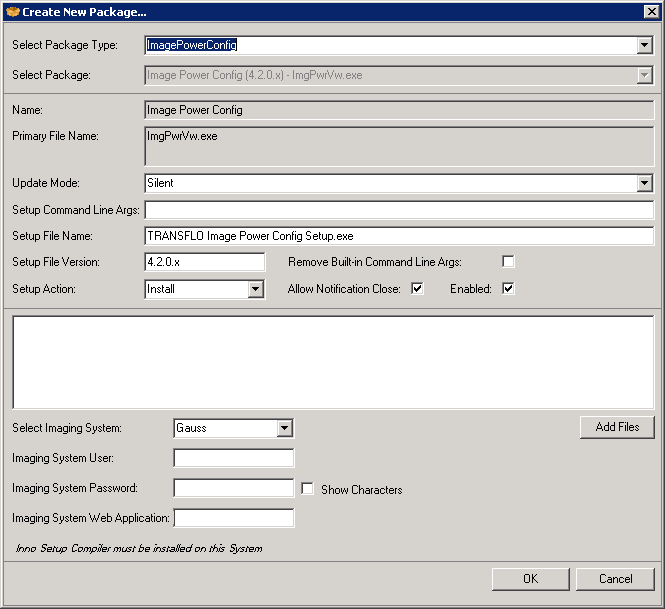
Complete the fields on the Create New Package dialog box.

-
Select ImagePowerConfig in the Select Package Type drop down.
-
The appearance of the Create New Package... dialog box changes to accommodate the special needs of Image Power Configuration deployments.
Note that the Select Package cannot be changed.

-
Follow steps in the New Built in Packages section above.
-
In the Setup File Version, change the “x” to a meaningful version number.
-
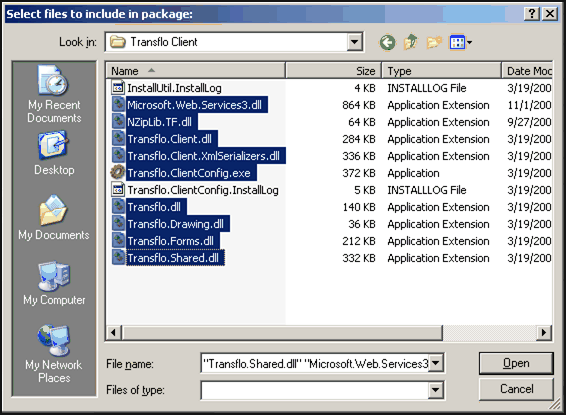
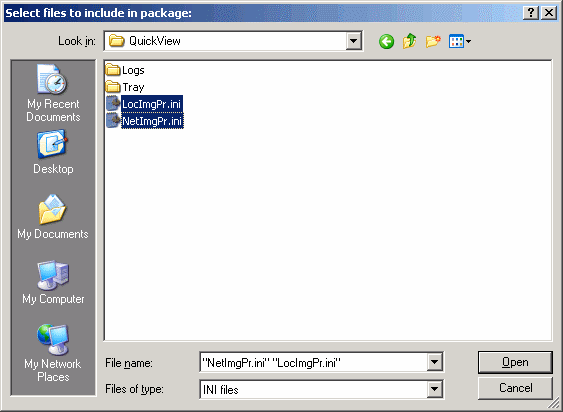
To add the files that will be in your Image Power Setup Package, click the Add Files button. The “Select files to include in package” window opens.
-
Navigate to the folder that contains the LocImgPr.ini, NetImgPr.ini, and Viewer.ini files.
-
Select these files by holding down the Ctrl key on the keyboard and clicking on the individual files.
-
Click the Open button.

-
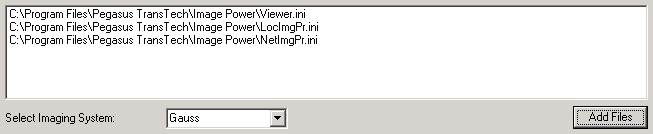
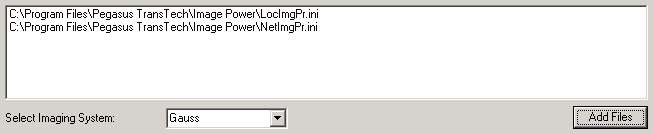
The selected files are displayed in the list box.

-
-
Select your imaging system type from the Select Imaging System drop down.
-
Enter your imaging system’s user name and password in the Imaging System User and Imaging System Password fields.
-
If your imaging system is Gauss type your the name of your Imaging System web application in the Imaging System Web Application field.
-
To display the password characters, check the Show Characters check box.
These credentials are stored in the following Windows Registry location and are used by Image Power to authenticate to your Imaging System.
HKEY_LOCAL_MACHINE\SOFTWARE\Pegasus TransTech\TRANSFLO® Image Power\Document Manager
-
When creating Image Power Config screen scrape config packages from a 64 bit machine the ini files need to be edited so that the NetIniFile and ImgPwrCmd values contain a directory that does not include Program Files (x86) especially if deploying packages to a 32 bit machine (XP).
-
-
Click OK to save the new Package and close the Create New Package... dialog box.
Result: Your package is added to the Configured Packages list.

-
Click Save.
The QuickView client application is deployed with built-in packages. If you are using the QuickView Screen Scrape feature, you must create QuickView Screen Scrape Configuration packages which are compiled and deployed when you create the package, similar to Image Power Configuration packages.
Before you can create an ImagePowerConfig package or a QuickView Screen Scrape Configuration package, you must first install the Inno Setup tool on your server. You must install Inno Setup isetup-5.4.3.exe and ispack-5.4.3.exe from your installation CD, DVD, or network volume, accepting all of the defaults for the isetup-5.4.3.exe but only selecting the Install Inno Setup Preprocessor check box from the ispack-5.4.3.exe installation .
To create a new QuickView Screen Scrape Configuration package:
-
Click on the Create New Package button located below the Configured Packages list on the Packages tab.
-
The Create New Package... dialog box opens.
-
Select QuickView Screen Scrape Config in the Select Package Type drop down.
-
The appearance of the Create New Package... dialog box changes to accommodate the special needs of Quick View Screen Scrape Configuration deployments.
Note that the Select Package cannot be changed.

-
Follow steps f through i in the New Built in Packages section above.
-
In the Setup File Version change the “x” to a meaningful version number.
-
To add the files that will be in your QuickView Setup Package, click the Add Files button.
-
The “Select files to include in package” window opens.
Navigate to the folder that contains the LocImgPr.ini, and NetImgPr.ini files are located.
Select these files by holding down the Ctrl key on the keyboard and clicking on the individual files.
Click the Open button.

-
The selected files are displayed in the list box.

-
When creating QuickView screen scrape config packages from a 64 bit machine the ini files need to be edited so that the NetIniFile and ImgPwrCmd values contain a directory that does not include Program Files (x86) especially if deploying packages to a 32 bit machine (XP).
-
Click OK to save the new Package and close the Create New Package... dialog box.
Result: Your package is added to the Configured Packages list.
-
Click Save.
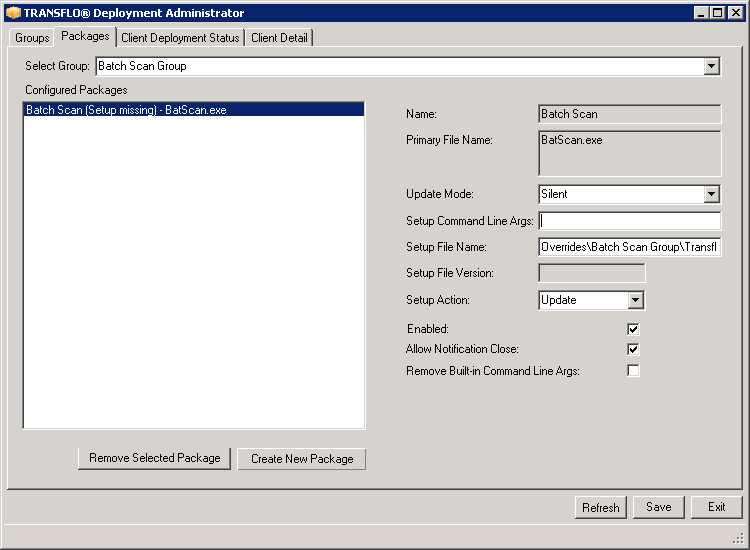
After you create a package, you can reconfigure it as often as necessary.
-
Click on the Packages tab at the top of the Deployment Administrator window.

-
In the Configured Packages list, select a package.
-
The configuration for the package is displayed to the right of the Configured Packages list.
The table below details the parameters for the package configuration:
Parameter Description Name
Package Name.
Primary File Name
The primary file for the package. This is usually the executable that is used to run the application (not the installation package.) Usually corresponds with the application that will be deployed with the package.
Update Mode
Determines the amount of user interaction required for the update or installation to take place.
The possible values are:
Standard: The user must start the installation and has full control of the installer.
Silent: The user must start the installation.
Once the installation begins, the user has no control of the installer, but the installation process is visible to the user.
Very Silent: The installation occurs in the background without the User’s knowledge. (Use this if the users are restricted from installing and/or accessing the registry.)
Setup Command Line Arguments
If the installer requires command line arguments to run, these are listed here.
Setup File Name
The name of the installer’s setup executable.
Setup File Version
Version of the Setup file to be installed.
Setup Action
This delineates whether the application will be upgraded or installed for the first time.
Enabled
If the Enabled check box is checked, the installation package will run on the selected machines.
Allow Notification Close
If this is checked the user will have the ability to close the tray window that notifies the user that an update is pending.
Remove Built-in Command Line Args
If this is checked it allows the administrator to override the built in command line arguments by removing them.
-
Click the Save button.
The Client Deployment Status tab of the TRANSFLO® Deployment Administrator is a useful tool that shows you a snap-shot of the TRANSFLO® Products installed on your network computers.
-
It provides basic host information, a history of the deployment packages that have been installed on the host machine and a list of the currently installed TRANSFLO® Applications on the host computers.
-
The Client Deployment Status tab also provides enhanced filtering and grouping of TRANSFLO® Express Deployment information.
When you click on the Client Deployment Status tab the following window appears:
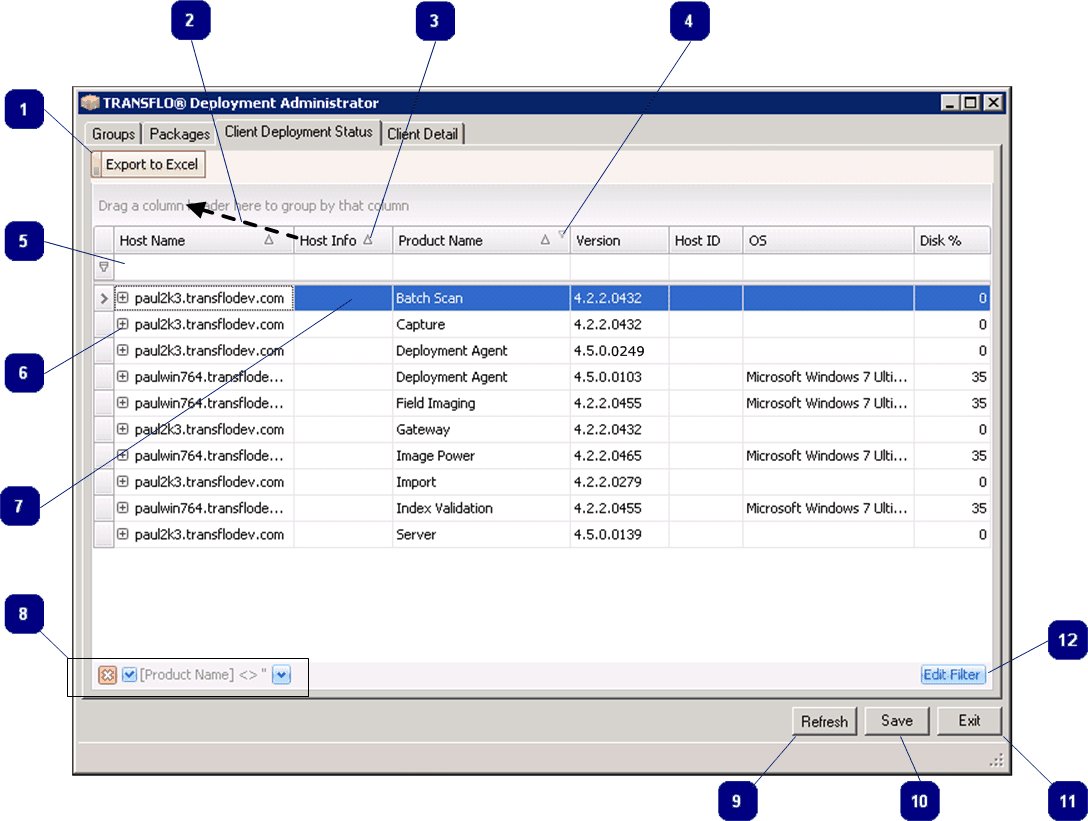
 Export to Excel: Allows you to export all of the data on the grid to a Microsoft Excel® spreadsheet.
 Group by Column: You can group the information on the grid by dragging the header of any column to the space above the header row.
 Sort by Column: Clicking any column header sorts the data in the grid by the values in the column. Multiple clicks on a column header toggles between sort ascending and sort descending.
 Filter icon: Indicates that a filter is active and the filter is applied to the column.
 Simple Column Filter: Typing text in this row on any column creates a begins with filter. The Simple Column Filter feature can be applied to more than one column.
 View Deployed Updates: When you click the plus sign button icon on any row, a list of all the TRANSFLO® Products on the machine and a history of versions for each of the products. The current version is indicated and if the installation directory is found the path is displayed for each version.
 Selected Row: The selected row is highlighted in blue.
 Current Filter: If the list is filtered, the current filter is displayed on the status bar. The X button icon clears the filter and the check mark button icon allows you to edit the filter.
 Refresh Button: Refreshes the Client Deployment Status grid with the latest information.
 Save Button: Saves any changes to deployment packages.
 Exit Button: Closes the window.
 Edit Filter Button: If the list is filtered, the Edit Filter button appears to provide advanced filtering options in the Filter Editor window.
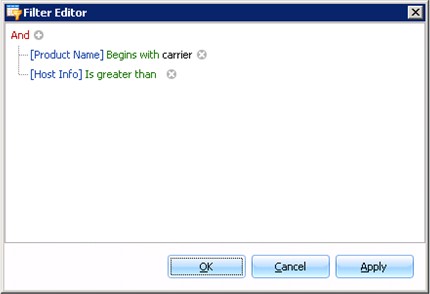
To create an advanced filter:
-
Click the Edit Filter button on the Client Deployment Status tab.
-
Click the + Add Filter Criteria icon next to the And statement.
-
Double-click the blue brackets [ ] and select a field from the list.
-
Click the Begins with operator and select an operator from the list.
-
Click <enter a value> and select a filter value from the list.
-
Repeat this until you have formulated your filter.
To remove a filter clause, click the x Remove icon.
-
Click OK.
Note: The Host Info and Host ID columns are used for reporting the Customer Express Code (Host Info) and Serial Number (Host Id) of Carrier Retrieval clients for TFX only. These columns are hidden in the TRANSFLO® Deployment Agent Administrator when there is no data to report.
The Client Detail tab of the TRANSFLO® Deployment Administrator is a useful tool to identify all of the TRANSFLO® Products and their versions on your network systems. This will aid you in keeping your TRANSFLO® Product versions current and synchronized within your network.
-
Click the Client Detail tab. The Client Detail tab of the TRANSFLO® Deployment Administrator is a useful tool that shows you a snap-shot of the TRANSFLO® Products installed on your network computers.
-
Review the basic host information, a history of the deployment packages that have been installed on the host machine, and a list of the currently installed TRANSFLO® Applications on the host computers.

-
On the top of the Deployment Administrator window, summary information of the Host Machine itself is displayed. Review the host name of the computer on your network domain, the machine make and model, and the Percentage of the Hard Disk that is in use.
-
On the bottom half of the Deployment Administrator window is a list of Deployment Packages. Review this history of all of the packages that were installed on this host machine. You can view product names, dates, and versions of the updates.
-
The current update version is shown as checked check boxes in the Current Version column.
-
Verification that the product was found is indicated by check marks in the Found? column check boxes and the path in the Install Directory column. Only the core TRANSFLO® applications are reported as found and show their install directory.
-
