Transflo DMS Admin Tool Exception Manager
The TRANSFLO® Administration Tool provides a search engine called TRANSFLO® Exception Manager that you can use to track documents, to search by batch, document, or field, to investigate problems, and resolve errors as documents are processed by TRANSFLO® applications and moved through queues.
As documents move through the TRANSFLO® system, errors can occur.
Examples:
-
Field data might be corrupted.
-
An entire batch may be corrupted.
-
Processing may have failed causing batches to move to a FAILED queue or an unexpected queue.
TRANSFLO® Exception Manager provides a means to correct these problems. Specifically, TRANSFLO® Exception Manager provides the following functions:
-
Change Queue
-
Change Document Field Data
-
Reconstruct Batch from Origination
Users can be granted access to Exception Manager without having access to the remaining functionality of the Administration Tool. These users are known as Exception Manager Power Users.
Exception Manager Power Users that are not in an Administrator group can log into the Administration Tool but will only see the Exception Manager node under the General and Company nodes in the tree menu. They first select a Document Class that they have access to and from that point forward can use all of the Exception Manager functionality.
The most basic use of the TRANSFLO® Exception Manager is to locate a document in the TRANSFLO® system. Three (3) types of searches are available:
-
Batch Search
-
Document Search
-
Field Search
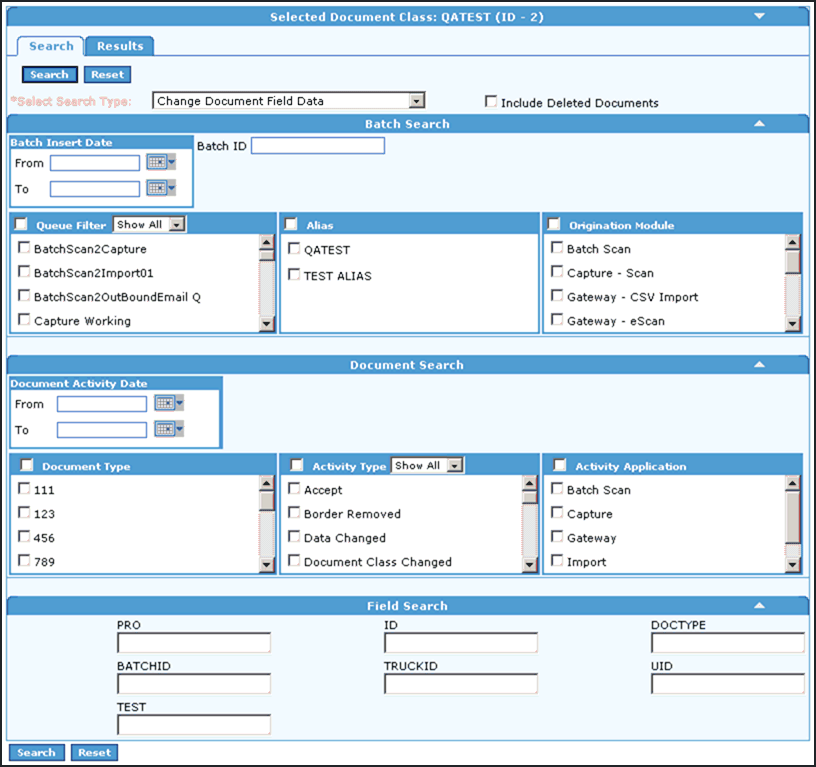
To set parameters for a batch search, follow these steps:
-
In the menu tree, click the Exception Manager menu item.

-
The Search tab of the Exception Manager page appears.
-
Set the Select Search Type field to Change document field data.
-
To include deleted documents in your search, select the Include Deleted Documents check box.
-
(Optional) To clear all of your search criteria and start over, you can click the Reset button at any time.
-
To add batch information to your search criteria, you can search by the date when the batch entered the TRANSFLO® system or by the Batch ID.
-
To search by the date when the batch entered the TRANSFLO® system, click the calendar icon
 next to the From field. On the calendar that appears, click the appropriate arrows to display the desired month and year, and then click the date when the search range should begin. Repeat this procedure with the To field to select the end of your date range.
If you know the exact date when your batch entered the TRANSFLO® system, enter it in both the To and From fields.
Known Issue: Hovering your mouse pointer over a Batch Insert Date calendar box sometimes generates a run time error. A refresh of the page will fix the issue.
-
To search by Batch ID, type the ID number in the Batch ID box. A complete Batch ID is needed. Wild cards and partial searches are not supported for the Batch ID box.
-
-
To search for your batch by Queue, select the desired Queues from the Queue Filter field. To do this, select the check boxes next to the desired Queues.
-
To select all Queues, select the check box at the top of the Queue Filter area.
-
To further simplify Queue filtering, you can select to show only Working Queues or Failed Queues in the Queue Filter area. To do this, expand the list at the top and click either Working or Failed. To display both types of Queues again, expand the list and click Show All.
-
-
To limit your search to a specific Alias, or group of Aliases, select the desired Aliases from the Alias area. To select all Aliases, select the check box at the top of the Alias area.
-
To limit your search to a specific Module or group of Modules, select the desired Modules from the Module area. To select all Modules, select the check box at the top of the Module area.
-
When you have finished entering criteria for a batch search, initiate the search by clicking the Search button.
-
To clear all of your search criteria and start over, click on the Reset button.
To set parameters for a Document search:
1. Ensure that the Document Search area is expanded.
If it is not, click the expand arrow 
The Document Search area appears.
2. To search by the date of the document’s last activity, click the calendar icon  next to the From field.
On the calendar that appears, click the appropriate arrows to display the desired month and year, and then click the date that the search date range should begin.
Repeat this procedure with the To field to select the ending date of your date range.
Note: If you know the exact document activity date, enter it in both the To and From fields.
3. To search for a document by Activity Type, select the desired Activity Types from the ActivityType box.
4. To do this, select the check boxes next to the desired Activity Types.
To select all Activity Types, select the check box at the top of the Activity Type area.
5. To further simplify Queue filtering, you can select to show only the last activity in the Activity Type field, meaning that a record will be returned only if its last activity matches one of the selected Activity Types.
To enable this option, expand the list at the top of the Activity Type box and click Last Activity.
6. To return to the default method of searching on Activity Type, expand the list at To return to the default method of searching on Activity Type, expand the list at.
7. You can narrow your search further by selecting a subset of applications from the Activity Application box.
To do this, select the check boxes next to the desired Application.
To select all Activity Types, select the check box at the top of the Activity Type area.
8. When you have finished entering criteria for a Document search, you can either enter additional types of search criteria, or initiate the search by clicking the Search button.
Ensure that the Field Search area is expanded.
If it is not, click the expand arrow
The Field search area appears.
To narrow your search by Field data, type the search values in the appropriate fields.
You can perform a partial value search by using the * as a wild card to replace a set of characters.
-
Enter your search criteria.
-
Click the Search button.
-
(Optional) To clear all search fields and start over, click the Reset button.
-
When you have entered your search criteria and clicked the Search button, you can view the resulting data and make changes to correct any problems that your Batches or Documents encountered during processing.
-
The results appear on the Results tab, which automatically opens after you click the Search button on the Search tab.
-
The results and the actions that you can perform depend on the Search Type that you selected at the top of the Search tab. As explained in the previous section, there are three Search Types available:
-
Change Document Field Data
-
Change Queue
-
Reconstruct Batch from History
-
This option allows you to view and manipulate Field data at the Document level. You can also reject and “un-reject” single pages of a batch. Once all pages of a batch are rejected, the whole batch is automatically rejected.
To modify Document Field data:
-
If you selected Change Document Field Data as your search type, your results appear similar to the image below:
It is likely that all of the data will not fit on the screen.
-
To view any data not shown in the default view, scroll the page to the right.
-
You can open an image by clicking on the icon in the Document Path column to the right.
-
You can display the path of a document by hovering your mouse over the corresponding icon.
-
-
Choose the Documents that you wish to modify by selecting the check box next to each desired Document, and then click the Modify button.
-
Make the necessary changes to the Document data.
-
Next to each Document Type is a pair of up and down arrow buttons.
-
To apply the same selected Document Type to all Batches above the current selection (if you selected multiple batches), click the up arrow.
-
To apply the selected Document Type to all Batches below the current selection, click the “down” arrow.
-
-
Click the Save button.
The Documents table re-opens on the Results tab, but now reflects the changes just made.
The row(s) will be highlighted and “Data Changed” will be in the Last Activity column.
-
If necessary, you can reject any Documents no longer needed. For example, in some circumstances, a Trip Sheet is used to identify a new batch and is rejected once the new batch has been created.
-
To reject a Document or a group of Documents, select the check boxes next to the Documents that you wish to reject.
-
Click the Reject button.
Result: The status of the rejected Documents changes to Reject.
-
To restore a previously rejected Document, select the check box next to that Document and click the UnReject button.
-
The search results of the Change Document Field Data search type allows you to view Document images. You can view Document images by clicking the magnifying glass icon on the row of the Document you wish to view.
If your on-prem Transflo server is running Windows® Server, you must install the Desktop Experience feature to view JPEG images.
To install the Desktop Experience feature:
-
In Administrative Tools, open Server Manager.
-
In the left navigation pane, click Features.

-
In the right pane, click the Add Features link.
-
The Add Features Wizard opens. Select the Desktop Experience check box.
-
Click Add Required Features in the pop-up window.
-
In the Add Features Wizard, click Next.
-
The Add Features Wizard displays the Confirm Installation Selections window. Review your options and then click Install.
-
The features that you selected are installed.
-
After installation is complete, close the Add Features Wizard.
-
To auto-configure default settings and start using the Windows features you installed, restart your TRANSFLO® Server.
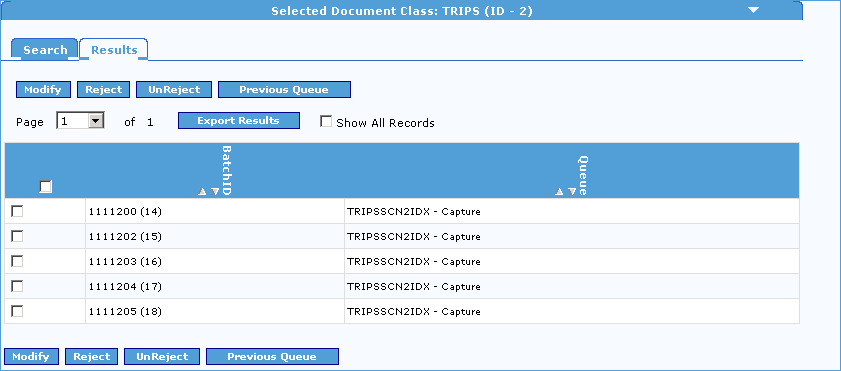
Batches are assigned to queues. This option allows you to view the assigned queues for batches with the option to move a batch to a different queue. This is particularly useful if a batch did not process correctly by a TRANSFLO® Application and you want the application to process it again. In this case, you would move the batch to the polling queue for the application and it will be processed by the application again. This option also allows you to reject an entire batch or restore a previously rejected batch.
If you selected Change Queue as your search type, and you want to change queues for selected batches, do the following:
-
Select the check boxes for the batches that you want to modify on the Search Results page.

-
Click the Modify button.
-
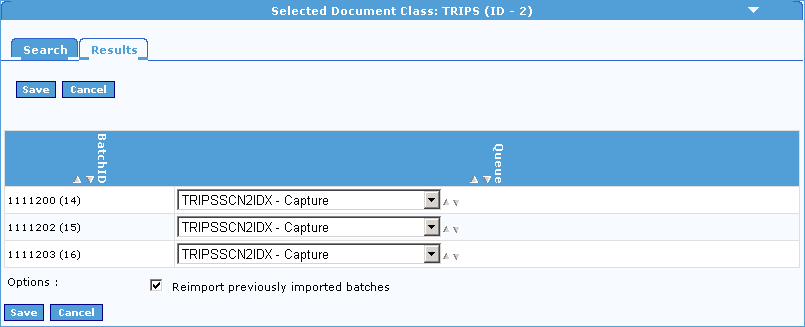
The selected batches appear in a list with a Batch ID field and a Queue field that includes a drop-down list.

-
For each batch, select the name of the appropriate queue.
-
Each row shows small up and down arrow buttons that help you auto-fill the same queue value if you selected more than one batch:
-
Fill Up: To apply the same selected queue to all batches above the current selection, click the Up arrow.
-
Fill Down: To apply the selected Queue to all Batches below the current selection, click the Down arrow.
-
-
To re-import batches that are already imported in the selected queues, select the Re-import previously imported batches option.
-
Click the Save button.
-
The updated batch table re-opens on the Results tab and shows the changes.
-
If necessary, you can reject any batches no longer needed.
-
To reject one or more batches, select their check boxes and click the Reject button.
-
To restore a previously rejected batch, select its check box and click the UnReject button.
-
-
To send one or more batches back to their previous queue, click the Previous Queue button. The Modify Queue page opens with the selected Queue field values set to the previous queue.
-
Click Save.
The Reconstruct Batch from Origination option allows you to place an item at the point in the TRANSFLO® system in which the Batch Originated. This allows the batch to be reprocessed by the TRANSFLO® system.
To reconstruct a batch from origination:
-
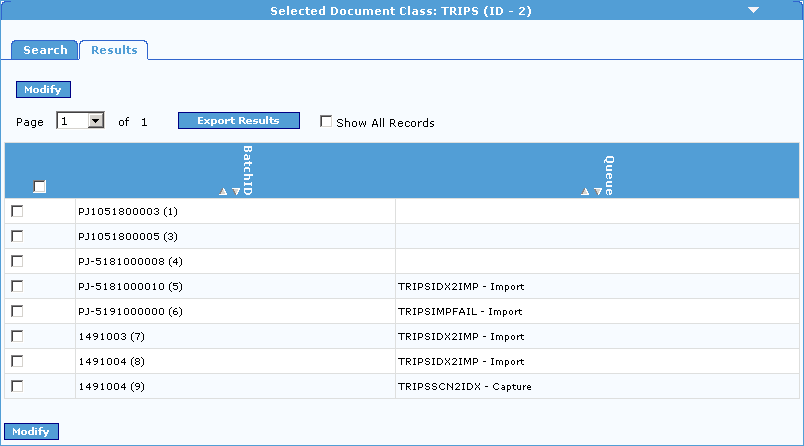
If you selected Reconstruct Batch from Origination as your search type, your results will appear similar to the image below:

-
Select the batches that you want to reconstruct. To do this, select the check boxes next to each batch and then click the Modify button.
Result: The selected batches appear in a list.
-
Next to each batch, a corresponding Queue list appears in the Queue column. For each batch, expand the corresponding list and click the name of the queue.
-
Next to each queue list is a pair of up and down arrow buttons.
-
To apply the same selected Queue to all Batches above the current selection (if you selected multiple batches), click the Up arrow.
-
To apply the selected Queue to all Batches below the current selection, click the Down arrow.
-
-
To re-import batches that are already imported, check the Re-import previously imported batches check box.
-
When you have finished, click the Save button. (If you do not want to save your changes, click the Cancel button.)
-
The Queue into which you placed the batch must be one from which the application can process.
-
TRANSFLO® Exception Manager is a powerful tool, and gives system administrators the ability to place the batch into ANY Queue. It is the administrator’s responsibility to place the batch in the Queue in which the batch entered the TRANSFLO® System.
-


