Transflo Invoice Interface Service for TMW
This article provides basic installation and configuration information about the TRANSFLO® Invoice Interface Service application for TMW (a third-party solution from TMW Systems). The TRANSFLO® Invoice Interface service for TMW is designed to work with the TRANSFLO® Printer Driver to process print jobs created by TMWSuite™ enterprise management software and make the data available to TRANSFLO® Rendition Print Service.
-
When a TMWSuite invoice is printed using the TRANSFLO® Print Driver a TIF image containing all pages of the invoice is created. The TIF file is named using the control number of the TMWSuite invoice.
-
TRANSFLO® Invoice Interface Service reads the TIF file name to obtain the invoice control number and executes a stored procedure query against the TMWSuite database to retrieve the data associated with that invoice.
-
Invoice Interface Service writes the retrieved data to a spool (SPL) file and splits the pages of the original TIF file into individual TIF files, keeping them in their original order. Invoice Interface Service then creates a ZIP file containing the SPL file and TIF files.
-
Invoice Interface Service places the ZIP file in a pickup folder from which TRANSFLO® Rendition Print Service can retrieve it. Once received by Rendition Print Service, the files are extracted and then are ready for storage, printing, emailing or faxing.
-
Processor: 800MHz
-
RAM: 512MB
-
Disk Space: 5GB
-
Screen Resolution: 1024x768
-
Processor: 1 x 1.8Ghz
-
RAM: 1GB
-
Disk Space: 5GB
-
Screen Resolution: 1024x768
-
Microsoft Windows® 2003 Server R2, SP2
-
Microsoft Windows® Sever 2008 (x86 and x64)
This product is backwards compatible for the existing operating systems and hardware configurations on your existing machines. Any upgrades to hardware and operating systems must meet the requirements above.
To install TRANSFLO® Invoice Interface Service for TMW:
-
Double-click the file TRANSFLO® Invoice Interface for TMW Setup.exe on the installation CD. When it begins running, the setup program checks the installation environment. If the ideal environment is not found, a dialog box appears indicating suggested changes to the environment. Read this message if it appears, and click OK.
-
The installation program welcome message appears. Click Next.
-
The Select Destination Location window opens. To change the default installation folder type the path in the box or use the Browse button to select the folder. When you have selected the desired installation option, click Next.
-
The Ready to install window opens. Verify the Destination Location is correct, and click Install. The installation begins.
-
When the setup process has finished, a message appears stating that TRANSFLO® Invoice Interface Service for TMW has been successfully installed. To complete the setup process, click Finish.
If you need any assistance while running this application, contact Customer Service at Pegasus TransTech Corporation.
-
Hours of operation: Monday through Friday 8:00 a.m. to 8:00 p.m. EST
-
E-mail: helpdesk@transflo.com
-
For new support cases: support@transflo.com
-
For existing support cases Support Telephone Number: (813) 386-232
-
The following is a checklist for Pegasus Imaging without the status coming back from Pegasus. If you have any questions, please contact Customer Service at Pegasus TransTech Corporation.
-
Make sure the TTS50.ini file contains the following entry:
[Invoice] InvoiceImagingActivated=Y
Has the license for imaging been purchased and installed? If not, the INI setting will not be recognized.
-
Make sure the DB mod has been applied (PTS15688):
If Select count(*) from systemcontrol where sys_controlid = ‘PEGNUM’ returns a zero, you do not have the mod. Try applying the following:
IF NOT EXISTS (SELECT * FROM systemcontrol
WHERE sys_controlid = 'PEGNUM')
INSERT INTO systemcontrol(sys_controlid, sys_controlnumber, sys_description, sys_alternateparm, sys_locked)
VALUES('PEGNUM', 100000000, 'Pegasus Control num', '', 0) Else
Begin
If (select sys_controlnumber From systemcontrol where sys_controlID = 'PEGNUM') < 100000000
Update systemcontrolset sys_controlnumber = 100000000 Where sys_controlID = 'PEGNUM'
End GO
To determine if the db mod has been applied, in Query Analyzer run the following:
Select * from Pegasus_invoicelist
If you get an error message, the db mod for PTS 13101 has not been applied.
-
Make sure the following procs versions are the latest. Run sp_helptext as follows:
Sp_helptext Pegasus_index_sp
(should see ‘DPETE 17033 1/30/03 Rewrite to handle empty moves, relay legs and canceled empty moves.’)
sp_helptext Image_invoicedata001_sp
(should see ‘-DPETE PTS 16234 remove CR/LF’)
(This script is subject to change; check with Pegasus TransTech for the latest version.)
-
Make sure the copies are set to 1 on the Invoice Selection screen and on any company folders. Pegasus cannot handle receiving multiple copies of the same document, they will handle copies on their side. Later versions of TMWSuite will ignore the copies.
-
If an email address is to be passed to Pegasus with the index information, make sure that there is an email address for each of the bill to companies to receive email. Go into the menu Tools > Edit Email Addr, enter the Bill to Company Id and provide the email address.
-
If Pegasus is to print supporting documents, the Company Miscellaneous 4 field (the last one in the ‘Comments’ section of the company folder and ‘cmp_misc4’ on the company table) is to be updated with a code indicated which supporting docs are to be printed with the invoice. Check with Pegasus on which codes to use.
-
If you do electronic billing via EDI and if you also want an invoice image to be passed to the imaging system, you need to change the company profile EDI setting to ‘EDI & Print’. If a bill to company is set up as ’EDI only’ no invoice is printed and no image produced.
-
When you print an invoice in ‘Ready to Print Status’ (either by clicking on the Printer icon with the invoice on the screen or from the print queue) and answer ‘Yes’ to ‘Do you want to update the status..’, a window will pop to allow you to redirect the printed output to the imaging printer. Many customers set up the Transflo printer as the default and they need to only click the OK button. After printing, the same window pops to allow switching back to a paper printer if desired. If this does not occur, either the INI was not inserted or the license was not applied.
-
If you believe that the imaging is not working and see TIFF files named TMWS Invoice Prints <inv#>.tif, you are printing invoices not in ready to print status or you are answering No to Do you want to update the status and have the default printer set up as the imaging printer? It is only when the status is Ready to Print, the INIInvoiceImagingActivated=Y, and the license applied that a TIFF with a numeric name gets generated.
As an administrator, you can configure TMW Systems TMWSuite™ and TRANSFLO® Invoice Interface Service for TMW to work with each other. The first task is to configure the backup document and fax settings for a TMWSuite customer account. Once this is done, Invoice Interface Service can be configured.
The first step in configuring TMWSuite and Invoice Interface Service to work together is to designate a backup folder and fax connection for the TMWSuite customer account that will be used. Follow these steps:
1. Open the TMWSuite application if it is not already open.
To do this, click the Windows Start button, point to Programs, point to TMW Systems, and click TMWSuite.
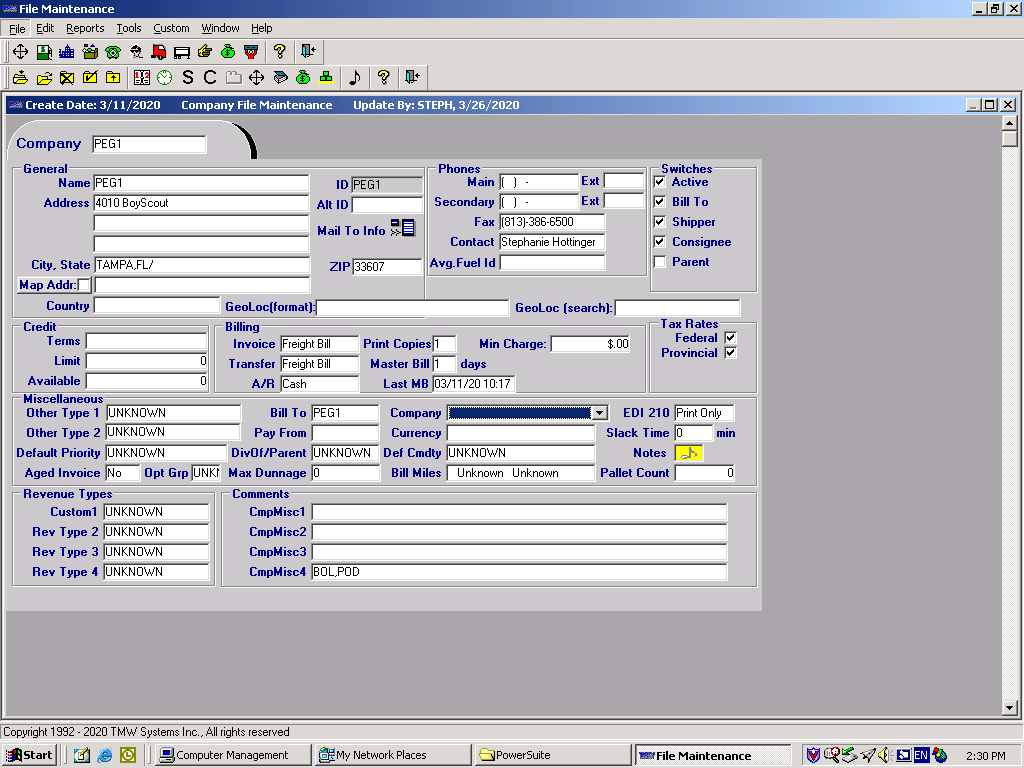
The TMWSuite File Maintenance window appears.
2. Either create a new customer account or open an existing customer account to be edited.
Click File on the menu bar.
On the File menu, either click New to create a new account, or click Open and select the existing account that you wish to open.
3. At the very least, the following customer account fields must be configured in order for TMWSuite to work with Invoice Interface Service:
- Company The customer’s name or abbreviation
- Address The customer’s street address
- City, State The customer’s city and state
- Country The customer’s country
- ZIP The customer’s zip code
- Main The customer’s main phone number. If there is an extension, type it in the Ext box.
- Secondary The customer’s secondary phone number. If there is an extension, type it in the Ext box.
- Fax The customer’s fax number
- Contact The person who is the contact at the customer’s office
- CompMisc4 The customer’s back-up documents. If there are multiple back-up documents, they must be separated by a commas.
When you have finished entering the required information, click Save in the File menu.
4. Once all required customer account fields have been configured, set up the customer’s email address.
To begin, on the menu bar, click Tools.
In the Tools menu, click Edit Email Address.
The Company Email Edit window appears:
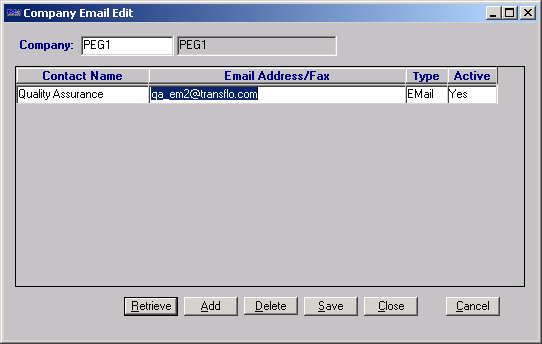
5. In the Company box, type the customer’s abbreviation or name, and then click the Retrieve button.
6. The contact name that was entered for the customer appears in the Contact Name box.
Type the contact’s email address in the Email Address/Fax box.
7. Click the Save button to save the contact’s email address.
Note: If more than one contact e-mail address is entered, only the address that comes first alphabetically will be used.
8. When you have finished configuring the e-mail address to be used, click Close.
You should now proceed with the instructions found in the next section, Configuring Invoice Interface Service.
To configure TRANSFLO® Invoice Interface Service for TMW:
1. Open the Invoice Interface Service application if it is not already running.
On the Windows taskbar, click the Start button.
In the Start menu, point to Programs, point to TRANSFLO® , and click TMW Invoice Interface Configuration.
The TMW Invoice Interface Configuration window appears.
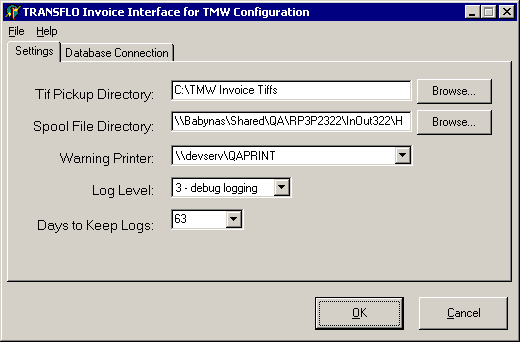
2. On the Settings tab, in the Tif Pickup Directory box, enter the path of the folder where TRANSFLO® Print Driver places the TIF images that it creates.
Either type the path in the box, or click the Browse button and navigate to the folder.
3. Invoice Interface Service creates zip files containing a spool file and the associated TIF images.
In the Spool File Directory box, enter the path of the folder where Invoice Interface Service will save the zip files that it creates.
Either type the path in the box, or click the Browse button and navigate to the folder.
4. In the Warning Printer list, select a network printer to which any error messages should be printed.
These error messages will alert you to any potential problems.
Click the arrow button to the right of the list box, and click the name of the desired printer.
5. In the Log Level list, select the level of detail that should be written to the log file.
Click the arrow button to expand the list, and click the desired log level.
The available levels are:
-
0 - No logging
-
1 - Critical logging
-
2 - Warnings
-
3 - Debug logging
6. In the Days to Keep Logs list box, enter the number of days that log data should be kept before being purged.
Either type the desired number of days in the box, or click the arrow button and click the desired number of days in the list.
The numbers of days in the list are iterated by 7, ranging from 7 days (1 week) to 63 days (9 weeks).
7. Click the Database Connection tab.
Settings that define Invoice Interface Service’s interaction with the TMWSuite interface are entered on this tab.
This tab contains two embedded tabs of its own: Generic and Advanced.
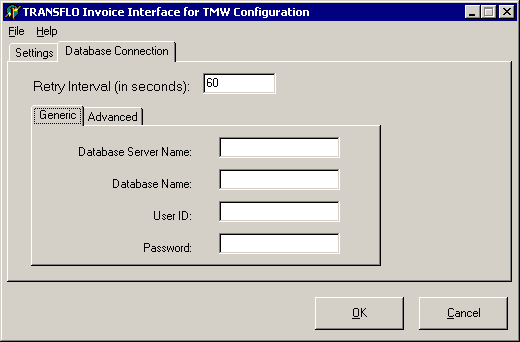
Note: Database connection information specified on the embedded Generic tab will be ignored.
You will configure the database connection when you configure Data Link Properties in step 9 and 10 on the embedded Advanced tab.
8. Click the embedded Advanced tab.
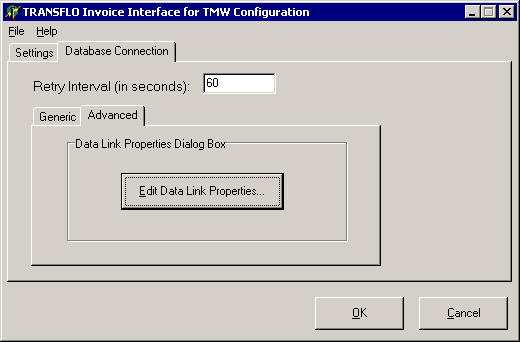
9. Select the type of database to which Invoice Interface Service will connect.
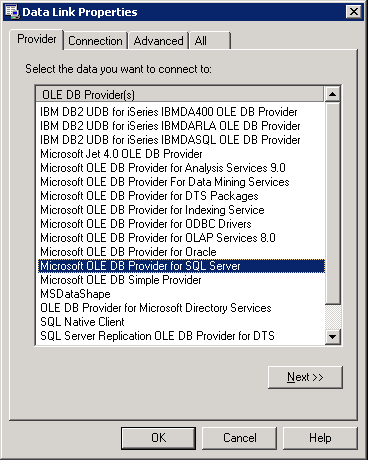
On the embedded Advanced tab, click the Edit Data Link Properties button.
The Data Link Properties dialog box appears.
Click the name of the type of OLE database being used for TMW, and configure the selected database type.
10. In the Data Link Properties window click the Connection tab.
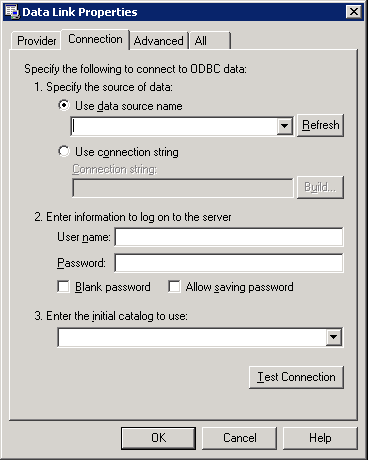
Under 1. Specify the following to connect to ODBC data select the Use data source name radio button.
In the corresponding drop down either type or select the name of your ODBC data source.
Under 2. Enter information to log on to the server enter a user name and password in the corresponding User Name and Password boxes.
Ensure the Blank password check box is not checked, and check the Allow saving password check box.
Leave the 3. Enter the initial catalog to use drop down empty.
11. When you have finished configuring the settings that Invoice Interface Service will use to connect to the TMW database, click OK to close the TRANSFLO® Invoice Interface for TMW Configuration window.
12. Click OK to close the TRANSFLO® Invoice Interface for TMW Configuration window.
After installing and configuring the Transflo Invoice Interface Service for TMW, start the service.
-
On the Windows taskbar, click the Start button.
-
In the Start menu, point to Settings, and click Control Panel.
-
In the Control Panel window, double-click Administrative Tools.
-
In the Administrative Toolswindow, double-click Services. The Services window appears.

-
In the Services window, locate the service TRANSFLO® Invoice Interface For TMW and click it to select it.
-
To start the service, on the Services toolbar click the play button .
-
Once the service has been started, it can be stopped or paused by clicking the stop or pause button, respectively.
-
If the configuration uses UNC paths right-click on the Invoice Interface Service and select the Properties option from the menu.
-
Select the Log On tab and click This account.
-
Click the Browse button and select a domain user with access to the configuration directory.
-

|
Event ID |
Type | Error |
Recovery Notes |
|---|---|---|---|
|
100 |
Info |
The service was started, version: %1. |
Information |
|
101 |
Info |
The service was stopped |
Information |
|
102 |
Info |
The service was paused |
Information |
|
103 |
Info |
The service was continued |
Information |
|
104 |
Warning |
Connection to the database failed, message=%1 |
None, will keep trying to reconnect to DB. |
|
105 |
Warning |
Cannot print to the printer %1, check connection |
Report to Technical Support to correct issue. |
|
106 |
Warning |
Cannot delete the record with Control Number %1, error: %2 |
Report to Tech Support to manually delete the record. |
|
107 |
Warning |
Invalid character found in file %1, character = %2, moved to fail folder: %3 |
Report to Tech Support to research why the tif file contained an invalid character. |
|
108 |
Warning |
Tif file has 0 images, error=%1 |
Report to Tech Support to research why the tif file is empty. |
|
109 |
Error |
Database query failed for %1, error=%2 |
Report to Tech Support to correct issue. |
|
110 |
Error |
No data found in record set for query value, error=%1 |
Report to Technical Support could be a problem with integration software or database. |
|
111 |
Error |
Creation of spool file failed for query value, error=%1 |
Report to Technical Support make sure network is not down and rights are valid to create files across network. |
|
112 |
Error |
Ran out of disk space trying to write to %1 |
Report to Tech Support to correct issue. |
|
113 |
Error |
Unable to delete the file %1 |
Report to Technical Support check deletion rights, or file marked as read only. |
|
114 |
Error |
Read-only file %1 cannot be processed. |
Report to Technical Support or remove the file from the directory and restart service. |
|
115 |
Error |
Error adding files to a zip archive, error: %1 |
Report to Tech Support to correct issue. |
|
116 |
Error |
The directory %1 does not exist. |
Report to Technical Support to correct issue. |
|
117 |
Error |
Database error: %1 |
Report to Tech Support to correct issue. |
|
118 |
Error |
Disk Access error: %1 |
Report to Tech Support to correct issue. |
|
119 |
Error |
Temporary folder for storing images could not be created, error=%1 |
Report to Technical Support network issues or rights issues. |