Install and Configure Transflo DMS Index Management
Use the Transflo DMS Index Management application for Docubase index backup and restore operations. The application operates with both the client-server and standalone Docubase environments.
Note: This legacy KB article describes deprecated features that are no longer supported as of March 15, 2025. Transflo DMS no longer supports environments running the Docubase repository. This KB article is no longer updated and is scheduled to be removed.
Index Management has two modes of operation: interactive and non-interactive.
-
The interactive mode provides a graphical user interface for manual backup and restore operations.
-
The non-interactive mode permits the utility to be launched using application launch switches. Through the use of these switches, the functions of the application can be controlled from batch commands, scripts, etc. When running in non-interactive mode, the application runs minimized.
Since the Docubase standalone environment functions without locking the indexes, Index Management can use file copy methods for both backup and restore operations. When using Index Management with the Docubase client-server environment, the utility implements the backup function by utilizing the Docubase Toolkit. This requires that the backup be performed with the services running.
Backup: You can select the bases upon which to perform the Index Management functions.
-
The backup function will create a directory for each day of backup.
-
Each directory will have a sub-directory for each selected base.
-
All index files for the base will be coped to their respective location.
-
These directories will be removed based on the value provided for the number of days backup to keep.
Restore: The restore function requires you to supply the date for which Index files will be restored.
-
The utility will attempt to copy the backup Index files over the current Index files.
-
Error messages are displayed on the screen when using interactive mode, and are placed in the Windows Event Log when using non-interactive mode.
-
Restoring indexes must be done using file copy method, which requires that the Docubase services be shut down for the base that is to be restored before attempting the restore operation.
Minimum OS and Hardware Requirements:
-
OS: Microsoft Windows 10 or 11
-
Processor: 800 MHz (1.8 GHz or faster recommended)
-
RAM: 512 MB (1.0 GB or more recommended)
-
Disk Space: 5.0 GB
-
Screen Resolution: 1024 x 768
To install TRANSFLO® Index Management:
1. In Windows Explorer, navigate to the folder containing the file TRANSFLO® Index Management Setup.exe, and double-click the file.
The Welcome screen of the Index Management Setup program opens.
2. The Select Destination Location window opens.
The default installation folder is displays in the box.
To change the installation folder to another location, click the Browse button and navigate to the desired folder.
When you are satisfied with the destination folder, click Next.
3. The Ready to Install window opens.
Review the installation settings, and if they are satisfactory, click Install.
To change any of the installation settings, click the Back button until you have returned to the necessary installation step, and make the desired changes.
4. The Index Management Setup program begins file installation.
This may take a few moments to complete.
Note: As file installation begins, the installation program may appear to be frozen.
This is normal behavior, and the installation program is still running.
5. When installation of the Index Management application has finished, the Completing the TRANSFLO® Index Management Setup Wizard window opens.
Click Finish to conclude the installation process.
If you are running Index Management on a Windows 7 machine with UAC enabled, you must run DBBASE.exe as an Administrator when you add a Base.
Otherwise, any Base you attempt to create will not be saved and will not be available to Index Management.
Note: If you are a Docubase customer, Index Management will use DBBASE.exe in the Client Folder.
To configure Index Management:
1. Begin by starting the Index Management application if it is not already open.
Click the Start button on the Windows task bar.
On the Start menu, point to Programs, point to TRANSFLO®, and click Index Management.
The Index Management window appears.
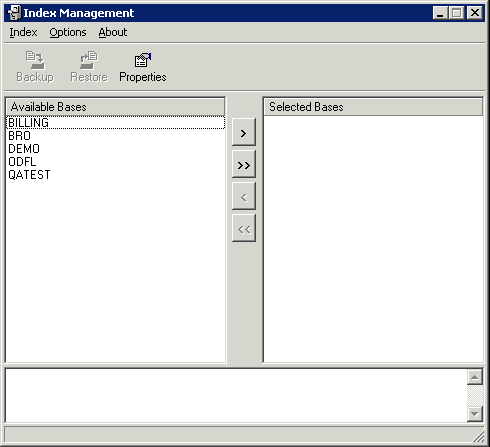
2. On the Index Management window toolbar, click the Properties button.
The Configuration Properties dialog box appears.
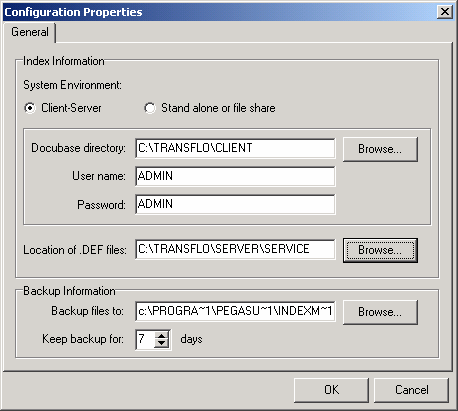
3. Select the System Environment option for the type of Docubase installation being used.
-
If a client-server Docubase installation is being used, select the Client-Server option and proceed to the next step below.
-
If a stand-alone Docubase installation is being used, select the Stand alone or file share option and skip ahead to Step 5.
4. If you are using a client-server Docubase installation, you must enter the Docubase path and login information.
-
In the Docubase directory box, enter the Docubase client installation path.
Either type the path in the box, or click the Browse button and navigate to the path.
-
In theUser name box, type the Docubase login ID to be used.
-
In the Password box, type the password for the Docubase ID being used.
5. In the Location of .DEF files box, enter the path to the folder containing the Docubase DEF or BDS files.
The DEF.BDS files contain the path information for the index files.
To enter the location, either type the path in the box or click the Browse button and navigate to the folder.
6. In the Keep backup for n days box, enter the number of days for which the backup index files should be retained.
Either type the desired number of days in the box, or adjust the number up or down by clicking the appropriate arrow button.
The default number of days is 7.
The maximum number of days is 99.
7. When you have finished configuring TRANSFLO® Index Management, click OK to save the settings and close the Configuration Properties dialog box.
To run Index Management from its Windows interface:
1. Begin by starting the Index Management application if it is not already open.
Click the Start button on the Windows task bar.
On the Start menu, point to Programs, point to TRANSFLO®, and click Index Management.
The Index Management window appears.
2. The Index Management window allows you to perform backup and restore operations on selected TRANSFLO® Index bases.
In the Available Bases box, select the base or bases that you wish to backup or restore, and then move the base name or names to the Selected Bases box.
To move a single base, click the base name and then click the single right arrow button (>).
To move multiple bases at one time, first select the desired bases.
Click the first base to select it, and then click the remaining desired bases while holding the [Ctrl] button.
When you have finished selecting the desired bases, click the single right arrow button (>).
To move all available bases to the Selected Bases box, click the double right arrow button (>>).
If necessary, use the left arrow buttons (< and <<) to move bases from the Selected Bases box to the Available Bases box.
3. When you have finished moving the desired bases to the Selected Bases box, you can perform a backup or restore operation on those bases.
To do this, click either the Backup or Restore button on the Index Management window toolbar.
In addition to running backup or restore operations from the Index Management interface, they can also be run using command switches. To do this, first open a command prompt window and navigate to the folder where Index Management was installed.
Default Folder (32-bit):
C:\Program Files\Pegasus TransTech\Index Management
Default Folder (64-bit):
C:\Program Files(x86)\Pegasus TransTech\Index Management
Backup and restore operations are defined by parameters entered after the executable name on the command line. Command switches are case-sensitive and must be entered in ALL CAPS (all upper-case letters).
/BACKUP Indicates that the requested operation is a backup operation. This flag should be the first parameter.
/BASE=<basename> Specifies the base on which to perform the backup operation, where <basename> is the name of the base to be backed up.
A command is required for each base. If no base is specified in the /BACKUP command, the backup operation will be performed on all bases.
Examples:
IdxMngmt.exe /BACKUP
IdxMngmt.exe /BACKUP /BASE=BILLING
/RESTORE Indicates the requested operation is a restore operation.
This flag should be the first parameter.
/BASE=<basename> - Specifies the base on which to perform the restore operation, where <basename> is the name of the base to be restored.
A command is required for each base. If no base is specified in the /RESTORE command, the restore operation will be performed on all bases.
/DAYSAGO=<integer> - Indicates the number of days previous to the current day to use for the index restore.
Examples:
IdxMngmt.exe /RESTORE /DAYSAGO=3
IdxMngmt.exe /RESTORE /BASE=BILLING /DAYSAGO=3
Note: If both the /BACKUP and /RESTORE commands are issued on the command line, only the backup will be performed.
|
Event ID |
Event Level Info/Warning/ Error |
Message |
Recovery Notes |
|---|---|---|---|
|
100 |
Info |
Index Management started. |
|
|
101 |
Info |
Index Management stopped. |
|
|
102 |
Info |
<StatusMessage> |
This is a simple status message for information only. |
|
103 |
Error |
Initialization error: <ErrorDetail> |
An error occurred while initializing the application where <ErrorDetail> indicates the exact problem. |
|
104 |
Error |
Invalid .DEF file. |
The Docubase .DEF file is improperly formatted or does not exist. Check the Docubase base settings. |
|
105 |
Error |
FileCopy: Source file <filename> does not exist. |
An attempt has been made to copy a file that does not exist, where <filename> contains the missing file. Contact Pegasus TransTech customer support for additional help. |
|
106 |
Error |
FileCopy: Destination directory <MissingDirectory> does not exist. |
An attempt has been made to copy a file to a directory that does not exist. <MissingDirectory> contains the missing directory name. Contact Pegasus TransTech customer support for additional help. |
|
107 |
Error |
FileCopy: Error copying file <filename> |
An error has occurred copying the file where <filename> is the name of the file that failed to copy. Contact Pegasus TransTech customer support for additional help. |
|
108 |
Error |
Error creating backup directory structure. |
The backup directory could not be properly created or cleaned-up. Check the permissions on the directory and contact Pegasus TransTech customer support for additional help. |
|
109 |
Error |
Index file <IndexFile> did not copy properly. |
The Docubase index file could not be backed-up properly, where <IndexFile> is the file name of the index file that did not copy correctly. Check drive space and contact Pegasus TransTech customer support for additional help. |
|
110 |
Error |
Backup indices for the selected date cannot be located. |
The backup files are no longer available in the backup directory. Choose files from a different date. |
|
111 |
Error |
Invalid command line parameters: <ErrorDetails> |
The command line parameters passed to the application are not properly formatted, where <ErrorDetails> indicates the exact problem. |
|
112 |
Error |
Docubase error: cannot backup indices for the <basename> base. |
The Docubase toolkit failed to backup the indices for a base where <basename> is the name of the base. Make sure that the base is working correctly. |
|
113 |
Error |
Cannot perform function with Docubase services running. |
The Docubase service must be inactive. Stop the service and re-run Index Management. |
|
114 |
Error |
Error reading system processes. |
Index Management was not able to get a list of running processes from the operating system. Contact Pegasus TransTech customer support for additional help. |
|
115 |
Error |
Cannot load <SysFile> |
An operating system file could not be loaded where <SysFile> is the name of the operating system file. Contact Pegasus TransTech customer support for additional help. |