Install Transflo DMS Server Components
As a system administrator, you can install the following Transflo DMS Enterprise server components:
- TRANSFLO DMS Server (including the listed sub-components)
- TRANSFLO DMS Database *
- TRANSFLO DMS Deployment Administrator*
- TRANSFLO DMS Administration Tool *
- TRANSFLO DMS System Agent Service *
- TRANSFLO DMS Management Reports *
- TRANSFLO DMS Gateway
- TRANSFLO DMS Gateway CSV Queue
- TRANSFLO DMS Gateway eScan Queue
- TRANSFLO DMS Gateway Express Index Queue
- TRANSFLO DMS Gateway Field Imaging Extractor Queue
- TRANSFLO DMS Gateway Inbound Email Queue
- TRANSFLO DMS Gateway Outbound Email Queue
- TRANSFLO DMS Gateway PBS Export Queue
- TRANSFLO DMS Gateway PBS Import Queue
- TRANSFLO DMS Gateway Simple XML Queue
- TRANSFLO DMS Rendition Print Service
- TRANSFLO DMS Transfer Service
- TRANSFLO DMS ezView
See the Third-Party Software Requirements section of the Hardware Specification System Administrators Manual for .NET Framework requirements and installation instructions. Workflow Server Installation and configuration instructions can be found in the Workflow System Administrators Manual.
Tip: Use UNC paths to specify installation and configuration paths for all web applications.
Complete the Transflo DMS Server Pre-Install Tasks
The TRANSFLO® Database, TRANSFLO® System Agent Service, TRANSFLO® Deployment Agent Service, TRANSFLO® Deployment Administrator, TRANSFLO® Management Reports application, and TRANSFLO® Administration Tool are all installed during the installation of the TRANSFLO® Server.
Note: You must have SQL Server installed on your network and it must be accessible by the computer on which you install your TRANSFLO® Server. See “Supported Client Operating System Platforms” on page 2 for supported versions of Microsoft SQL Server.
Best Practices:
-
If you are performing an upgrade, it is best to ensure all of your TRANSFLO® users are off the system, and to stop all TRANSFLO® services.
You should also run iisreset before you upgrade your TRANSFLO® Server.
-
Before you upgrade your TRANSFLO® Server, you should stop the IIS App Pool that the TRANSFLO® Web Service is using. In order to prevent impact on other websites using the Default IIS App Pool, you should create a separate App Pool for your TRANSFLO® Web Service.
Note: When Installing the TRANSFLO® Server on Microsoft Windows® Server 2008 (x86 and x64) with IIS 7.0 or 7.5 as the default platform, the following IIS 6 Compatibility components must be installed as roles for IIS/:
-
IIS 6 Management Compatibility
-
IIS 6 Metabase Compatibility
Register ASP.NET with IIS/.0 on Windows Server 2008
If you are installing the TRANSFLO® Server on Windows Server 2008, you must register ASP.NET with IIS 7.
To register ASP.NET with IIS 7:
1 From the Start menu, open Programs and Features from the Control Panel.
Click the link labeled “Turn Windows features on or off”.
The Server Manager window opens.
3 From within the Server Manager tree, click Roles.
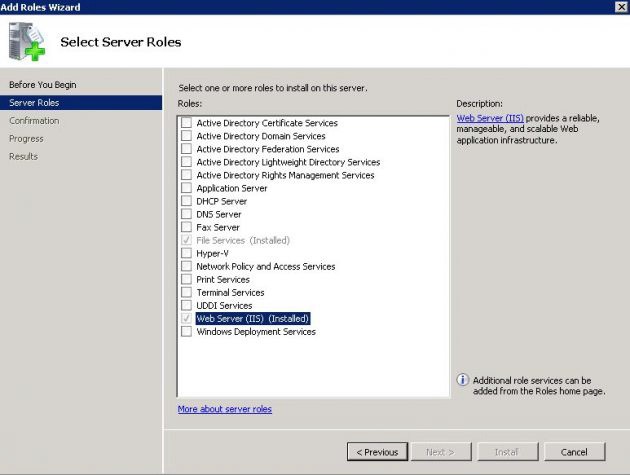
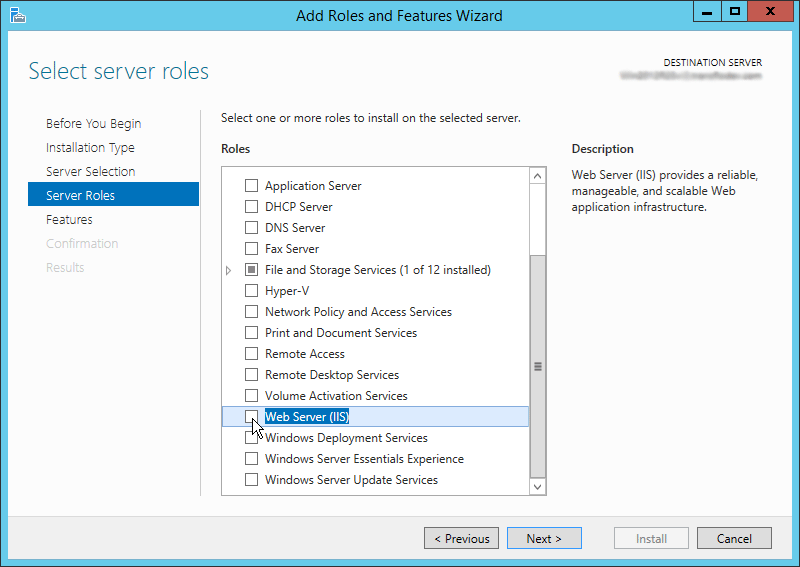
4 Click on Add Roles.
5 Select Web Server (IIS).
6 Click Install if it is not already installed, and follow the install instructions.
7 From within the Server Manager, click on Roles if it is not already selected.
8 Click on Add Role Services.
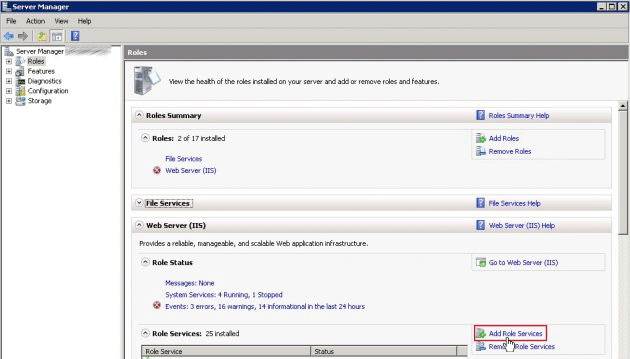
9 The Add Roll Services window opens.
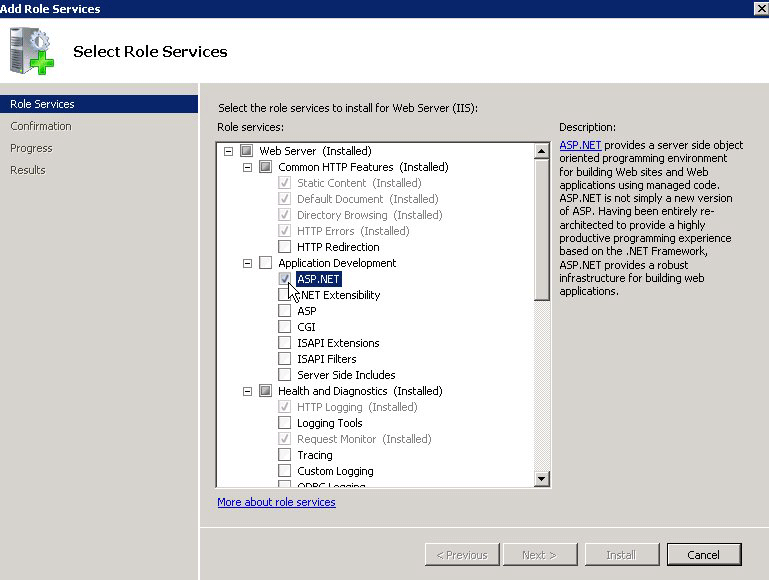
Ensure the following check boxes are selected:
- Web Server
- Common HTTP Features
- Static Content
- Default Document
- Directory Browsing
- HTTP Errors
- Application Development
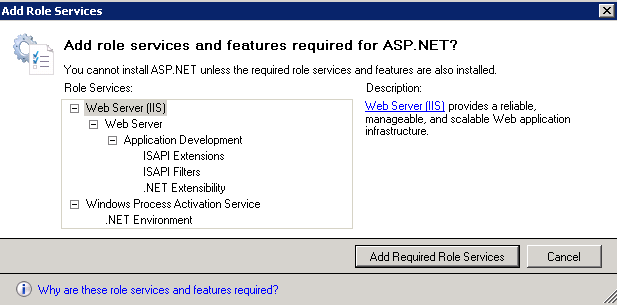
- ASP.NET
- .Net Extensibility
- ASP
- CGI
- ISAPI Extensions
- ISAPI Filters
- Server Side Includes
- Health and Diagnostics
- HTTP Logging
- Request Monitor
- Security
- Basic Authentication
- Windows Authentication
- Request Filtering
- Performance
- Static Content Compression
- Management Tools
- IIS Management Console
- IIS Management Scripts and Tools
- IIS Management Compatibility
- IIS Metabase Compatibility
10 Follow any confirmation messages.
Note: If .Net 4.0 is installed and the Website application pools are running as ASP.Net v4.0 DefaultAppPool, then the ISAPI and CGI Restrictions feature must be edited to Allow ASP.NET v4.0.301319. If this is not done, the site will not load.
Run Multiple Concurrent .NET Framework Versions
If you have to install a .NET Framework version that is 3.5 or lower on your TRANSFLO® Server, the .NET Framework 4.0 installation will be corrupted and the TRANSFLO® Server will stop working.
To correct this, the .NET Framework 4.0 will need to be re-registered.
To re-register the .NET Framework 4.0:
1 Open a Windows® Command Prompt as Administrator.
2 Type “cd C:\Windows\Microsoft.NET\Framework\v4.0.30319” at the Command Prompt to change the directory.
3 Type “aspnet_regiis.exe -iru” at the Command Prompt to register the
.NET Framework 4.0 on IIS.
The following will appear on the screen showing the progress of the registration:
Start installing ASP.NET (4.0.30319).
...........
Finished installing ASP.NET (4.0.30319). C:\Windows\Microsoft.NET\Framework\v4.0.30319>
4 Log into the TRANSFLO® Administration Tool to verify there are no errors.
Create an Application Pool for the Transflo Web Service
In order to prevent impacting other websites using the Default IIS Application Pool, it is recommended that you create a separate Application Pool for your TRANSFLO® Web Service in IIS.
To create a dedicated Application Pool:
1 In the IIS Manager, right-click on Application Pools in the tree on the left.
Select "Add Application Pool" from the pop-up menu.
Note: In Windows 2008 and Windows 2012, you must install IIS Manager from the Control Panel’s Programs and Features utility. You also must install the .NET Framework 4.0
2 In the Add Application Pool window, type a name to the new Application Pool (something like "PTCAppPool") in the Name field.
3 From the .NET Framework version drop down, select the installed .NET Framework 4.0.
4 From the Managed Pipeline Mode drop down, select “Integrated”.
5 To save and close the Add Application Pool window, click OK.
6 Right-click on the recently created Application Pool and select “Advanced Settings”.
7 Set the value for “Enabled 32-Bit applications” to “True”.
8 To save and close the Advanced Settings window, click OK.
9 In the tree on the left, click on the Default Web Sites node.
10 In the Actions menu on the right, click the Basic Settings link.
11 In the Edit Site window, click the Select button.
12 In the Select Application Pool window, select the newly created Application Pool from the Application pool drop down.
13 To save and close the Select Application Pool window, click OK.
14 To save and close the Edit Site window, click OK.
15 Close the IIS Manager.
Transflo Server Upgrade Prerequisites for QuickView
If you are upgrading your TRANSFLO® Server from versions 2012 R1 or 2012 R2 and you have QuickView configured, you need to verify if the QuickView Profile names match the Document Class names.
If your QuickView Profile names do not match your Document Class names you must perform the following pre-upgrade steps:
1 Print or save screen captures of all your QuickView Profile Configurations.
2 Remove all QuickView Profile Configurations for profiles whose names do not match any Document Class.
3 Upgrade the TRANSFLO® Server using the installation steps below.
4 Create your QuickView Configurations for the Document Classes and Groups based on the screen captures you took in step 1.
Windows Server Installation Prerequisites
Many of the Server Roles and Features required by the TRANSFLO® Server are not automatically installed with your Windows Server installation.
You will need to install these using the Server Manager.
To install required Server Roles and Features on your Windows Server:
1 Make sure you have all Windows updates installed on your Windows Server.
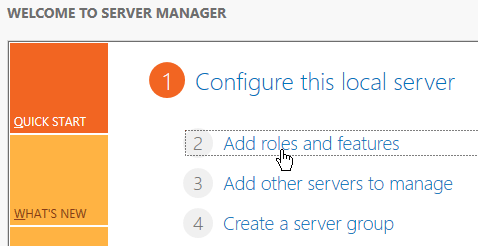
2 Start the Server Manager and select Dashboard from the menu in the left panel.
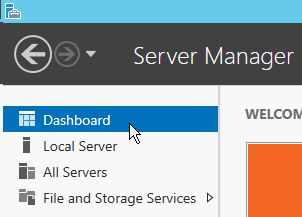
3 In the right panel under Quick Start, click the “Add roles and features” link.
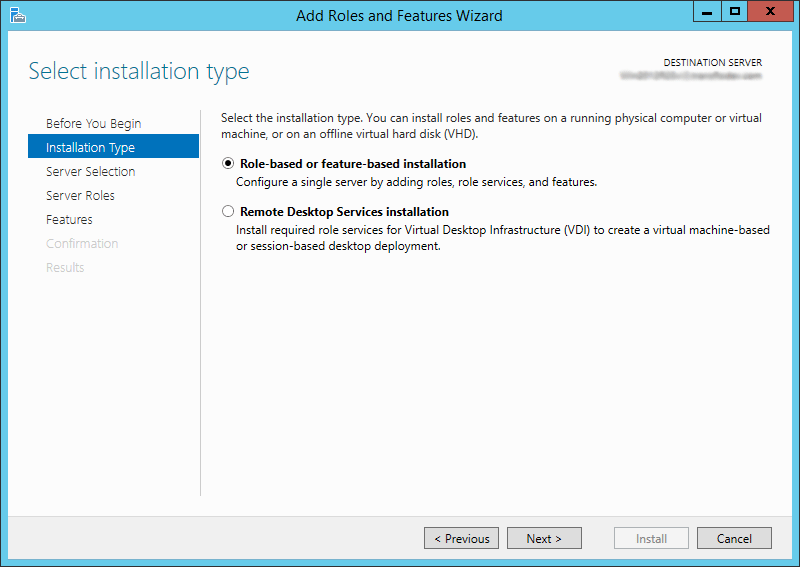
4 The Add Roles and Features Wizard opens.
Click Next.

5 The “Select installation type” window opens.
Select the “Role-based or feature based installation” radio button, and click Next.
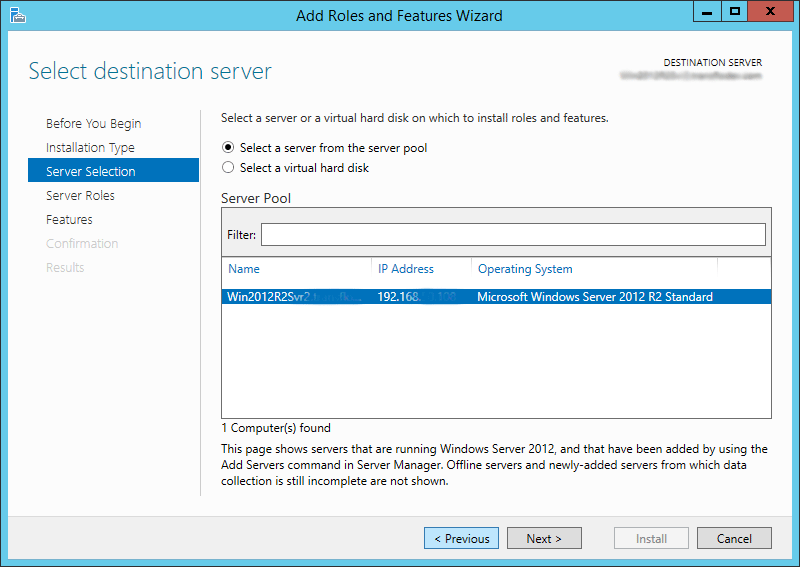
6 The “Select destination server” window opens.
Select your server from the list, and click Next.
7 The “Select server roles” window opens.
From the Roles list, select the Web Server (IIS) check box.
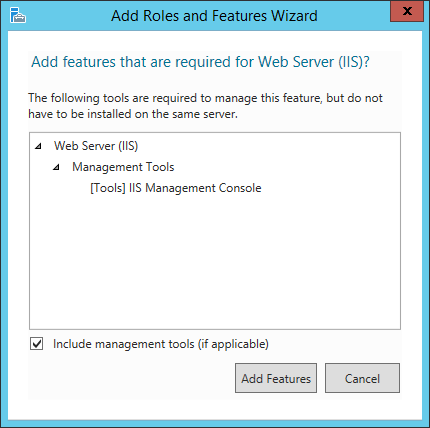
8 The “Add features that are required for Web Server (IIS)?” window opens.
Click the Add Features button.
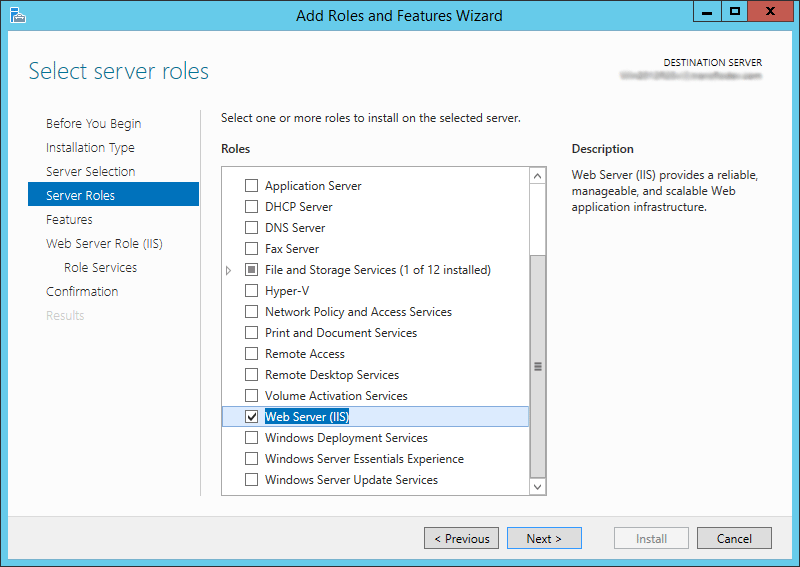
9 The Web Server (IIS) is installed.
Click Next.
10 The “Select features” window opens.
Click Next.
11 The “Confirm installation selections” window opens.
Click Install.
12 When the installation is complete, click Close.
13 Reboot your Server.
14 From the Server Manager Dashboard, start the “Add Roles and Features Wizard” again.
15 In the menu on the left, click Server Selection.
Select your server from the list, and click Next.
16 The Select Server Roles window opens.
Expand the Web Server (IIS) node and child nodes as needed.
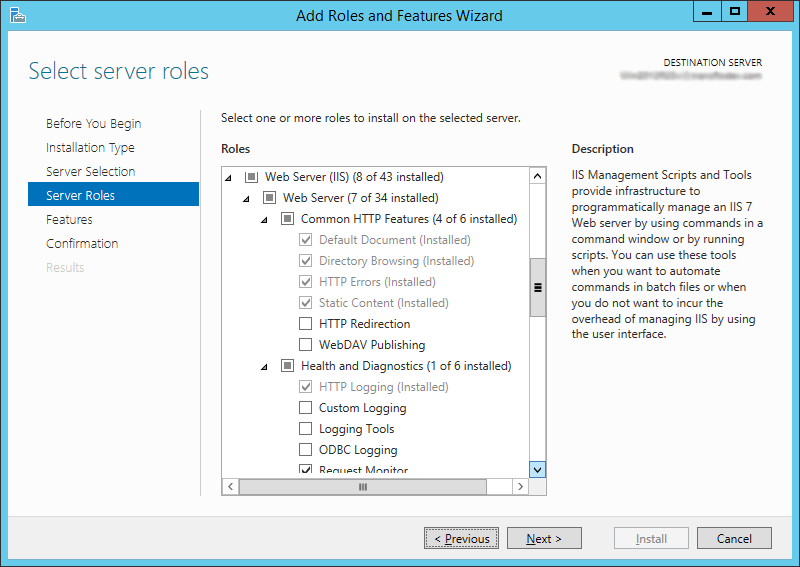
Ensure the following check boxes are selected:
-
Web Server
-
Common HTTP Features
-
Default Document
-
Directory Browsing
-
HTTP Errors
-
Static Content
-
Health and Diagnostics
-
HTTP Logging
-
Performance
-
Static Content Compression
-
Security
-
Request Filtering
-
Basic Authentication
-
Windows Authentication
-
Application Development
-
.Net Extensibility 3.5
-
.Net Extensibility 4.5
-
ASP
-
ASP.NET 3.5
-
ASP.NET 4.5
-
ISAPI Extensions
-
ISAPI Filters
-
WebSocket Protocol
-
Management Tools
-
IIS Management Console
17 Click Next.
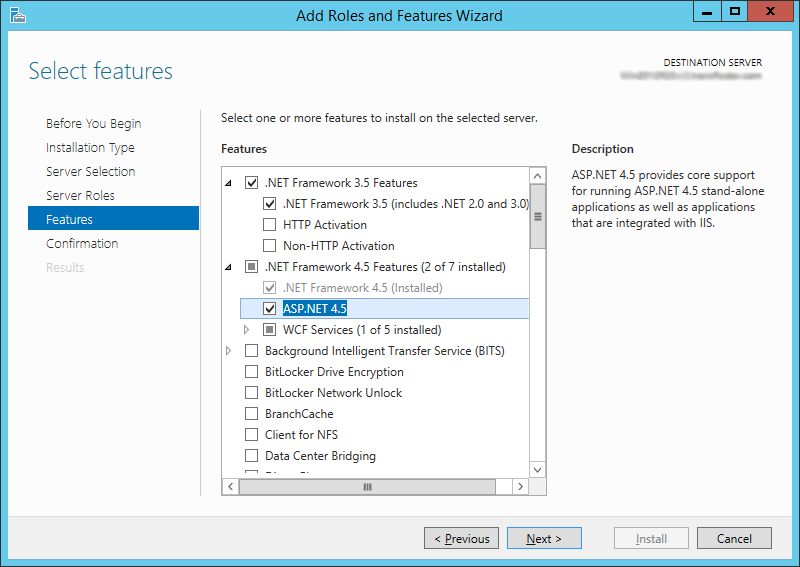
18 The “Select features” window opens.
Select the “.NET Framework 3.5 Features” check box.
Select the ASP.NET 4.5 check box, and click Next.
WCF Services is selected by default.
19 The “Confirm installation selections” window opens.
If you need to specify an alternate source path, you may need to insert the Windows 2012 installation media in your server's DVD drive.
Click Install.
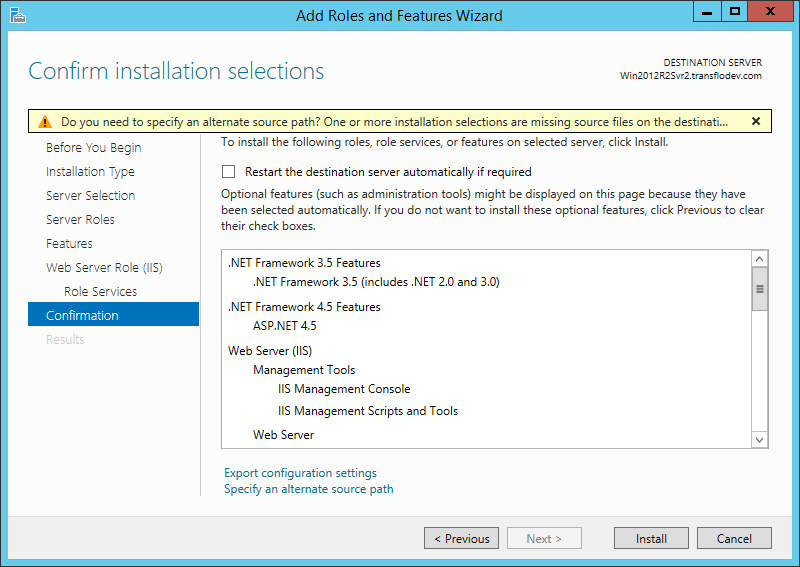
20 The roles and features will start to install.
21 When the installation is complete, click Close.
22 Reboot your Server.
Install Transflo DMS Server
Note: If upgrading from TRANSFLO® Server version 4.5 or earlier, you must follow the instructions in the note in the current version of the TRANSFLO® Administration Tool System Administrator’s Manual, Chapter 7, sub-section “Configuring Image Repository Connections”.
To install or upgrade the TRANSFLO® Server:
1 From your installation CD, run the file Transflo Server Setup.exe.
The Setup welcome window opens.
Click Next.
Setup searches for the Microsoft .NET Framework prerequisite.
If it is not installed, it will launch the Microsoft .NET Framework installer. In this case the Framework already is installed on the server.
Note: See the “Third Party Software Requirements” section for .NET Framework requirements.
2 The Select Destination Location window opens.
Select the folder where TRANSFLO® Server will be installed.
3 To accept the default installation path shown in the Destination Folder box, click Next.
To install to a different folder, click the Browse button.
In the Browse For Folder dialog box that opens, navigate to the desired installation folder and click OK.
The updated installation path is displayed in the Destination Folder area.
Click Next.
4 The “Select log files folder location” window opens.
Select a folder where the TRANSFLO® Server logs will reside.
To select the default, click Next.
To select a different location, you may either type the path in the text box or navigate to it via the Browse button.
Click Next.
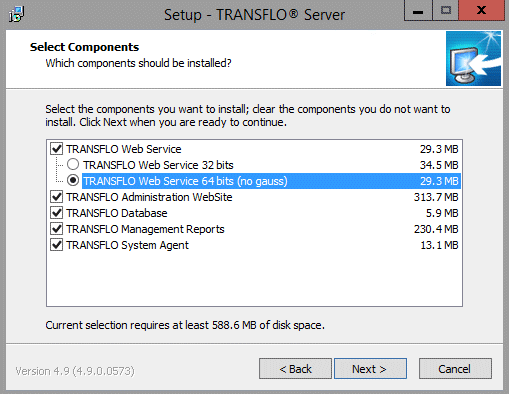
5 Select the components that you wish to be installed on your TRANSFLO® Server by checking or clearing the appropriate check boxes.
Click Next.
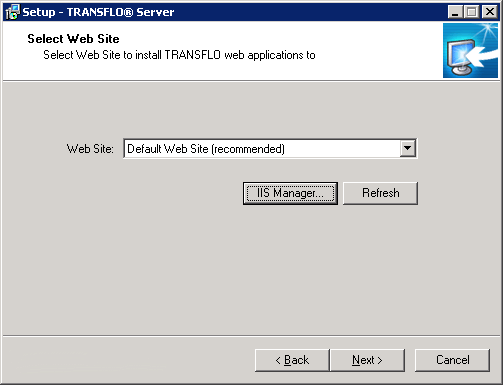
6 In the Select Web Site window, select a website where you wish to install the TRANSFLO® Web applications in the Web Site drop down.
The Defaul Web Site is recommended.
If you prefer to create a new website for the TRANSFLO® Web applications, click the IIS Manager button.
This launches the Windows® Internet Information Services (IIS) Manager where you can create the new website.
In the Setup window, click the Refresh button.
The website you created will appear in the Web Site drop down.
Once you have selected a website, click Next.
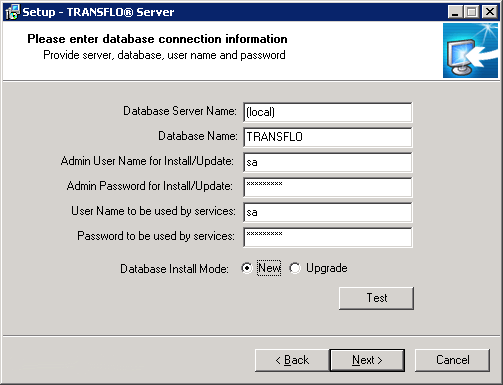
7 Enter the information for the TRANSFLO® Database that will be used.
If you have not yet created the database that you wish to use, setup will create one for you.

In the Database Server field, type the server name for the database.
In the Database Name field, type the name of the database that you created.
Warning: Do not use hyphens (-) in the Database Name box.
In the “Admin User Name for Install/Update” field, type the administrator user ID that Setup will use to create or update the TRANSFLO® Database, and type the corresponding password in the “Password for Install/Update” field.
This user information will not be stored anywhere in the TRANSFLO® System.
In the “User Name to be used by services” field, type the user ID that TRANSFLO® application web services should use when connecting to the database, and type the corresponding password in the “Password to be used by services” field.
The password must be at least eight characters in length, contain at least one number character, and an uppercase letter.
If you want to create a new TRANSFLO® database, select the New radio button.
To upgrade an existing TRANSFLO® database, select the Upgrade radio button.
When you have finished entering the required information, click the Test button to verify that you can connect to SQL Server on the Server you selected. When the Test button is clicked in step 7 above, the following authentication checks occur regarding the user that is entered in the “User Name to be used by services” field:
New Server Installations
-
If the user exists, the password will be validated. If the password is validthe installation mayproceed.
-
Iftheuserdoesnotexist,theuserwillbecreatedwiththepasswordenteredin the “Password to be used by services” field, and the installation willproceed.
Server Upgrades
-
If the user exists, validation will pass only if the password is correct andthe user is a database owner in the TRANSFLO® Database.
If the validation passes, the installation mayproceed.
-
Iftheuserdoesnotexist,theuserwillbecreatedwiththepasswordenteredin the“Passwordtobeusedbyservices”field.
Theuserwillbegranteddatabase ownerprivileges.
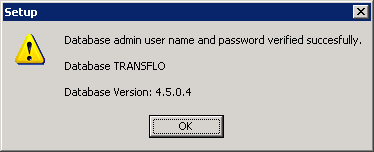
8 A message box opens and confirms that your administrator credentials successfully connected to your SQL Server.
Click OK.
Note: See the “Database Authentication Notes” section for information regarding server installations/upgrades and errors associated with them.
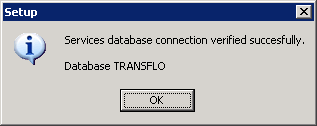
9 A message box opens, giving you the status of your Services database connection. (For more details see the “Database Authentication Notes” section below.)
Click OK.
10 The message box closes.
Click Next on the setup window.
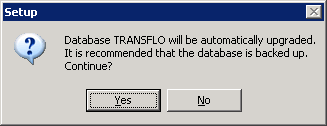
11 If you are performing an upgrade, the following message box will remind you to back up your TRANSFLO® database.
Click Yes.
12 The Select Additional Tasks window opens.
To create shortcuts on the Windows Start menu or Desktop, select the Start Menu and/or Desktop check boxes respectively.
Click Next.
13 The Ready to Install window opens.
Review the “Destination location”, “Setup type”, “Selected components”, and “Additional tasks” information to ensure that it is correct.
Click Install.
If the information is not correct, click the Back button to return to the previous steps and make the necessary changes.
14 Setup will complete the installation.
This may take a few moments.
Note: During an upgrade, you may get an error stating that the installer failed to replace the Transflo.SystemAgent.exe because it was in use. This sometimes happens on slower systems when the System Agent service has not yet shut down.
If this happens wait a few seconds, and click the Retry button.
Note: During an upgrade on a system that has a very large TRANSFLO® Database, the installer may display the following error and write it to the InstallationLogFile.Errors.log file:
Exception: Microsoft OLE DB Provider for ODBC Drivers: [Microsoft][ODBC SQL Server Driver]Query timeout expired
If this happens, wait for the TRANSDFLO Server Installer to finish, then run the Doc Process Date Post Install Script.sql database script that is packaged with all your installation files.
15 When installation is complete, the Complete the TRANFLO® Server Setup Wizard window opens.
To run the Client Configuration Application after setup closes, select the Run Client Configuration Application check box.
Click Finish to conclude the installation process.
Note: If, during an upgrade, the installer displays an “access denied” error while attempting to replace the pthreadVCE.dll, reset IIS and restart the installer.
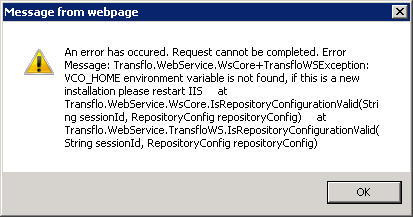
Note: If you are performing an upgrade and your Repository is Gauss VCO, you must do the following after the upgrade to enable the latest Gauss VIP VCO version:
1 Log in to the TRANSFLO® Administration Tool.
2 In the menu tree, under System, click Repository.
3 The Repository Configuration page opens.
Make sure that the Type is “GaussVco”.
4 Click the Validate button.
Once you get the confirmation that your configuration is correct, click the Save button.
5 If you get the “Message from webpage” alert below, click OK, reset IIS, and click the Validate button.
The message should not appear after you reset IIS.
Configure the Transflo Web Service to Work with LDAP
Configure the Web Service for LDAP on Windows Server 2008:
For Windows Server 2008, to configure the TRANSFLO® Web Service to work with LDAP:
1 On the Transflo Server, navigate from the Start menu to Computer, right-click on Computer, and then click on Manage to open the Server Manager.
2 In the tree, expand the Roles node, expand the Web Server IIS node, and then click on Internet Information Services (IIS) Manager.
3 In IIS, expand the IIS Server node, expand the Sites folder, and then expand the Default Web Site list.
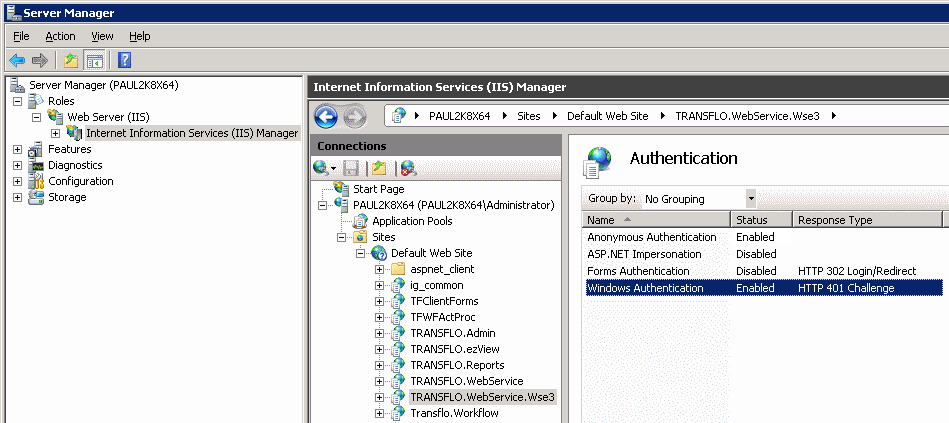
4 Click on the TRANSFLO® .Webservice.Wse3 site.
In the TRANSFLO® .Webservice.Wse3 Home screen, double-click on the Authentication icon under the IIS section.
5 Verify that the Windows Authentication and the Anonymous Authentication options are enabled.
All other Authentication options should be disabled as shown below.
6 Navigate to C:\Program Files (x86)\Pegasus TransTech\TRANSFLO® Server\TRANSFLO® .WebService and open the Web.Config file using Notepad.
Search for the following line:
<authentication mode="Windows" />
Verify that the Authentication Mode is set to Windows (i.e., <authentication mode="Windows" /> then save the Web.Config file).
7 Reset IIS.
8 Repeat these steps for the TRANSFLO® .WebService as needed.
Configure the Web Service for LDAP on Windows Server 2012
1 On the Transflo Server, from Administrative Tools, click on Server Manager.
2 In the navigation pane on the left, click IIS.
3 In the Servers list in the right pane, right-click the server to configure, and select Internet Information Services (IIS) Manager.
4 In the Connections tree in the left pane, expand the IIS Server node, expand the Sites folder, and then expand the Default Web Site list.
5 Click on the TRANSFLO® .Webservice.Wse3 site.
6 In the TRANSFLO® .Webservice.Wse3 Home screen, double-click on the
Authentication icon under the IIS section.
7 Verify that the Windows Authentication and the Anonymous Authentication options are enabled.
If they are not enabled, right-click the name and select Enabled from the pop-up menu.
All other Authentication options should be disabled.
8 Navigate to C:\Program Files (x86)\Pegasus TransTech\TRANSFLO® Server\TRANSFLO® .WebService and open the Web.Config file using Notepad.
Search for the following line:
<authentication mode=
Verify that the Authentication Mode is set to Windows (i.e., <authentication mode="Windows"/> then save the Web.Config file).
9 Reset IIS.
10 Repeat the previous steps for the TRANSFLO® .WebService as needed, except step 8, which only needs to be done once.
Known Validation Errors During Installs or Upgrades
The following errors may occur even if the TRANSFLO® database is not upgraded. These errors will prevent the installation or upgrade to proceed.
Cannot open database "databasename" requested by the login. The login failed.
This error usually indicates that the user does not have rights to the TRANSFLO® Database. Ask your DBA to verify the user’s credentials and grant the user the appropriate privileges on the TRANSFLO® Database.
Login failed foruser"username"
This error indicates that the user name or passwordare invalid
Move the Database and SQL Server Jobs to a New Server
When you copy the TRANSFLO® database to a new SQL Server, the SQL Server Jobs do not automatically get copied over.
This will affect Management Reports that relies heavily on SQL Server Jobs.
Once you have copied the TRANSFLO® database to the new server, use the SQL Server Transfer Jobs Task Editor to move these jobs.
For more information on how to use the SQL Server Transfer Jobs Task Editor see:
http://msdn.microsoft.com/en-us/library/ms137568(v=sql.110).aspx
Configure Management Reports to Work With LDAP
For Windows Server 2008, to configure the TRANSFLO® Management Reports to work with LDAP:
1 On the Transflo Server, navigate from the Start menu to Computer, right-click on
Computer, and then click on Manage to open the Server Manager.
2 In the tree, expand the Roles node, expand the Web Server IIS node, and then click on Internet Information Services (IIS) Manager.
3 In IIS, expand the IIS Server node, expand the Sites folder, and then expand the Default Web Site list.
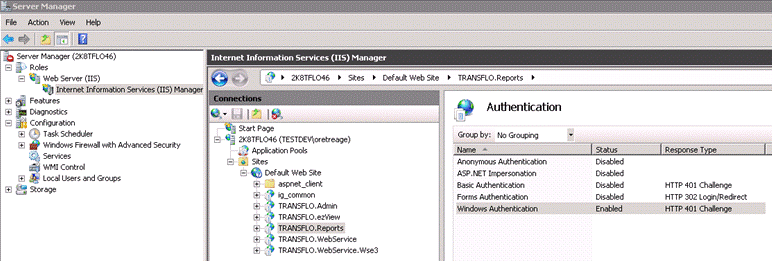
4 Click on the TRANSFLO® .Reports site. In the TRANSFLO® .Reports home screen, double click on the Authentication icon under the IIS section.
Verify that only the Windows Authentication option is enabled.
All other Authentication options should be disabled as shown below.
5 Navigate to C:\Program Files (x86)\Pegasus TransTech\TRANSFLO® Server\TRANSFLO® .Reports and open the Web.Config file using notepad. Search for the following lines:
<authentication mode="Windows">
<forms name="ManagementReports" loginUrl="login.aspx" protection="All" slidingExpiration="true" timeout="120" />
</authentication>
6 Verify that the Authentication Mode is set to Windows (i.e., <authentication mode="Windows" />, and then save the Web.Config file).
7 Reset IIS.
8 Open Internet Explorer and on the Tools menu, click Internet Options.
9 Click on the Security tab.
10 Click on Local Intranet.
11 Click the Sites button and add http://localhost and http://<servername> to this zone, where <servername> is the name of the server that is running Management Reports.
12 Click Close and click OK to close Internet Options.
13 Close and reopen Internet Explorer and browse to the Management Reports site.
The user that is logged into windows will be logged into the Management
Reports site automatically if the Windows user is a member of the LDAP group configured.
For Windows Server 2012, to configure the TRANSFLO® Management Reports to work with LDAP:
1 On the Transflo Server, from Administrative Tools, click on Server Manager.
2 In the navigation pane on the left, click IIS.
3 In the Servers list in the right pane, right-click the server to configure, and select Internet Information Services (IIS) Manager.
4 In the Connections tree in the left pane, expand the IIS Server node, expand the Sites folder, and then expand the Default Web Site list.
5 Click on the TRANSFLO® .Reports site.
6 In the TRANSFLO® .Reports Home screen, double-click on the Authentication
icon under the IIS section.
7 Verify that the Windows Authentication option is enabled.
If it is not enabled, right-click the name and select Enabled from the pop-up menu.
All other Authentication options should be disabled.
8 Navigate to C:\Program Files (x86)\Pegasus TransTech\TRANSFLO® Server\TRANSFLO® .Reports and open the Web.Config file using Notepad.
Search for the following line:
<authentication mode=
Verify that the Authentication Mode is set to Windows (i.e., <authentication mode="Windows"/> then save the Web.Config file).
9 Reset IIS.
10 Open Internet Explorer and on the Tools menu, click Internet Options.
11 Click on the Security tab.
12 Click on Local Intranet.
13 Click the Sites button and add http://localhost and http://<servername> to this zone, where <servername> is the name of the server that is running Management Reports.
14 Click Close and click OK to close Internet Options.
Close and reopen Internet Explorer and browse to the Management Reports site.
The user that is logged into windows will be logged into the Management Reports site automatically if the Windows user is a member of the LDAP group configured.
Run the Client Configuration Application
For TRANSFLO® client applications to communicate with TRANSFLO® Server, the TRANSFLO® Client Configuration application must be properly configured.
If you are experiencing connection problems with the TRANSFLO® Server, you should verify the settings using this application.
To access the TRANSFLO® Client Configuration application and verify its settings:
1 From the Windows Start menu, point to Programs, point to TRANSFLO® , and then click Client Configuration.
2 The Connection tab of the TRANSFLO® Client Configuration window opens.
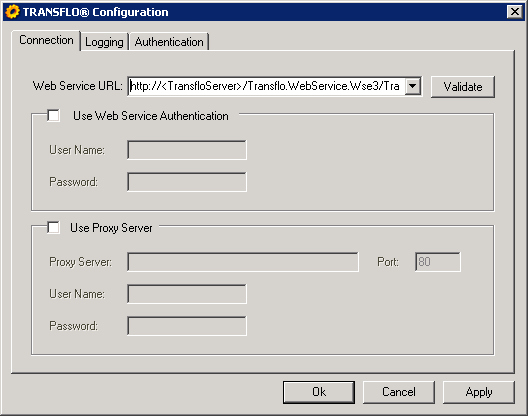
To configure the Connection tab:
-
In the Web Service URL box, type the address of the TRANSFLO® Web service being used for communications with the TRANSFLO® ® Server.
The address must be of the format:
http://<TransfloServer>/Transflo.WebService.Wse3/TransfloWS- wse3.asmx
Where <TransfloServer> is the name of your TRANSFLO® ® Server.
Click Validate to ensure that the connection is active.
-
If your TRANSFLO® Server installation requires authentication, select the “Use Web Service Authentication” check box and type the appropriate user name and password in the fields provided.
-
If the local computer connects to the Internet via a proxy server, select the “Use Proxy Server” check box and type the proxy server address, connection port number, user name, and password in the fields provided.
When you have finished entering or verifying connection information, click Apply.
To enter or verify the logging settings that should be used for TRANSFLO® applications, click the Logging tab of the TRANSFLO® Client Configuration window.
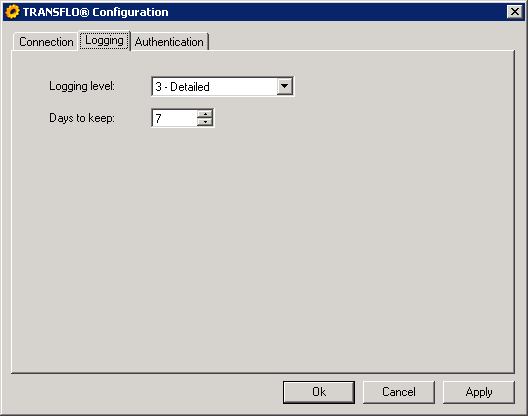
To enter or verify logging settings:
-
Expand the Logging Level list and click the desired level of complexity for logged events.
-
In the Days to keep field, enter the number of days that events should remain in the log before being erased.
When you have finished configuring the logging settings for your TRANSFLO® client applications, click Apply to save your changes.
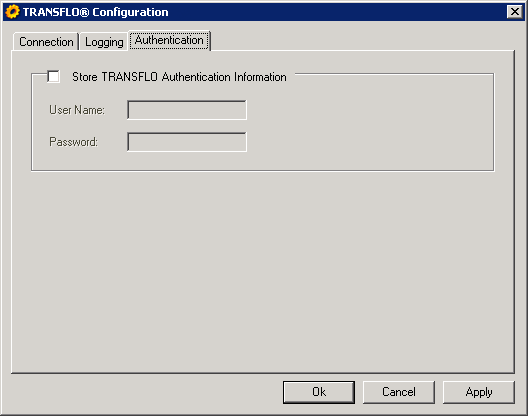
If you would like to use TRANSFLO® authentication:
-
Click the Authentication tab of the TRANSFLO® Client Configuration window.
-
Check the “Store TRANSFLO® Authentication Information” check box and enter a User Name and Password in the corresponding fields.
The following warning is displayed:
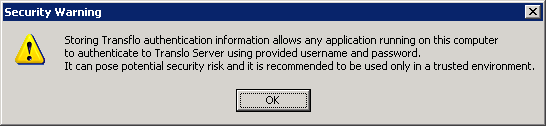
Note: This is not recommended because it poses the security risk that any application running on the client machine can access your TRANSFLO® Server including the Data stored on the Server.
3 When you have finished configuring your TRANSFLO® Client Configuration, click OK.
Back Up the Server
There are several occasions when it is important to make a backup of your TRANSFLO® Server.
This should be part of your company’s backup strategy plan.
This section describes guidelines for backing up your TRANSFLO® Server.
There are several backup strategies that can be used and these will depend on your specific needs and resources.
For more in-depth information see:
http://msdn.microsoft.com/en-us/library/ms191239(v=sql.105).aspx
These are best practices for database maintenance for large companies.
For smaller companies, you can create a backup strategy using the following guidelines:
1 Create an automated backup schedule using the wizard described in:
http://msdn.microsoft.com/en-us/library/ms189036(v=SQL.100).aspx and this video >http://technet.microsoft.com/en-us/sqlserver/Video/dd430301
Make sure you do full backup every week and keep the last 3 or 4 backups.
2 Create a full backup every time anybody will modify TRANSFLO® Structures (such as modifying the Document Class Field names or types, removing Fields, renaming Fields, etc.).
3 Create a full backup before you execute any other modifications where you are not sure what part of the system may be affected.
To create a backup, right-click on the database.
Under tasks, you will see the backup entry item.
A dialog box will open with all possible options.
Install Transflo DMS Gateway and Modules
TRANSFLO® Gateway provides the means of creating the processes that drive the routing of Documents through the Gateway structure from a source to a destination.
To install TRANSFLO® Gateway:
1 From your installation CD, run the file TRANSFLO® Gateway Setup.exe.
The Welcome to the TRANSFLO® Gateway Setup Wizard window opens.
Click Next.
2 Setup searches for the Microsoft .NET Framework prerequisite.
If it is not installed, it will launch the Microsoft .NET Framework installer.
In this case the Framework already is installed on the server.
Note: See the Third Party Software Requirements section for .NET Framework requirements.
3 If a Select Destination Location window opens, select the folder where Gateway will be installed.
You can accept the default installation path or install to a different folder.
4 The Ready to Install window opens.
Review the “Destination location”, “Setup type”, and “Selected components” information to ensure that it is correct, and click Install.
If the information is not correct, click the Back button to return to the previous steps and make the necessary changes.
5 Setup will complete the installation.
This may take a few moments.
6 When installation is complete, the “Completing The TRANSFLO® Gateway Setup Wizard” window opens.
Click Finish to conclude the installation process.
Repeat the steps above for each of the Gateway Modules you purchased.
The available modules are:
-
TRANSFLO® Gateway CSV Module
-
TRANSFLO® Gateway eScan Module
-
TRANSFLO® Gateway Express Index Module
-
TRANSFLO® Gateway Field Imaging Extractor Module
-
TRANSFLO® Gateway File Source Module
-
TRANSFLO® Gateway Inbound Email Module
-
TRANSFLO® Gateway Inbound Fax Module
-
TRANSFLO® Gateway Outbound Email Module
-
TRANSFLO® Gateway PBS Export Module
-
TRANSFLO® Gateway PBS Import Module
-
TRANSFLO® Gateway Server Zip File Output Module
-
TRANSFLO® Gateway Simple XML Module
Contact your project manager if you need more information about the different Gateway Modules.
Note: You will not be asked for database information when installing the Gateway modules.
Install Rendition Print Service
This Section details the procedures required to install the TRANSFLO® Rendition Print Service.
The Rendition Print Service installer includes:
-
TRANSFLO® Rendition Print Service
-
TRANSFLO® Transfer Service
-
TRANSFLO® Rendition Print Service Database
-
TRANSFLO® Rendition Script Converter
To install the TRANSFLO® Rendition Print Service:
1 From your installation CD, run the file TRANSFLO® Rendition Print Service Setup.exe.
2 The “Welcome to the TRANSFLO® Rendition Print Service Setup Wizard” window opens.
Click Next.
3 Setup searches for the Microsoft .NET Framework prerequisite.
If it is not installed, it will launch the Microsoft .NET Framework installer.
In this case the Framework already is installed on the server.
Note: See the Third Party Software Requirements section for .NET Framework requirements.
4 The Select Destination Location window opens.
Select the folder where the Rendition Print Service will be installed.
To accept the default installation path shown in the text box, click Next.
To install to a different folder, click the Browse button.
In the Browse For Folder dialog box that opens, navigate to the desired installation folder and click OK.
The updated installation path is displayed in the text box.
Click Next.
Note: If you select the Transfer Service on the next window, it will be installed in the folder specified in the window above.
5 Select the Rendition Print components that you wish to install by checking or clearing the appropriate check boxes in the Select Components window.

Important: If you are performing an upgrade, you must clear the Rendition Print Service Database check box on this screen.
Click Next.
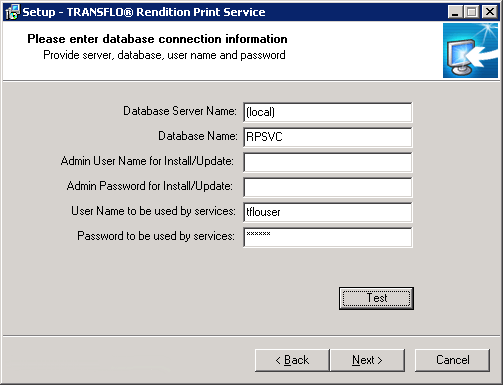
6 The “Please enter database connection information” window opens.
Enter the information for the Rendition Print database that will be used.
For new installations, setup will create the database for you.
Note: If you are performing an upgrade, this window will not appear.
If you need to update the Rendition Print database, you must run the update script provided with the installer manually after you upgrade.
All future database connection changes must be made via the Rendition Print Service Administrator.
In the Database Server Name field, type the server name for the database.
In the Database Name field, type the name of the database.
In the “Admin User Name for Install/Update” field, type the administrator user ID that Setup will use to create or update the Rendition Print Database, and type the corresponding password in the Admin Password for Install/Update field.
This user information will not be stored anywhere in the TRANSFLO® System.
In the “User Name to be used by services” field, type the user ID that Rendition Print should use when connecting to the database, and type the corresponding password in the “Password to be used by services” field.
When you have finished entering the required information, click the Test button to verify that you can connect to SQL Server on the Server you selected.
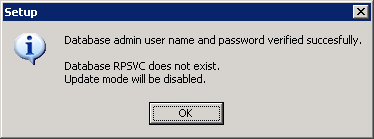
7 A message box opens, indicating that your database administrator user name and password verified successfully.
Click OK.
8 A message box opens, indicating that the user name and password that Rendition Print will use when connecting to the database verified successfully.
Click OK.
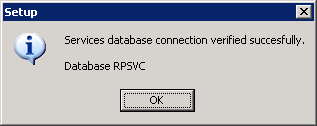
9 The message box closes.
Click Next on the setup window.
10 The Ready to Install window opens.
Review the “Destination location”, “Setup type” and “Selected components” information to ensure that it is correct, and then click Install.
If the information is not correct, click Back to return to the previous steps and make the necessary changes.
11 Setup will complete the installation.
This may take a few moments.
12 When installation is complete, the “Completing the TRANSFLO® Rendition Print Service Setup Wizard” window opens.
If you would like to open the Rendition Print Service Administrator after you have finished the setup, check the Run Rendition Print Service Administrator check box.
Click Finish to conclude the installation process.
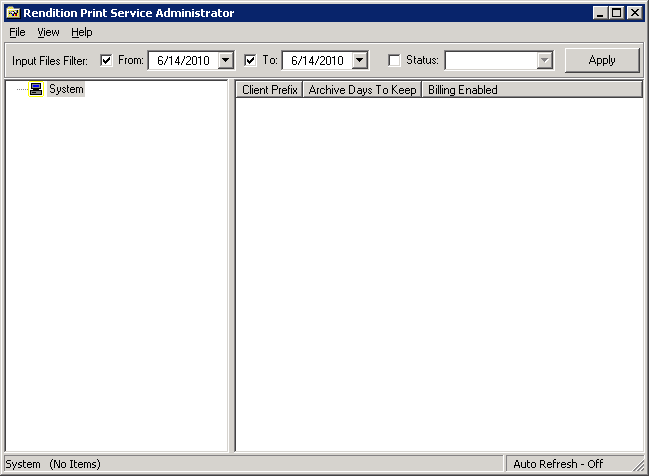
13 If you chose to run Rendition Print Service Administrator after setup, the Rendition Print Service Administrator window opens.
Install Transfer Service
To install the TRANSFLO® Transfer Service:
1 From your installation CD, run the file TRANSFLO® Transfer Service Setup.exe.
2 The Welcome to the TRANSFLO® Transfer Service Setup Wizard window opens.
Click Next.
3 The Select Destination Location window opens.
Select the folder where Batch Scan will be installed.
To accept the default installation path shown in the text box, click Next.
To install to a different folder, click the Browse button.
In the Browse For Folder dialog box that opens, navigate to the desired installation folder and click OK.
The updated installation path is displayed in the text box.
Click Next.
4 The Ready to Install window opens.
Review the “Destination location”, “Setup type”, and “Selected components” information to ensure that it is correct, and then click Install.
If the information is not correct, click Back to return to the previous steps and make the necessary changes.
5 The setup wizard will complete the installation.
This may take a few moments.
6 When installation is complete, the “Completing the TRANSFLO® Transfer Service Setup Wizard” window opens.
Click Finish to conclude the installation process.
Install ezView
ezView is a web-based document search and retrieval viewer used to find and view images on your image repository.
To install ezView on your server:
1 On your installation media, double-click TRANSFLO® ezView Setup.exe file.
2 The setup Welcome window opens.
Click Next.
3 The Select Web Site window opens.
Select a website where ezView will be installed from the Web Site drop down.
It is recommended that you use your server’s Default Web Site.
Click Next.
4 The “Select log files folder location” window opens.
Use the Browse button to navigate to the folder you want the log files to be stored.
You may also just accept the default location.
Click Next.
5 If a Select Destination Location window opens, use the Browse button to navigate to the folder you want the website to be installed.
You may also just accept the default location.
Click Next.
6 In the Select Components window, select “Full Installation,” “Compact Installation,” or “Custom Installation” from the drop down.
The “Compact Installation,” and “Custom Installation” options allow you to select the components you want to install in your EZView website. For example, beginning in early 2024, you can install DMS ezView and configure it to retrieve documents from a Gauss repository using your own custom Gauss repository API configuration.
Click Next.
The “database connection information” window opens.
7 In the Database Server Name field, type the server name that hosts your TRANSFLO® database.
8 In the Database Name field, type the name of your TRANSFLO® database.
9 In the “User Name to be used by services” field, type the database user name that ezView will use to communicate with the TRANSFLO® Server.
Type the corresponding password in the “Password to by used by services” field.
10 Click the Test button.
Setup verifies that the connection parameters are valid.
11 In the message box that opens, click OK.
12 Click Next.
13 The Ready to Install window opens.
Verify that the setting are correct.
If they are not correct, click the Back button and make the corrections.
If the settings are correct, click Install.
14 Setup installs ezView on your server.
This may take several seconds to complete.
Setup indicates that ezView was installed successfully on your server.
15 Click Finish.
16 Open Internet Explorer and type the ezView URL in the address bar.
This is usually
http://<WebServer>/TRANSFLO® .ezView
where <WebServer> is the name of the Web server that is hosting the ezView website.
The ezView Log On page opens in the browser.
Note: If your page opens with the error, “Http Error 403.14 - Forbidden error after installing ezView,” this could be a result of the .Net Framework being installed before IIS. In order to resolve this issue, you can re-register IIS. To re- register IIS, open the command prompt as an administrator and run the following command:
c:\Windows\Microsoft.NET\Framework\v4.0.30319>aspnet_regiis -i
Note: If you install custom URL Rewrite Rules in IIS 7 or above, they may affect ezView’s functionality.
For example, if you create a rule that forces URL characters to lower case, ezView’s Ajax calls will fail.
Note: If you upgrade ezView from a version prior to 4.7.0.0334, the Searchable and Visible settings on the Document Class Field Permissions may be lost. Before performing an upgrade in this scenario, print the Field Permissions for all of your Document Classes in the ezView Configuration. You will have to manually re-configure these settings. (For information on configuring ezView, see the current version of the TRANSFLO® ezView System Administrator’s Manual.)
Configure IIS 6 for ezView
The TRANSFLO® ezView Website installer automatically configures installations on IIS 7 or higher.
However, IIS 6 must be configured manually.
To configure IIS 6 for ezView:
1 From Administrative Tools, open Internet Information Services (IIS) Manager.
2 In the tree on the left, expand the Web Sites node and expand the Default Web Site node.
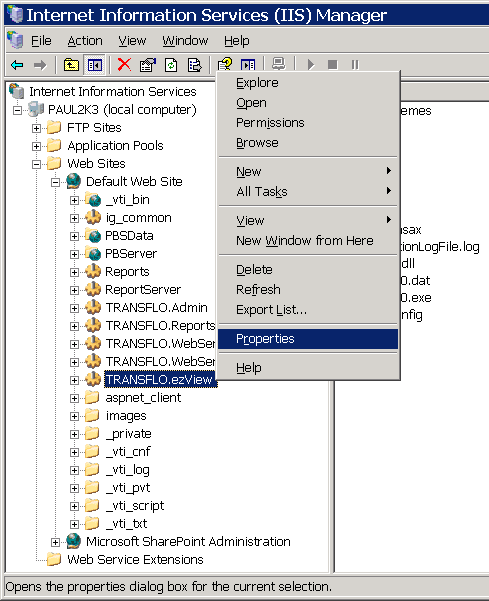
3 Right-click TRANSFLO® .ezView and click Properties in the pop-up menu.
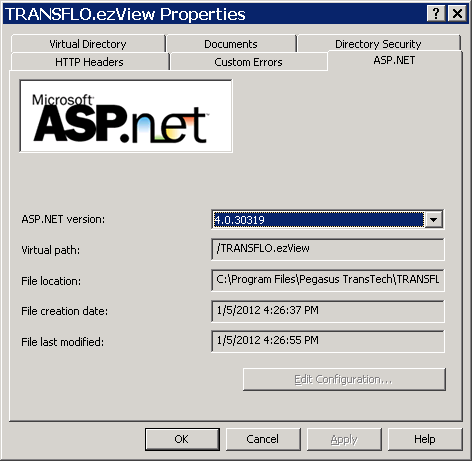
4 On the Properties window, click the ASP.NET tab.
Select 4.0 or higher from the ASP.NET version drop down.
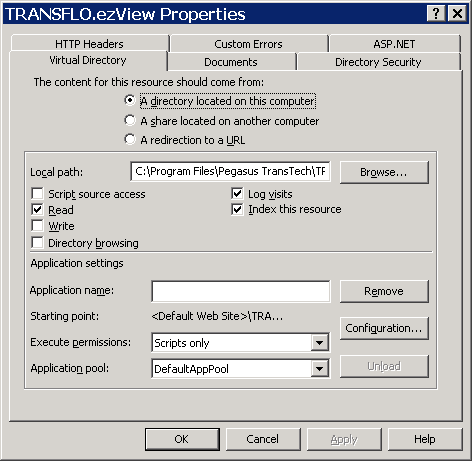
5 Click the Virtual Directory tab, and click the Configuration button.
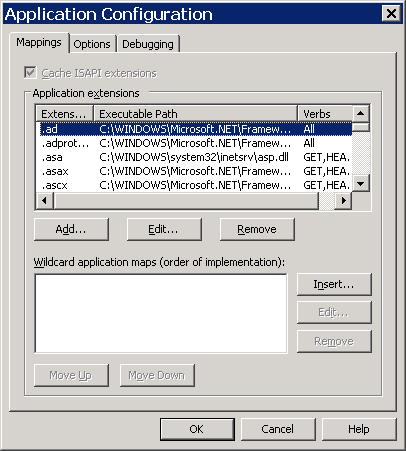
6 The Application Configuration window opens.
Click the Insert button.
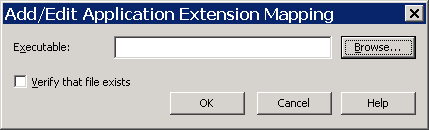
7 The Add/Edit Application Extension Mapping window opens.
Clear the “Verify that file exists” check box.
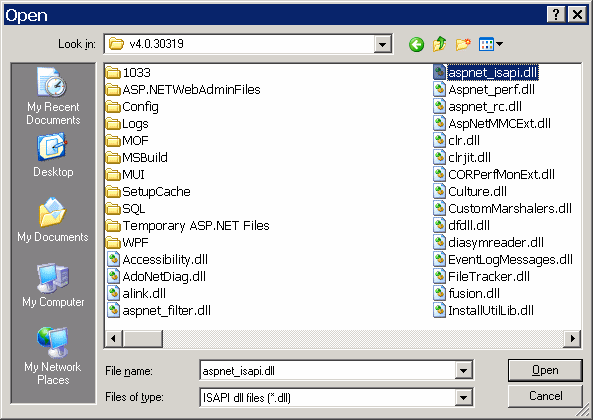
Click the Browse button.
8 Select apsnet_isapi.dll from the C:\WINDOWS\Microsoft.NET\Framework\v4.0.30319folder, and click Open.
9 To save your settings and close the Add/Edit Application Extension Mapping window, click OK.
10 To close the Application Configuration window, click OK.
11 To close the Properties window, click OK.
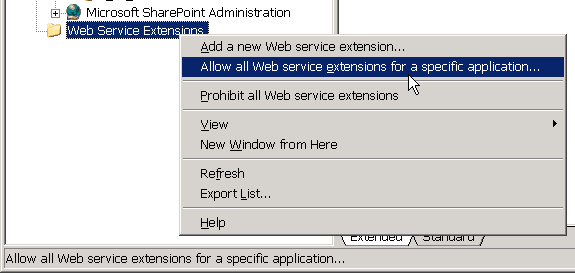
12 Right-click the Web Service Extensions node on the IIS tree, and select “Allow all Web service extensions for a specific application” option from the pop-up menu.
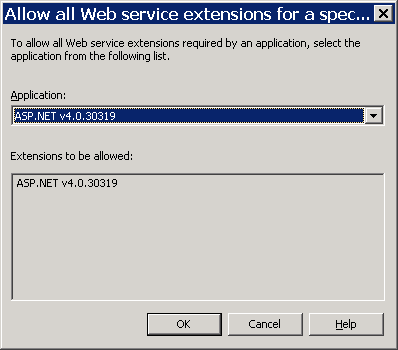
13 The “Allow all Web service extensions for a specific application” window opens.
Select “ASP.NET 4.0” from the Application drop down.
Click OK.
Configure ezView to Work with LDAP
On Windows Server 2008, to configure ezView to work with LDAP:
1 On the Transflo Server, navigate from the Start menu to Computer, right-click on Computer, and then click on Manage to open the Server Manager.
2 In the tree, expand the Roles node, expand the Web Server IIS node, and then click on Internet Information Services (IIS) Manager.
3 In IIS, expand the IIS Server node, expand the Sites folder, and then expand the Default Web Site list.
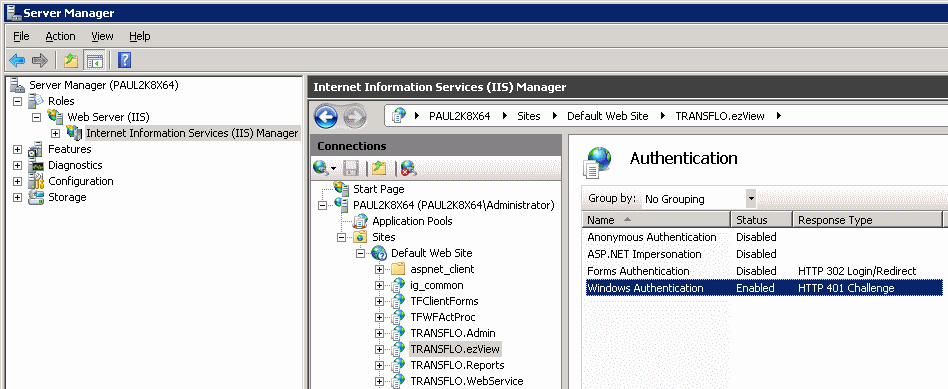
4 Click on the TRANSFLO® .ezView site. In the TRANSFLO® .ezView Home screen, double-click on the Authentication icon under the IIS section.
5 Verify that only the Windows Authentication option is enabled.
All other Authentication options should be disabled as shown below.
6 Navigate to C:\Program Files (x86)\Pegasus TransTech\TRANSFLO® ezView and open the Web.Config file using Notepad.
Search for the following lines:
<authentication mode="Windows">
<forms loginUrl="~/Account/LogOn" timeout="360" />
</authentication>
Verify that the Authentication Mode is set to Windows (i.e., <authentication mode="Windows" />, and then save the Web.Config file)
7 Reset IIS.
8 Open Internet Explorer and on the Tools menu, click Internet Options.
9 Click on the Security tab.
10 Click on Local Intranet.
11 Click the Sites button and add http://localhost and http://<servername> to this zone, where <servername> is the name of the server that is running ezView.
12 To close Internet Options, click Close and click OK.
13 Close and reopen Internet Explorer and browse to the ezView site.
The user that is logged into windows will be logged into the ezView site automatically if the Windows user is a member of the LDAP group configured.
On Windows Server 2012, to configure TRANSFLO® ezView to work with LDAP:
1 On the Transflo Server, from Administrative Tools, click on Server Manager.
2 In the navigation pane on the left, click IIS.
3 In the Servers list in the right pane, right-click the server to configure, and select Internet Information Services (IIS) Manager.
4 In the Connections tree in the left pane, expand the IIS Server node, expand the Sites folder, and then expand the Default Web Site list.
5 Click on the TRANSFLO® .ezView site.
6 In the TRANSFLO® .ezView Home screen, double-click on the Authentication icon under the IIS section.
7 Verify that only the Windows Authentication option is enabled.
If it is not enabled, right-click the name and select Enabled from the pop-up menu.
All other Authentication options should be disabled.
8 Navigate to C:\Program Files (x86)\Pegasus TransTech\TRANSFLO® Server\TRANSFLO® .WebService and open the Web.Config file using Notepad.
Search for the following line:
<authentication mode=
Verify that the Authentication Mode is set to Windows (i.e., <authentication mode="Windows"/> then save the Web.Config file).
9 Reset IIS.
Repeat these steps for the TRANSFLO® .ezView as needed.