DMS Database Backup and Recovery
Workflow database backup and disaster recovery are part of your overall organizational SQL Server Backup and Disaster Recovery Plan. The instructions in this section are a guideline on how to set up Backup and Recovery of your Workflow Data. This article provides recommended best practices for creating a Disaster Recovery environment and Disaster Recovery Plan for your TRANSFLO® Workflow environment. It describes disaster recovery strategies for both Virtual Machine environments and Physical Machine environments. The Disaster Recovery strategy you choose depends on your production Workflow environment. Both scenarios assume that your Workflow database is running on a Physical Machine.
For more detailed information on SQL Server Backup and Restoration, see the MSDN article Backing Up and Restoring Databases in SQL Server.
The following hardware requirements are for the physical servers if you are running Workflow in a Physical Machine environment. If you are running Workflow in a virtual machine environment, the hardware requirements are for the VM partitions in your Workflow environment.
Note:FAT partitions are not supported by the TRANSFLO® system.
| Component | Requirement |
|---|---|
|
Processor |
Minimum: 2 x 2.5Ghz with Dual Core Recommended: 2 x 3.0Ghz with Dual Core |
|
Memory |
Minimum: 3 GB Recommended: 4 GB |
|
Disk Space |
Minimum: 30 GB Recommended: 100 GB |
|
File system |
NTFS |
Note: Your Workflow Web Server and Workflow iProcess Engine server can reside on the same machine.
| Component | Requirement |
|---|---|
|
Processor |
Minimum: 2 x 2.5Ghz with Dual Core Recommended: 2 x 3.0Ghz with Dual Core |
|
Memory |
Minimum: 3 GB Recommended: 4 GB |
|
Disk Space |
Minimum: 30 GB Recommended: 100 GB |
|
File system |
NTFS |
| Component | Requirement |
|---|---|
|
Processor |
Minimum: 2 x 2.5Ghz with Dual Core Recommended: 2 x 3.0Ghz with Dual Core |
|
Memory |
Minimum: 3 GB Recommended: 4 GB |
|
Disk Space |
Minimum: 30 GB Recommended: 100 GB |
|
File system |
NTFS |
|
Operating System... |
with Service Pack Level... |
Additional Requirements |
|---|---|---|
|
Windows Server 2016 |
R2 SP2 |
MS04-012: Cumulative Update for Microsoft RPC/DCOM (KB828741) |
|
Windows Server 2019 (x86 and x64) |
R2 |
None |
|
Database... |
with Service Pack Level... |
|---|---|
|
SQL Server 2016 |
1 or 2 |
|
SQL Server 2019 |
None |
|
Browser... |
with Service Pack Level... |
Additional Requirements |
|---|---|---|
|
Microsoft Internet Explorer 9.0 or 11.0 |
N/A |
32-bit browsers only |
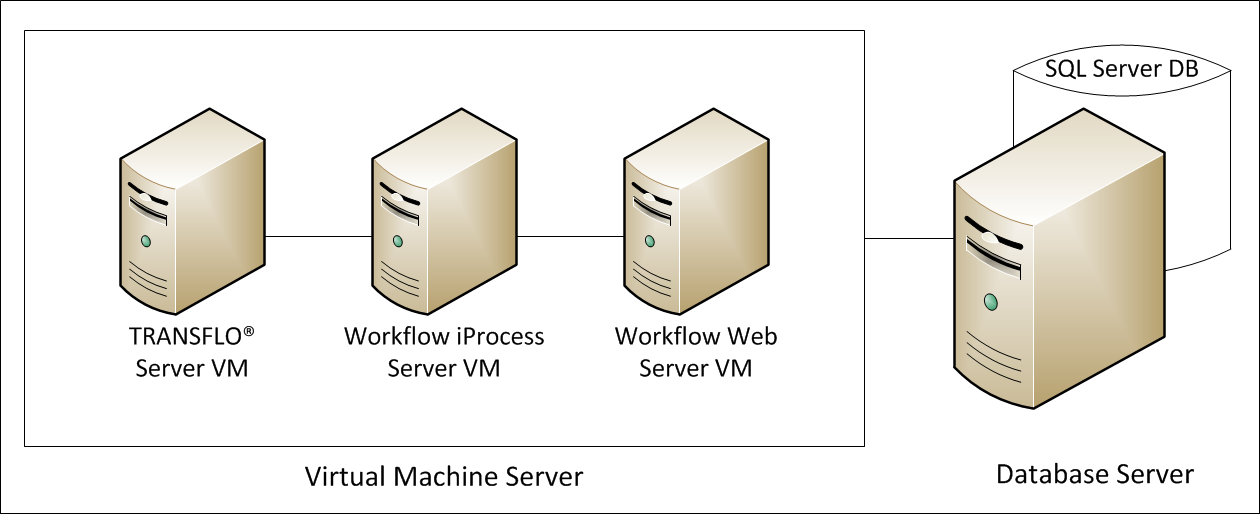
In a virtual machine (VM) environment, you can use the power of your VM software for most of your disaster recovery plan and execution. The following diagram shows TRANSFLO® Workflow running in a typical Virtual Machine environment.
-
The TRANSFLO® Server, the Workflow iProcess Server, and the Workflow Web Server exist as separate Virtual Machines running on a Virtual Machine server.
-
The database server that houses the TRANSFLO® Database and the Workflow database typically is on a separate database server physical machine.
To create a virtual machine (VM) environment for disaster recovery, perform the following steps for each VM running on your server:
1. Schedule a full daily snapshot at a time during the day, when there is a low volume of activity on the VM.
2. Schedule copy of full snapshot to your disaster recovery Virtual Machine host.
3. Schedule incremental snapshots throughout each day.
4. Schedule copy of incremental snapshots to your Disaster Recovery Virtual Machine host.
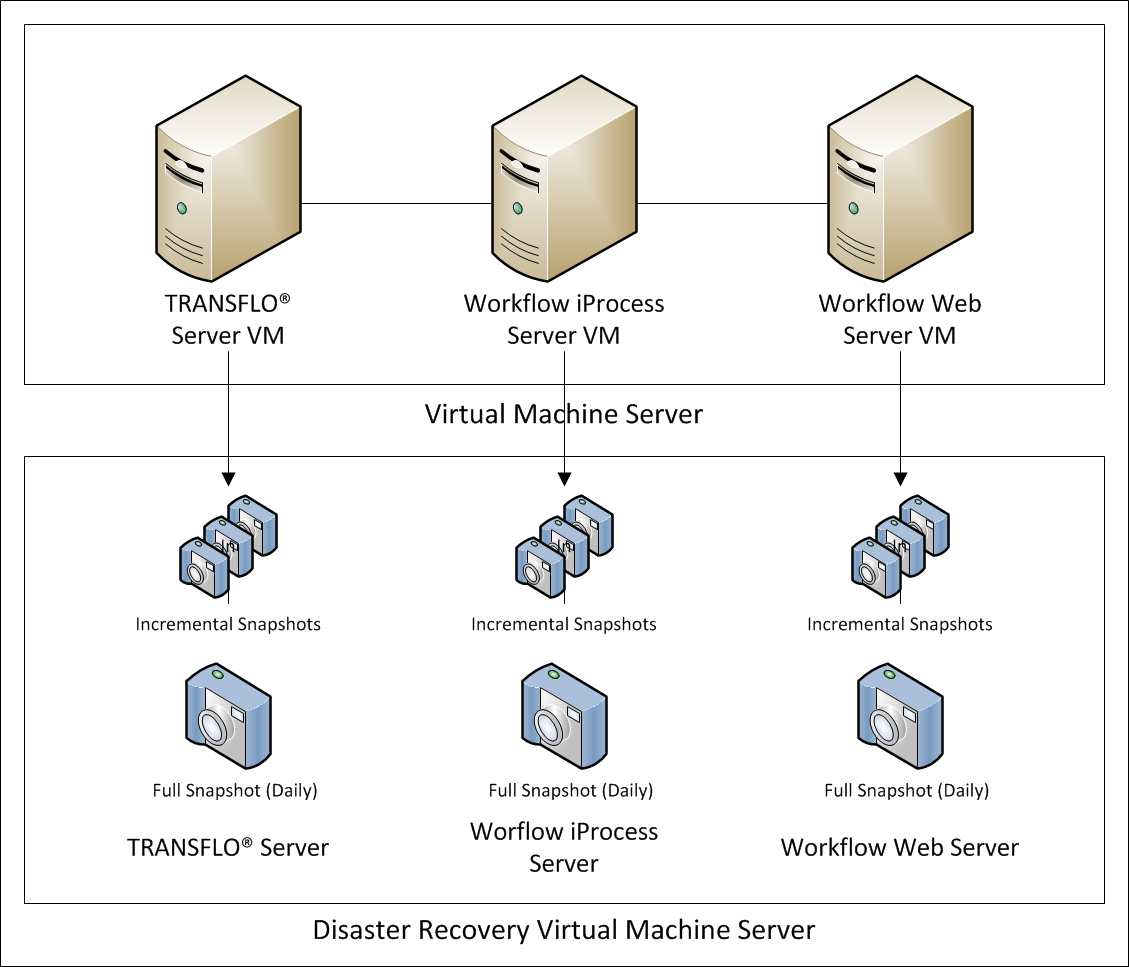
5. Once in operation, your Virtual Machine Disaster Recovery environment might look similar to the following example:
Note: For detailed instructions on how to set up VMware® backup and recovery, see: http://www.vmware.com/ pdf/vi3_35/esx_3/r35/ vi3_35_25_vm_backup.pdf
6. To recover from a Virtual Machine failure, revert to the last working VM snapshot.
7. To recover from a Virtual host server failure, create VM machines from the last good snapshots on your Disaster Recovery host server.
Use the Disaster Recovery host server as your VM host until a production Virtual host server is available.
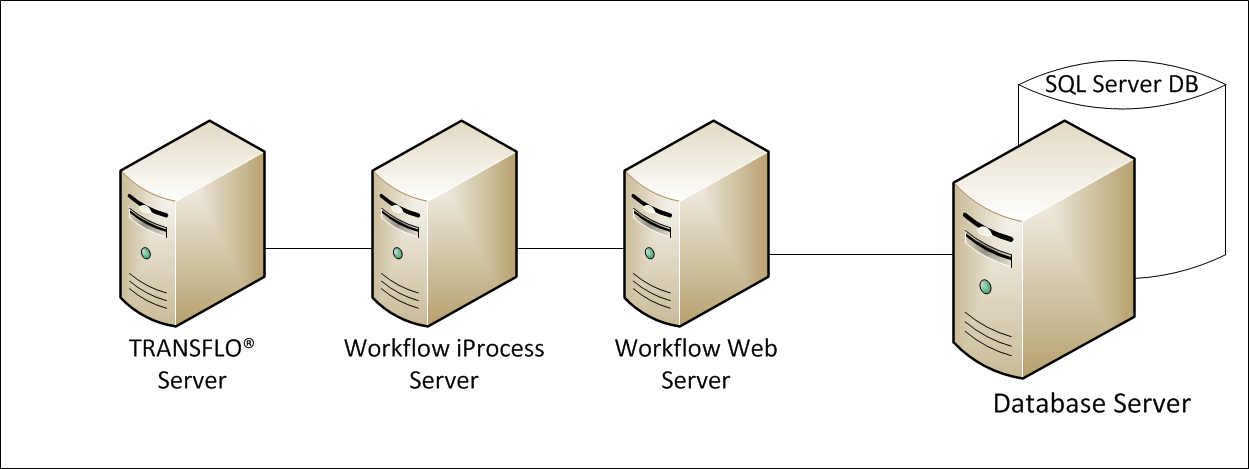
Physical machine environments require additional hardware where you can backup files from your physical servers. The illustration below shows TRANSFLO® Workflow running in a typical Physical Machine environment.
-
The TRANSFLO® Server, the Workflow iProcess Server, and the Workflow Web Server exist as separate Physical Machines running on a LAN.
-
The database server that houses the TRANSFLO® Database and the Workflow database typically is on a separate database server physical machine.
To create a Physical Machine environment for Disaster Recovery, perform the following:
1. For each Workflow related production server, purchase and equivalent server to be used for backup and disaster recovery
2. Install the same version of the TRANSFLO® Server on the Disaster Recovery TRANSFLO® Server.
During the installation, point the Disaster Recovery TRANSFLO® Server to the same database that the production server is using.
3. Bring the Disaster Recovery TRANSFLO® Server offline.
4. Install the same version of the Workflow Server on the Disaster Recovery Workflow Server with the same installation parameters as on the production Workflow Server.
During the installation, point the Disaster Recovery TRANSFLO® Server to the same database that the production server is using.
5. Bring the Disaster Recovery Workflow Server offline.
6. If a new Workflow process or form is deployed to production, bring the Disaster Recovery Workflow Server online, deploy the process or form to the Disaster Recovery Workflow Server, and bring the Disaster Recovery Workflow Server offline again.
7. Install the same version of the Workflow Web Server on the Disaster Recovery Workflow Web Server.
8. Bring the Disaster Recovery Workflow Web Server offline.
9. Your Disaster Recovery environment might look like the following example:

To recover from a production machine failure:
1. Bring the corresponding Disaster Recovery machine online.
2. Rename the machine with the same name as the production server that failed.
This machine will act as the production machine until the failed production machine is repaired or replaced.
An integral part of your TRANSFLO® Workflow Disaster Recovery Plan how you schedule your Microsoft® SQL Server® database containing your Workflow data. Depending on your volume of Workflow Cases and the risks you are willing to assume will mold your database backup schedule. The following diagram shows a typical backup scenario.
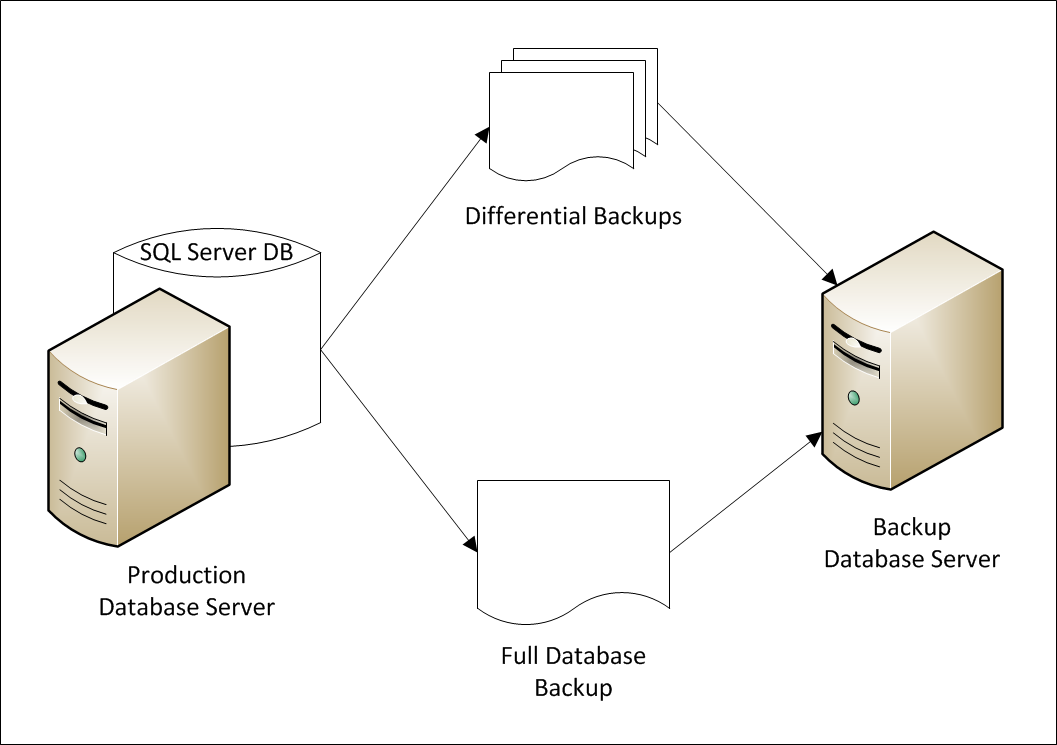
You should always backup your database to a server on a different Physical Machine and, if possible, in a different geographical location. This mitigates the risk that your Production Database server goes down, due to a hardware failure. If a true disaster happens at the facility where your Production Database Server is housed, you will experience minimal down time if your Backup Database Server was in a different geographical location.
Typical backup schedules include two types of backups:
-
Full database backups
-
Differential backups
You should run a full backup daily at a time during the day, when you usually experience low database activity. Differential (also known as incremental or partial) backups have minimal impact on the performance of your system, so you could run these frequently during the day.
Some companies prefer to perform full database backups on a weekly basis and rely on differential backups to keep the backup current. The risk they take is increased down time in the event the database must be restored from the backups. This is because their DBA’s will have to apply more differential backups to the last full backup to bring the restored data current.
In the event of a hardware failure on your Production Database Server, do the following to restore your TRANSFLO® Workflow database:
1. Bring up your Disaster Recovery Workflow (iProcess Engine) server.
For more information, see and .
2. Restore your Workflow database (TFLOWF) onto your Disaster Recovery SQL Server.
You can restore the backup with a different name, such as TFLOWF_DR.
-
Restore the last full backup.
-
Apply differential backups so your data is as current as possible.
3. If the tfwfowner and tfwfuserSQL Server Accounts are not on your Disaster Recovery SQL Server, they must be created with the same passwords that were on your Production SQL Server.
4. Run the following SQL statements on the newly restored database:
EXEC sp_change_users_login 'Auto_Fix', 'tfwfowner', NULL, 'tfwfowner'
EXEC sp_change_users_login 'Auto_Fix', 'tfwfuser', NULL, 'tfwfuser'
5. Log on your Disaster Recovery Workflow (iProcess Engine) Server.
6. Stop all iProcess services that are on.
7. Open the ODBC Data Source Administration, from the Administrative Tools menu.
Important: If your Disaster Recovery Workflow server is a 64 bit machine, run c:\Windows\sysWOW64\odbcad32.exe, from the Windows command prompt.
8. On the System DSN tab, double-click TFLOWF.
Note: If TFLOWF is not listed in the System DSN, tab contact Pegasus TransTech Customer Support for assistance.
9. In the Server drop-down, change the Server name to the name of your Disaster Recovery SQL Server.
Click Next.
10. Type the password for the tfwfowner Login ID in the Password box.
Click Next.
11. Select the Change the default database to: check box and select the Disaster Recovery Workflow database, from the drop-down.
Click Next.
12. Accept the defaults and click Finish.
13. Click the Test Connection button.
TESTS COMPLETED SUCCESSFULLY will appear in the SQL Server ODBC Data Source Test window.
Click OK.
14. Close all of the ODBC Data Source windows.
Start the iProcess Engine services.
15. Verify that your Disaster Recovery Workflow environment is working.