Rendition Print Service Status, Filters, and Views
The Rendition Print Service Administrator window shows a tree view on the left side allowing you to navigate the hierarchy of objects in the system and a list view on the right showing all objects belonging to a parent object. Examples include child objects for a selected parent, a client file structure, or lines of raw data in an input file.
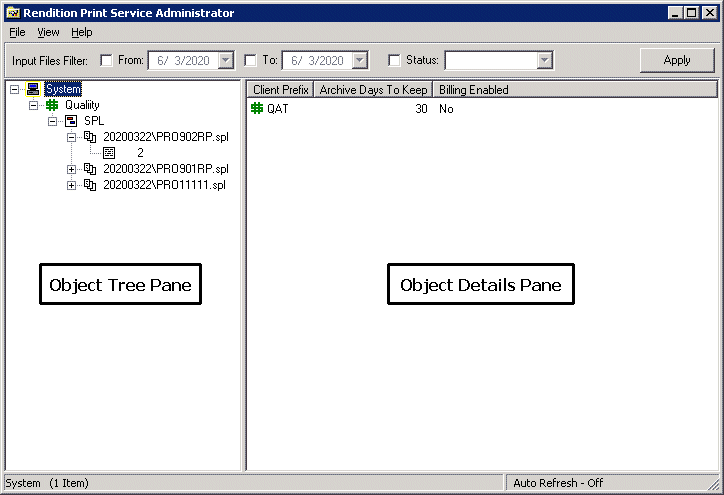
The Rendition Print Service Administrator window is the primary window you see when the application opens. All property interfaces such as the Client Properties dialog box or File Structure Properties dialog box are opened from this window.
The purpose of this window is to give you a consolidated view of all of the objects that are currently configured and recognized by the system. From this window, you will define your database connection options; create, edit, and delete clients and file structures; set the various properties of input files and their associated document contents; and view the raw document data for invoices or documents that are contained within each input file.
To navigate in the Rendition Print Service Administrator window, perform one or more of the following actions:
-
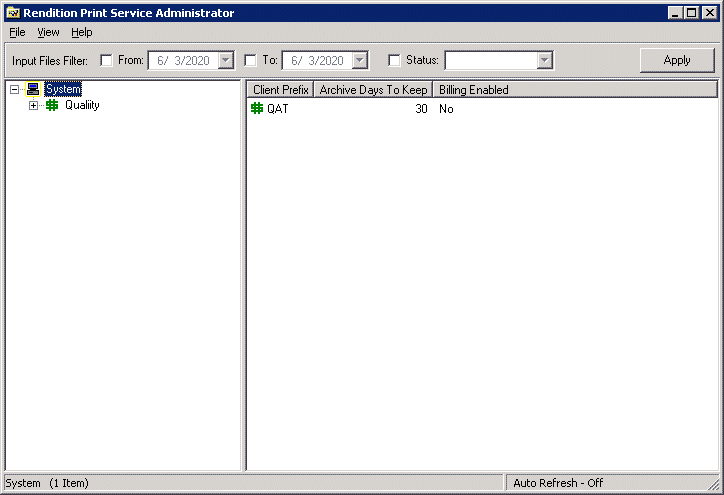
Select an object in the Object Tree pane to display its details or contents in the Object Details pane.
-
View the details or contents of a selected object in the Object Details pane.
-
Access the File menu to set the Database Connection String or exit the program.
-
Access the View menu to filter invoices, refresh views, or set up auto refresh.
-
Search for particular objects by entering the appropriate criteria via the Input Files Filter.
Note: The performance of the Rendition Print Server Administrator interface slows down if a large number of spool files (approximately 5,000 or more) are present in a single file structure.
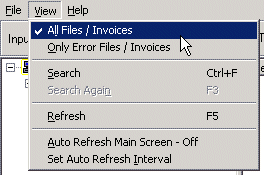
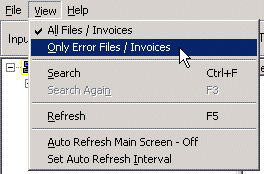
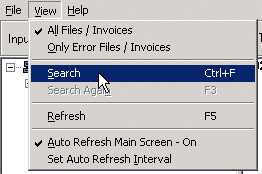
The Rendition Print Service Administrator window provides the option of viewing all files and invoices or just those files and invoices containing errors. You can toggle between the two settings in the View menu where a check mark appears next to the currently selected option.
-
To view all files and invoices, click View on the menu bar, and then click All Files / Invoices.

-
To view only files and invoices containing errors, click View on the menu bar, and then click Only Error Files / Invoices.
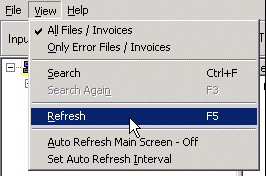
To refresh the view so that only files and invoices containing errors are displayed, click the View menu again, and click Refresh. Alternatively, you can press F5 on the keyboard to refresh the view.

The Input Files Filter allows you to limit the displayed objects to just those matching the filter criteria that you define. You can enter your filters in the Input Files Filter area above the Object Tree and Object Details panes.

To configure the Input Files Filter:
1. Select a From date, if needed. The From date is the first date in the date range to which the filter will be applied. To select a From date, first select the From check box.

Once the From check box has been selected, the accompanying date list is enabled. Click the arrow button to expand the list. A calendar appears. Change the calendar to the appropriate month by clicking the forward or backward arrow button, and then click the desired date.

Note: To filter on all objects going back to the earliest object date, you do not need to select a From date.
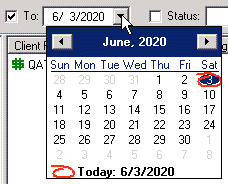
2. Select a To date, if needed. The To date is the last date in the date range to which the filter will be applied. To select a To date, first select the To check box.
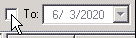
Once the To check box has been selected, the accompanying date list is enabled. Click the arrow button to expand the list. A calendar dialog box appears. Change the calendar to the appropriate month by clicking the forward or backward arrow button, and then click the desired date.
Note: To filter on all objects going up to the present date, you do not need to select a To date.
3. Select an object status, if needed. To do this, select the Status check box.
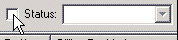
Next, select an object status. Click the arrow button to expand the status list, and then click a status.
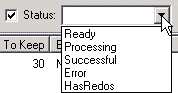
The available status values include:
-
Ready
-
Processing
-
Successful
-
Error
-
HasRedos
Note: To view all objects within the specified date range, you do not need to select a status.
4. When you have finished selecting filter criteria, click the Apply button to filter the available objects.
5. The Refresh dialog appears, asking you to select a refresh option. Before filter criteria can be applied, a refresh of invoice objects is required in order to ensure that the filter is applied to the most up-to-date information.
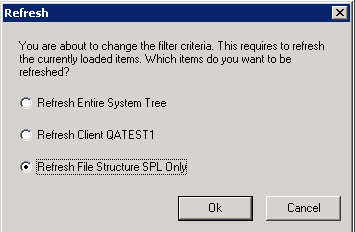
Three refresh options are presented, allowing you to apply the refresh to different levels of the invoice object hierarchy. The available options are:
-
Refresh Entire System Tree: - All invoice objects in the entire System tree (all objects in the Object Tree pane) are refreshed.
-
Refresh Client <client name> : All objects belonging to the currently selected client are refreshed.
-
Refresh <current item> Only: Only the currently selected item is refreshed. The current item can be a file structure, an input file, or an invoice.
Select an option and then click OK. The filter is applied at the selected hierarchy level.
For more information on refreshing invoice objects, see Refreshing the Interface.
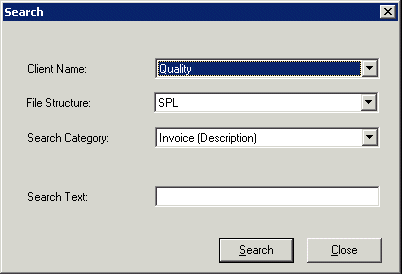
The Rendition Print Service search utility allows you to search for a particular file or invoice by selecting a client name, file structure, and search category, and entering a search string.
To search for a file or invoice:
-
On the menu bar, click the View menu, and then click Search. Alternatively, you can start a search by pressing Ctrl+F on the keyboard.

-
In the resulting Search window, select a client to search for a file or invoice. Expand the Client Name list and click the name of a client.

-
Select the file structure of the desired file or invoice. Expand the File Structure list and click the appropriate file structure type.
-
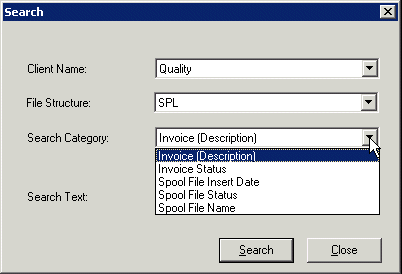
Select the type of search that you want to perform. Rendition Print Service Administrator can search for spool files by insert date, file status, or file name, and can search for invoices by description or status. Expand the Search Category list and click a category for the search.

-
In the Search Text box, type your search string in the selected category.
-
Click the Search button.
-
(Optional) To cancel the search and close the Search dialog box, click the Close button.
The Rendition Print Service Administrator window must be refreshed in order to see any changes to its contents. This can be done either manually or automatically.
-
If done manually, the interface can be refreshed as often as desired.
-
If done automatically, the interface will be refreshed on a regular basis according to a configurable interval.
To refresh the interface manually, do one of the following:
-
On the menu bar, click View, and then click Refresh on the View menu.
OR
-
Press the [F5] key on the keyboard.
The manual refresh feature can be used regardless of whether or not the auto- refresh feature has been enabled.
Note: If you have several pages of rows in the Object Details Pane and you scroll down to a row past the half way mark, you will be taken near the top of the list when the list is refreshed either manually or through Auto Refresh.
The row you are on remains highlighted but you will have to scroll down to see the row.
This typically happens when you are monitoring a large number of rows such as a spool file or invoice processing status.
To toggle the auto-refresh feature on or off, click View on the menu bar, and then click Auto Refresh Main Screen.
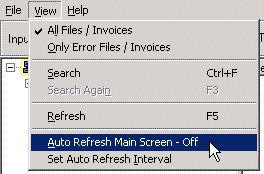
The Auto Refresh Main Screen menu item indicates whether or not auto- refresh is turned on or off.
If it is turned off, clicking the menu item will turn it on, and vice versa.
When the auto-refresh feature is turned on, it will refresh the Rendition Print Service Administrator window regularly, according to the interval that has been configured for the feature.
To configure the auto-refresh interval, click View on the menu bar, and then click Set Auto Refresh Interval.
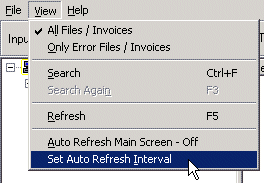
The Set Auto Refresh Interval dialog box appears.
In the Auto Refresh Interval (Secs.) box, enter the desired number of seconds for the refresh interval.
To do this, either type the desired number of seconds in the box, or adjust the current interval up or down by clicking the arrow buttons provided.
The interval can be no less than 10 seconds and no greater than 60 seconds.
The default interval is 60 seconds.
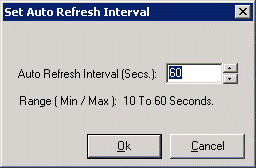
When you have finished configuring the refresh interval, click OK to apply the new interval and close the dialog box.
If you do not wish to modify the interval, click Cancel.
The Rendition Print Service Administrator window allows you to quickly set the status of spool files and invoices. Specifically, the following status functionality is provided:
-
A spool file that generated an error message can have its status reset to Ready so that it can be re-processed.
If this is done, the invoice files contained in the spool file also will have their statuses reset to Ready.
-
An individual invoice file can have its status set to Cleanup, ForcePrint, or Ready, independent of the spool file’s status.
The sections below explain these options in more detail.
You can set the status of a spool file with an error to ready in two ways. It can be done from either the spool file level or the invoice file level.
-
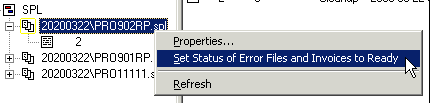
To set the status to ready from the spool file level, right-click the spool file either in the Object Tree pane or Object Details pane (Object Treepane shown below). In the shortcut menu, click Set Status of Error Files and Invoices to Ready.

-
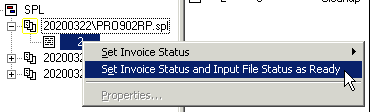
To set the status to ready from the invoice file level, right-click the spool file either in the Object Tree pane or Object Details pane (Object Tree pane shown below). In the shortcut menu, click Set Invoice Status and Input File Status as Ready.

Selecting either of these two options sets the spool file’s status to Ready, along with the statuses of all invoice files in the spool file.
Note: If selecting spool files in the Object Details pane, you can select multiple spool files at once and apply the status change to all of them simultaneously.
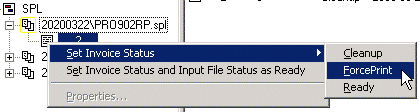
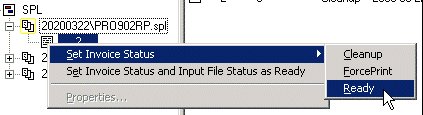
The status of an invoice file can be set to one of three values: Cleanup, ForcePrint, or Ready.
To set the status of an invoice file, right-click the invoice file in the Object Tree pane or the Object Details pane (the Object Tree pane is shown in the examples below). In the shortcut menu, point to Set Invoice Status, and then click a status:
-
To set the invoice status to Cleanup, click Cleanup.

-
To set the invoice status to ForcePrint, click ForcePrint.

-
To set the invoice status to Ready, click Ready.


If selecting invoice files in the Object Details pane, you can select multiple invoice files at once and apply the status change to all of them simultaneously.