Configure Transflo DMS Rendition Print Service
Rendition Print Service requires three (3) configuration records to be set up before it can process an input file.
-
System Admin Record: The System Admin record includes information on the root file directories (e.g., where customer and system directories will be created, polling intervals for the various manager components, and process logging options).
-
Client Admin Record: The Client Admin record identifies a client to the system and allows the user to set up “File Structure” records. It identifies each client by a four character prefix that is used by the system to create unique sub-folders under the Archive, Input Files, and Log Files system directories, thus allowing the input files for each client to be moved and processed in an entirely compartmentalized fashion.
-
File Structure Record: The File Structure records allow you to identify the various types of input files to the Input Manager. Each File Structure record defines a file extension that uniquely identifies each input file type for a client and identifies the various attributes of the file’s contents that are used in processing the file’s raw data.
After you define system, client, and file structure information, the Rendition Print Service can set up Archive, Input File, and Log File directory sub-folders specific to each client.
To start the TRANSFLO® Rendition Print Service Administrator application, click the Start button on the Windows task bar, point to Programs, point to TRANSFLO®, and click Rendition Print Service Administrator.
The Rendition Print Service Administrator window opens.
From here you can begin configuring the Rendition Print Service, using the instructions found in this manual.
Note: If this is a new installation, you will be prompted to set up an ADO connection to the database. This will require an existing database and ODBC connection to be established.
The System Properties dialog box is used to configure global settings that are used to manage client files. This dialog box allows you to perform the following steps:
-
Enter the System root directories (i.e., directories where all of a client’s folders and files are found)
-
Enter the log file directory and the name of the TRANSFLO® Server import queue to be used
-
Configure the polling intervals
-
Configure the log settings
-
Set up the maximum number of lines per batch
-
Configure the authentication settings for connecting to TRANSFLO® Server
Note: If you enter a directory that does not exist in any field, and then press the Tab key, the system displays the Confirm dialog box asking if you want to create the directory (it will create that directory only, no sub-directories). After clicking the OK button, the changes are saved to the database.

To configure the System Properties dialog box:
-
In the Object View tree pane on the Rendition Print Server Administrator window, right-click the System object and then click Properties.
-
On the System Properties tab, in the Input / Output Files box, type the path where the client input and output sub-folders should be created.
Note: Values are required for most of these fields with a 255-character maximum.
-
Click the Browse button or –to select a path. No period or dot characters (.) should be used in the path. The path can be overridden at the file structure level.
-
In the Input File Archive box, type the path where the client archive and error sub-folders should be created (255 character maximum). This is a required field. Click the Browse button or –to navigate to and select the desired path. No period characters (.) should be used in the path.
-
In the Client Files box, type the path where the client files are found (e.g., TIF files used in image generation). This is where the templates will reside. This is a required field. Click the Browse button or – to select a path. No period characters (.) should be used in the path.
-
In the Logs box, type the path where the system will store the log files for the input, process, and cleanup manager processes (255 character maximum). A sub-folder will automatically be created to store the daily Invoice Process Component log. This is a required field. Click the Browse button or – to navigate to and select the desired path.
-
In the Import Queue box, type the name of the TRANSFLO® Server queue that will be used to import invoices into TRANSFLO® Gateway. This is a required field.
-
In the Input box, enter the interval, in seconds, that the Input Manager will “sleep” before performing another scan for input files, or accept the default (60). The range of values is 1 to 9999. Values less or greater than this range are automatically set to the minimum and maximum values respectively.
-
In the Processing box, enter the interval, in seconds, that the Process Manager will “sleep” before performing another scan for input files and launching Invoice Process Components, or accept the default (60). The range of values is 1 to 9999. Values less or greater than this range are automatically set to the minimum or maximum values respectively. This is a required field.
-
In the Cleanup box, enter the interval, in seconds, that the Cleanup Manager will “sleep” before performing another scan for cleanup files, or accept the default (60). The range of values is 1 to 9999. Values less or greater than this range are automatically set to the minimum or maximum values respectively. This is a required field.
-
In the Days to keep box, enter the number of days to keep log file archives, or accept the default (10). The range of values is 1 to 9999. Values less or greater than this range are automatically set to the minimum or maximum value respectively. This is a required field.
-
In the Level of detail box, enter the level of detail that is written to the various process logs, or accept the default (1). The range of values is 0 to 4, with 4 being the highest level of detail. Values less or greater than this range are automatically set to the minimum or maximum values respectively. This is a required field.
-
In the Max Lines Per PBS File box, enter the maximum number of lines per batch file, or accept the default (100). The range of values is 1 to 500, with 500 being the maximum number of lines per batch file. Values less or greater than this range are automatically set to the minimum or maximum values respectively. If the number of lines in a spool file exceeds the maximum defined number of lines, Rendition Print Service will split the spool file at the defined line number. Unless an invoice is a multi-page invoice, only a single batch file will be produced.
-
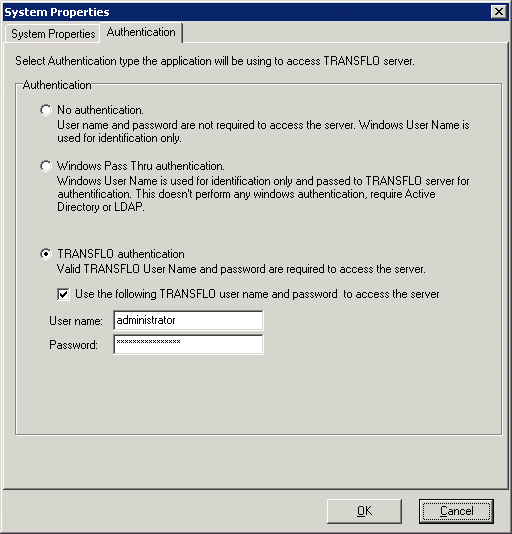
Click the Authentication tab. The Rendition Print Service authentication options are displayed. The option selected determines the method of authentication that Rendition Print Service will use to connect to TRANSFLO® Server.

-
Select the authentication option that matches the method configured for TRANSFLO® Server, either No authentication, Windows Pass Thru authentication, or TRANSFLO® authentication. If using TRANSFLO® authentication, you can enter the username and password that should be used each time that Rendition Print Service accesses TRANSFLO® Server. To do this, select the Use the following TRANSFLO® user name and password to access the server check box, and then type the appropriate user name and password in the boxes provided.
Note: If you are using TRANSFLO® authenication and you do not enter a user name and password here, the system will require that a user name and password be entered manually each time Rendition Print Service attempts to access TRANSFLO® Server.
Best Practice: If LDAP authentication is configured on your TRANSFLO® Server (via the TRANSFLO® Administration Tool), it is recommended that you use TRANSFLO® Authentication for your RP Service.
-
When you have finished configuring system properties for Rendition Print Service, click OK to save the settings and close the dialog box. If you do not want to save the changed settings, click Cancel.
The Client Properties dialog box is used to identify a client to the system. This window can be accessed from the Object View tree pane of the Rendition Print Server Administrator window in either of two ways:
-
If you are creating a new client, right-click the System node and then click Add Client in the shortcut menu.
- or -
-
If you are editing an existing client, right-click the client node whose properties you wish to access, and then click Properties in the shortcut menu.
This dialog box allows you to set up a client name and prefix, and specify the length of time to retain archive files for the client folder.
The prefix is the name of the client sub-folders that will be used throughout the various system directories. After making changes and clicking the OK button, the new client is added. The system will automatically create the directory structures.
If an existing client is deleted, the system automatically deletes the directory structures for the input, archive, output, and client files. If a client directory is deleted, the system will provide a confirmation dialog box.

To configure the Client Properties dialog box:
1. In the Name box, type the full name of the client to be used in the Object View tree (50 character maximum). This is a required field.
2. In the Prefix box, type the unique prefix to be used to name of all of the client’s sub-folders throughout the system (4 character maximum). These folders will contain archive directories, input files, output files, and logs. This is a required field.
3. In the Keep Archive Days box, enter the number of days to keep the input file archives before purging them, or accept the default (30). The range of values is 1 to 9999. Values less or greater than this range are automatically set to the minimum or maximum value, respectively.
4. Click the OK button to save the changes and close the dialog box.
5. When the confirmation dialog box is displayed, click Yes to create the client directories.
The File Structure Properties dialog box is used to identify a client’s file structure to the system. This dialog box allows you to define a file type and establish other attribute settings such as line control width and page continuation characters, as well as to identify the template script file that will be used to perform the client-specific processing of the file’s contents.
The dialog box also allows you to enter the name of the TRANSFLO® import queue to which invoices will be sent. This dialog box can be accessed from the Object View tree pane of the Rendition Print Server Administrator window in either of two ways:
-
If you are creating a new file structure for a client, right-click the client’s node and then click Add File Structure in the shortcut menu.
- or -
-
If you are editing an existing file structure, right-click the node of the file structure whose properties you wish to access, and then click Properties in the shortcut menu.
The File Structure Properties dialog box is composed of two areas. The first area, General, controls the basic spool file attributes. You can select from one of three types of spool files:
-
Text - Line Control: This option is the standard IBM AS/400 spool file type with the line number to the left to track positioning. It is the default spool file type. When the file structure type is set to “Text - Line Control,” the spool file is processed by the current parser.
-
Text - No Line Control: This option allows you to configure a file structure to process text files that do not contain line control information. When the file structure type is set to “Text - No Line Control,” the spool file is processed by the flat text parser.
-
XML: This option reads text indicators in the spool file to parse the file’s data.
The second area of the File Structure Properties window, located at the bottom of the window, changes dynamically depending on the type of spool file selected in the Type list. The procedural steps for this window are explained in the sections below. The first section explains the General area. The remaining sections explain the lower areas depending on the selected spool file type. You must click the OK button when finished to save all changes to the database.
The first area of the File Structure Properties dialog box is called the General area.
Here, the spool file type is determined and other general spool file settings are established.
Some of the settings include:
-
Days until Force Print - Maximum number of days that the system will wait before changing the status of an invoice from Redo to ForcePrint
-
Redo Interval In Hours - Number of hours that the Invoice Process Component will defer processing an input file invoice when the status has been set to “Redo”
-
Max Invoices In Error - Maximum number of consecutive invoices to fail before the spool file status is set to Error
-
Spool File Size Delay Enabled - Whether or not to defer moving a file if its size is still changing
-
Size Delay In Seconds - Number of seconds to wait before attempting to move the file again
-
Default Table - The imaging Doc Class to use
-
Workflow Enabled - Whether to enable TRANSFLO® WorkFlow
-
Batch Spool Files Enabled - Whether spool files should be batched
-
Max Batch File Count and Max File Size - Number and size limitations for batched spool files
-
Import Queue - The name of the TRANSFLO® import queue to which invoices will be sent
Note: When files are processed during a Redo cycle, the status of invoice items goes from Redo to Ready, and then to Clean Up or back to Redo.
The invoice item status never shows that an invoice is being processed.
Spool file status, however, does indicate processing.
Note: A Batch Id (Batch Name) must be passed to the TRANSFLO® Server for each record. (The field designated as the Batch Name cannot be NULL.)
As noted earlier, the fields and control in the lower area will change depending on the type of spool file selected.
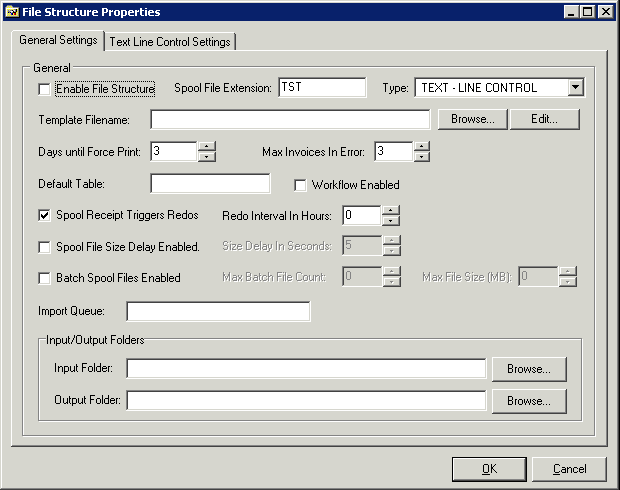
Perform the following steps to configure the General Settings tab:
1. Select the Enabled File Structure check box if the Rendition Print Service’s Process Manager will process file types identified by this file structure’s spool file extension.
2. In the Spool File Extension box, type the file extension that the Rendition Print Service’s Input Manager will use to identify a client’s input files.
This is a required field.
Type “TXT” if the spool files will be text files or type “XML” if the spool files will be XML files.
3. Select a spool file type from the Type list.
To do this, click the list arrow, and then click the type of spool file to be used.
The available choices are:
-
Text - Line Control
-
Text - No Line Control
-
XML
Note: Once a spool file type has been saved for the file structure, it cannot be changed.
4. In the Template Filename box, type the name of the template script file that will be used to process the file’s contents (50 character maximum).
-
Script files have a default extension of “TPL”.
or
-
Click the Browse button to search the Client Files folders for the template file.
The file must be stored in the respective client’s sub-folder under the “Client Files” system directory.
When you select the template file to use, it is automatically saved to the Client Files directory.
This is a required field.
If you need to edit the template script file, click the Edit button.
5. In the Days until Force Print box, enter the maximum number of days that the system can suspend an input file while waiting on a redo before being forced to process it, or accept the default (3).
Typically an input file is suspended because supporting documents, required in the document generation phase, are not yet available.
The range of values is 0 to 9999.
Values less or greater than this range are automatically set to the minimum or maximum value respectively.
This is a required field.
6. In the Max Invoices In Error box, enter the maximum number of consecutive invoices to fail (i.e., to mark with a status of “error”) before the system will mark the spool file with a status of error and suspend further processing for that spool.
The default number of invoices is 3.
The range of available values is from 0 to 10.
7. In the Default Table box, type the name of the default Document Manager table where the image look up will be done (50 character maximum).
8. If your TRANSFLO® system includes Pegasus TransTech’s Workflow product, select the Workflow Enabled check box to set a corresponding flag in a generated PBS (Image Index) file for images saved to Workflow’s Import Images directory.
9. If a spool file pending redo should be re-processed immediately upon receipt of an updated spool file, select the Spool Receipt Triggers Redos check box.
Important: If a spool file was originally processed as part of a ZIP archive, it must be re-processed as part of a duplicate archive.
If the spool file is re-processed by itself, it will cause a conflict in Rendition Print Service.
10. In the Redo Interval In Hours box, enter the number of hours for which the Invoice Process Component should defer processing an input file invoice when the status has been set to “Redo.”
The default value is 0, which means that the spool file will be processed again as soon as its status is set to Redo.
11. Select the Spool File Size Delay Enabled check box if you wish to enable the Spool File Size Delay Interval functionality for the current file structure.
If selected, the Input Manager will defer moving a file from a client’s Input folder to the Archive folder if the file size is changing.
Input Manager will then make another attempt after the delay interval passes.
If disabled, the Input manager will not delay moving a file to the Archive folder for processing.
12. In the Size Delay In Seconds box, enter the number of seconds that the Input Manager will defer moving a file from the client’s input folder to the archive folder for processing.
The default value is 5 seconds.
The available range of values is from 1 to 60.
This field is only available if the Spool File Size Delay Enabled check box has been selected.
13. If you wish for Rendition Print Service to batch multiple spool files into a single spool file, select the Batch Spool Files Enabled check box. (If this option is not selected, Rendition Print Service will process spool files in their original format.)
14. In the Max Batch File Count box, enter the maximum number of invoices that can be included in a single spool file.
The default value is 0, which means the maximum number of files is unlimited.
15. In the Max File Size box, enter the maximum file size for the batch spool file.
The default value is 0, which means the maximum file size is unlimited.
16. In the Input Folder box, enter the full path of the folder that should be monitored for incoming spool files.
To do this, either type the path in the box, or click the Browse button and navigate to the desired folder.
If you type a folder path that does not exist, a prompt will be displayed asking if you want to create the folder.
Important: Make sure that the Rendition Print Service has full permissions to the Input folder.
If the Rendition Print Service has read-only permission to the Input folder, files will not be removed and will be processed as new.
17. In the Output Folder box, enter the full path of the folder where batch files should be saved.
To do this, either type the path in the box, or click the Browse button and navigate to the desired folder.
If you type a folder path that does not exist, a prompt will be displayed asking if you want to create the folder.
18. In the Import Queue box, type the name of the queue on TRANSFLO® Server that will receive invoices from Rendition Print Service.
Proceed to the section below pertaining to the spool file type that you selected in the Type list.
-
If you selected Text - Line Control, see Text - Line Control.
-
If you selected Text - No Line Control, see Text - No Line Control.
-
If you selected XML File, see XML File.
The Text Line Control Settings tab is activated if Text Line Control was selected from the Type list. This is the most common type of spool file.
There are four Text - Line Control areas: Line Control, Page Continuation, Sorting, and Invoice Identifier.

To configure the Text Line Control settings:
1. Click the Text Line Control Settings tab.
2. In the Line Control area, in the Line Control Width box, enter the line control width number (the default value is 4).
The line control information is used to create a row-column coordinate system which allows for precise mapping of various file attributes such as the page and document delimiters, sorting information, and document identifier information.
3. In the Page Continuation area, in the Indicator box, type the string that will serve as the page continuation indicator, or accept the default (blank string).
The maximum length is 50 characters and is case sensitive.
4. In the Row box, enter the row number where the page continuation indicator is found, or accept the default (0).
The range of values is 0 to 9999.
5. In the Column box, enter the column number where page continuation indicator is found, or accept the default (0).
The range of values is 0 to 999.
6. In the Sorting area, select the Enable Invoice Sorting check box if the invoices or documents found in the spool file should be sorted by data found at the specified sort row and column position.
7. In the Row box, enter the row number where document’s sort data is found, or accept the default (0).
The range of values is 0 to 9999.
8. In the Column box, enter the column number where document’s sort data is found, or accept the default (0).
The range of values is 0 to 9999.
9. In the Length box, enter the length of the sort data, or accept the default (0).
The range of values is 0 to 50.
10. In the Invoice Identifier area, in the Row box, enter the row number where the document’s invoice identifier data is found, or accept the default (0).
The range of values is 0 to 9999.
If a row number is not specified, then the line number related to the spool file will be used.
11. In the Column box, enter the column number where the document’s invoice identifier data is found, or accept the default (0).
The range of values is 0 to 9999.
12. In the Length box, enter the length of the invoice identifier data, or accept the default (0).
The range of values is 0 to 50.
13. Click the OK button to save the changes and close the dialog box.
The Text No Line Control Settings tab is activated if TEXT NO LINE CONTROL was selected from the Type list.
The top of the area contains four tabs, which are used to enter regular expressions for the start or end blocks, page continuation, sorting, and invoice identifier fields.
These expressions are entered against an actual spool file.
The following sections outline the steps for completing each of these four top tabs.
The tabs at the bottom of the area appear on each of the top four tabs, and are documented in each of the following subsections.
To being configuring the Text No Line Control Settings tab, click the tab if you have not already done so.
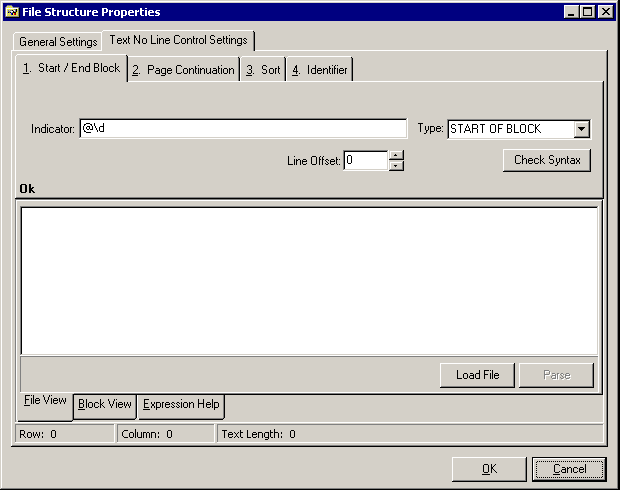
To configure the Start/End Block tab:
1. Click the Start/End Block tab.
2. In the Indicator box, type the expression sequence of characters that will mark the beginning or end of the document page (255 character maximum).
All regular expressions will be validated to ensure that they are accurately formed.
3. Click the Check Syntax button to validate the regular expression for syntax errors.
The status of the selected regular expression is displayed in the small text label in the lower left hand corner of the regular expression editor tab control.
Note: The syntax of regular expressions is checked for errors when a file is parsed.
4. In the Type list, select the type of block marker to use.
The type of marker used will depend on whether the information entered in the Indicator box describes the start or end of the block.
The available options are Start of Block and End of Block.
The default value is Start of Block.
5. In the Line Offset list, select the number of lines that the actual page data can be offset from the block marker position.
For the Start Indicator, this is the number of lines (0 - 99) below the block marker location and indicates where the page data actually starts.
For the End Indicator, this is the number of lines (0 - 9) above the block marker location and indicates where the page data actually ends.
The default is 0.
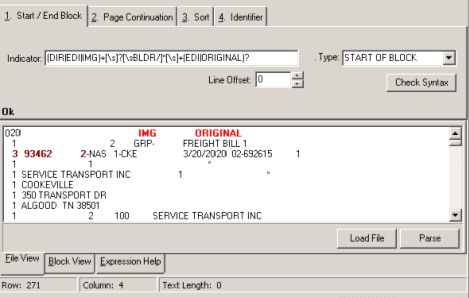
6. Click the File View tab to view the results of parsing the entire spool file.
This view provides a “big picture” view of the file parsing process.
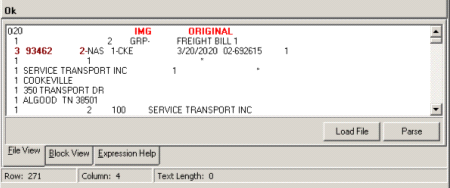
On this tab, you can click the Load File button to load a spool file into the box above.
Once the spool file is loaded into the box, you can interactively test the regular expression used to specify the block, continuation, sort, and invoice ID data.
In addition, you can click the Parse button to apply the regular expressions from the Start/End Block, Continuation, Sort, and Identifier tab expression fields to the lines of text in the box.
The application uses the following color identification:
-
Start/End Block Marker - Red, Bold
-
Continuation Marker Text - Green, Bold
-
Continuation Marker Sub-string data- Yellow, Bold
-
Sort Text - Blue, Bold
-
Invoice ID Text - Maroon, Bold
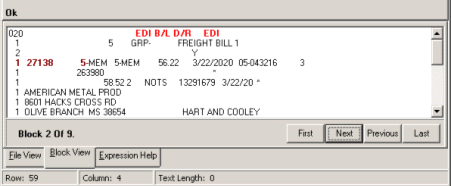
7. Click the Block View tab to view how the regular expression for the start or end and continuation will cause the file to be subdivided into documents or blocks.
Once the tab has been selected, you can navigate through the file block-by-block by clicking the following navigation buttons:
-
First - Navigates to the first block of the file.
-
Next - Navigates to the next block in the file.
-
Previous - Navigates to the previous block in the file.
-
Last - Navigates to the last block in the file.
Note: The spool file first must be parsed for the results to be seen in the block view.
This view will be refreshed every time a parse operation is completed.
8. Click the Expression Help tab to view a reference of standard regular expression terms and to view some commonly used regular expression strings.
For additional information, see Using the Expression Help Tab.
9. Click the OK button to save the changes and close the dialog box.
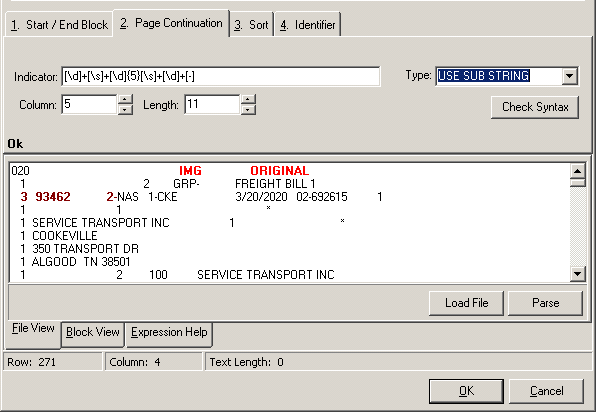
To configure the Page Continuation tab:
1. Click the Page Continuation tab.
2. In the Indicator box, type the expression sequence of characters that will indicate if the page is part of a multi-page invoice (255 character maximum).
All regular expressions will be validated to ensure that they are accurately formed.
3. Click the Check Syntax button to validate the regular expression for syntax errors.
The status of the selected regular expression is displayed in the small text label in the lower left hand corner of the regular expression editor tab control.
4. In the Type list, select the type of continuation marker to be used.
The type determines if the continuation marker text will be static or variable.
Static marker text will use the same sequence of characters recurring on each page.
Variable marker text means that a sub-string within the string returned by the continuation marker’s regular expression will indicate if the page is a continuation of the current document.
The available types are USE WHOLE LINE (static, the default) and USE SUB STRING (variable).
Tip: If the USE WHOLE LINE option is selected, the Column and Length boxes are not available for selection.
They are available only if USE SUB STRING is selected.
5. In the Column box, enter the starting position number (0 - 99) for the sub-string that will be extracted from the expression indicator.
The default is 0.
Note: This box is not available if the USE WHOLE LINE continuation marker type was selected.
6. In the Length box, enter the length (0 - 99) of the sub-string that will be extracted from the line returned by the expression indicator.
The extraction will begin at the position indicated in the column list.
The default is 0.
Note: This box is not available if the USE WHOLE LINE continuation marker type was selected.
7. Click the File View tab to view the results of parsing the entire spool file.
This view provides a “big picture” view of the file parsing process.
On this tab, you can click the Load File button to load a spool file into the box above.
Once the spool file is loaded into the box, you can interactively test the regular expression used to specify the block, continuation, sort, and invoice ID data. In addition, you can click the Parse button to apply the regular expressions from the Start/End Block, Page Continuation, Sort, and Identifier tab expression fields to the lines of text in the box.
The application uses the following color identification:
-
Start/End Block Marker - Red, Bold
-
Continuation Marker Text - Green, Bold
-
Continuation Marker Sub-string data - Yellow, Bold
-
Sort Text - Blue, Bold
-
Invoice ID Text - Maroon, Bold
8. Click the Block View tab to view how the regular expression for the start or end and continuation will cause the file to be subdivided into documents or blocks.
Once the tab has been selected, you can navigate through the file, block by block, by clicking the following navigation buttons:
-
First - Navigates to the first block of the file.
-
Next - Navigates to the next block in the file.
-
Previous - Navigates to the previous block in the file.
-
Last - Navigates to the last block in the file.
Note: The spool file first must be parsed for the results to be seen in the block view.
This view will be refreshed every time a parse operation is completed.
9. Click the Expression Help tab to view a reference of standard regular expression terms and some commonly used regular expression strings.
For additional information, see Using the Expression Help Tab.
10. Click the OK button to save the changes and close the dialog box.
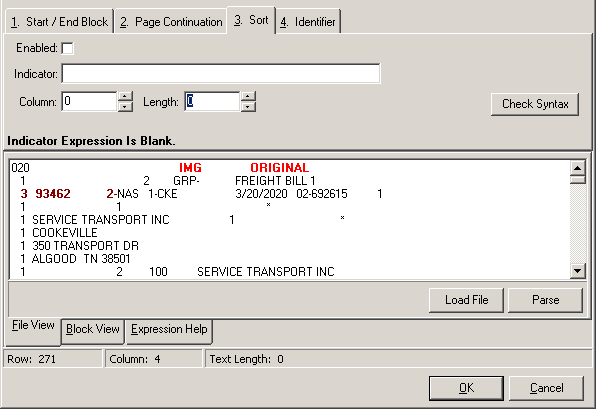
To configure the Sort tab:
1. Click the Sort tab.
2. Select the Enabled check box if the invoices should be sorted before they are processed.
By default, the check box is cleared.
3. In the Indicator box, type the expression sequence (255 character maximum) that will be used to find the line containing the data that will determine the order in which invoices are sorted when Rendition Print Service processes the invoice.
All regular expressions will be validated to ensure that they are accurately formed.
4. Click the Check Syntax button to validate the regular expression for syntax errors.
The status of the selected regular expression is displayed in the small text label in the lower left hand corner of the regular expression editor tab control.
Note: The syntax of regular expressions is checked for errors when a file is parsed.
5. In the Column box, enter the starting position number (0 - 99) for the sub-string that will be extracted from the sort marker’s expression indicator.
The default is 0.
6. In the Length box, enter the length (0 - 99) of the sub-string that will be extracted from the line returned by the expression indicator.
The extraction will begin at the position indicated in the Column box.
The default is 0.
7. Click the File View tab to view the results of parsing the entire spool file.
This view provides a “big picture” view of the file parsing process.
On this tab, you can click the Load File button to load a spool file into the box above.
Once the spool file is loaded into the box, you can interactively test the regular expression used to specify the block, continuation, sort, and invoice ID data.
In addition, you can click the Parse button to apply the regular expressions from the Start/End Block, Page Continuation, Sort, and Identifier tab expression fields to the lines of text in the box.
The application uses the following color identification:
-
Start/End Block Marker - Red, Bold
-
Continuation Marker Text - Green, Bold
-
Continuation Marker Sub-string data - Yellow, Bold
-
Sort Text - Blue, Bold
-
Invoice ID Text - Maroon, Bold
8. Click the Block View tab to view how the regular expression for the start or end and continuation will cause the file to be subdivided into documents or blocks.
Once the tab has been selected, you can navigate through the file, block by block, by clicking the following navigation buttons:
-
First - Navigates to the first block of the file.
-
Next - Navigates to the next block in the file.
-
Previous - Navigates to the previous block in the file.
-
Last - Navigates to the last block in the file.
Note: The spool file first must be parsed for the results to be seen in the block view.
This view will be refreshed every time a parse operation is completed.
9. Click the Expression Help tab to view a reference of standard regular expression terms and some commonly used regular expression strings.
For additional information, see Using the Expression Help Tab.
10. Click the OK button to save the changes and close the dialog box.
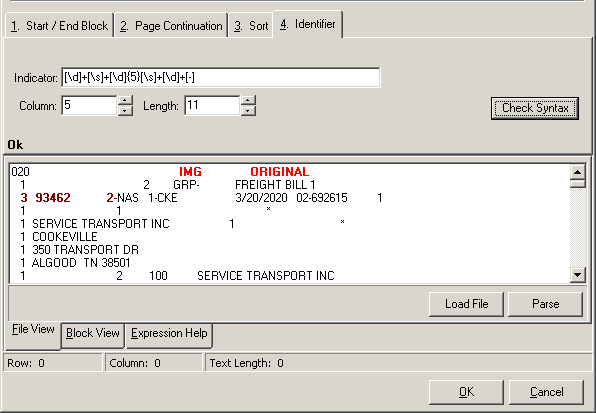
To configure the Identifier tab:
1. Click the Identifier tab.
2. In the Indicator box, type the expression sequence that will be used to locate information that uniquely identifies the invoice (255 character maximum).
All regular expressions will be validated to ensure that they are accurately formed expressions.
3. Click the Check Syntax button to validate the regular expression for syntax errors.
The status of the selected regular expression is displayed in the small text label in the lower left hand corner of the regular expression editor tab control.
Note: The syntax of regular expressions is checked for errors when a file is parsed.
4. In the Column box, enter the starting position number (0 - 99) for the sub-string that will be extracted from the invoice identifier regular expression.
The default is 0.
5. In the Length box, enter the length (0 - 99) of the sub-string that will be extracted from the line returned by the invoice identifier marker’s regular expression.
The extraction will begin at the position indicated in the Column box.
The default is 0.
6. Click the File View tab to view the results of parsing the entire spool file.
This view provides a “big picture” view of the file parsing process.
On this tab, you can click the Load File button to load a spool file into the box above.
Once the spool file is loaded into the box, you can interactively test the regular expression used to specify the block, continuation, sort, and invoice ID data.
In addition, you can click the Parse button to apply the regular expressions from the Start/End Block, Page Continuation, Sort, and Identifier tab expression fields to the lines of text in the box.
The application uses the following color identification:
-
Start/End Block Marker - Red, Bold
-
Continuation Marker Text- Green, Bold
-
Continuation Marker Sub-string data - Yellow, Bold
-
Sort Text- Blue, Bold
-
Invoice Id Text- Maroon, Bold
7. Click the Block View tab to view how the regular expression for the start or end and continuation will cause the file to be subdivided into documents or blocks.
Once the tab has been selected, you can navigate through the file, block by block, by clicking the following navigation buttons:
-
First - Navigates to the first block of the file.
-
Next - Navigates to the next block in the file.
-
Previous - Navigates to the previous block in the file.
-
Last - Navigates to the last block in the file.
Note: The spool file first must be parsed for the results to be seen in the block view.
This view will be refreshed every time a parse operation is completed.
8. Click the Expression Help tab to view a reference of standard regular expression terms and some commonly used regular expression strings.
For additional information, see Using the Expression Help Tab.
9. Click the OK button to save the changes and close the dialog box.
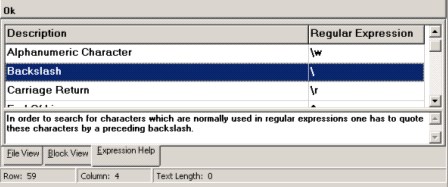
Expression Help Tab
The Expression Help tab contains a quick reference for regular expression syntax. The regular expression syntax and the corresponding description are designed to assist you in understanding the commonly used regular expression building blocks.
To select a regular expression, simply highlight the regular expression and then double-click the selected expression on the grid. The selected element will be added to the selected parsing indicator in the expression view (i.e., the Start/End Block, Continuation, Sort, or Identifier tab).
A detailed explanation of the regular expression string is displayed in the window below the regular expression grid. The expressions are sorted in alphabetical order according to the description.
The expression may contain simple or complex search strings depending on the content of the flat text spool file’s contents.
Allowable characters in a regular expression are any characters, series of characters, meta-characters, or escape sequences that can be interpreted as directives and used by a regular expression parser.
The following are examples of regular expressions:
-
[-az] matches “a”, “z” and “-”
-
[az-] matches “a”, “z” and “-”
-
[a\-z] matches “a”, “z” and “-”
-
[a-z] matches all twenty six lowercase characters from “a” to “z”
-
[\n-\x0D] matches line feed, vertical tab, form feed, or carriage return characters.
-
[\d-t] matches any digit, “-” or a lowercase “t”.
-
[]-a] matches any char from “]” through lowercase “a”.
The following table list the meta-characters that are allowed within a regular expression:
|
\ |
Backslash. In order to search for characters that are normally used in regular expressions, one has to quote these characters by a preceding backslash. |
|
^ |
Circumflex. A circumflex as the first character of the regular expression con- strains matches to the beginning of lines. A circumflex as the first character of a set inverts the set. In any other case, a circumflex is not allowed and has to be quoted by a preceding backslash in order to be searched for. |
|
$ |
Dollar. A dollar sign as the last character of the regular expression con- strains matches to the end of lines. |
|
. |
Period. A period matches any single character. |
|
[] |
Square brackets. A string enclosed in square brackets defines a character set which matches the string at the current position. If the first character of the string is a circumflex, the set is inverted (this means that the regular expression matches any character except for the characters in the set). In order to specify a range of characters, the first and the last characters of the range have to be connected by a hyphen (e.g. [0-9] defines a set of all digits). Note that most of the special characters usually used as expression specifiers (i.e., $ . [ ( ) ? * and +) are treated as normal characters when used in a set definition. The only exceptions are the circumflex, the backslash, the hyphen, and the closing bracket. These characters have to be quoted by a preceding backslash in order to be processed correctly. |
|
? |
Question mark. An expression followed by a question mark matches zero or one occurrence of that expression. |
|
* |
Asterisk. An expression followed by an asterisk matches zero or more occurrences of that expression. |
|
+ |
Plus. An expression followed by a plus sign matches one or more occurrences of that expression. |
|
\xnn |
Special character. ASCII code of an arbitrary character where “nn” is a two digit hexadecimal number representing the ASCII code of this character. |
|
() |
Parentheses. Parentheses can be used to group characters together prior to using the repetition operators * + or ?. Parentheses must not be stacked. |
If XML is selected in the Type list, the XML Formatted Settings tab is activated. This section describes how to configure the XML settings. Rendition Print Service currently supports only one invoice per XML file. This section provides brief explanations of XML, the Extensible Markup Language, and XML Schemas and how they should be defined in the File Structure Properties dialog box of the Rendition Print Server Administrator application.

To configure XML settings:
1. Click the XML Formatted Settings tab.
2. In the XSD Schema Filename box, type the name of an XML schema file that will be used to validate the XML file’s contents, or click the Browse button to search for XML schema files (maximum length is 50 characters).
Schema files have a default extension of “XSD”.
The file must be stored in the respective client’s sub-folder under the “Client Files” system directory.
This is a required field.
3. In the Schema Target Name Space box, type the target namespace to which the XSD schema file belongs (255 character maximum).
The namespace must be part of the “transflo.com” target.
This is typically specified as an attribute of the root element of an XML document when a schema is associated with it.
This is a required field.
Example: xmlns = "http://www.transflo.com/Transflo.xsd" sets the name space attribute in an XML document file.
-
or –
If you do not wish to type or do not know the target namespace, click the Browse button to search the namespaces found within the schema file (entered in the XSD Schema Filename box).
The Select Namespaces dialog box will appear.
For additional information, see Browse Schema.
4. In the XML Node Name Of ID Field box, type the XML node name of the ID field (255 character maximum).
This is the field whose node name identifies the document identifier data.
Note: The XML format for RP Service to read an attribute value must to be in a well formed XML node format where the value is between opening and closing tags.
Example:<Invoice_Number>1234567890</Invoice_Number>
5. In the XML Node Name Of Output File box, type the XML node name for the output file (255 character maximum).
This is the field whose node name defines the file name to be used for the output file.
If it is not specified, then the system default date and time will be used.
6. Click the OK button to save the changes and close the window.
TheSelect Namespace dialog box is used to allow the user to select from a list of namespaces that are present within an XML schema file when working with an XML-formatted spool file.
To access this dialog box, in the File Structure Properties dialog box, select the XML Formatted File check box and then click the Browse button next to the Schema Target Name Space box.
The value of the XSD Schema Filename box is used as the browsing source.
If the filename in the XSD Schema Filename box exists and is a well-formed XML document, then the dialog will appear with a list of namespaces found within the schema file.
The Schema Target Name Space box will be filled in with the selected value from this dialog box if you click the OK button.

To select the target name space for the schema:
1. In the list shown, select the file that contains the namespaces that are present within an XML schema file and is part of “transflo.com” (e.g., http://www.transflo.com/PackingSlipScheme.xsd).
2. Click the OK button to save the highlighted file in the Schema Target Name Space box on the File Structure Properties dialog box.
XML is a very flexible text format that provides a uniform method for describing and exchanging structured data that is independent of applications or vendors. Like HTML, XML is a set of tags and declarations but rather than being concerned with formatting information on a page, XML focuses on providing information about data and specifying the characteristics of that data.
XML documents are made up of storage units called entities, which contain either parsed or un-parsed data. Parsed data is made up of characters, some of which form character data, and some of which form markup. Markup encodes a description of the document's storage layout and logical structure.
XML provides a mechanism to impose constraints on the storage layout and logical structure of a document. In reality, XML need not be a document at all in the traditional sense since XML and XML Schemas can exist as a flow of bytes between applications or as fields in a database record. The appeal of XML lies in the ability to invent tags that convey meaningful information that can be processed by applications and read by users.
The purpose of a schema is to define a class of XML documents. In general, a schema can be viewed as a collection (vocabulary) of type definitions and element declarations whose names belong to a particular namespace called a target namespace. Target namespaces enable us to distinguish between definitions and declarations from different vocabularies. For example, target namespaces would enable us to distinguish between the declaration for “element” in the XML Schema language vocabulary, and a declaration for “element” in a hypothetical chemistry language vocabulary.
The former is part of the http://www.w3.org/2001/XMLSchema target namespace, and the latter is part of another target namespace.
An XML namespace is a collection of names, identified by a URI reference or Uniform Resource Identifiers. A URI is nothing more than a short string that identifies resources on the Web such as files, documents, images, or whatever.
When we want to check that an XML document conforms to one or more schemas (through a process called schema validation), we need to identify which element and attribute declarations and type definitions in the schemas should be used to check which elements and attributes in the XML document. The target namespace is what allows us to carry out this identification process.
XML documents that are processed by Rendition Print Service as spool files must have both an XML schema file and the schema file’s target namespace specified. This ensures that every spool file that is processed is first validated against the schema file and the associated target namespace prior to actually performing any processing on the file.
XML spool files that fail to validate against the specified schema and target namespace that is found in the File Structure will be marked with a status of ERROR and no further processing will take place.
The Schema Target Name Space field should be a valid URI (Uniform Resource Identifier). The Rendition Print Administrator executable File Structure dialog does not validate the contents of the target namespace edit box; only that it is non-blank. A typical target namespace would look like:
http://www.transflo.com/TransfloSchema.xsd
Strictly speaking, this is not the address of a web page -- any attempt to address this through a browser would likely result in an HTTP protocol error -- but simply a unique string that is used to identify the vocabulary associated with a particular schema.
It is customary to use a URI that is controlled by the schema originator. The target namespace for a schema can be found in the schema file itself specified as the targetNamespace attribute of the <schema> tag.
A third attribute that is also found on the File Structure for an XML spool file is the “XML Node Name of ID Field” field. This field, though not required, allows the user to identify an XML document element whose node value contains the ID data for the document. The ID data is stored in the TESInvoice table’s DescriptiveValue field if an XML node name is specified. If the node name value supplied is incorrect or left blank, then no ID data will be retrieved for the document.
The Input File Properties dialog box is used to examine the properties of a selected input file.
This dialog box allows you to change the status of the selected input files. For single input files, it displays information about the file and any error text that was generated during processing. With the exception of the file status, all other fields on this dialog are read-only and cannot be changed.
After making changes and clicking the OK button, the changes are saved to the database.
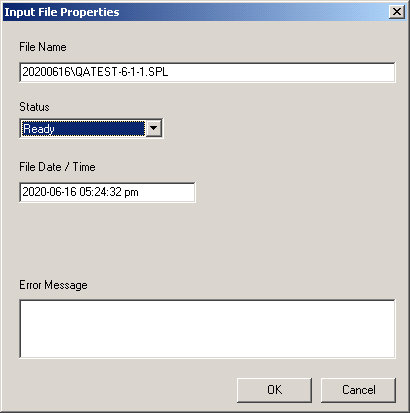
In the Input File Properties dialog box, the File Name, File Date / Time, and Error Message boxes are read-only.
The timestamp in the File Date / Time box indicates the date and time when the file was placed under the client’s sub-folder in the Archive directory.
The Error Message box details the nature of the processing exception that occurred when the input file’s status was set to “Error.”
To configure the Input File Properties dialog box:
-
Right-click one or more Input File objects in the Object View tree pane in the Rendition Print Server Administrator window and then click Properties in the shortcut menu.
-
In the Status list, reset the input file status as necessary. To do this, click the list arrow to expand the list, and then click a status option. The available options are:
-
Ready: The input file was placed in the Archive directory and can be processed.
-
ForcePrint: The input file was set to Redo and the number of days in the Redo interval has passed.
-
Processing: The file is currently in process.
-
Success: The file and all of its invoices or documents processed without error.
-
Error: The file failed to parse properly or an invoice or document in the file failed to process correctly.
-
Redo: Indicates that one or more invoices or documents are in a redo status where processing is pending.
-
-
In the Error Message box, view the error message detailing the nature of the processing exception that occurred when the input file’s status was set to “Error.”
-
Click the OK button to save changes and return to the Rendition Print Server Administrator window.
The Invoice Properties dialog box is used to examine the properties of a selected invoice from an input file.
The value in the Invoice Description box is found in the invoice file and determined by the invoice identifier positional information that was entered in the File Structure Properties dialog box.
The Start Offset of Invoice box contains the number of bytes from the beginning of the file where the invoice or document starts.
The Insert Date / Time box contains the date and time when the invoice record was inserted into the TESInvoice table.
The Last Update Date / Time box contains the date and time when the invoice record in the TESInvoice table was last updated.
Typically, this indicates the last time the status was changed.
The Sort Value box contains the value of the sort data that was found in the file as specified by the sorting positional information entered in the File Structure Properties dialog box.
The Error Message box contains the error message detailing the nature of the processing exception that occurred when the invoice’s status was set to “ERROR”.
To configure the Invoice Properties dialog box:
1. In the Status list, reset the invoice file’s status if necessary.
To do this, click the list arrow to expand the list, and then click the desired status option.
The available options are:
-
Ready - Indicates that the invoice’s input file was placed in the Archive directory and can be processed
-
Cleanup - Indicates that the file and all of its invoices or documents processed without error and can be purged when the Archive Days limit is reached
-
Redo Tells the process to re-process a particular invoice the next time this client has a file come through for processing or the redo interval has expired
-
Force Print - Indicates that the invoice will be processed regardless of whether or not supporting documentation is available for output, as well if the file date-time indicates that it has exceeded the “Days for Force Print” limit
-
Error - Indicates that the invoice failed to parse properly or failed to process correctly
If needed, click the Show Invoice Text button to display the “raw data” associated with the invoice in the Display Of Invoice Text dialog box.
To access this dialog box, right-click an Invoice object in the Object View tree pane in the Rendition Print Server Administrator window, and then click Properties in the shortcut menu.
This dialog box allows you to change the status of an invoice, display the raw data text within the input file that defines the invoice, and display information about the invoice and any error text that was generated during processing.
With the exception of the file status, all other fields in this dialog box are read-only.
After making changes and clicking the OK button, the changes are saved to the database.

2. Click the OK button to save changes to the database and return to the Rendition Print Server Administrator window.
Since the Invoice Process Component (IPC) performs the bulk of the file processing you may need to make changes to the IPC timeout value in the registry and modify the appsettings configuration.
If you are processing high volumes of backup files and the Process Manager is terminating and not processing a spool file, do the following:
1. Edit the ImagePath value in the Windows Registry Key:
HKEY_LOCAL_MACHINE/SYSTEM/CurrentControlSet/services/ TRANSFLORenditionPrint
as follows:
"C:\Program Files (x86)\Pegasus TransTech\Rendition Print Service\Transflo.SvcHost.exe" /processname="C:\Program Files (x86)\Pegasus TransTech\Rendition Print Service\RPService.exe"/processargs="/process //NoIPCTimeout"
2. Navigate to the following folder with Windows Explorer:
C:\Program Files (x86)\Pegasus TransTech\Rendition Print Service
3. Open the Transflo.SvcHost.exe.config file with Windows Notepad.
Add the following entries to the <appSettings>XML tag:
<add key="RecycleLastActivityAgeSeconds" value="1800"/>
<add key="RecycleVirtualMemorySize" value="1000000000"/>
<add key="RecyclePageMemorySize" value="1000000000"/>
<add key="RecyclePrivateMemorySize" value="1000000000"/>
4. If this does not resolve the problem increase these values incrementally until you can process the spool file.
Note: The settings recommended here are for processing 3000 backup documents with a single spool file.
|
Event ID |
Event Level |
Message |
Recovery Notes | |
|---|---|---|---|---|
|
1. |
EVMSG_STARTED (100) |
Info |
The service was started, version= <version info>. |
None |
|
2. |
EVMSG_STOPPED (101) |
Info |
The service was stopped. |
None |
|
3. |
EVMSG_PAUSED (102) |
Info |
The service was paused. |
None |
|
4. |
EVMSG_CONTINUED (103) |
Info |
The service was continued. |
None |
|
5. |
EVMSG_CLEANUP_MANAGER_ERROR (104) |
Error |
An unexpected error has occurred in the CleanupManager, error=<Error Message>. |
Review process log |
|
6. |
EVMSG_INPUT_MANAGER_ERROR (105) |
Error |
An unexpected error has occurred in the InputManager, error=<Error Message>. |
Review process log |
|
7. |
EVMSG_PROCESS_MANAGER_ERROR (106) |
Error |
An unexpected error has occurred in the ProcessManager, error=<Error Message> |
Review process log |
|
8. |
EVMSG_INVOICE_PROCESS_ERROR (107) |
Warning |
An error occurred processing input file id <Input File Id No.>, error=<Warning Mes- sage>. |
Review process log |
|
9. |
EVMSG_SPOOL_FORMAT _ERROR (108) |
Warning |
Spool file id <Input File Id No.> is not correct format, <Warning Message>. |
Review File Structure |
|
10. |
EVMSG_DATABASE_INITI ALIZE_ERROR (109) |
Error |
An unexpected error has initializing the service, error=<Error Message>. |
Review db connect string |
|
11. |
EVMSG_BILLING_EXCEPTION (110) |
Warning |
The billing component raised the exception: <Exception Message> (CustCode=<Customer Code>, SvcCode=<Ser- vice Code>, ItemCount=<Count>, Detail=<Detail>). |
Review billing setup |
|
12. |
EVMSG_BILLING_ERROR (111) |
Warning |
The billing component returned error code <Error Message> (CustCode=<Customer Code>, SvcCode=<Ser- vice Code>, ItemCount=<Count>, Detail=<Detail>). |
Review billing setup |
|
13. |
EVMSG_DOCUMENT_MANAGER_ERROR (112) |
Warning |
An error occurred in the Document Manager while processing Input File ID <Input File Id No.>, error = <Error Message>. |
Review doc mgr. setup |
|
14. |
EVMSG_EMAIL_ERROR (113) |
Warning |
An error occurred sending an email message to server <Server Name> while processing Input File ID <Input File Id No.>, error =<Error Message>. |
Review email call in script |
|
15. |
EVMSG_UNKNOWN_INPUT_FILE_EXTENSION (114) |
Warning |
An input file with an unknown extension (<File Extension>) has been moved to archive path <Archive Error File Path>. |
Verify the extension file is defined in the Admin |
|
16. |
EVMSG_ZERO_BYTE_INP UT_FILE |
Warning |
An input file with Zero Byte (File Name) has been moved to archive path <Archive Error File Path>. |
None |
|
17. |
EVMSG_READ_ONLY_INPUTFILE |
Warning |
An input file with the read only attribute set (<File Name>) has been moved to archive path <Archive Error File Path>. |
None |
Invoice Process Component Table
Examples of invoice process components are listed in the table below.
|
Control Width = 2 New Modifications All Absolute |
Control Width = 2 Incremental and Absolute |
Control Width = 3 New Modifications Incremental and Absolute |
||
|---|---|---|---|---|
|
01 |
001 |
1 |
001 |
001 |
|
02 |
002 |
2 |
1 |
0 |
|
03 |
003 |
3 |
1 |
1 |
|
04 |
004 |
4 |
1 |
1 |
|
05 |
005 |
5 |
1 |
1 |
|
06 |
006 |
6 |
010 |
010 |
|
07 |
007 |
7 |
2 |
1 |
|
08 |
008 |
8 |
3 |
02 |
|
09 |
009 |
9 |
023 |
023 |
|
10 |
010 |
10 |
024 |
024 |
The following items should be taken into consideration when configuring an AS/400 installation for Rendition Print Service.
The AS/400 user account to be used by Rendition Print Service should either be configured so that its password never expires, or the account should be carefully monitored to ensure that the password is not allowed to expire.
An expired password on the Rendition Print Service account can result in multiple spool files falling into error status.
If this happens, the AS/400 multiple select function can be used to reset all of the errored items to ready, rather than resetting them individually.
If running TRANSFLO® Document Manager with Rendition Print Service, the AS/400 “Threadsafe” and “Stateless” options cannot be active simultaneously, or performance issues will result for Rendition Print Service.
Should you need to re-process a spool file, the spool file must be re-processed in the same format as the original spool file.
If the original spool file was processed as part of a ZIP archive that included the associated TIF files, the re-processed spool file must also be in a ZIP file with the required TIFs.
The spool file in this scenario cannot be re-processed by itself.
Failure to follow this method will cause Rendition Print Service to stop running.
Files will be processed in first-in-first-out (FIFO) order.
Therefore, it is very important that if there are files that are sent to Rendition Print Service that depend on each other, the files must be sent to Rendition Print Service in the correct order.
FIFO is based on each client, in the order of each created file structure.
In a multi-client configuration, individual threads are used for each client, which can maintain FIFO only on a per client basis.
Some brands of anti-virus software may view Rendition Print Service as a mass mailing worm and block the application from sending e-mail. You must configure your anti-virus software so that Rendition Print Service is permitted to communicate outside of the computer where it is installed.
For example, in the case of McAfee Anitivirus, the value “RPService.exe” should be added to the Excluded Processes list for the Port Blocking (Prevent Mass Services from Sending Email) setting under the Access Protection settings. (Consult your antivirus software’s documentation if you use another brand of antivirus software.)
If Rendition Print Service is being blocked, your anti-virus software event viewer or log files may not log the cause of the e-mail failure, but the virus protection log should capture the issue.
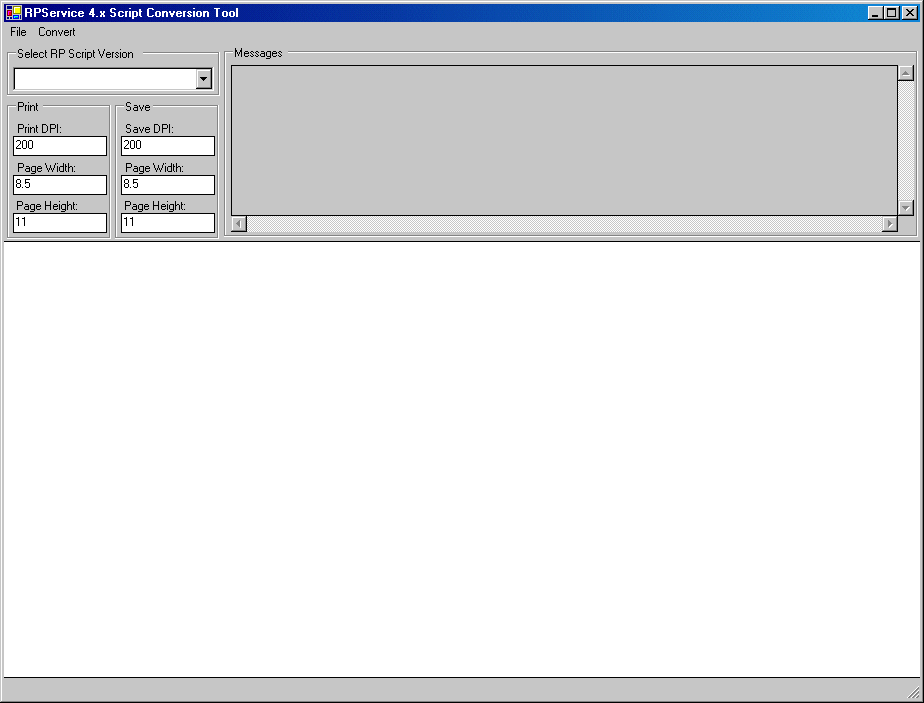
The TRANSFLO® Rendition Print Service Script Conversion Tool provides a streamlined way to convert templates created for Rendition Print version 3.2 or earlier into templates compatible with version 2020. The bulk of the conversion is automated with manual intervention needed only in certain instances. The Script Conversion Tool provides instructions to help you make any corrections that cannot be automated.
To update a template via the Script Conversion Tool:
1. Click the Start button.
In the Start menu, point to Programs, point to TRANSFLO® , and click RP Script Conversion Tool.
The Script Conversion Tool interface appears.
2. On the menu bar, click File.
In the File menu, click Open.
Browse to the template that you wish to convert, click it to select it, and click the Open button.
The text of the original script appears in the view area in the lower portion of the Script Conversion Tool window.
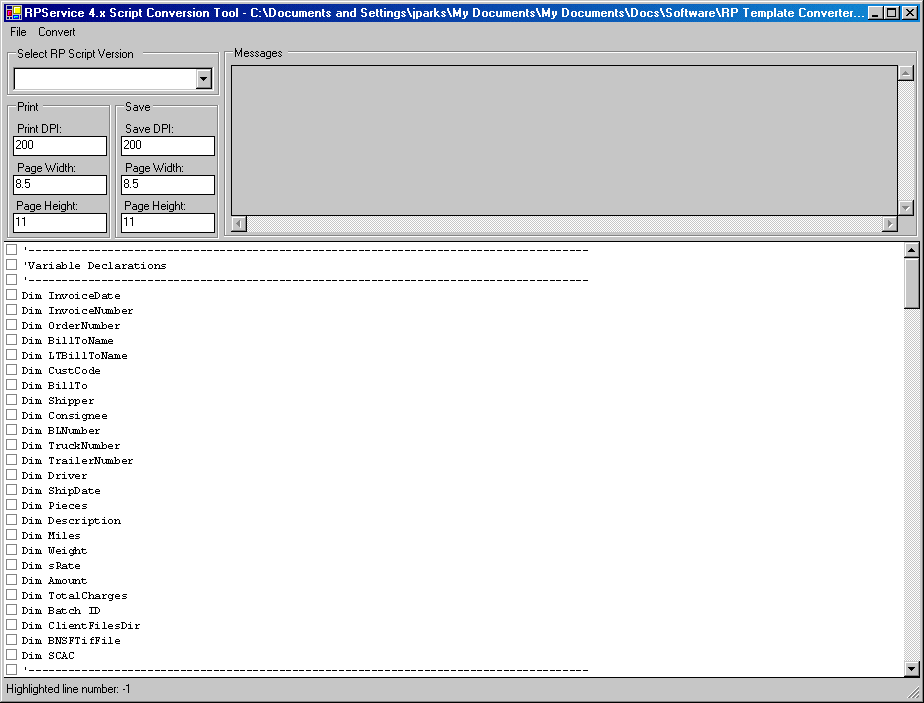
3. In the Select RP Script Version list, select the type of template script you are converting.
If the script is from a Rendition Print version earlier than 3.2, select RP Application (VB).
If the script is from Rendition Print version 3.2 or 3.2.1, select RP Service 3.2/c Compatibility Mode On.
Click the arrow button and then click the appropriate script version in the list.
4. Press [F2] on the keyboard, or on the menu bar, click Convert, and in the Convert menu, click Evaluate.
The Script Conversion Tool quickly evaluates the script and provides a readout in the gray Messages box, indicating all changes that need to be made to the script.
5. Read line-by-line through the Messages box.
You will see that most of the required changes will be automated.
Any manual changes required will also be indicated.
Each converted script will need DPI and page size information for printing and saving.
To expedite entering this information, DPI, width, and height boxes are provided for both print and save settings, and are populated with the most common settings.
If necessary, you can change these settings.
6. To make any further necessary changes to the old script before converting it, press [F1] on the keyboard.
Alternatively, click Convert on the menu bar, and then click Free Form Edit.
This allows you to edit the text of the original script in the display area of the Script Conversion Tool.
7. When you have finished making the required changes, press [F1] again to turn the Free Form Edit option off (or click it again on the menu bar).
8. You are now ready to convert the template script.
To do this, press [F5], or click Convert All in the Convert menu.
9. Read and acknowledge any messages that appear after the conversion, and ensure that there are no further manual changes that are required on your part.
Once you have successfully converted a template script, it can be used with Rendition Print version 2019 or later.
In order for TRANSFLO® client applications to communicate with TRANSFLO® Server, the TRANSFLO® Client Configuration application must be properly configured. If you are experiencing connection problems with TRANSFLO® Server, verify the settings in this application.
To access the TRANSFLO® Client Configuration application and verify settings:
1. Click the Windows Start button, point to Programs, point to TRANSFLO® , and click Client Configuration.
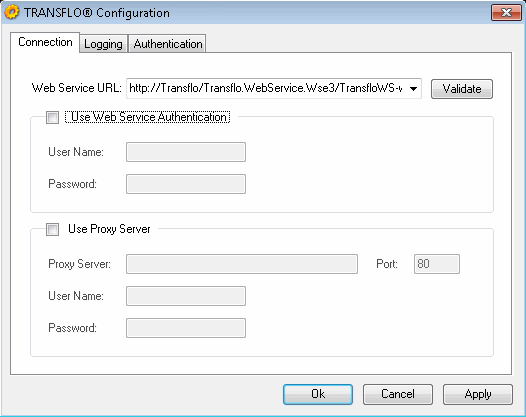
2. The TRANSFLO® Client Configuration window appears.
To configure or verify settings:
-
In the Web Service URL box, type the address of the TRANSFLO® Web Service being used for communications with TRANSFLO® Server.
The default address is shown in the above screen capture.
Click Validate to ensure that the connection is active.
-
If your TRANSFLO® Server installation requires authentication, select the Authenticated Access check box and type the appropriate user name and password in the boxes provided.
-
If the local computer connects to the Internet via a proxy server, select the Use Proxy Server check box and type the proxy server address, connection port number, user name, and password in the boxes provided.
When you have finished entering or verifying connection information, click Apply, and then click the Logging tab.
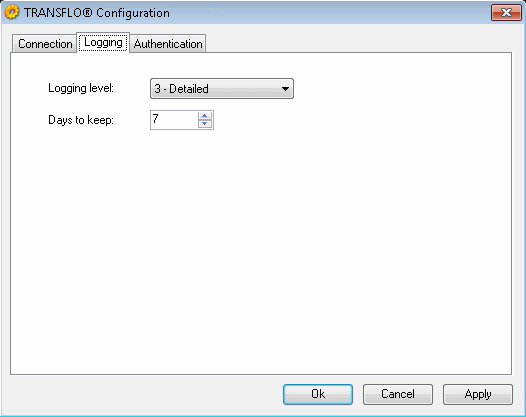
3. On the Logging tab of the TRANSFLO® Client Configuration window, enter or verify the logging settings that should be used for TRANSFLO® applications.
To enter or verify logging settings:
-
Expand the Logging Level list and click the desired level of complexity for logged events.
-
In the Days to keep box, enter the number of days that events should remain in the log before being erased.
When you have finished configuring the logging settings for your TRANSFLO® client applications, click Apply to save your changes.
When you have finished entering your logging settings, click Apply, and then click the Authentication tab.
4. If you would like to use TRANSFLO® authentication, on the Authentication tab of the TRANSFLO® Client Configuration window check the Store TRANSFLO® Authentication Information check box and enter a User Name and Password in the corresponding boxes.

When you have finished configuring your TRANSFLO® Client Configuration, click OK.
For trouble shooting purposes you can temporarily override the Log Level from the file system.
To override the log level:
1. Navigate to the TRANSFLO® Client log folder.
This is typically is C:\Program Files\Common Files\Pegasus TransTech\Transflo Client\Logs\Transflo.ClientConfig
2. Create a text file in the log folder and rename it to Log.Config.
3. Open the file with a text editor and add the following line to the file:
<Config LogLevel="[Level]" />
where,
[Level] is an integer between 0 and 4 indicating the log level.
The available log levels are:
-
0: No Logging
-
1: Errors Only
-
2: Errors and Warnings
-
3: Detailed
-
4: Trace
Example: For the log level to be set to Trace the entry in the Log.Config file will be:
<Config LogLevel="4" />
4. Save and close the Log.Config file.
The log level has changed.
5. To disable this feature and revert to the configured log level, rename the Log.Configfile to Log.Config.Old.