Set Up and Back Up the Rendition Print Database
After completing the installation process, the TRANSFLO® Rendition Print database must be set up. Follow the steps below to set up a SQL Server database for Microsoft SQL Server or MSDE.
The TRANSFLO® Rendition Print installation process automatically creates a SQL Server database called RPSVC. No further steps are required in order to use this database.
However, if you want to create a database with a different name for use with Rendition Print Service, follow the instructions below:
1. From the Database Server, run SQL Enterprise.
2. Create a new database for Rendition Print Service.
3. Click the Start button, point to Settings, and click Control Panel.
4. In the Control Panel window, double-click Administrative Tools.
5. In the Administrative Tools window, double-click Data Sources (ODBC).
The ODBC Data Source Administrator window displays.
Note: If you are running Rendition Print Service on a Windows 2008 x64 machine use the ODBC Configuration link found in the Start > Programs > TRANSFLO® group.
6. Click the System DSN tab, and on that tab click the Add button.
The Create New Data Source dialog box appears.
7. In the driver table, scroll down until you find SQL Server in the Name column.
Click SQL Server to select it, and then click Finish.
8. The Create a new Data Source to SQL Server dialog box is displayed.
9. In the Name box, type a name for the Rendition Print Service data source.
10. In the Which SQL Server do you want to connect to? list box, select the name of the server hosting the Rendition Print Server database.
Click Next.
11. Select the With SQL Server authentication using a login ID and password entered by the user option.
12. Type the login ID and password in the Login ID and Password boxes, respectively.
Click Next.
13. Select the Change the default database to check box, select the name of the Rendition Print Server database that you wish to use.
Click Next.
14. On the next page, accept the defaults and click the Finish button to complete the process of creating a new data source.
15. In the ODBC Microsoft SQL Server Setup window, click the Test Data Source button to test the connection.
16. The results of the test are displayed in the SQL Server ODBC Data Source Test window.
If the tests completed successfully, then your SQL Server database is set up correctly.
17. In the SQL Server ODBC Data Source Test window, click the OK button to close the dialog box.
The Database Connection Properties dialog box is used to identify the location and connection options needed to connect to the Rendition Print Service database.
This dialog box can be accessed from either the Rendition Print Service application or the Windows Start menu.
To configure the database connection, you must enter the connection string in the Database Connection Properties dialog box.
1. To open the Database Connection Properties dialog box, do one of the following:
-
In the Rendition Print Service application, click the Database Connection Configuration option in the File menu.
- or -
-
Click the Windows Start button, point to Programs, point to TRANSFLO® , and click Rendition Print Service Administrator.
If an error dialog box appears, click the OK button to display the Database Connection Properties dialog box.
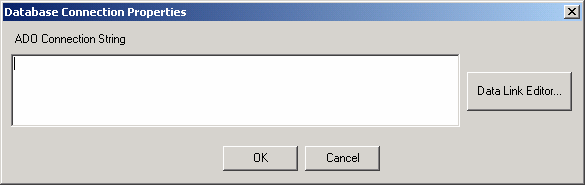
2. Enter the connection string either by typing or pasting it in the ADO Connection String box.

You can insert a database connection string created in a different application into the ADO Connection String edit box in the Database Connection Properties window. Use the standard keyboard paste command, CTRL + V.
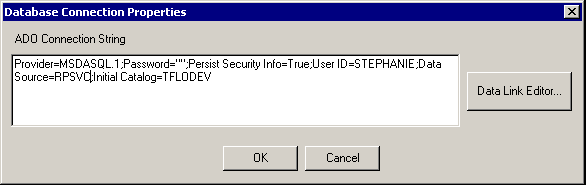
The data string should be in the following format:
Provider=<OLE_DB_PROVIDER>;Password=<PASSWORD>;Persist Security Info=<TRUE/FALSE>;User ID=<USERNAME>;Data Source=<ODBC_DATA_SOURCE>;Initial Catalog=<INITIAL_CATALOG>
This string will allow the Rendition Print Admin and Rendition Print Service executables to connect to the Rendition Print Service database.
There is no limitation on the length of the connection string.
– or –
Click the Data Link Editor button to build a connection string interactively by opening the Data Link Properties dialog box.
3. Click the OK button, to save the database connect string information entered and close the dialog box.
The database connect string is saved in the following system registry key:
Root: KEY_LOCAL_MACHINE
Path: HKEY_LOCAL_MACHINE\SOFTWARE\Pegasus TransTech\TRANSFLO® \4.2\ Rendition Print Service
Key Name: DatabaseConnectString
Type: String (REG_52)
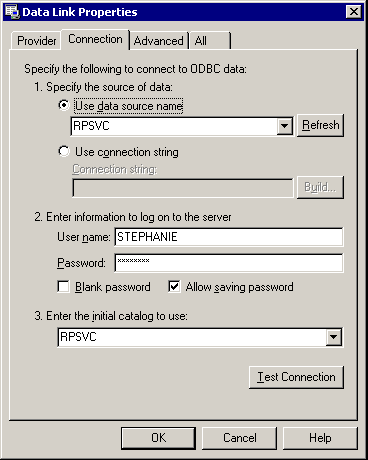
The Data Link Properties dialog box is used to interactively build an ADO connection string. This dialog box is accessed by clicking the Data Link Editor button in the Database Connection Properties dialog box.
Although there are four tabs on the dialog’s page control, only the first two tabs, Provider and Connection, are required in order to complete the task of defining the connection string.
The Provider tab is used to select which provider or database connection library to actually communicate with the DBMS in question.
The Connection tab is used to select the data source and server name; to determine whether or not to use integrated Windows security or connect as a specific database user; and to determine which database on the server to utilize.
You can click the Test Connection button to ensure that the connection string works.
Once you click the OK button, the connection string will be returned to the ADO Connection String box on the Database Connection Properties dialog box.
Perform the following steps to configure the data link properties:
1. On the Provider tab in the Microsoft OLE DB Provider(s) list, click Microsoft OLE DB Provider for ODBC Drivers.
2. Click the Connection tab or click the Next button to proceed to the Connection tab.
3. On the Connection tab, select the Use data source name option, and then either type the server name or click the corresponding list arrow and click the name of the desired server.
4. In the User name box, type the SQL User ID that was created in the Create a New Data Source window during the installation process.
5. In the Password box, type the corresponding password for the user ID that you entered in the previous step.
If no password is required, leave this box empty and select the Blank password check box.
You must enter a Username and Password on the Data Link Properties – Connection tab, if you select the Windows security option.
6. Select the Allow saving password check box, if you wish to allow the system to save the password.
7. In the Enter the initial catalog to use list, either type the name of the catalog to use, or click the list arrow and click the name of the desired catalog in the list.
This is the same data source name that was assigned to the data source in the Name box on the Create a New Data Source to SQL Server dialog box.
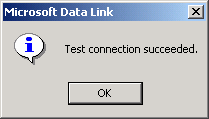
8. Click the Test Connection button to ensure that the connection string is valid.
If the connection string is valid, a confirmation message box will be displayed.
Click the OK button on the message box to return to the Connection tab.
9. Click the OK button to save the changes and return the connection string to the ADO Connection String box on the Database Connection Properties dialog box.
10. Click the OK button to save the changes and automatically open the Rendition Print Server Administrator window.
You should back up the Microsoft SQL Server or MSDE database on a daily basis. Consult your database software documentation for instructions.
You should back up your Rendition Print Service database and critical files on a regular basis.
The application server also hosts the TRANSFLO® Rendition Print Service application, which contains several folders on the server that should be backed up on a daily basis. The backup should include the following folders:
-
Application installation folder (e.g., C:\Program Files\Pegasus TransTech\TRANSFLO® Rendition Print Service)
-
Logs folder and all sub-folders (actual folder is configurable)
-
Client Files folder and all sub-folders (actual folder is configurable)
-
Input File Archive folder and all sub-folders (actual folder is configurable)
To back up files, simply copy them to a safe location.
You should also back up the Windows registry settings for Rendition Print Service.
To do this, export the following registry sub-key to a REG file for safe keeping.
HKEY_LOCAL_MACHINE\SOFTWARE\Pegasus TransTech\TRANSFLO® \4.2\ Rendition Print Service
HKEY_LOCAL_MACHINE\SOFTWARE\Pegasus TransTech\TRANSFLO® \4.2\ Document Manager SDK
To access your Microsoft Windows registry and export settings, see the documentation for your edition of Microsoft Windows.
If you ever need to shut down the SQL server, follow these steps:
-
Stop Rendition Print Service first and then shut down the SQL server.
-
Restart Rendition Print Service after the SQL Server is up.
In the event that there is a connection failure between Rendition Print Service and TRANSFLO® Server, the following error message will appear in the event log:
[DBNETLIB][ConnectionWrite(Send()).General network error.
Check your network connection.
After the connection issue is corrected, TRANSFLO® Administrator Tool must be stopped and restarted, or you must select the database connection again from the Rendition Print Service Administrator File menu, before you can initialize the connection again.
If you receive an error string, follow the steps in the following table to resolve the issue:
|
Event Viewer Message |
Action |
|---|---|
|
ERROR: in Template Control Object, ERROR: running script: C:\Transflo\Data\RP Server\PK\ Packing Slip.tpl line=290, column=4, error=Violation of UNIQUE KEY constraint 'IX_UniquePackingSlip'. Cannot insert duplicate key in object 'PackingSlip'. |
Nothing; this message signals that the Packing Slip Spool file from the ERP is a duplicate. The packing slip is already available in the eShip system. |
|
Error Running Script: Packing Slip_tpl.txt Line= 296, Column= 12, Error= Database entry for Packing Slip 990000001 will be rolled back. |
The Packing Slip Spool File from ERP has an invalid location name. The location needs to be added from eShip and the Packing Slip spool file needs to be re-processed. |
|
ERROR: The element: {http://www.transflo.com/.PackingSlipSchema.xsd}OrderDate' has an invalid value according to its data type. Error parsing, Error (C00CE184) At Line: 28, Col: 25. The value of '2002/10/31' is invalid according to its data type. |
The OrderDate field in the Packing Slip Spool File from ERP is not in the correct format. The ERP data value needs to be corrected. |
|
Error Running Script: Packing Slip_tpl.txt Line= 327, Column= 4, Error= Application uses a value of the wrong type for the current operation |
There is a in the Packing Slip Spool File from ERP is too long. The ERP data value needs to be corrected. |
Manually reset the invoice status to “Ready” and then reset the input file status to “Ready,” or select the menu item that resets both the invoice and input file to “Ready” at the same time.
Set the invoices with errors to “Cleanup” and the spool file status of each to “Success.”
With the status changed, the scheduled eShip records cleanup process will take effect automatically, or the DBA can run a delete on the selected files and invoices on the database.
If the Rendition Print Service is shutting down or failing, follow these steps:
In the Event Log, check for the following error: “An error occurred processing input file id 4405, error=ERROR: 3 Invoices Encountered Errors While Processing. Last Error Message: Error Running Script QaTest_tpl.txt At Line = 510, Column = 6. Error: waOpen failed in FindSpylink”.
In most instances, the reason that this occurs is because there are multiple clients enabled and Document Manager is not in “Thread Safe Mode.”