Transflo DMS Workflow Studio Templates
The use of Workflow Templates is a powerful way to reuse processes and modify them for your specific needs. TRANSFLO® Workflow Studio includes three (3) Process Templates:
-
PTC Billing Test-Process: The PTC Billing Test-Process is a main Process Template for a Billing Department in a Trucking Firm.
-
DOCLIST: The DOCLIST template is a Sub-Process for the PTC Billing Test– Process Template.
This template calls a web service that retrieves a List of expected Document Types and the number of expected Documents for each Document Type from your imaging repository.
-
MDP: The MDP (Missing Document Processor) Template is a Sub-Process for the PTC Billing Test–Process Template.
The MDP Sub-Process Template is used to identify Missing Documents and wait for the Missing Documents to enter your imaging repository.
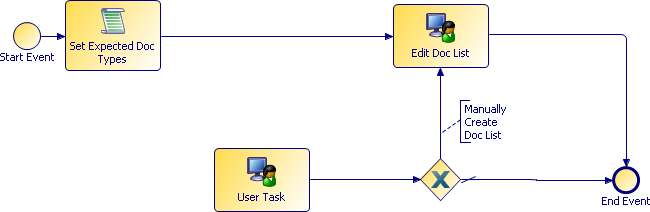
The PTC Billing Test Process template is shown in the diagram below.
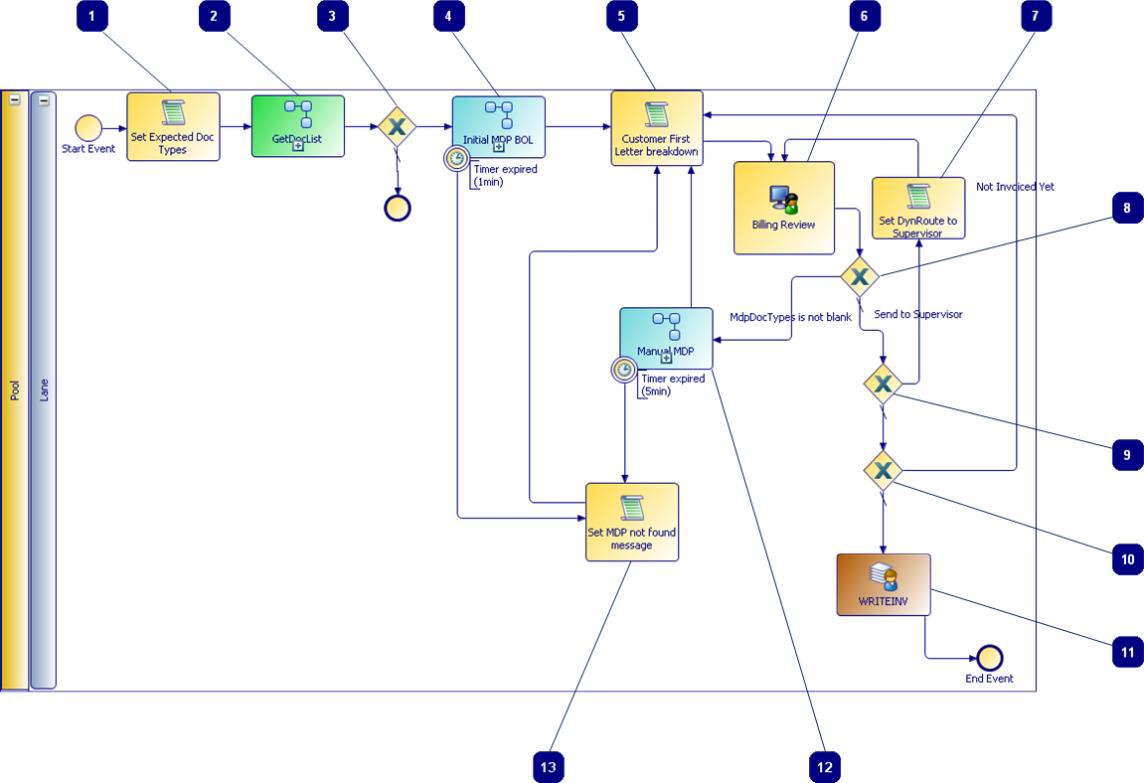
The following sections describe the tasks and gateways in the PTC billing test process:
![]() Set Expected Doc Types Script Task:The Set Expected Doc Types Task contains a simple JavaScript script that initializes the MdpDocTypes data field to a list of expected Document Types and the expected number of Documents for each of the Document Types.
Set Expected Doc Types Script Task:The Set Expected Doc Types Task contains a simple JavaScript script that initializes the MdpDocTypes data field to a list of expected Document Types and the expected number of Documents for each of the Document Types.
![]() GetDocList Independent Sub-Process:The GetDocList Independent Sub-Process Task references the DOCLIST Sub- Process. The DOCLIST Sub-Process uses the main Process’ Key fields to retrieve a list of Document Types and the expected number of Documents for each of the expected Document Types.
GetDocList Independent Sub-Process:The GetDocList Independent Sub-Process Task references the DOCLIST Sub- Process. The DOCLIST Sub-Process uses the main Process’ Key fields to retrieve a list of Document Types and the expected number of Documents for each of the expected Document Types.
![]() Is Invoiced? XOR Data Gateway: The Is Invoiced? Exclusive Data-Based Gateway is used to determine if an invoice has already been issued for the Case. If so, it will terminate the process.
Is Invoiced? XOR Data Gateway: The Is Invoiced? Exclusive Data-Based Gateway is used to determine if an invoice has already been issued for the Case. If so, it will terminate the process.
![]() Initial MDP BOL Independent Sub-Process: The Initial MDP BOL Independent Sub-Process Task references the MDP Sub- Process. The MDP Sub-Process checks to see if all the required Documents are in the Document Imaging System. If the Documents are not found it waits until the Documents enter the Imaging System or until the timer expires. If the timer expires, the Case goes to the Set MDP not found message.
Initial MDP BOL Independent Sub-Process: The Initial MDP BOL Independent Sub-Process Task references the MDP Sub- Process. The MDP Sub-Process checks to see if all the required Documents are in the Document Imaging System. If the Documents are not found it waits until the Documents enter the Imaging System or until the timer expires. If the timer expires, the Case goes to the Set MDP not found message.
![]() Customer First Letter Breakdown Script Task: The Customer First Letter Breakdown Script Task reads the first letter of the Customer Name and uses it to set the DynRoute Performer Data Field. The DynRoute Field will be used to route the case to the Biller responsible for the Customer.
Customer First Letter Breakdown Script Task: The Customer First Letter Breakdown Script Task reads the first letter of the Customer Name and uses it to set the DynRoute Performer Data Field. The DynRoute Field will be used to route the case to the Biller responsible for the Customer.
 Billing Review User Task: The Billing Review User Task is used by the Biller to review Documents associated with the Case. The Biller can determine if the Case is ready to be invoiced, if there still are missing Documents, or if the Case must be reviewed by a Supervisor. The Biller does this with the Billing Review Sample Form.
 Set DynRoute to Supervisor Script Task: DynRoute is a Data Field of type Performer and is used in the place of a Participant.
It is used to dynamically route a case to a Participant’s Queue.
If the Biller chose to send the Case to the Billing Supervisor, the Set DynRoute to Supervisor Script Task changes the DynRoute Data Field so that the Case goes to the Billing Supervisor’s Queue.
 MdpDocTypes is not Blank XOR Data Gateway:
The MdpDocTypes is not Blank Exclusive Data-Based Gateway is used to send the Case to the Manual MDP Sub-Process if the Biller indicated that there are Documents missing.
 Send to Supervisor XOR Data Gateway:
The Send to Supervisor Exclusive Data-Based Gateway is used to route the Case to the Billing Supervisor’s Queue if the Biller chose to do so.
 Not Invoiced Yet XOR Data Gateway:
If the Biller indicated that the Case was not ready to be invoiced, the Not Invoiced Yet Exclusive Data-Based Gateway will route the Case to the Customer First Letter Breakdown Task.
Otherwise, the Case will be routed to the Write Invoice Scripting Independent Sub-Process.
 WRITEINV Human Task: The WRITEINV Human Task represents the Billing activity that is done with Third Party Billing software.
 Manual MDP Independent Sub-Process:
The ManualMDP Scripting Independent Sub-Process reuses the MDP Sub- Process but in this case the input comes from data input in the Billing Review Task if a Biller noticed Documents were missing and sent them to MDP.
 Set MDP not found message Scripting Task: The SetMDPnotfoundmessage Scripting Task creates an error message with the list of messages that were not found in the MDP Sub-Process.
The DOCLIST Sub-Process template is shown in the diagram below.
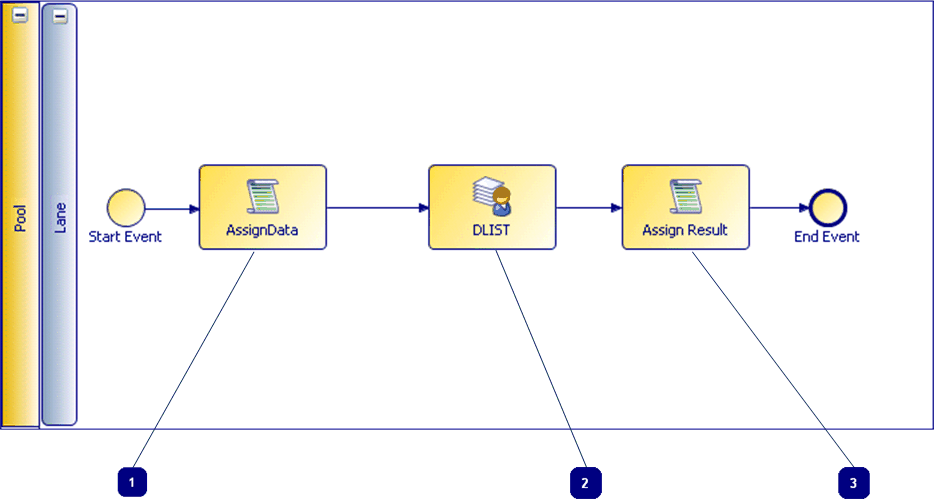
![]() Assign Data Script Task: The Assign Data Script Task sets parameters to local values.
Assign Data Script Task: The Assign Data Script Task sets parameters to local values.
![]() DLIST Manual Task: The DLIST Manual Task uses a Web Service to authenticate to the TIBCO Server and the Document Repository.
DLIST Manual Task: The DLIST Manual Task uses a Web Service to authenticate to the TIBCO Server and the Document Repository.
![]() Assign Result Script Task: The Document Type Count (DList) Service Task creates a delimited string of Document Types and the Number of Documents for each Document Type required for the Case.
Assign Result Script Task: The Document Type Count (DList) Service Task creates a delimited string of Document Types and the Number of Documents for each Document Type required for the Case.
The MDP Sub-Process template is shown in the diagram below.
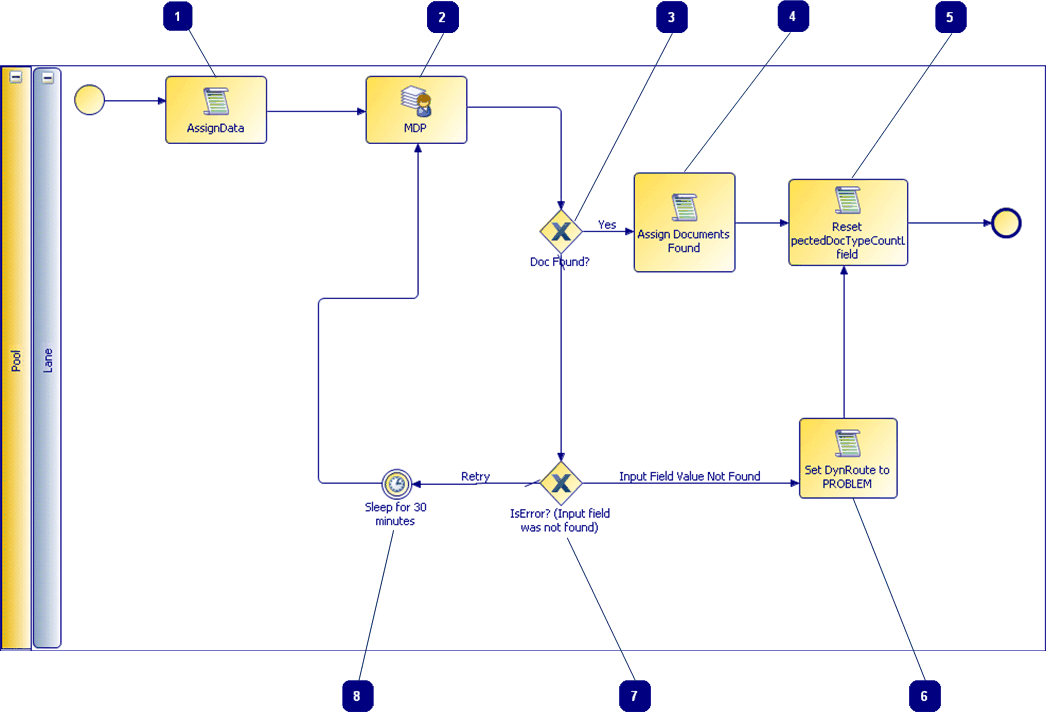
![]() Assign Data Script Task: The Assign Data Script Task sets values required for authentication.
Assign Data Script Task: The Assign Data Script Task sets values required for authentication.
![]() MDP ManualTask: The MDP Manual Task uses a Web Service to authenticate to the TIBCO Server and the Document Repository.
MDP ManualTask: The MDP Manual Task uses a Web Service to authenticate to the TIBCO Server and the Document Repository.
![]() DocFound? XOR Data Gateway: The DocFound? Exclusive Data-Based Gateway sets in motion activities that will eventually move the Case to the Parent Process if the Documents are all found.
DocFound? XOR Data Gateway: The DocFound? Exclusive Data-Based Gateway sets in motion activities that will eventually move the Case to the Parent Process if the Documents are all found.
Otherwise, the case is kept in this Sub-Process to wait for the missing Documents.
![]() Assign Documents Found Script Task: The Assign Documents Found Script Task sets the MDPMessage output parameter to “Documents found.”
Assign Documents Found Script Task: The Assign Documents Found Script Task sets the MDPMessage output parameter to “Documents found.”
![]() Reset Expected Doc Type Count List Field Script Task: The Reset Expected Doc Type Count List Field Script Task is used to clear the ExpectedDocTypeCountList output parameter that holds the delimited string of Document Types and the Number of Documents for each Document Type required for the Case.
Reset Expected Doc Type Count List Field Script Task: The Reset Expected Doc Type Count List Field Script Task is used to clear the ExpectedDocTypeCountList output parameter that holds the delimited string of Document Types and the Number of Documents for each Document Type required for the Case.
Set DynRoute to PROBLEM Script Task: If the error condition: an Input Field value is not found, the Set Dyn Route to PROBLEM Script Task sets the DynRoute performer Data Field to “PROBLEM” and exits the Sub-Process. The case is then sent to the PROBLEM queue to be resolved by a System Administrator. This error condition is usually the result of one of the services being down.
IsError? (Input field value was not found) XOR Data Gateway: If the Input field value was not found the Is Error? (Input field value was not found) Exclusive Data-Based Gateway route the case to the Set Dyn Route to PROBLEM Script Task. Otherwise, it sends the case to retry the missing Document search.
Sleep for 30 minutes Timer Intermediate Event: The Sleep for 30 minutes Timer Intermediate Event causes the Case to pause 60 seconds before it sends the case to the Check if document found Service Task to retry the search for missing Documents.
The Billing Review Form template is used by the Billing Review User Task in the PTC Billing Test Process template. It is bound to TRANSFLO® Workflow Client Document List and Document Viewer controls where images and image data can be viewed and edited.

![]() Keep Button:The Keep button closes the form and saves the data changes made on the form. The case remains in your queue.
Keep Button:The Keep button closes the form and saves the data changes made on the form. The case remains in your queue.
![]() Supervisor Button: The Supervisor button saves the data entered on the form and sends the case to the billing supervisor queue. This is done with a custom script triggered by the OnButtonClick event.
Supervisor Button: The Supervisor button saves the data entered on the form and sends the case to the billing supervisor queue. This is done with a custom script triggered by the OnButtonClick event.
![]() MDP Button: The MDP button is used to send the case to the missing document processor if the biller notices documents are missing. A custom pop-up form opens where the biller can select the document types and the number of documents of each type that are missing.
MDP Button: The MDP button is used to send the case to the missing document processor if the biller notices documents are missing. A custom pop-up form opens where the biller can select the document types and the number of documents of each type that are missing.
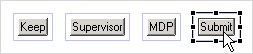
![]() Submit Button: The Submit button is used to send cases without errors to the WRITEINV manual step.
Submit Button: The Submit button is used to send cases without errors to the WRITEINV manual step.
![]() Validation Pane: The Validation Pane shows any validation errors that have been encountered with the case.
Validation Pane: The Validation Pane shows any validation errors that have been encountered with the case.
Read Only Fields: The read only fields represent the following Case Key Fields:
-
Doc Class
-
Bill To Name
-
Order Number
Data Entry Fields: The data entry fields can be changed by your users. The example data entry fields are:
-
MDP Doc List
-
DocList
-
Routing
-
Message
-
Invoiced
-
Pass-through (This field is not set as visible)
If your fields contain the ampersand (&) character, modify the pass-through field value rule by replacing
p.KeyFields.replace(',','&')
with
escape(p.KeyFields).replace('%2C','&')
Your TRANSFLO® Workflow Studio installation includes the templates described above. If you select the default installation folder during TRANSFLO® Workflow Studio installation, the templates are copied to the following directory:
C:\Program Files\Pegasus TransTech\Workflow Studio\Workflow Studio Templates.zip
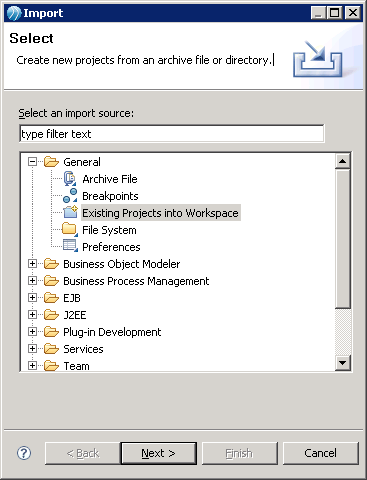
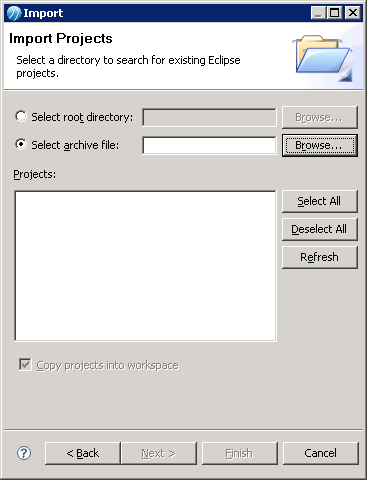
To import the templates, perform the following steps:
-
On the Workflow StudioFile menu, select Import...
The Import wizard opens.
-
In the Select an Import Source tree, expand the General node, and click Existing Projects into Workspace. Click Next.

-
In the Import Project window click the Select archive file radio button, and click Browse.

-
Open the C:\Program Files\Pegasus TransTech\Workflow Studio\WorkflowStudioTemplates.zip file, and click Finish.
If you are using a 64-bit edition of Windows, the Workflow Studio Templates are located in the C:\Program Files (x86) folder.
-
The Workflow Studio Templates project appears in the Project Explorer after Workflow Studio completes the import process.
To import projects from previous versions of Workflow Studio, use the same procedure described above for importing Workflow Studio templates. You will get errors in the Problems tab; however, you will be able to fix most errors by right-clicking on the errors and selecting Quick Fix from the menu.
Any participants from previous versions of Workflow Studio of type “System” must be changed to “ROLE” in the current version of Workflow Studio.
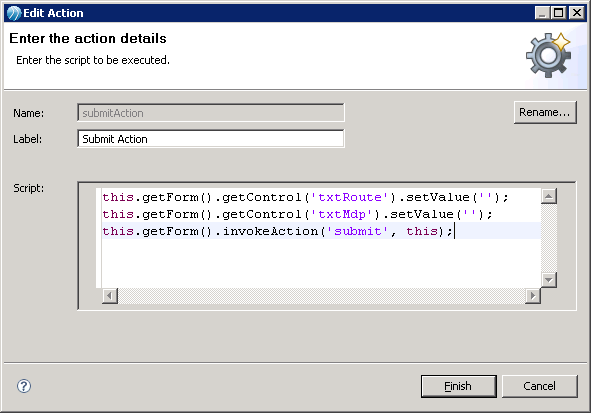
If the Submit button on your Form does not save values and/or fails to move the case to the next step do the following:
-
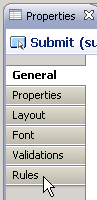
Open the form in Business Studio and click the Submit button to select it.
-
In the Properties view, click the Rules tab.
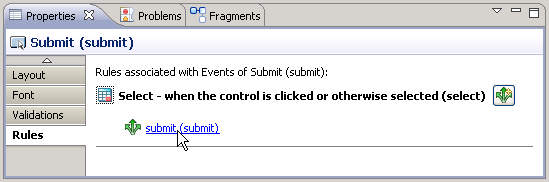
-
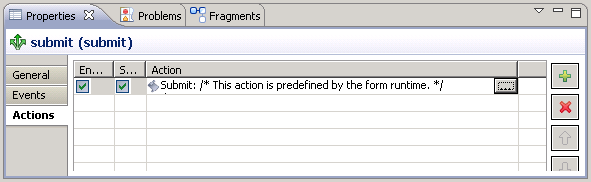
Click the submit (submit) link to open the rule for the Submit button.
-
Click the Actions tab, select the Submit action entry row, and click the Browse... button.
The Edit Action window opens.
-
In the Script field, enter the following script:
this.getForm().getControl('txtRoute').setValue('');
this.getForm().getControl('txtMdp').setValue('');
this.getForm().invokeAction('submit', this);
If Transflo Workflow is being upgraded from an existing Workflow version, and the previous existing plan is imported, the 4.6 installer will not upgrade the existing plan in the Workflow Studio with the new script for the pass-through field. This will need to be done manually. The value below needs to replace the current value of the Pass-through <Control> Pass-through (docViewer) entry in Workflow Studio. Go to the form and edit the Value field script property as follows:
'<iframe src="DocViewerFrame.htm?' +
escape(p.KeyFields).replace('%2C','&') + '&Profile=QATEST"
id="frameDocViewer" name="frameDocViewer" width="100%"
height="100%" frameborder="0" scrolling="no" STYLE="width:100%; height: 100%;">
</iframe>'; - Click the Finish button.
The MDP sub-process can be used by any process that requires an automated way of determining if required documents are missing from your document image repository and halting the process until the documents arrive in the repository. The DOCLIST sub-process is used to create a list of required document types and the number of each document that is required for a case. This list is used by MDP to determine if any documents are missing.
To insert one of these sub-processes in your process:
-
Create a new Workflow BPM/SOA developer project.
-
Create a new process and model it by adding tasks, sequence flows, gateways, fields, and participants.

-
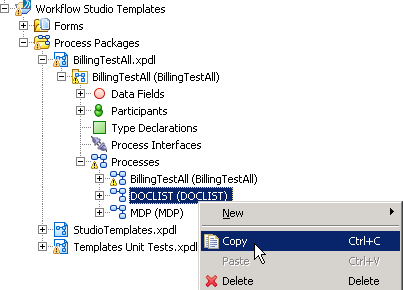
In Project Explorer,
-
Expand the Workflow Studio Templates project.
-
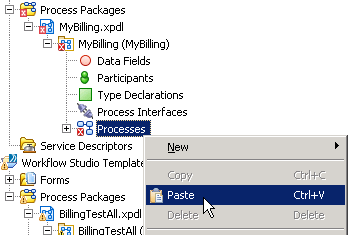
Right-click the sub-process template you want to use and choose Copy in the shortcut menu.

Note: The Billing Test All Process and the Billing Review Form are just two (2) examples of how you might use Workflow Studio.
-
-
Right-click in your project and click Paste to copy the template to your project.

-
(Optional) You can rename your Processes or Form.
-
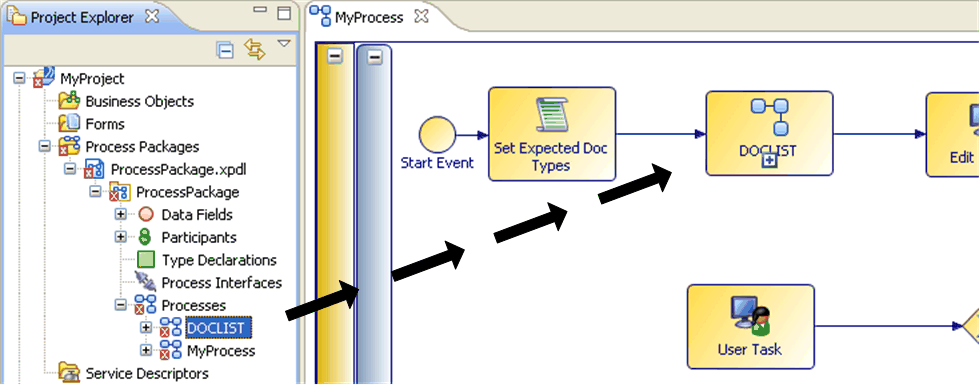
Drag the Process you copied from the Project Explorer to the new Process map.

-
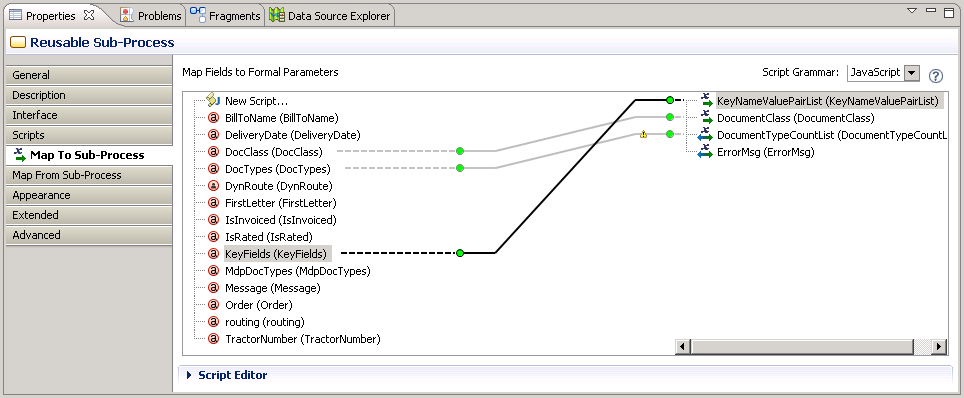
Click the Properties tab and click the Map To Sub-Process menu button. The Map To Sub-Process function is used to define the Data Fields that you wish to pass to the Formal Parameters. Your Fields are listed on the left and your Formal Parameters are listed on the right. Map your Fields to your Formal Parameters by dragging your Fields to the appropriate Formal Parameters.

-
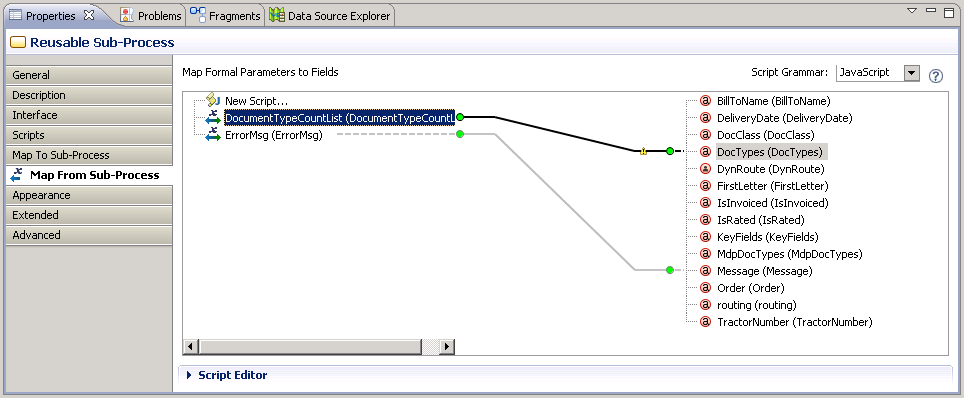
Click the Map From Sub-Process menu button. The Map From Sub-Process function is used to define the Formal Parameters you wish to pass to your fields.
-
Map your Formal Parameters to your Fields by dragging your Formal Parameters to the appropriate Fields.

Caution:Do not modify the original templates. Always make a copy of the template(s) you wish to use and modify the copy only.