Install Transflo DMS Workflow Studio and Workspace
TRANSFLO® Workflow processes are created and designed using the graphical interface of the TRANSFLO® Workflow Studio product. Custom code can also be inserted into your process with TRANSFLO® Workflow Studio.
To install TRANSFLO® Workflow Studio, follow these steps:
-
Launch TRANSFLO® Workflow Studio Setup.exe from the installation CD.
-
The Welcome window for the TRANSFLO® Workflow Studio setup opens.
Click Next.
-
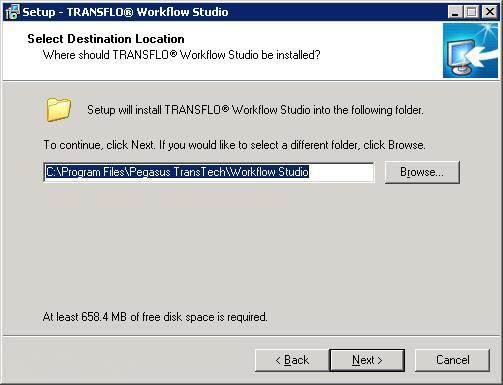
The Select Destination Location window opens. To accept the default path click Next.

-
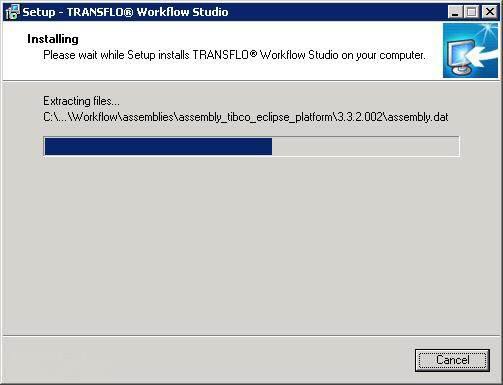
Setup installs TRANSFLO® Workflow Studio on your computer. This may take several minutes. Do not interrupt the installation.

-
Setup notifies you that your installation completed successfully. Click Finish.
The Windows Client for TRANSFLO® Workflow is known as TRANSFLO® Workflow Workspace. Although this is not the supported client for TRANSFLO® Workflow 2012, some of its functionality is necessary. Previously limited to Edge, IE, and Firefox browsers, the DMS workflow and workspace browser was updated in early 2024 to support the Google Chrome browser.
To install the TRANSFLO® Workflow Workspace, perform the following steps:
-
Launch TRANSFLO® Workflow Workspace Setup.exe from the installation CD.
-
The Welcome window for the TRANSFLO® Workflow Workspace Setup opens. Click Next.
-
Setup starts the installation.

-
The Choose Setup Language dialog opens. Select the language of your preference form the drop-down and click OK.

-
The TIBCO iProcess™ Workspace InstallShield® Wizard initializes and shows its progress.

-
The TIBCO iProcess Workspace(Windows) window opens. Close all programs and click Next
-
The Software License Agreement window opens. Read the agreement and select Yes.

-
The Choose Destination Location window opens. Click Next.
-
The Setup Type window opens. Select Administrator from the list and click Next.

-
The Select TIBCO iProcess Engine window opens.
-
Enter your default iProcess Engine Machine Name in the first text box.
-
Do not change the RPC program number in the second text box.
-
Click Next.

-
-
The Select Program Folder window opens. Click Next.

-
The Start Copying Files window opens. Review that all the settings you selected are correct. If not click the Back button and make the necessary corrections. If the settings are correct click Next.

-
The installer installs the components.

-
The Install Complete window opens indicating that your installation completed successfully. Click Finish.

The TRANSLFO® Workflow Workspace allows you to create Workflow users and groups.
Before you can create Users you must apply your user license key. To apply your Workflow licenses do the following:
1. Copy the License Key file to your TRANSFLO® Workflow server.
2. On the Windows® Start menu open the Workflow License Manager by selecting All Programs, TRANSFLO®,and Workflow License Manager.
3. The Workflow Database Connection Properties window opens. (This may only happen the first time you use the License Manager.)
![]()
-
Enter your Workflow server name in the Server Name box.
-
Enter your Workflow database name in the Database Name box.
-
Enter the database system administrator user name in the DB Admin User ID box.
-
Enter the database system administrator password in the DB Admin Password box.
-
Click the Validate button.
Click OK on the confirmation message box.
-
Click OK.
4. The Workflow User Management window opens.
![]()
5. Click the Load button, and select the License Key file you copied to your Workflow Server.
Click Open.
![]()
6. The Workflow User Management window shows the total number of user licenses in the Named User Count box.
Click the Apply button.
![]()
7. Once the user license key has been applied you can add the users using the TIBCO iProcessAdministrator as described above.
Perform the following steps to create Workflow users and groups:
1. On the Windows® Start menu, open the TIBCO iProcess Administrator by selecting All Programs, TIBCO iProcess Workspace (Windows), TIBCO iProcess Administrator.
2. The TIBCO iProcess Administration Login window opens.
Type in the Workflow Administrator user name and password in the respective Userand Password text boxes.
Select the Server from the Server drop-down and then click OK.
![]()
3. The TIBCO iProcess Administrator window opens.
Double-click on the User Manager icon.
![]()
4. The User Manager window opens on the Users Tab.
Click on the Add button.
![]()
5. Enter the User Name and optionally a Description in the respective text boxes.
Click OK.
Repeat these steps until you have created all of your Users.
![]()
Note: All Users added here must already be users on your domain or computer. If you are adding domain users to Workflow ensure that they are in the appropriate Windows® Groups on your Workflow Server.
6. To select a user to be a supervisor, click on the Supervisors button in the User Manager window
7. In the Supervisors window, select a user from the Non-Supervisors list and click the <--Add button.
The user moves to the Supervisors list.
Repeat this until all supervisors have been selected.
Click OK.
![]()
8. Click on the Groups Tab, then click Add to create a new group.
![]()
9. Enter a name for your group in the Group Name text box.
Click OK.
![]()
10. Now add Users to your group by clicking on the Membership button in the User Manager window.
11. In the Membership of Group window select a User from the Non Members list and click the <--Add button.
The user moves to the Members list.
Repeat this until all members have been selected.
Click OK.
![]()
12. To view all of the users and groups, click on the Users/Groups tab.
![]()
13. To create roles, click on the Roles tab in the User Manager window and click Add.
![]()
Note: Creating groups and roles is a good practice since roles can be used in TRANSFLO® Workflow Studio Processes. If groups and roles are used and the user list changes the Processes do not require changes.
14. Enter a name for your role in the Role Name text box.
Enter a valid Group in the User Name text box.
Click OK.
![]()
15. Save your changes by selecting Save from the File menu.
Close the User Manager window by selecting Exit from the File menu.
![]()
16. Double-click on the Move Sysinfo icon on the iProcess Administrator.
![]()
17. Click Move Sysinfo to publish the changes you made.
Click Cancel.
![]()
Note:TRANSFLO® 2012 Workflow will only allow you to create users up to the maximum number of users in your license agreement. TRANSFLO® validates the number of users when you run Move SysInfo.
If you are upgrading from TRANSFLO® Workflow 4.0 your existing Workflow Procedures, Users and Queues are stored in Staffware. You cannot upgrade your Workflow Procedures to Workflow 2012 Processes; however, you can import your Staffware Users and Queues to Workflow 2012.
To import Staffware Users and Queues to Workflow 2012:
-
On the Staffware server open a Command Prompt.
-
Navigate to bin directory (d:\swserver\NODENAME\bin) and type: swutil USERINFO EXPORT > c:\user.xfr.
-
Copy the file to the new Workflow server on root of C:\ or D:\ for easy access.
-
Open a command prompt on the new Workflow Server.
-
Navigate to bin directory (d:\swserver\NODENAME\bin) and type: swutil USERINFO c:\user.xfr
-
Click on the Windows Start > Programs Files > TIBCO iProcess Workspace > TIBCO iProcess Administrator menu item.
-
Login and click the User Manager button.
-
Click on the Attributes tab in the User Manager window.
-
Delete QPARAM_DESCs 1-4
-
Save and close the User Manager window.
-
Double-click on the Move SysInfo icon on the iProcess Administrator.
-
Click Move SysInfo button, and then click Cancel.
Note: If you do not delete the QPARAMs from the list, when you create and publish the CDQPs in the new workflow, your original 4 SW_QPARAMs for sort will still display (e.g.: you will see Order Number listed twice).
As an administrator, you can disable Users from starting cases. This can happen when cases are configured to start automatically but you only want cases to be started by a supervisor or an administrator.
To disable a user from being able to start a case from the web client:
-
Open the userAccessProfiles.xml with an XML editor. (The default location is
C:\Inetpub\wwwroot\Transflo.Workflow\JSXAPPS\ipc\userAccessProfiles.xml)
-
Search for the profile that your user belongs to.
-
Replace the child attribute for the profile:
<property name="CaseStart" state="1" />
with
<property name="CaseStart" state="0" />
-
Run Move SysInfo from TIBCO iProcess Administrator.
Case data queue parameters (CDQPs) allow values from work item case data to be used to sort, display, and filter work items. CDQPs also help you find specific work items in Work Queue Manager.
CDQPs must first be defined (globally), and can then be mapped to specific queues for use in Work Queue Manager. Any field in an iProcess procedure can be used as a CDQP.
After a CDQP has been mapped to a queue, users with access to that queue can use the CDQP to sort, display, and filter the work items list, or to find specific work items.
To define and publish CDQP perform the following:
-
Login to your Workflow server as tfwfadmin.
-
Export existing CDQP file. If nothing is available, use the sample file provided by PTC and modify as necessary.
-
In a Command Prompt, enter:
swutil QINFO EXPORT > c:\cdqp.xfr.
-
Open the CDQP file and modify the procedure data and queue permissions. Procedure data is usually your index values. The data and permissions are global to all procedures and queues.
-
Queue permissions must be listed AFTER the field additions or the upload process will fail.
Example: The following file shows global queue settings:
; Add all Capture Fields as Data Parameters in WF
;
F+TRIP,25,Trip Number F+TRACTOR,25, Tractor Number F+DRVCODE1,25, Driver Code 1 F+DRVCODE2,25, Driver Code 2 F+AUDITFLG,1, Audit Flag
; Define these Fields as the default mapping for group queues Q+SW_DEFAULT_CASEDATAQPARAM_GROUP
C+TRIP
Q+SW_DEFAULT_CASEDATAQPARAM_GROUP C+TRACTOR
Q+SW_DEFAULT_CASEDATAQPARAM_GROUP C+DRVCODE1
Q+SW_DEFAULT_CASEDATAQPARAM_GROUP C+DRVCODE2
Q+SW_DEFAULT_CASEDATAQPARAM_GROUP C+AUDITFLG
-
Save the file in an easy location for future access (root of c or root of d) as CDQP.XFR.
-
Verify the CDQP file is valid.
-
Navigate to a cmd prompt.
-
Type: swutil QINFO C:\CDQP.XFR
-
Service should return successful results.
For more information on warnings or errors, navigate to d:\swserver\TFLOWF\logs and open qinfoimp.log for additional information.
-
-
Publish the values to the Users. If you do not publish the values the users will not see the data after validation unless iProcess services are cycled.
-
Navigate to a cmd prompt.
-
Type : swutil QINFO C:\CDQP.XFR PUBLISH
-
The process should return successful results and warnings. The warnings will be for the Fields which have already been imported from the Validate step.
-
To verify that your Workflow Web client installation was successful, perform the following post installation check:
-
Open your TRANSFLO® Web Client at http://<Web Server>/transflo.workflow/ and log in as one of the users you created.

-
The TRANSFLO® Workflow Web Client home page opens with user names and groups in the list.
