3. Transflo Express Carrier Retrieval Service
Component 3 of 5
As a system administrator, you can install, configure, and use the TRANSFLO® EXPRESS Carrier Retrieval client service to retrieve load document batches from the TRANSFLO® Express network at www.transfloexpress.com.
Information in this document is subject to change without notice. The software described in this document is furnished under a license agreement or nondisclosure agreement.The software may be used or copied only in accordance with the terms of those agreements. No part of this publication may be reproduced, stored in a retrieval system or transmitted in any form or any means electronic or mechanical, including photocopying and recording for any purpose without the written permission of Pegasus TransTech. Windows® and Windows Server® are registered trademarks of Microsoft Corporation in the United States and other countries. Core™ is a trademark and Intel®, Pentium® and Celeron® are registered trademarks of Intel Corporation or its subsidiaries in the United States and other countries.
Hardware Requirements
Memory:
-
Minimum: 512 MB.
-
Recommended: 1 GB or higher
Free disk space
-
Minimum: 725 MB.
-
Recommended: 2.0 GB
Operating System Requirements
Server:
-
Windows Server 2012, 2016, 2019, or newer
-
Deprecated legacy and original specifications included Windows Server 2008 (x86 and x64) and Windows Server 2003 (x86) R2 SP2 with MS04-012: Cumulative Update for Microsoft RPC/DCOM(KB828741).
Client:
-
Windows 10 or 11
-
Deprecated legacy and original specifications included Windows XP Professional SP3, Windows Vista Business SP2, Windows 7 Ultimate (x86) SP1, Windows 7 Ultimate (x64) SP1, and Windows 8 SP3
The Carrier Retrieval installer determines if the Carrier Retrieval application is already installed. If not installed, the installer performs a new installation. If Carrier Retrieval is already installed, the installer performs an upgrade (for example, from 3.5 to 4.4; as of 2023, the newest version is still 4.4).
-
Download the TRANSFLO Express Carrier Retrieval Client Setup installer at the following link:
http://www.transflo.com/CarrierRetrievalInstall/CarrierRetrievalSetup.exe
-
In the File Download window, click Run. You can also open the Downloads folder and run the installer.
-
If a security window opens click Run or Allow. (The security window is slightly different, depending on your browser and operating system security settings.)
-
The Setup Welcome window opens. Click Next.
-
If the .NET Framework 4.0 is not installed you are prompted to install it. Click OK.
-
The Carrier Retrieval Client setup acknowledges that .NET Framework 4.0 is installed. Click Next.
-
The Ready to Install window opens. Verify that the settings are correct, and click the OK button.
-
Setup finishes the Carrier Retrieval client installation. Click Finish.
TRANSFLO EXPRESS® Carrier Retrieval also supports the installation of multiple instances of the Carrier Retrieval service at your organization.
Updates are periodically available. You can perform a manual upgrade or updates can be deployed automatically from the TRANSFLO Express server using the Deployment Agent service.
To upgrade manually, follow these steps:
-
Open the Windows Add Remove Programs utility in the Windows Control Panel. In Windows 10, open Settings and click Apps.
-
Uninstall the TRANSFLO Express Carrier Retrieval program.
-
Restart your computer.
-
Download the TRANSFLO Express Carrier Retrieval Client Setup.exe by following the link:
http://www.transflo.com/CarrierRetrievalInstall/CarrierRetrievalSetup.exe
-
On the File Download window, click Run. You can also open the Downloads folder and run the installer.
-
If a security window opens click Run or Allow. (The security window is slightly different, depending on your browser and operating system security settings.)
-
The Setup Welcome window opens. Click Next.
-
If setup detects a previous version of the Carrier Retrieval client, it opens the Uninstall previous version window. Click Next to uninstall the existing version of the Carrier Retrieval client.
-
In the Confirm File Deletion pop-up message box click Yes to continue the un-install.
-
Setup starts removing all of the existing components of Carrier Retrieval. This may take a few minutes.
-
If the .NET Framework 4.0 is not installed you are prompted to install it. Click OK.
-
The Carrier Retrieval Client setup acknowledges that the .NET Framework 4.0 is installed. Click Next.
-
The Select Destination Location window opens. Click Next.
-
If setup detects that the location already exists, a message box prompts you to determine if you would like to install to the folder anyway. Click OK.
-
The Ready to Install window opens. Verify that the settings are correct, and click the Install button.
-
Setup finishes the Carrier Retrieval client installation. This may take a few minutes.
-
Click Finish.
After Carrier Retrieval has been installed for the first time, it must be activated and configured. The first time you run Express Client Configuration you are prompted to activate your Carrier Retrieval license. Activation is not required after an upgrade.
To activate your Carrier Retrieval client service:
-
In the Windows Start menu, choose All Programs, Transflo, Express Client Configuration.
-
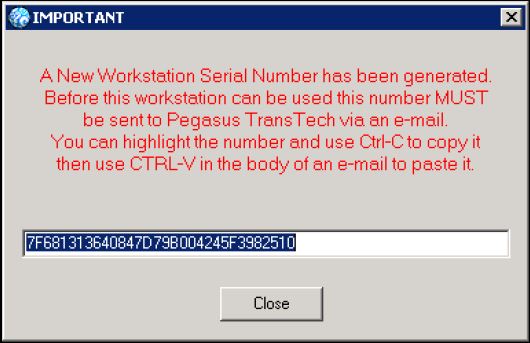
The Workstation Serial Number Activation window opens. The Workstation Serial Number appears on the Communication tab after this window closes.
-
Right-click on the window title bar and click Copy.
-
Open your email client application such as Outlook or open your email in a browser such as gmail. In the body of a blank new email message, right-click and Paste what you copied in the previous step.
-
After you copy and paste the serial number into an email message, send it to support@transflo.com.
-
TRANSFLO EXPRESS Support will reply to your email when the activation process starts.
-
After that acknowledgment is received you can proceed to the next step (configure the Carrier Retrieval client service).
-
In the Windows Start menu click on All Programs, and click on TRANSFLO and then choose Express Client Configuration.
-
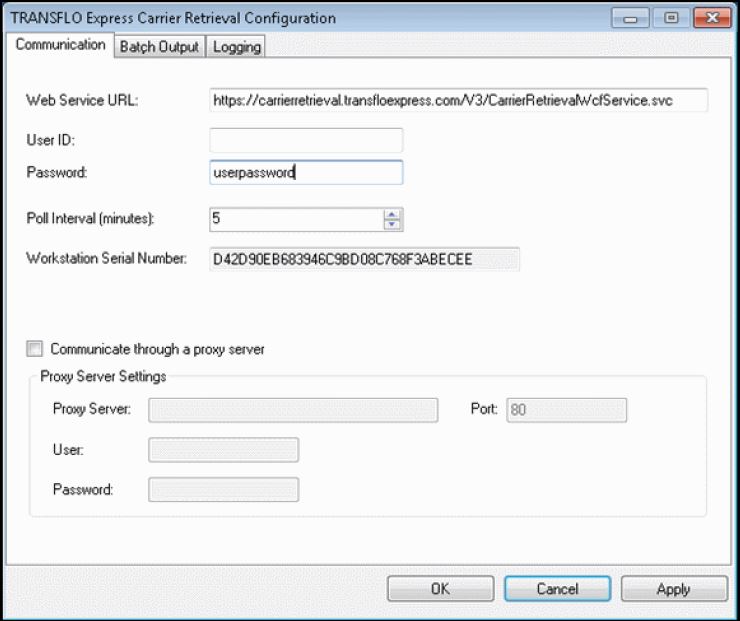
The TRANSFLO Express Carrier Retrieval Configuration window opens to the Communication tab.
-
Enter the User ID and Password provided to you by TRANSFLO EXPRESS.
Tip: Multiple instances of the Carrier Retrieval service for your company can share the same user ID and password configured here.
-
In the Poll Interval (minutes) field, enter the number of minutes you want your Carrier Retrieval service to wait before it polls the TRANSFLO EXPRESS network for batches. The minimum polling interval is set to 5 minutes by default and cannot be set below this value.
-
If your Carrier Retrieval service communicates with the TRANSFLO EXPRESS network using a proxy server, select the Proxy Server Settings check box and enter your proxy server settings.
-
Click the Apply button.
If required values are blank, a red exclamation point image will appear next to the configuration item.
-
In the Save your changes? message box, click Yes.
-
-
Click the Batch Output tab.
-
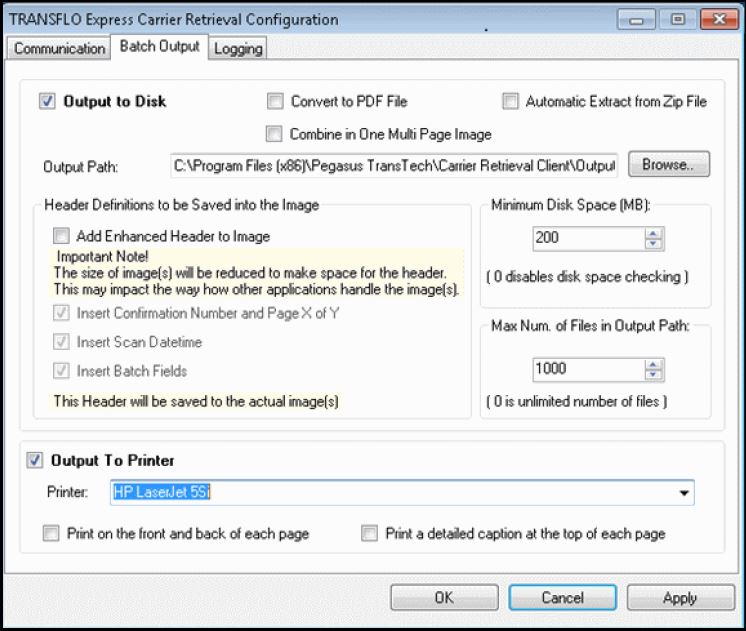
Select Output to Disk, Output to Printer, or both. To output to disk, select the Output to Disk check box.
-
To extract Batch Zip files to sub-folders of the Output Path check the Automatic Extraction of Zip file check box. This will create a sub-folder for each Batch with the folder name the same as the Batch name. Each Batch folder will contain the Batch images and the Batch.xml.
-
To convert Batch each Batch image to single page PDF files, check the Convert to PDF check box.
-
Type the path or browse to the folder where you want the Batch output to be written in the Output Path box.
-
To write header information to the images check the Add Enhanced Header to Image check box. Check the Insert Confirmation Number and Page X of Y check box if you wish the Confirmation numbers and page numbers to appear in the image headers. To write the Scan Datetime or the Batch Field data to the image headers, check the Insert Scan Datetime or Insert Batch Fields check boxes.
-
To set the minimum free disk space required for batches to be written to disk, enter a value in the Minimum Disk Space (MB) field. If the minimum disk space is reached, the Carrier Retrieval service will stop and an error will be written to the event log. A value of 0 in this box disables disk space checking.
-
Set the maximum number of files that can be written to the output path in the Max. Num. of Files in Output Path box. If the maximum number of files is reached, the Carrier Retrieval service will stop and an error will be written to the event log. A value of 0 in this box disables maximum number of files checking.
-
Set the maximum number of files that can be written to the output path in the Max. Num. of Files in Output Path box.
-
A value of 0 in this box disables maximum number of files checking.
-
If the maximum number of files is reached the Carrier Retrieval service will stop and an error will be written to the event log.
-
If you have more than one fleet configured and the 'Use separate folder for each fleet' option is selected on the TRANSFLO Express Server, Carrier Retrieval will create sub-folders under the output folder for each fleet.
-
If the maximum number of files is reached in the Fleet sub-folder that is being written to, the Carrier Retrieval service will stop and write an error to the event log.
-
-
The Carrier Retrieval service must use an account on your network that has permissions to any network share or network printer that the Carrier Retrieval service sends files to and/or prints to. To do this open the windows Control Panel and open Administrative Tools, or contact your System Administrator to do this for you.
-
The Print a detailed caption at the top of each page option in the Output to Printer section will not be available if the Add Enhanced Header to Image option is selected in the Output to Disk section, however an image header will still be printed on the image if the Add Enhanced Header to Image and Output to printer options are selected.
-
To send Batch Output to a Printer check the Output To Printer check box, and select a printer from the Printer drop-down. To print on both sides of paper check the Print on the front and back of each page check box. To Print the Confirmation Number, page number, scan date-time, and Batch Fields on each page, check the Print a detailed caption at the top of each page check box.
-
Click the Apply button.
-
In the Save your changes? message box, click Yes.
-
-
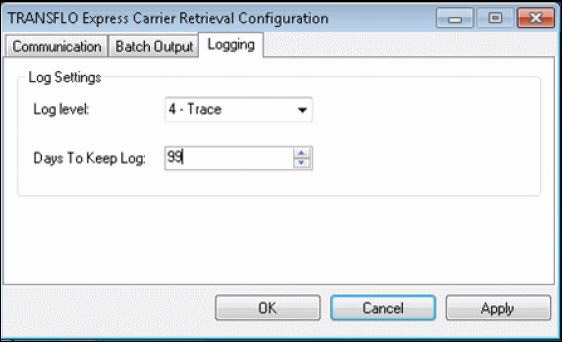
Click the Logging tab:
-
It can take up to 2 hours for the workstation ID to go into effect after it has been applied to your account. After the 2 hour period you can start the Carrier Retrieval service from the Windows Services Console or you can restart the PC to force the Carrier Retrieval service to start.
-
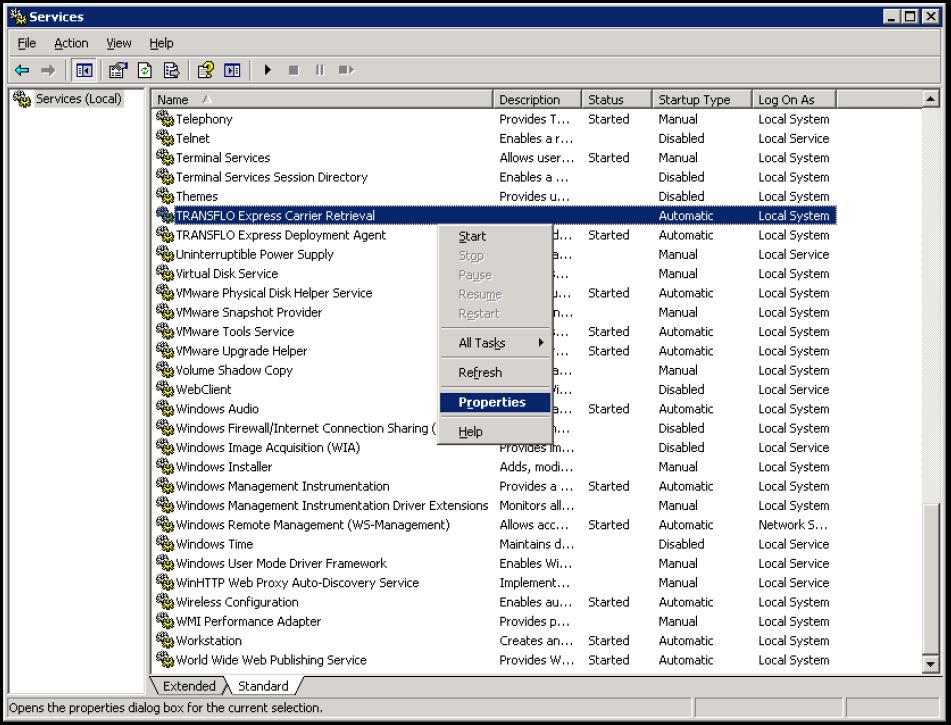
Open the Services window, right-click the TRANSFLO Express Carrier Retrieval service, and click Properties from the pop-up menu.
-
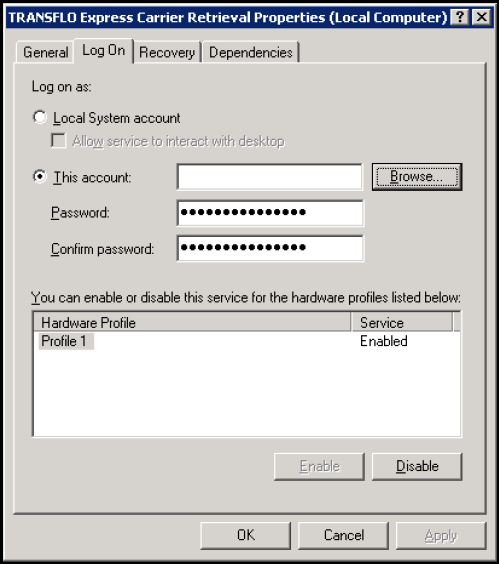
In the TRANSFLO Express Carrier Retrieval Properties window, click the Log On tab.
-
Under Log on as, select This account and then click the Browse button.
-
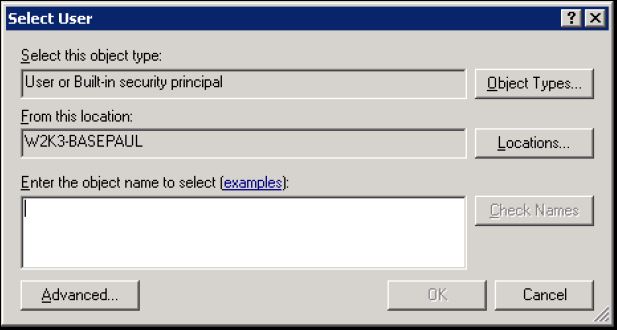
In the Select User window, click the Advanced button.
-
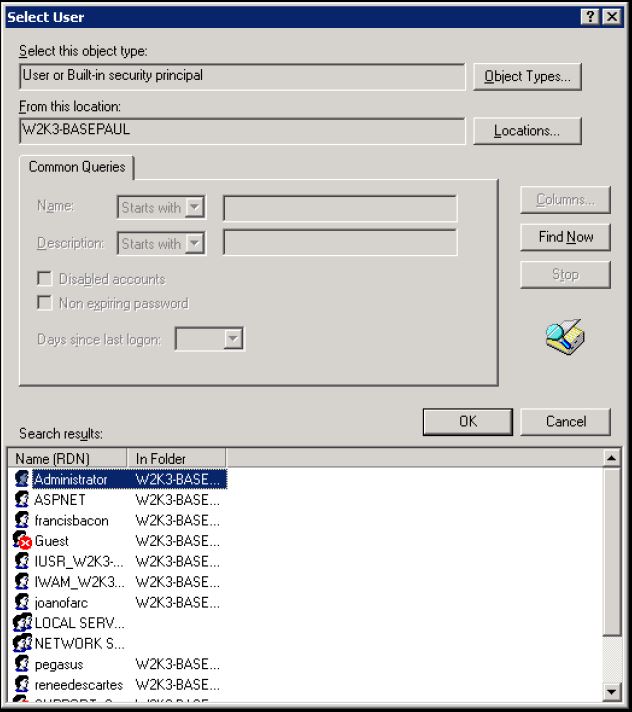
In the advanced Select User window, do a search and then double-click the user account that has permissions to the network shares or printers where you want to send your batch files. Click OK.
-
The user account is in the Enter the object name to select box. Click OK.
-
Click OK on the TRANSFLO Express Carrier Retrieval Properties window. Your TRANSFLO EXPRESS Carrier Retrieval service is now ready to receive Batches and send them to their destination location or printer.
As a system admin, refer to the following sections to troubleshoot and resolve potential issues with Transflo Carrier Retrieval:
-
Verify that the TRANSFLO Express Carrier Retrieval service is running in the Windows Services console.
-
Check the event viewer and the error logs to determine the problem. Two common reasons the TRANSFLO Express Carrier Retrieval service goes down are:
-
The free disk space is lower than the value set in the Minimum Disk Space (MB) box in the Batch Output tab. If the free disk space is lower than Minimum Disk Space value, free up some disk space and restart the TRANSFLO Express Carrier Retrieval service.
-
The number of files in the Batch Output folder has exceeded the value set in the Max. Num. of Files in Output Path box in the Batch Output tab. Determine why files are accumulating in the Batch Output folder. Is a service or application not picking up the Batches from the Batch Output folder?
-
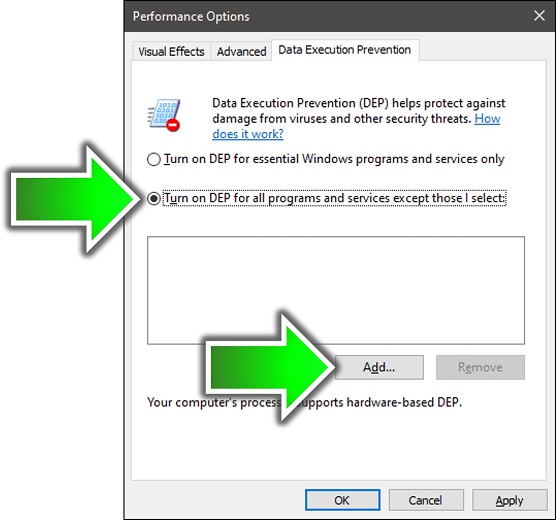
If you experience problems with printing and advanced headers, create a Data Execution Prevention (DEP) exclusion for the tfexpress.exe application. Data Execution Prevention (DEP) may prevent the Carrier Retrieval service advanced headers to be written to images on machines running Windows® Vista® or Windows® Server 2003. If this is the case, a DEP exclusion must be created for the Carrier Retrieval service. To create a DEP exclusion:
-
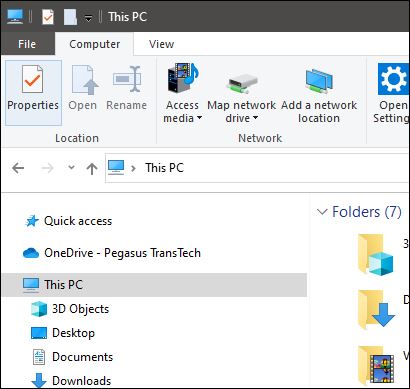
In Windows Explorer, click This PC and then click Properties.
-
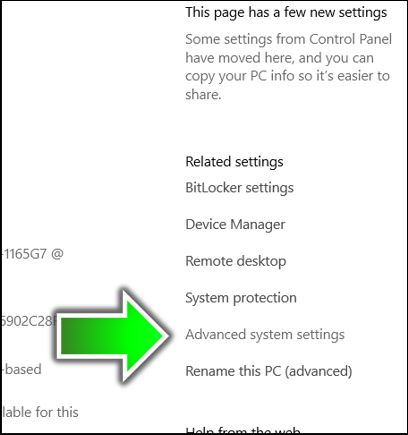
On the About page, under Related Settings, click Advanced System Settings.
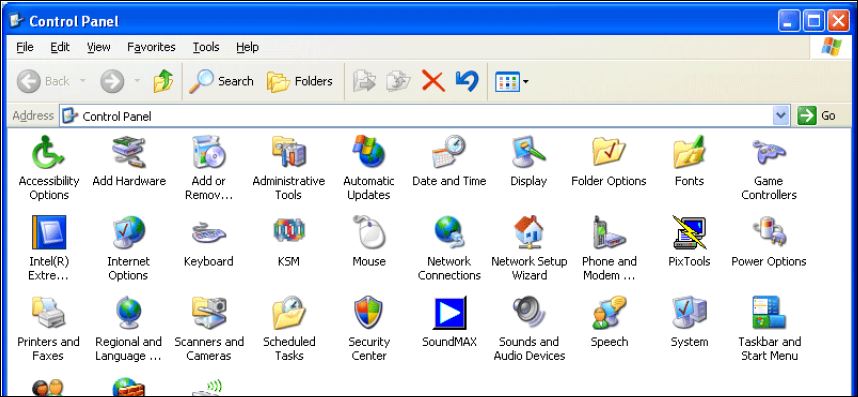
Tip: On older versions of Windows, instead of the first two steps, open the Control Panel, click System, and then click the Advanced tab in the System Properties window.
-
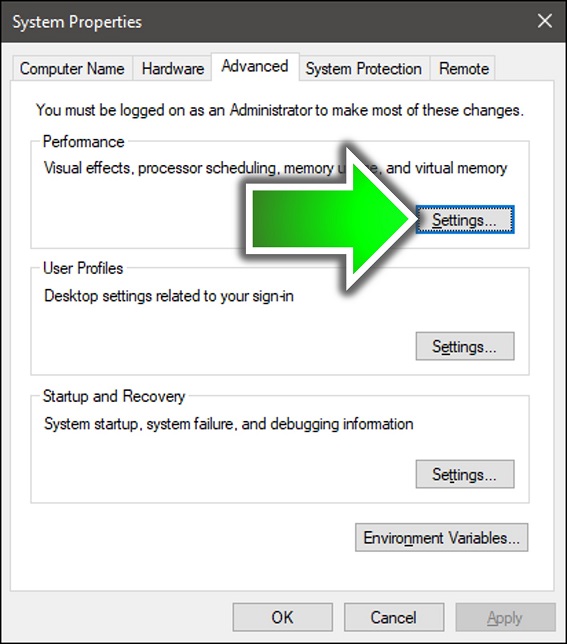
Click the Settings button in the Performance section.
-
In the Performance Options window, click the Data Execution Prevention tab. Select the Turn on DEP for all programs and services except those I select option and then click the Add button.
-
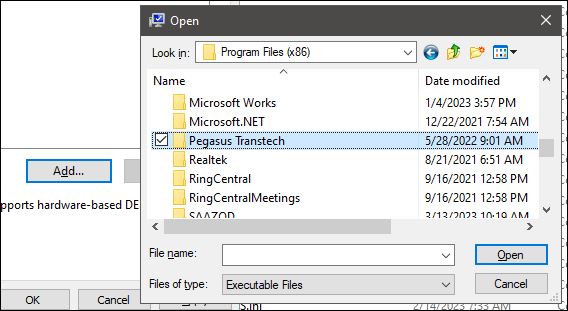
Navigate to C:\Program Files\Pegasus TransTech\Carrier Retrieval Client and select TFExpress.exe. Click Open.
-
Click OK or Apply.
This scenario is likely because you had one or more TRANSFLO® programs installed on your computer. The TRANSFLO deployment agent and the TRANSFLO EXPRESS deployment agent are two separate applications.
If other TRANSFLO® products are installed on the same machine as the Carrier Retrieval client, the TRANSFLO Deployment Agent will be installed as well. If you uninstall Carrier Retrieval from the machine, the TRANSFLO EXPRESS® Deployment Agent will be uninstalled as well. The TRANSFLO® Deployment Agent is not affected by the uninstallation of Carrier Retrieval.
