Configure Synergize Driver Recruitment
This article summarizes the top-level application views and tabs for Driver Recruitment. The initial screen, like all other main screens in Driver Recruitment, has the following main menu tabs: Dashboard, Drivers, Leads, Reports, Manage.
As a recruiter, the Dashboard tab of the Driver Recruitment Portlet is the first screen after logging in. The sections on this screen give an overall picture of all recruitment data.
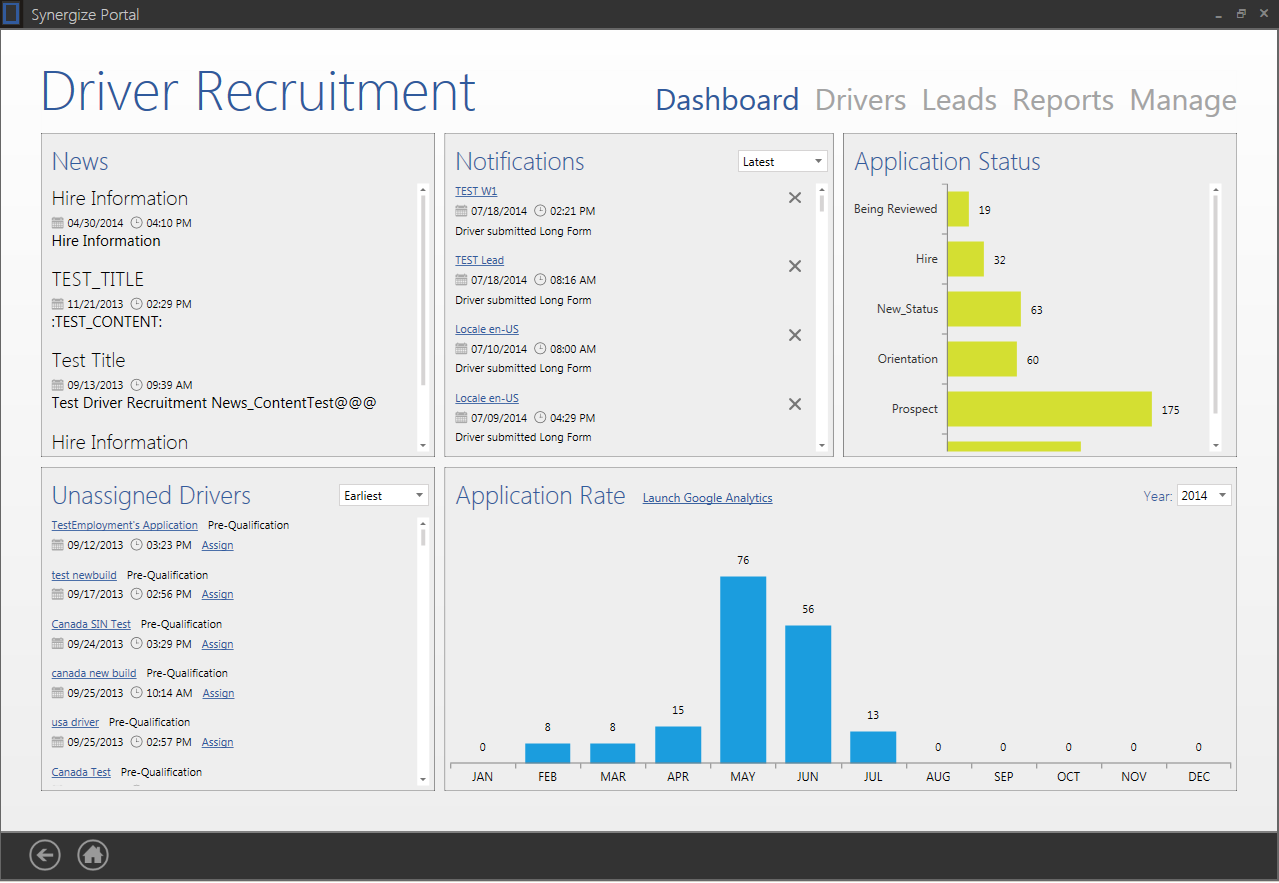
Below is the list of all the sections on the dashboard:
-
News: Allows an administrator to communicate news items to the recruitment staff with a date & time stamp for each message. The recruiter administrator can add, edit and delete news items from “Manage Tab: News”.
-
Notifications: Presents a list of notifications to the user. It has a drop-down to sort notifications by date.
-
Application Status: Presents the statistics of all active drivers in the system by their application status.
-
Unassigned Drivers: Presents a list of all unassigned drivers in the system. It has the drop-down to sort by date.
-
Application Rate: Displays a bar graph with monthly statistics of the number of applications received for a specific year.
-
Launch Google Analytics: If Analytics are configured, a link to the Google Analytics sign in page appears.
Driver Grid View
The Drivers Grid View is the first screen shown to the recruiter, when the Drivers tab is selected from the Driver Recruitment Dashboard. Recruiters can add or delete drivers, search and filter drivers, sort and group drivers by fields, view recent drivers, or select and view a driver full profile. One hundred drivers are shown per page.

Driver Grid View: Filter/Search
With these controls you can execute a text-based search for drivers. The filters allow you to narrow the results by recruiter, application status, and form status. The two icons enable you to either search or reset all fields within the filter section.
Driver Grid View: Navigation
You can navigate to the First/Previous/Next/Last page of search results, by clicking the page control buttons below the search grid.
Driver Grid View: Add
You can enter the basic information required to create a new driver in the system. You can also set the application type, application status and which recruiter this driver should be assigned to.
Driver Grid View: Delete
If you are an Admin User, you can delete a driver by highlighting them and clicking the delete icon.
WARNING: Deleting a driver results in a complete and irreversible removal of the driver and all of their records from the system. Any driver documents in Synergize are de-referenced from the system but not deleted from the repository.
Driver Grid View: Reset Filters
This button allows you to reset all of the filters on the drivers grid (including the Sort, Filter, and Group By fields).
Driver Grid View: Settings
You can select which columns to show or hide.
Driver Grid View: Recent Drivers
This is a list of recently accessed drivers (maximum 10 drivers).
The list lets you work with recent drivers without having to filter or otherwise find the driver, after moving to another part of the application.
Driver Grid View: Sort By Column
Clicking on a column header sorts the rows using the values in that column in ascending order.
Clicking a second time sorts in descending order, and clicking a third time removes the sort and reverts the grid back to its original order.
Driver Grid View: Filter By Column
The funnel icon on each column enables you to filter using the values in that column.
You have the option to apply more advanced filtering criteria to the grid.
Driver Grid View: Group By Column
By dragging a column header into the row above the grid, you can group by equivalent values for that column. It is possible to add multiple fields to the grouping, which effectively chains the grouping in the order each field was added.
Driver Profile
Within a given driver profile, the driver name is displayed at the top, the section navigation is in the left panel, and the driver high-level details are on the right. These sections are found on every page within the section, and the main content in the middle changes for each page. You can edit the driver personal information, by clicking the edit icon on the right panel.
Driver Summary
The summary page shows the driver's accidents, violations, and work histories plotted over time. Work histories are colored according to their status (Verified - Green, Verification Attempted - Yellow, Verification Not Attempted - Red). A recruiter can read or add notes associated with the driver in the Notes section. A Notifications section shows auto-generated notifications for several milestones that a driver goes through during the recruiting process.
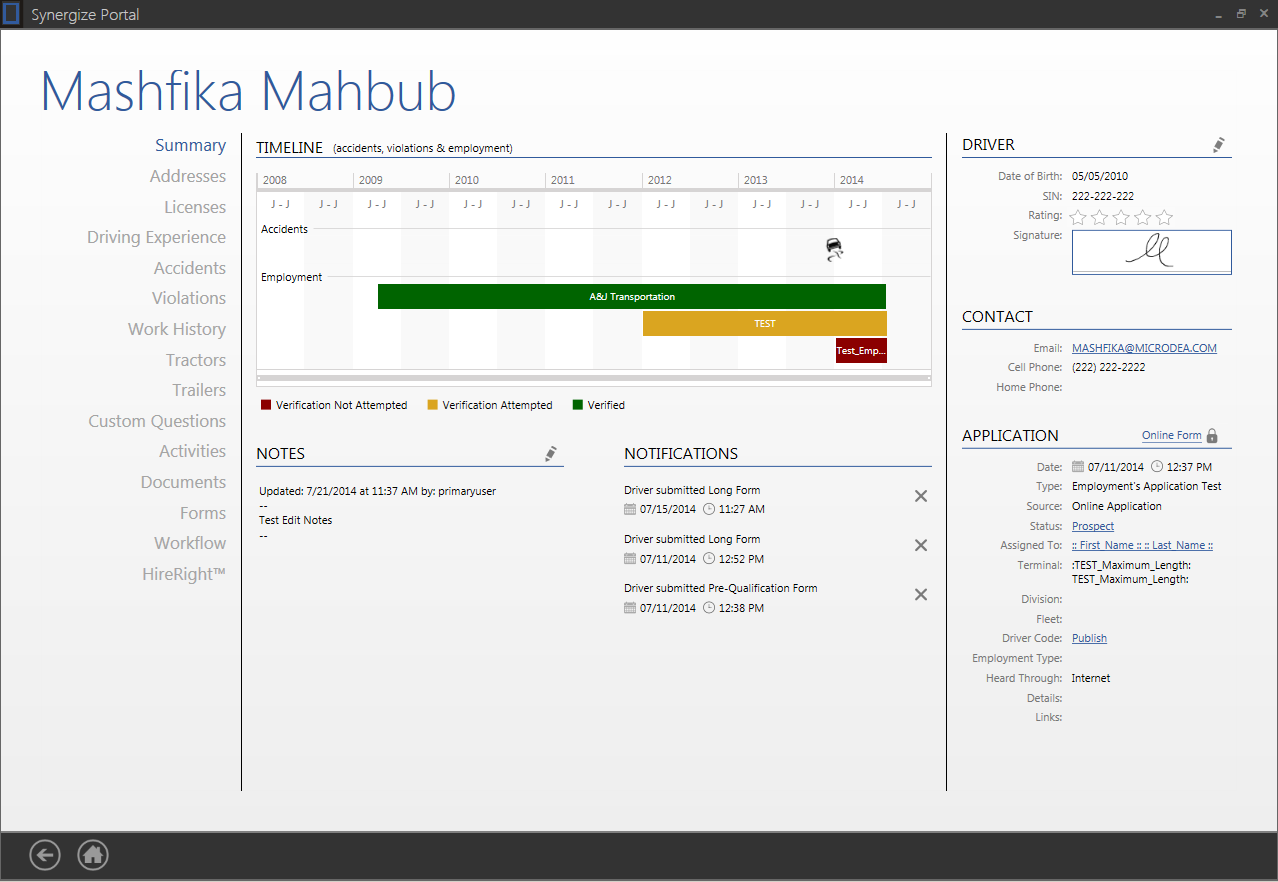
Driver Summary: Edit Notes
The driver notes can be edited, which opens a panel with the notes in an editable text area.
There is also a link-button to insert a current time-stamp, with the logged-in User's name.
Driver Summary: Delete Notifications
Notifications can be deleted by clicking the X, to the right of each notification.
Driver Addresses
Addresses for the driver residence history are displayed in this section.

Driver Addresses: Add
You can add an address for the driver, by clicking add and filling in the required information.
Driver Addresses: Edit
You can edit an existing address by selecting an address and clicking the edit icon.
Driver Addresses: Delete
A recruiter can delete an address by highlighting it and clicking the delete icon.
WARNING: This action is irreversible.
Driver Addresses: Reset Filters
This button allows you to reset all of the filters on the drivers grid (including the Sort, Filter and Group By Fields).
Driver Addresses: Sort By Column
Clicking on a column header sorts the rows using the values in that column in ascending order.
Clicking a second time sorts in descending order, and clicking a third time removes the sort and reverts the grid back to its original order.
Driver Addresses: Filter By Column
The funnel icon on each column enables you to filter using the values in that column.
You have the option to apply more advanced filtering criteria to the grid.
Driver Addresses: Group By Column
By dragging a column header into the row above the grid, you can group by equivalent values for that column.
It is possible to add multiple fields to the grouping, which effectively chains the grouping in the order each field was added.
Driver Licenses
The history of driver licenses held by the driver can be found here with icons indicating whether the license is currently valid, expired or unknown.
If the license has no expiry date associated with it, it is considered unknown.

Driver Licenses: Add
A recruiter can add a license to the driver by clicking add and filling in the required information.
Driver Licenses: Edit
A recruiter can edit an existing license by selecting a license and clicking the edit icon.
Driver Licenses: Delete
A recruiter can delete a license by highlighting it and clicking the delete icon.
WARNING: This action is irreversible.
Driver Licenses: Reset Filters
This button allows you to reset all of the filters on the drivers grid (including the Sort, Filter and Group By Fields).
Driver Licenses: Sort By Column
Clicking on a column header sorts the rows using the values in that column in ascending order.
Clicking a second time sorts in descending order, and clicking a third time removes the sort and reverts the grid back to its original order.
Driver Licenses: Filter By Column
The funnel icon on each column enables you to filter using the values in that column.
You have the option to apply more advanced filtering criteria to the grid.
Driver Licenses: Group By Column
By dragging a column header into the row above the grid, you can group by equivalent values for that column.
It is possible to add multiple fields to the grouping, which effectively chains the grouping in the order each field was added.
Driver Driving Experience
This section shows a history of driving experiences for the past (X) number of years.

Driver Driving Experience: Add
The recruiter can add driving experience to the driver, by clicking add and filling in the required information in the pop-up.
Driver Driving Experience: Edit
A recruiter can also edit an existing driving experience with the same pop-up listed above, by selecting a driving experience and clicking the edit icon.
Driver Driving Experience: Delete
A recruiter can also delete a driving experience by highlighting it and clicking the delete icon.
WARNING: This action is irreversible.
Driver Driving Experience: Reset Filters
This button allows you to reset all of the filters on the drivers grid (including the Sort, Filter and Group By Fields).
Driver Driving Experience: Sort By Column
Clicking on a column header sorts the rows using the values in that column in ascending order.
Clicking a second time sorts in descending order, and clicking a third time removes the sort and reverts the grid back to its original order.
Driver Driving Experience: Filter By Column
The funnel icon on each column enables you to filter using the values in that column.
You have the option to apply more advanced filtering criteria to the grid.
Driver Driving Experience: Group By Column
By dragging a column header into the row above the grid, you can group by equivalent values for that column.
It is possible to add multiple fields to the grouping, which effectively chains the grouping in the order each field was added.
Driver Accidents
A history of the driver accidents for the past (X) number of years is displayed in this section.
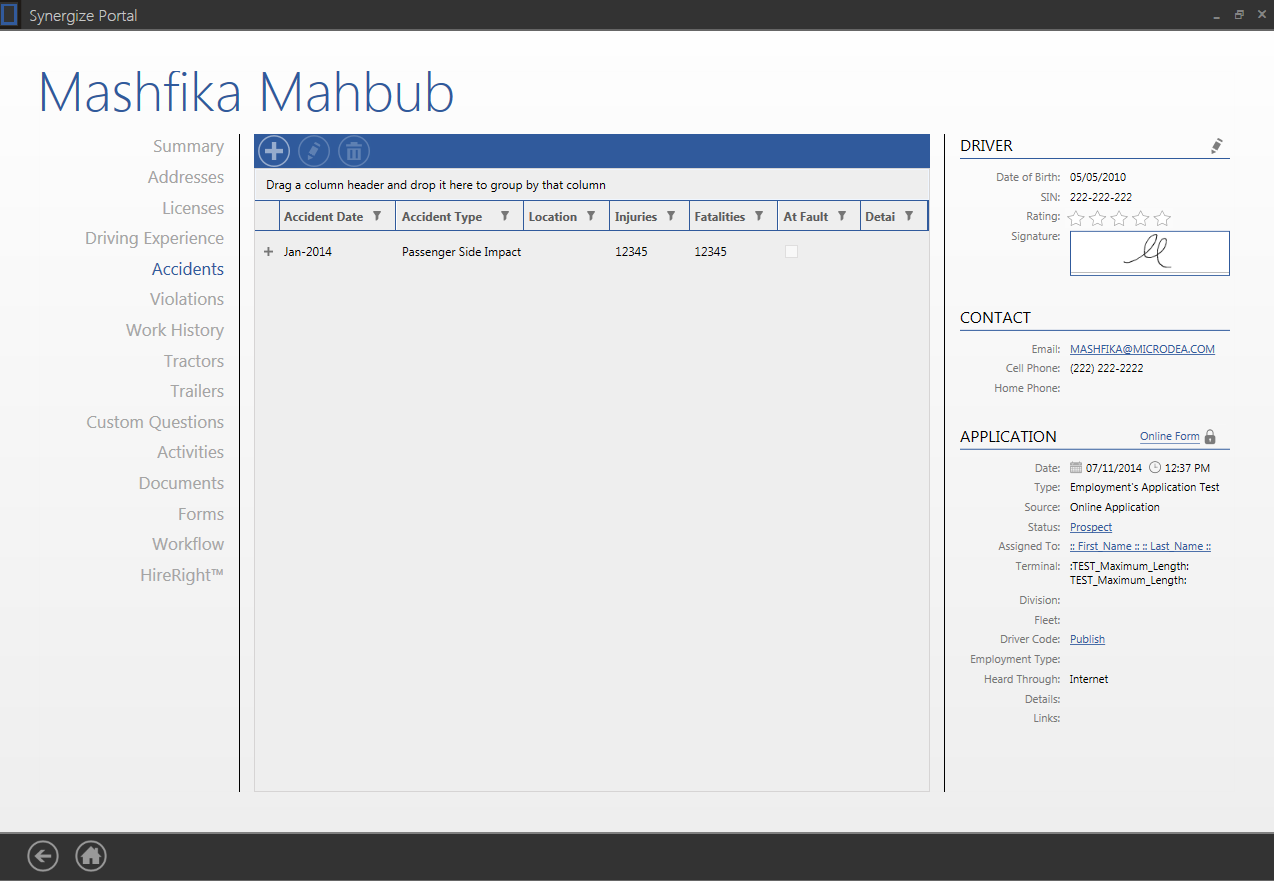
Driver Accidents: Add
The recruiter can add an accident for the driver, by clicking add and filling in the required information in the pop-up.
Driver Accidents: Edit
A recruiter can edit an existing accident with the same pop-up listed above, by selecting the accident and clicking the edit icon.
Driver Accidents: Delete
A recruiter can delete an accident by highlighting it and clicking the delete icon.
WARNING: This action is irreversible.
Driver Accidents: Reset Filters
This button allows you to reset all of the filters on the drivers grid (including the Sort, Filter and Group By Fields).
Driver Accidents: Sort By Column
Clicking on a column header sorts the rows using the values in that column in ascending order.
Clicking a second time sorts in descending order, and clicking a third time removes the sort and reverts the grid back to its original order.
Driver Accidents: Filter By Column
The funnel icon on each column enables you to filter using the values in that column.
You have the option to apply more advanced filtering criteria to the grid.
Driver Accidents: Group By Column
By dragging a column header into the row above the grid, you can group by equivalent values for that column.
It is possible to add multiple fields to the grouping, which effectively chains the grouping in the order each field was added.
Driver Violations
A history of the driver violations for the past (X) number of years is displayed in this section.
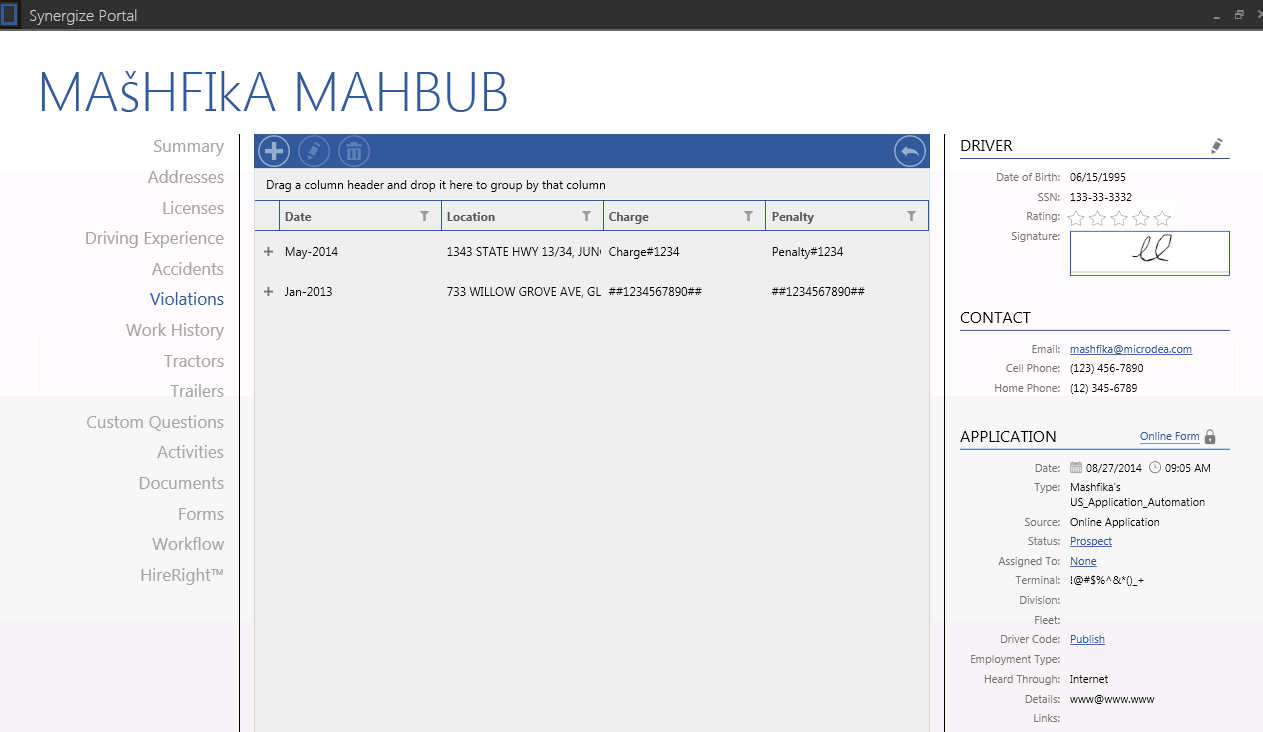
Driver Violations: Add
The recruiter can add a violation for the driver, by clicking add and filling in the required information in the pop-up.
Driver Violations: Edit
A recruiter can edit an existing violation with the same pop-up listed above, by selecting the violation and clicking the edit icon.
Driver Violations: Delete
A recruiter can delete a violation by highlighting it and clicking the delete icon.
WARNING: This action is irreversible.
Driver Violations: Reset Filters
This button allows you to reset all of the filters on the drivers grid (including the Sort, Filter and Group By Fields).
Driver Violations: Sort By Column
Clicking on a column header sorts the rows using the values in that column in ascending order.
Clicking a second time sorts in descending order, and clicking a third time removes the sort and reverts the grid back to its original order.
Driver Violations: Filter By Column
The funnel icon on each column enables you to filter using the values in that column.
You have the option to apply more advanced filtering criteria to the grid.
Driver Violations: Group By Column
By dragging a column header into the row above the grid, you can group by equivalent values for that column.
It is possible to add multiple fields to the grouping, which effectively chains the grouping in the order each field was added.
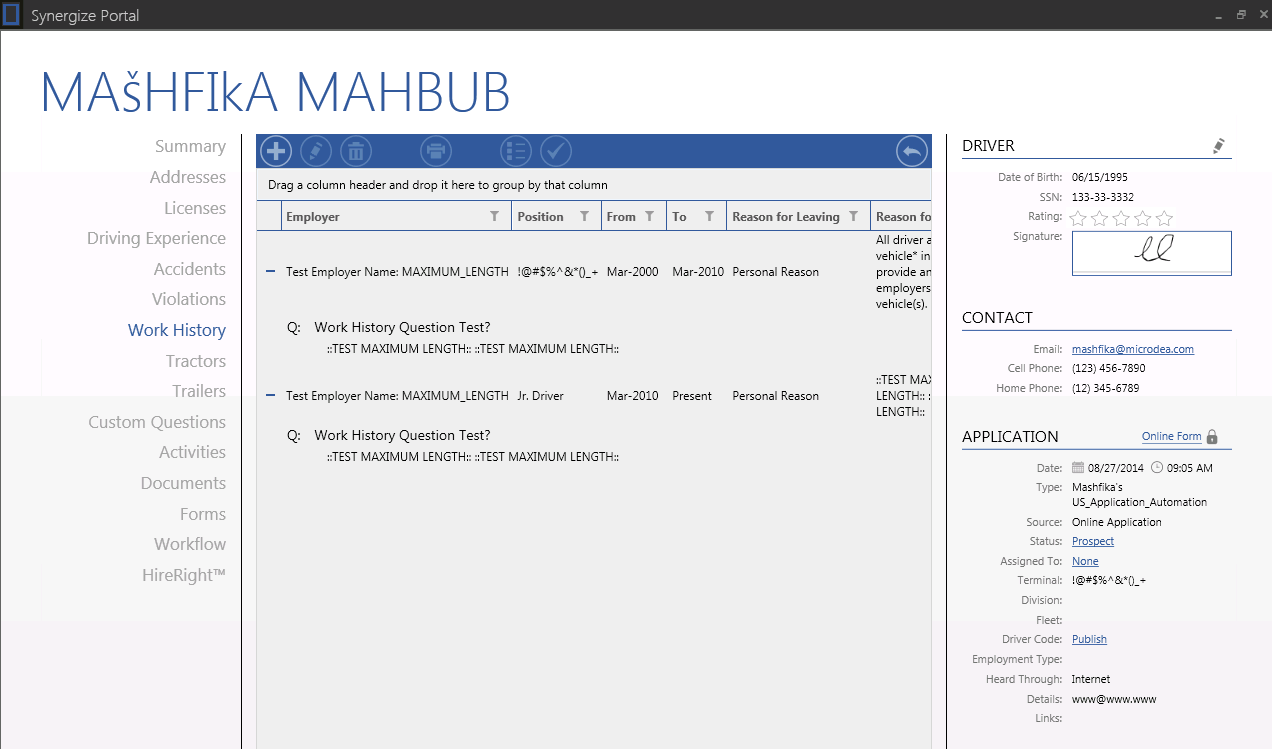
Driver Work History
Work Histories are a record of the driver past employment.
Each job the driver has held has its own entry here.
Each entry also has the ability to expand or collapse, which will show the custom questions associated with each entry.
Driver Work History: Add
The recruiter can add a work history to the driver, by clicking add and filling in the required information in the pop-up.
The pop-up also has an employer lookup component.
The recruiter can add a new employer, or search for existing employers in the system.
Each employer is either verified or un-verified.
In order to proceed with work history verification or HireRight automation, a work history must have a verified employer.
Driver Work History: Edit
A recruiter can also edit an existing work history with the same pop-up listed above, by selecting the work history and clicking the edit icon.
In cases where the work history has an un-verified employer, the recruiter can either verify the employer that is already there or replace that employer with a verified version of that employer already in the system.
Driver Work History: Delete
A recruiter can also delete a work history, by highlighting it and clicking the delete icon.
WARNING: This action is irreversible.
Driver Work History: Print Verification Form
The recruiter can print a work history verification form which includes all of the values associated with the selected work history inside of the configured Email attachment report.
Driver Work History: Send Verification
The recruiter can send a work history verification by email, fax or web.
Clicking this icon will bring up a pop-up where the recruiter can use or over-ride the default values/contact method.
The employer must be verified before the recruiter can send a verification.
Driver Work History: Log Verification Attempted
Once a verification has been attempted the recruiter can log the details of that attempt.
Clicking on this icon will bring up a pop-up that allows the recruiter to record the contact method and any details associated with the attempt.
Driver Work History: Mark as Verified
You can also mark a work history as verified once they have confirmed that it is accurate.
Driver Work History: Mark as Un-Verified
If the user finds that a work history is marked as verified and shouldn't be, they can mark it as un-verified, by clicking this icon.
Driver Work History: Reset Filters
This button allows you to reset all of the filters on the drivers grid (including the Sort, Filter and Group By Fields).
Driver Work History: Sort By Column
Clicking on a column header sorts the rows using the values in that column in ascending order.
Clicking a second time sorts in descending order, and clicking a third time removes the sort and reverts the grid back to its original order.
Driver Work History: Filter By Column
The funnel icon on each column enables you to filter using the values in that column.
You have the option to apply more advanced filtering criteria to the grid.
Driver Work History: Group By Column
By dragging a column header into the row above the grid, you can group by equivalent values for that column.
It is possible to add multiple fields to the grouping, which effectively chains the grouping in the order each field was added.
Driver Tractors
A history of the tractors that the driver has worked with for the past (X) number of years is displayed in this section.

Driver Tractors: Add
The recruiter can add a tractor to the driver by clicking add and filling in the required information in the pop-up.
Driver Tractors: Edit
A recruiter can also edit an existing tractor with the same pop-up listed above by selecting the tractor and clicking the edit icon.
Driver Tractors: Delete
A recruiter can also delete a tractor by highlighting it and clicking the delete icon.
WARNING: This action is irreversible.
Driver Tractors: Reset Filters
This button allows you to reset all of the filters on the drivers grid (including the Sort, Filter and Group By Fields).
Driver Tractors: Sort By Column
Clicking on a column header sorts the rows using the values in that column in ascending order.
Clicking a second time sorts in descending order, and clicking a third time removes the sort and reverts the grid back to its original order.
Driver Tractors: Filter By Column
The funnel icon on each column enables you to filter using the values in that column.
You have the option to apply more advanced filtering criteria to the grid.
Driver Tractors: Group By Column
By dragging a column header into the row above the grid, you can group by equivalent values for that column.
It is possible to add multiple fields to the grouping, which effectively chains the grouping in the order each field was added.
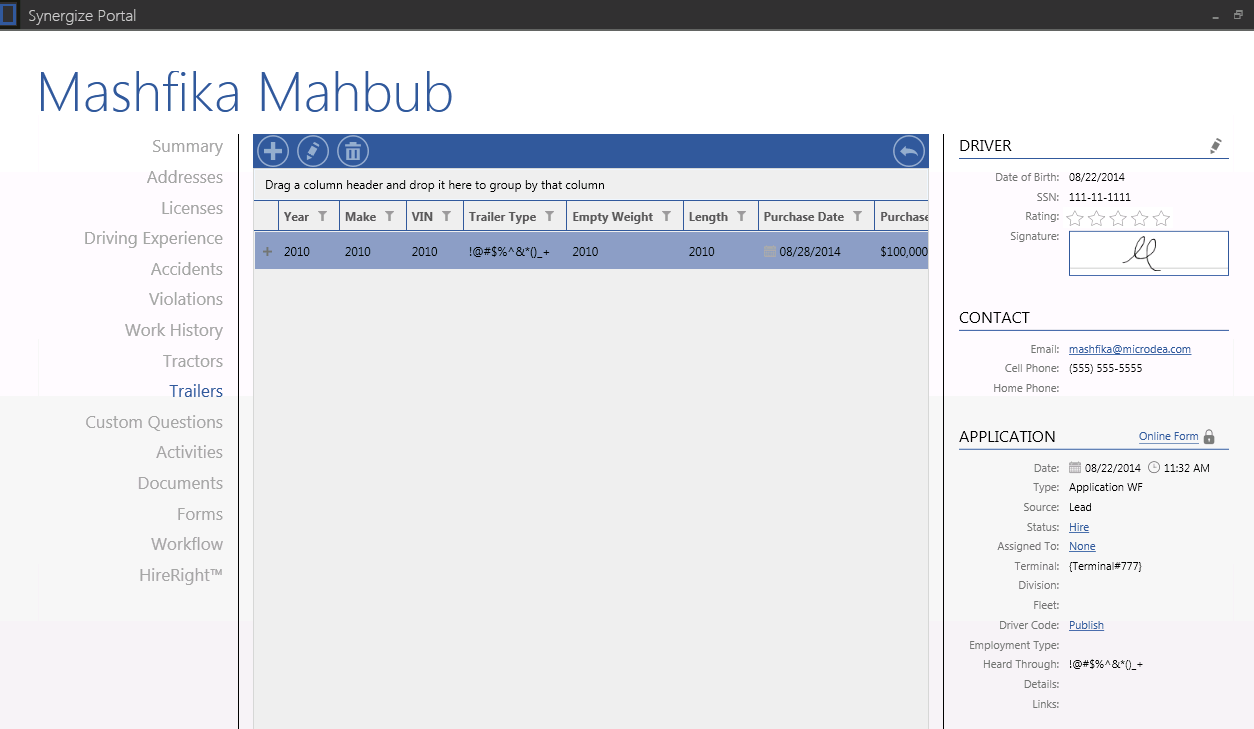
Driver Trailers
A history of the trailers that the driver has worked with for the past (X) number of years is displayed in this section.
Driver Trailers: Add
The recruiter can add a trailer to the driver, by clicking add and filling in the required information in the pop-up.
Driver Trailers: Edit
A recruiter can edit an existing trailer with the same pop-up listed above by selecting the trailer and clicking the edit icon.
Driver Trailers: Delete
A recruiter can delete a trailer by highlighting it and clicking the delete icon.
WARNING: This action is irreversible.
Driver Trailers: Reset Filters
This button allows you to reset all of the filters on the drivers grid (including the Sort, Filter and Group By Fields).
Driver Trailers: Sort By Column
Clicking on a column header sorts the rows using the values in that column in ascending order.
Clicking a second time sorts in descending order, and clicking a third time removes the sort and reverts the grid back to its original order.
Driver Trailers: Filter By Column
The funnel icon on each column enables you to filter using the values in that column.
You have the option to apply more advanced filtering criteria to the grid.
Driver Trailers: Group By Column
By dragging a column header into the row above the grid, you can group by equivalent values for that column.
It is possible to add multiple fields to the grouping, which effectively chains the grouping in the order each field was added.
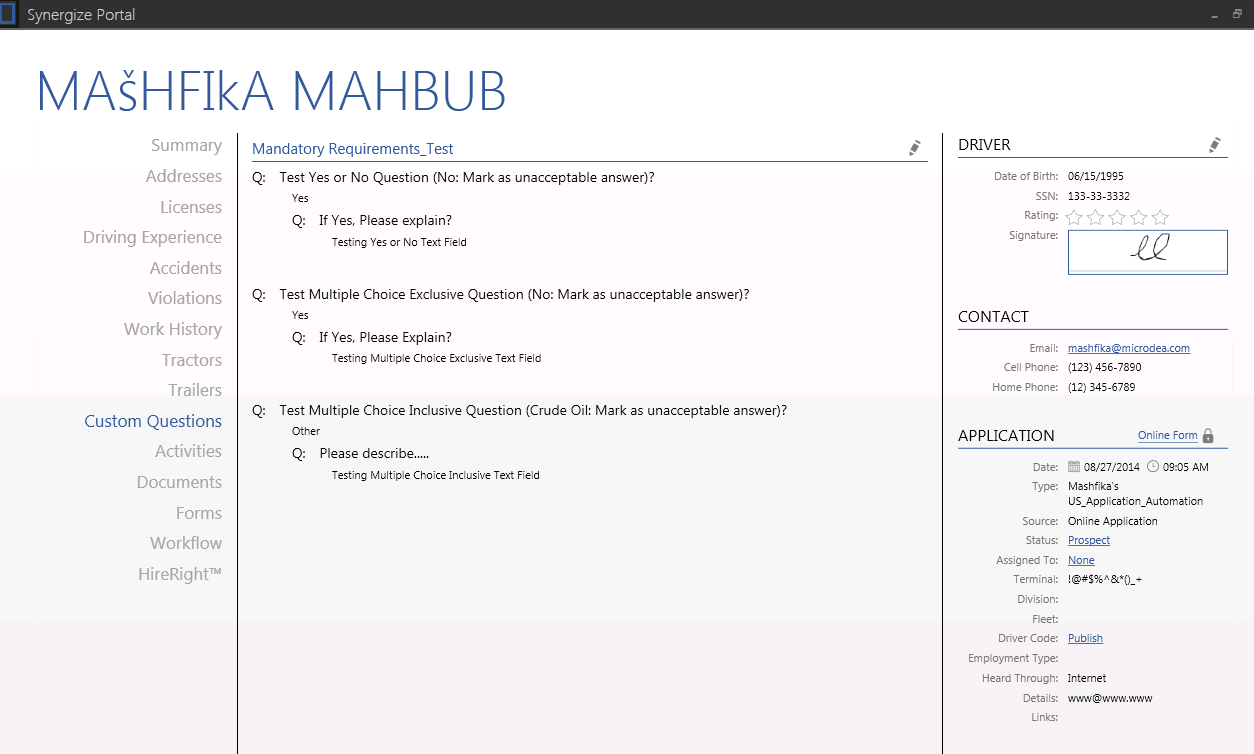
Driver Custom Questions
All of the custom questions associated with the driver are listed here.
They are separated by section/business object and are editable.
Driver Custom Questions: Edit
A recruiter can edit existing custom questions by clicking the edit icon.
WARNING: Editing answers is an irreversible action.
Driver Activities
The Activities tab shows various important milestones a given driver has completed (ie. Long Form Submission, Employment Verification, etc.).
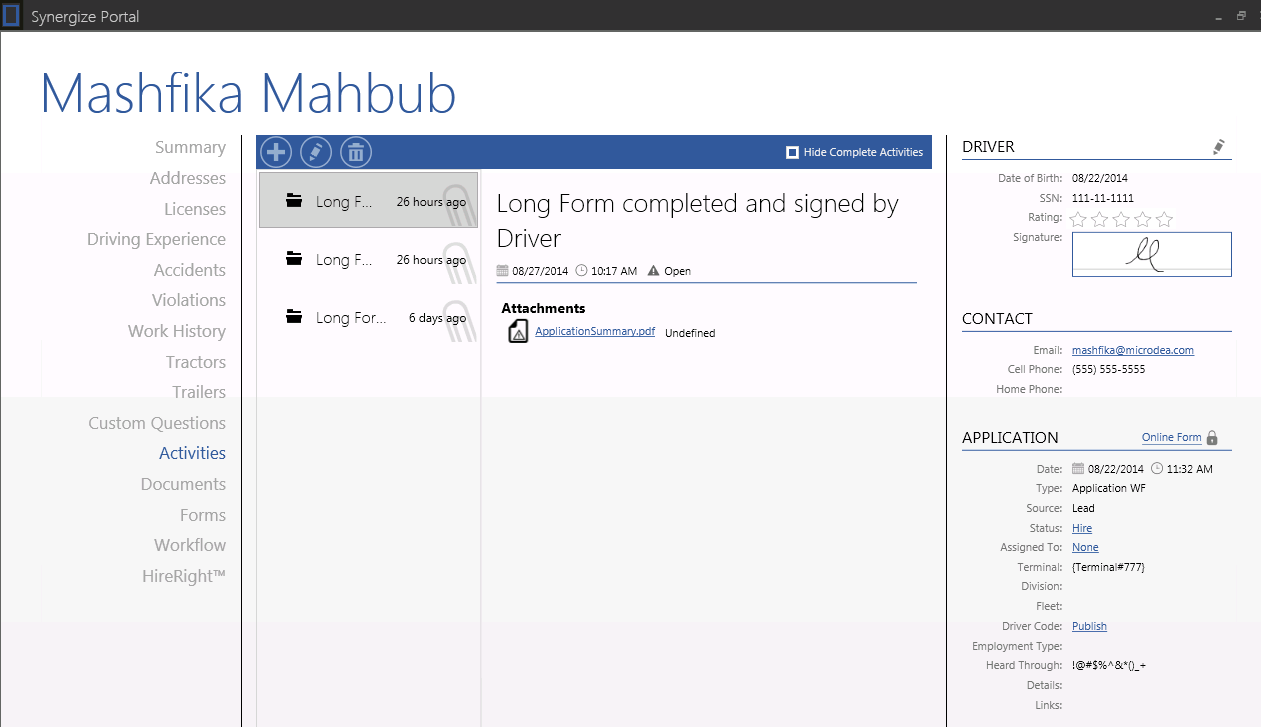
Driver Activities: View
By clicking on an activity the details and status of the activity along with any associated documents are displayed on the right side of the screen.
When a document is attached to an activity, the user can click on the link and open viewer to see the document.
Driver Activities: Add
The recruiter can add an activity to the driver, by clicking add and filling in the required information in the pop-up.
Driver Activities: Edit
A recruiter can also edit an existing activity with the same pop-up listed above, by selecting the activity and clicking the edit icon.
Driver Activities: Delete
A recruiter can also delete an activity by highlighting it and clicking the delete icon.
WARNING: This action is irreversible.
Driver Activities: Hide Completed Activities
You can hide or show activities with a completed status.
The check box in the top right corner enables the user to toggle this function.
Driver Documents
The documents section shows all of the documents associated with a given driver that are stored in Synergize.
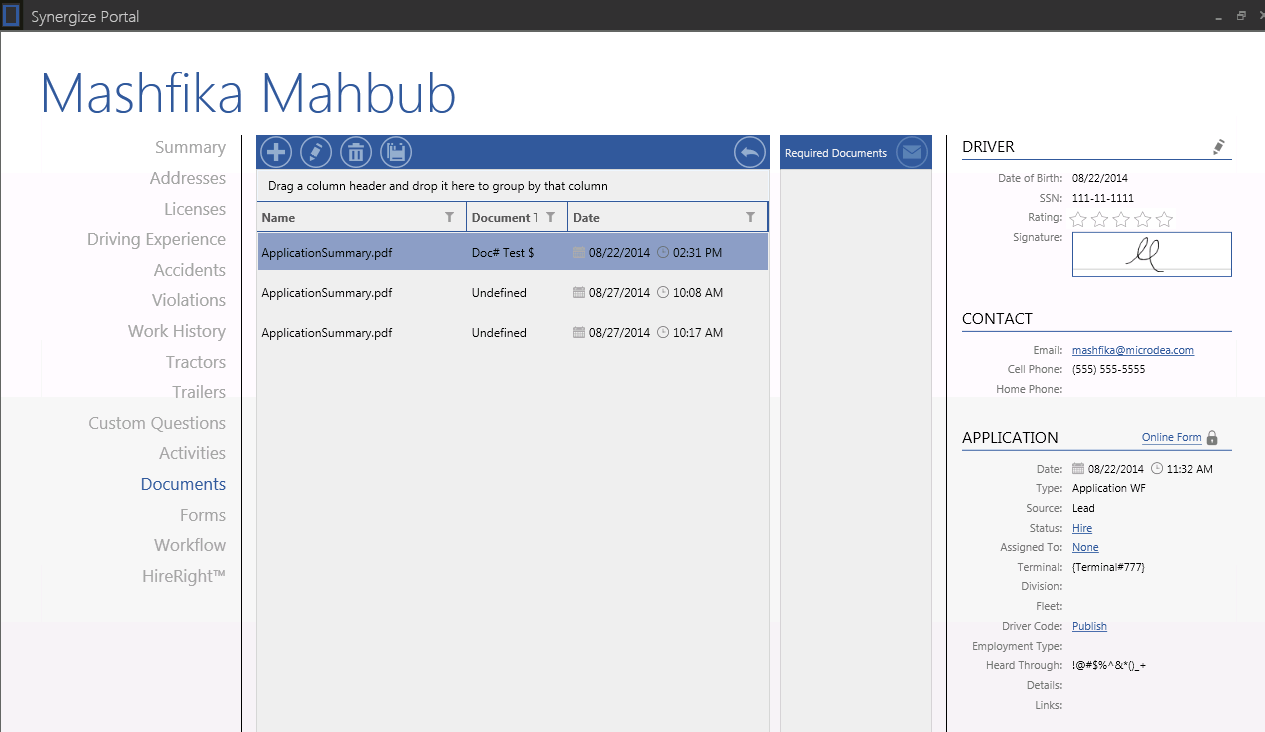
Driver Documents: View
By double-clicking on a document, the user can launch viewer to see the document's contents.
Driver Documents: Add
The recruiter can add a document to the driver, by clicking and attaching the document in the pop-up.
Driver Documents: Edit
A recruiter can edit an existing document with the same pop-up listed above, by selecting the document and clicking the edit icon.
This allows the user to change the document's name and Synergize document type.
Driver Documents: Delete
A recruiter can delete a document by highlighting it and clicking the delete icon.
WARNING: This action is irreversible.
Driver Documents: Save As
A recruiter can download a file from the driver document section by clicking on the save as icon.
Driver Forms
Forms and Form Packages for the driver are displayed in this section.
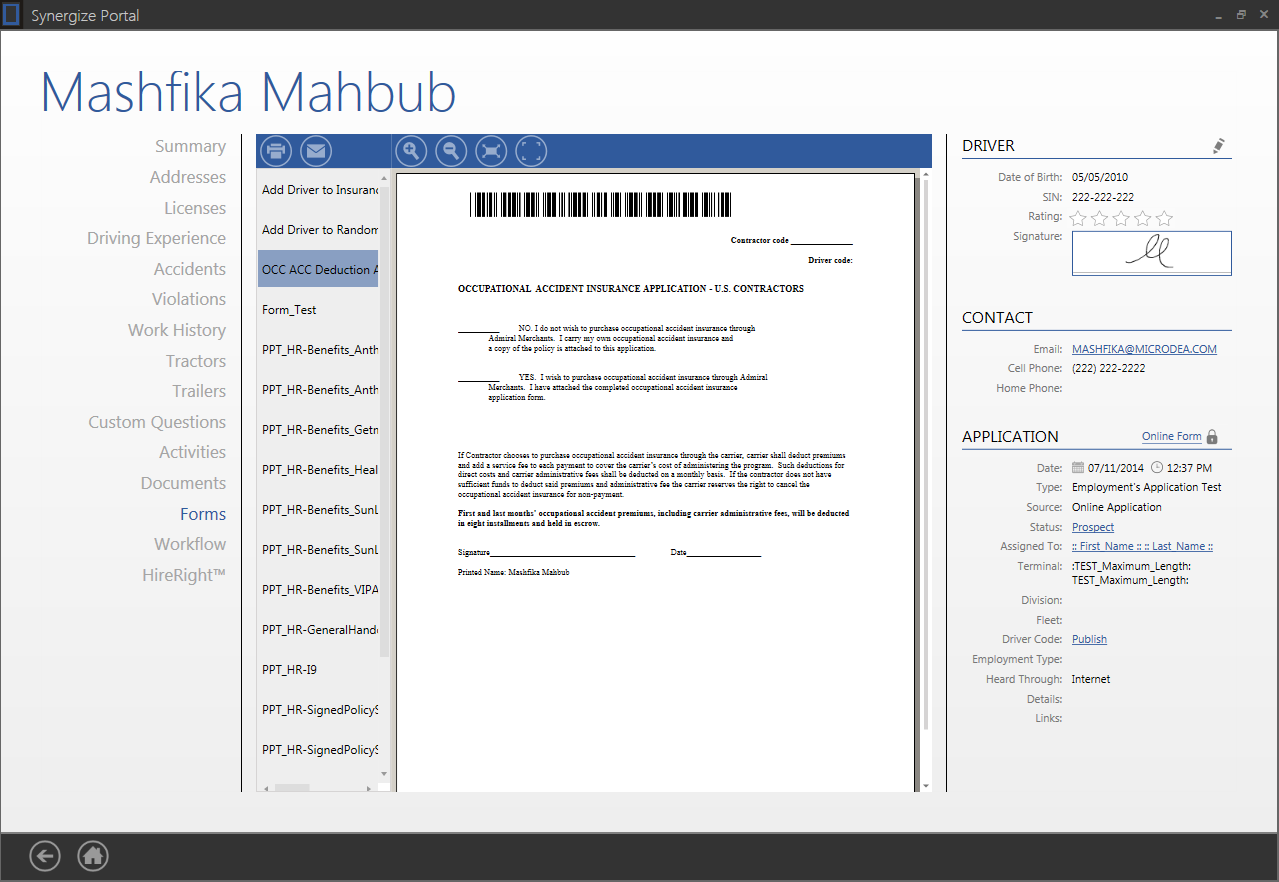
Driver Forms: Load Form/Form Package
You can view the form or form package for driver, by double-clicking on its name in the list.
Driver Forms: Print
You can print the form/form package by selecting it and clicking the Print button or by pressing Ctrl+P.
Driver Forms: Email
You can email the form/form package by clicking the Email button and filling in the required information like the contact that has an email id (available for the driver), subject, email body and attachment form.
Driver Forms: Fax
You can fax the form/form package by clicking the Fax button and filling in the required information like the contact that has a fax number (available for the driver), cover sheet form/package and document form/package.
Driver Forms: Zoom In
You can zoom in to the form/form package by selecting it, double-clicking it (to load) and clicking the Zoom In button.
Driver Forms: Zoom Out
You can zoom out of the form/form package by selecting it, double clicking it (to load) and clicking the Zoom Out button.
Driver Forms: Fit To Width
You can fit the form/form package to the width of container area by selecting it, double clicking it (to load) and clicking the Fit To Width button.
Driver Forms: Actual Size
You can view the actual size of form/form package by selecting it, double clicking it (to load) and clicking the Actual Size button.
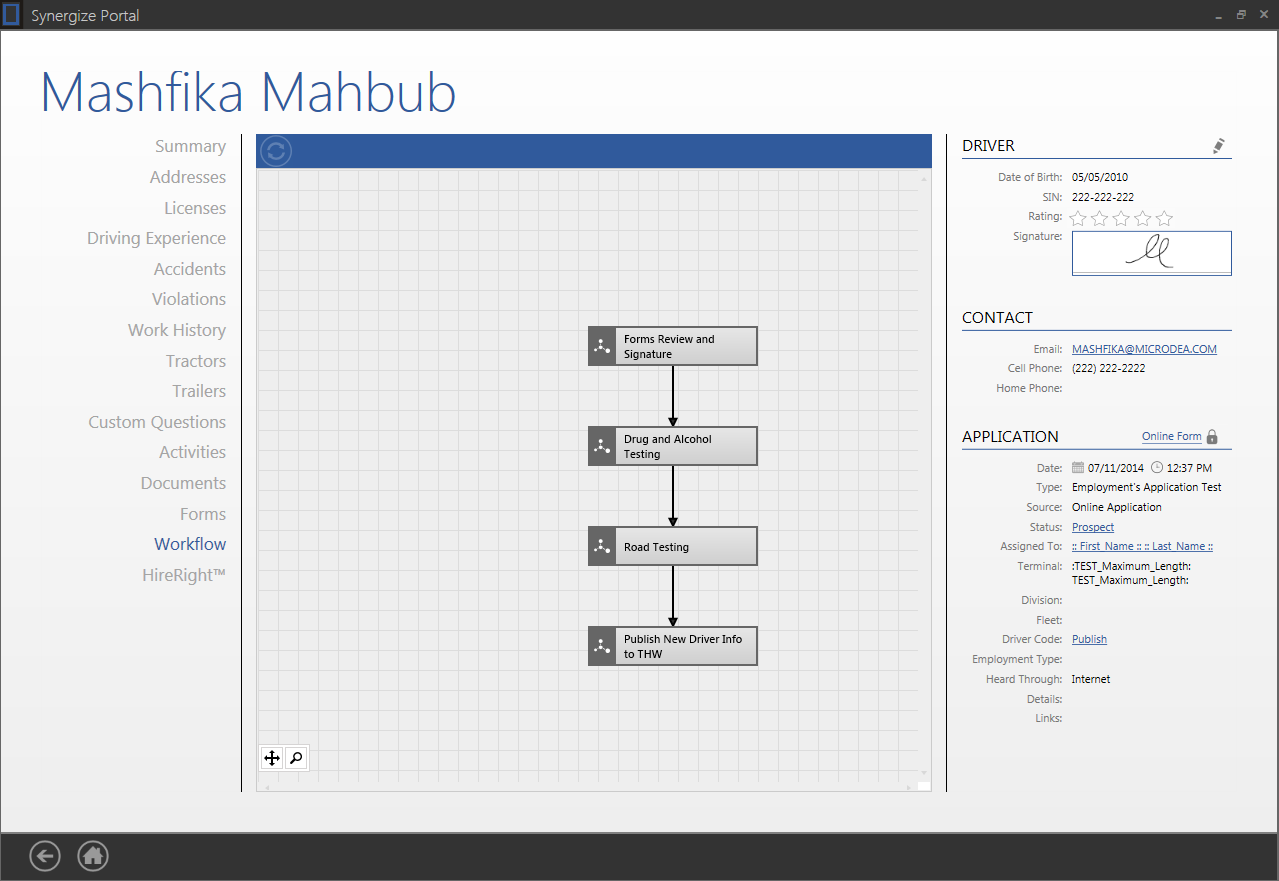
Driver Workflow
You can view the workflow status of the driver related to his application type which is provided while recruiting or adding the driver.
Driver Workflow: Promote
You can promote the driver to the latest version of the workflow, by clicking the Refresh button at the top.
WARNING: Depending on changes made in workflow (Manage tab) this action can lead to some data lost which is irreversible.
Driver Workflow: Auto fit and Scale
You can auto fit, scale in/out the workflow on its canvas, by clicking Auto fit and Scale button given at the bottom left corner if the workflow canvas.
Driver Workflow: Start
You can start a step in the workflow by selecting that step and clicking the Start button inside the step.
If its not visible, it means that step can not be started due to the step(s) (Any/All: depending on how this workflow and step is designed) pointing to it not being completed.
Driver Workflow: Force Complete
You can Force Complete a step in the workflow by selecting that step and clicking the Force Complete button inside the step.
If it's not visible, it means that step has already been completed.
You have to provide a reason for closing the step forcefully.
Driver Workflow: Complete
You can complete a step in the workflow by selecting that step and clicking the Complete button inside the step.
If its not visible, it means that step has not been started yet.
Driver Workflow: Fail
You can start a step in the workflow by selecting that step and clicking the Start button inside the step.
If it's not visible, it means that step can not be started due to the step(s) (Any/All: depending on how this workflow and step is designed) pointing to it not being completed.
You have to provide a reason for failing the step.
Driver Workflow: Restart
You can start a step in the workflow by selecting that step and clicking the Start button inside the step.
If its not visible, it means that step can not be started due to the step(s) (Any/All: depending on how this workflow and step is designed) pointing to it not being completed.
You have to provide a reason for restarting the step.
Step Summary
You can view detailed information of a step like - pre conditions, post conditions, actions, history etc in the summary box at bottom right corner of the canvas that appears after selecting a step.
The initial mode of this summary will show pre-conditions, post conditions and actions related to this step, and user can click the Toggle History button to view the history, along with the reasons that user provided while changing the state of the step.
Driver HireRight™
The HireRight tab shows a list of products/packages the system has requested from HireRight as part of the workflow automation.
Each entry has its own status, completion percentage and the ability to view a report once it has returned.
Driver HireRight™: Launch HireRight
Clicking on the HireRight icon will launch a single sign on page in the User's browser for them to go directly to HireRight and log in to their account.
Driver HireRight™: Reset Filters
This button allows the user to reset all of the filters on the grid (including the Sort, Filter and Group By Fields).
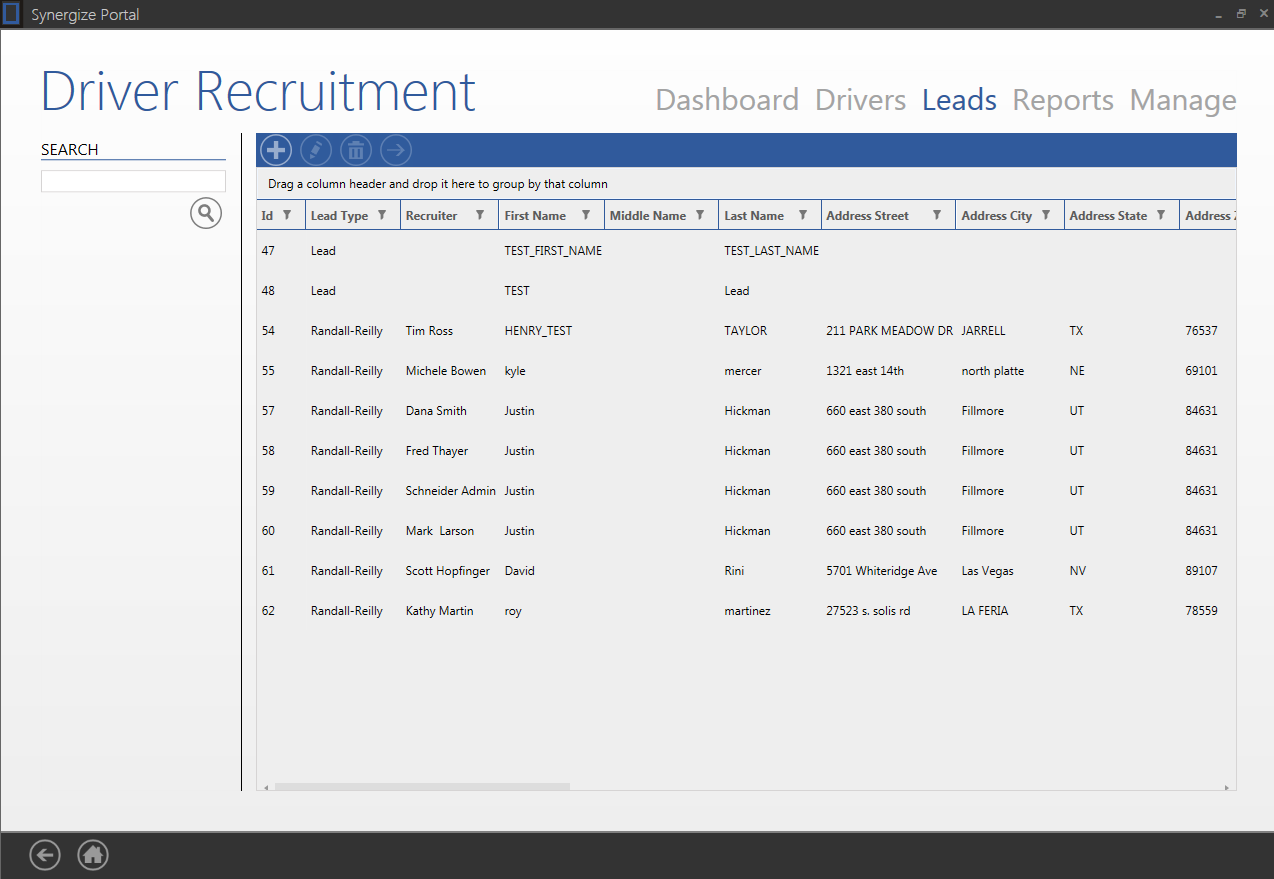
Lead Grid View
The Lead Screen Dashboard is the first screen presented to the recruiter when the Leads tab is selected from the Driver Recruitment Dashboard.
Recruiters can add, edit, delete or convert to recruit drivers, search leads, select and view a lead's full profile.
100 Leads are shown per page.
Lead Grid View: Search
Use this search control to execute a text-based search for leads.
Lead Grid View: Navigation
You can navigate to First/Previous/Next/Last page of search results by clicking the provided buttons in the pagination section, below the search grid that shows up if the search result set is not empty.
Lead Grid View: Add
Brings up a pop-up allowing the recruiter to enter the basic information required to create a new lead in the system. System allows recruiter to create duplicate leads.
Lead Grid View: Edit
A recruiter can also edit an existing lead with the same pop-up listed above by selecting a lead and clicking the edit icon.
Lead Grid View: Delete
A recruiter can also delete a lead by highlighting it and clicking the delete icon.
WARNING: This action is irreversible.
Lead Grid View: Convert to Recruit
A recruiter can convert a lead to driver by selecting a lead and clicking the convert to recruit icon.
The recruiter can set the application type, application status and which recruiter this driver should be assigned to.
Lead Grid View: Reset Filters
This button allows you to reset all of the filters on the drivers grid (including the Sort, Filter and Group By Fields).
Lead Grid View: Settings
This button opens a pop-up that allows the user to select which columns to show or hide.
Lead Grid View: Sort By Column
Clicking on a column header sorts the rows using the values in that column in ascending order.
Clicking a second time sorts in descending order, and clicking a third time removes the sort and reverts the grid back to its original order.
Lead Grid View: Filter By Column
The funnel icon on each column enables you to filter using the values in that column.
You have the option to apply more advanced filtering criteria to the grid.
Lead Grid View: Group By Column
By dragging a column header into the row above the grid, you can group by equivalent values for that column.
It is possible to add multiple fields to the grouping, which effectively chains the grouping in the order each field was added.
Lead Profile
The recruiter can view a lead's full profile by selecting a lead and double clicking on lead.
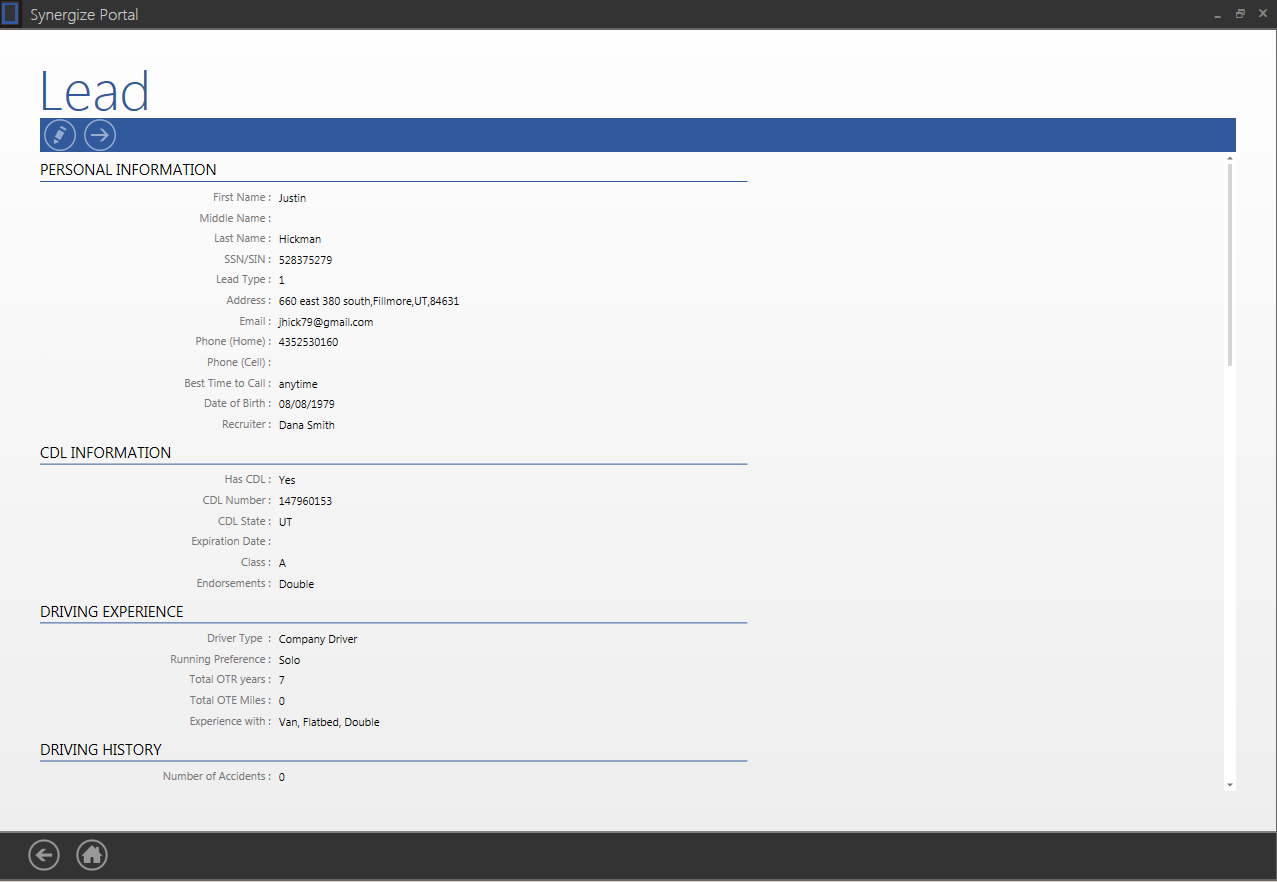
Lead Profile: Edit
A recruiter can also edit an existing lead Personal Information with the same pop-up listed above by selecting a lead and clicking the edit icon.
Lead Profile: Convert to Recruit
A recruiter can convert a lead to driver by selecting a lead and clicking the convert to recruit icon.
The recruiter can set the application type, application status and which recruiter this driver should be assigned to.
The Reports dashboard displays a list of available reports that can be generated from Synergize Report Designer.
A report merges the recruitment data onto a standardized template and allows the recruiter to print and or save the report from the reports display screen.
The driver recruitment online application form (in Manage tab) uses application summary report to capture the snapshot of online application form submissions.

Reports: Upload
The upload function allows the recruiter to upload a form (.repx file) to the system, which can then be used to send out to drivers.Note: .repx files can be created and modified by Synergize Report Designer and are stored and managed by Report Viewer Server.
Reports: Download
The download function allows the recruiter to download a .repx file from the system and save it to their local machine.
This is useful if a recruiter wants to make changes to a report and upload a modified version.
Reports: Delete
The delete function will delete a report from Report Viewer Server.
Once deleted, the form will no longer be available in the system, however any reports that were rendered and saved to Synergize or sent to drivers will not be affected.
WARNING: This action is irreversible.
Reports: Load Report
You can view the report by double clicking on its name in the list.
Load Report: Parameters
You can load the report by providing the values to the parameters and clicking the Submit button.
User can also reset the values of the parameters back to default, by clicking the Reset button if the parameters are modified.
Load Report: Print
You can print the report by selecting it and clicking the Print button or by pressing Ctrl+P.
Load Report: Page Setup
You can setup a page for the report by selecting it and clicking the Page Setup button.
Load Report: Zoom In
You can zoom in to the report by selecting it and clicking the Zoom In button.
Load Report: Zoom Out
You can zoom out of the report by selecting it and clicking the Zoom Out button.
Load Report: First Page
You can navigate to first page of the report by clicking the First Page button.
Load Report: Previous Page
You can navigate to previous page of the report by clicking the Previous Page button.
Load Report: Next Page
You can navigate to next page of the report by clicking the Next Page button.
Load Report: Last Page
You can navigate to last page of the report by clicking the Last Page button.
Load Report: Save
You can save the report by selecting it and clicking the Save button.
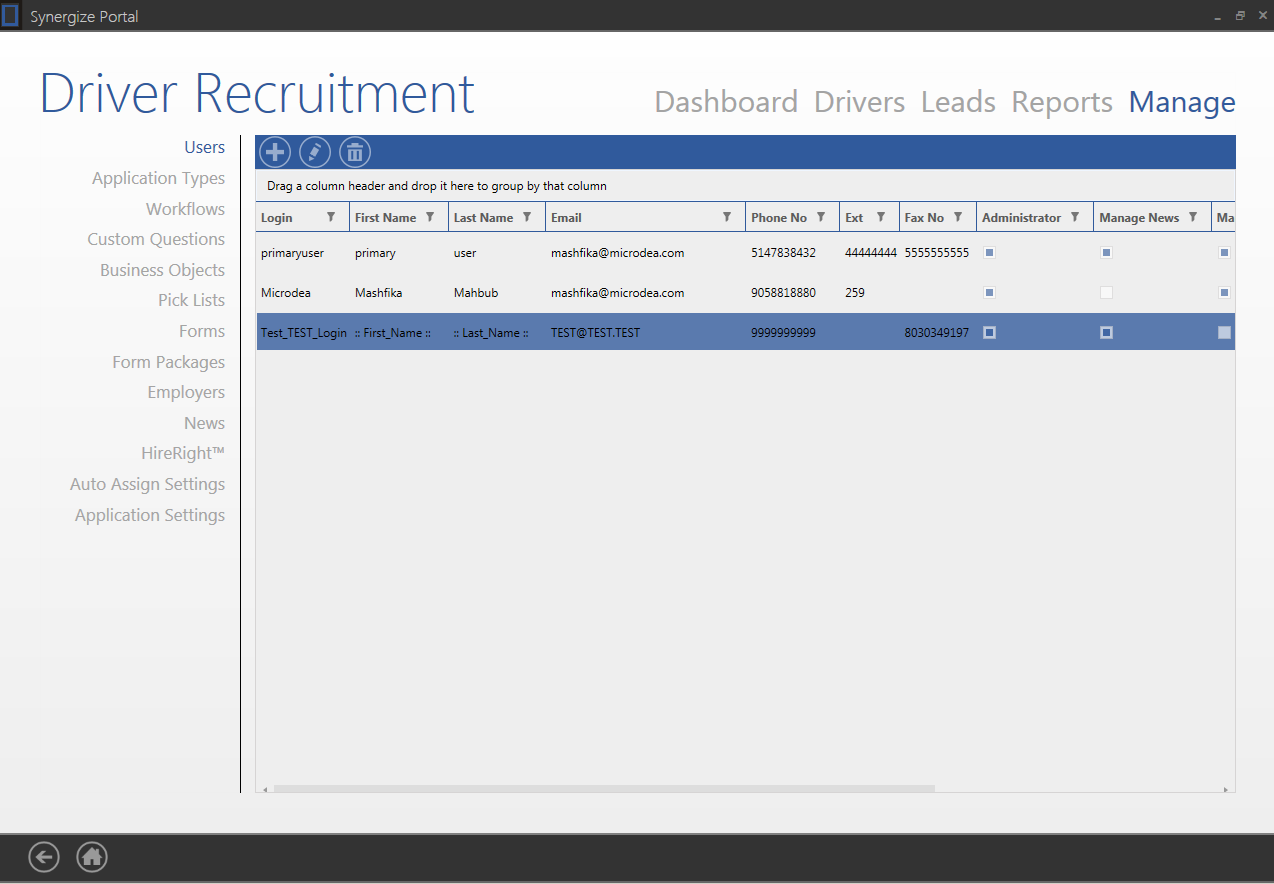
The Users tab allows you to add, edit or delete users in terms of their credentials and which functions they can perform within Driver Recruitment.
Changing permissions will hide the relevant tabs from the application's manage tab the next time the affected user logs in.
Administrator
Administrator permission allows the logged in user to view and manage options in the following tabs:
-
Users
-
Application Types
-
Pick Lists
-
Forms
-
Form Packages
-
HireRight
-
Auto Assign
-
Application Settings
Manage News
Manage News permission allows the logged in user to view and manage the News tab.
Manage Employers
Manage Employers permission allows the logged in user to view and manage the list of employers in the Employers tab.
Manage Workflows
Manage Workflows permission allows the logged in user to view and manage options within the Workflows tab.
Manage Custom Questions
Manage Custom Questions permission allows the logged in user to view and manage options within the Custom Questions and Business Objects tabs.
Users: Add
The recruiter can add a new user by clicking add and filling in the required information in the pop-up.
Users: Edit
A recruiter can edit an existing user with the same pop-up listed above by selecting a user and clicking the edit icon.
Users: Delete
A recruiter can delete a user by highlighting it and clicking the delete icon.
System does not allow to delete Admin User.
WARNING: This action is irreversible.
Users: Reset Filters
This button allows you to reset all of the filters on the drivers grid (including the Sort, Filter and Group By Fields).
Users: Sort By Column
Clicking on a column header sorts the rows using the values in that column in ascending order.
Clicking a second time sorts in descending order, and clicking a third time removes the sort and reverts the grid back to its original order.
Users: Filter By Column
The funnel icon on each column enables you to filter using the values in that column.
You have the option to apply more advanced filtering criteria to the grid.
Users: Group By Column
By dragging a column header into the row above the grid, you can group by equivalent values for that column.
It is possible to add multiple fields to the grouping, which effectively chains the grouping in the order each field was added.
The Application Types tab allows administrators to configure the various types of driver application types. Within this list, you can add, edit, or delete application types as well as sort and filter the applications.
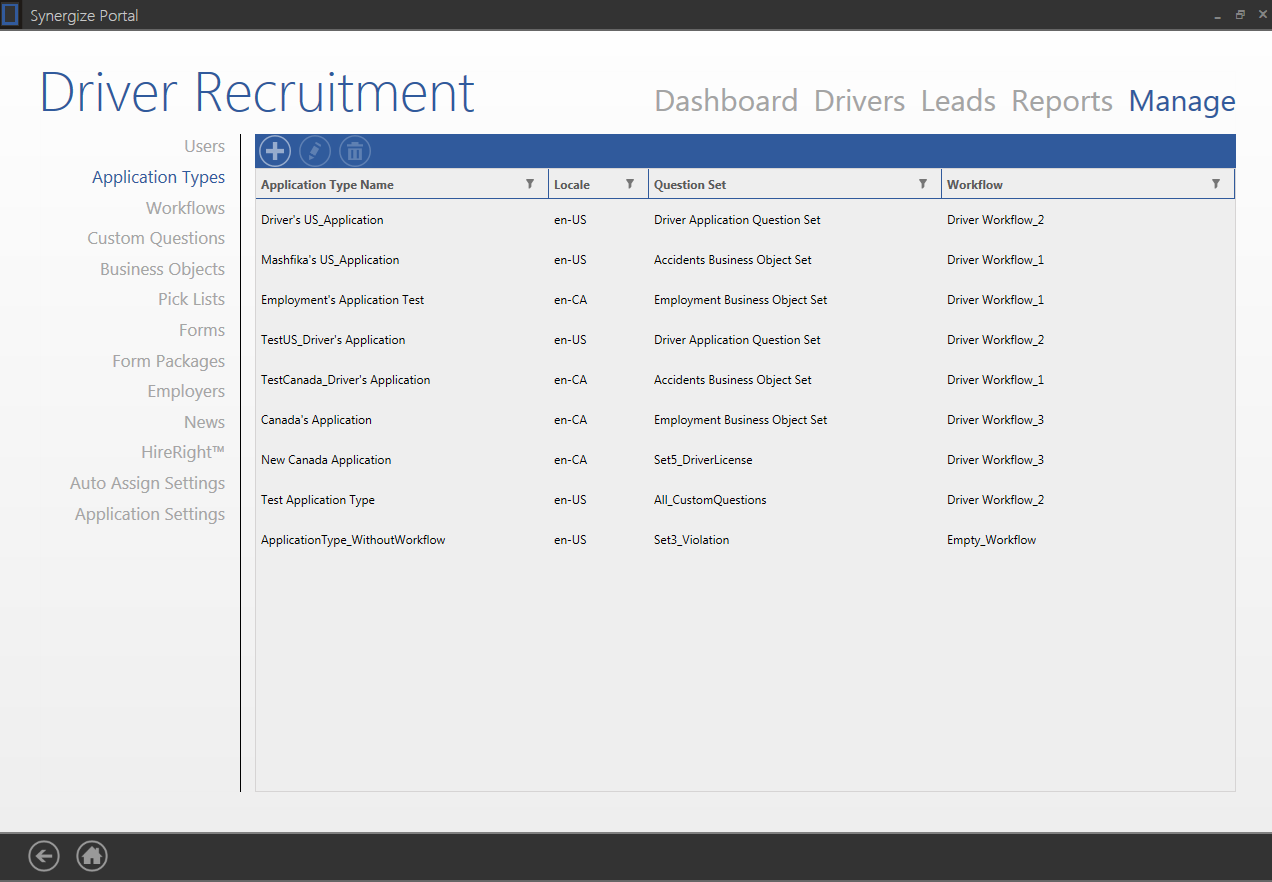
Application Types: Add
The recruiter can add a new Application Type by clicking add and filling in the required information in the pop-up.
Application Types: Edit
A recruiter can edit an existing Application Type with the same pop-up listed above by selecting an Application Type and clicking the edit icon.
Application Types: Delete
A recruiter can delete an Application Type by highlighting it and clicking the delete icon.
WARNING: This action is irreversible.
Application Types: Sort By Column
Clicking on a column header sorts the rows using the values in that column in ascending order.
Clicking a second time sorts in descending order, and clicking a third time removes the sort and reverts the grid back to its original order.
Application Types: Filter By Column
The funnel icon on each column enables you to filter using the values in that column.
You have the option to apply more advanced filtering criteria to the grid.
The Workflows tab allows users to add, edit, or delete workflow names and descriptions as well as design workflows and promote drivers to the latest workflow.
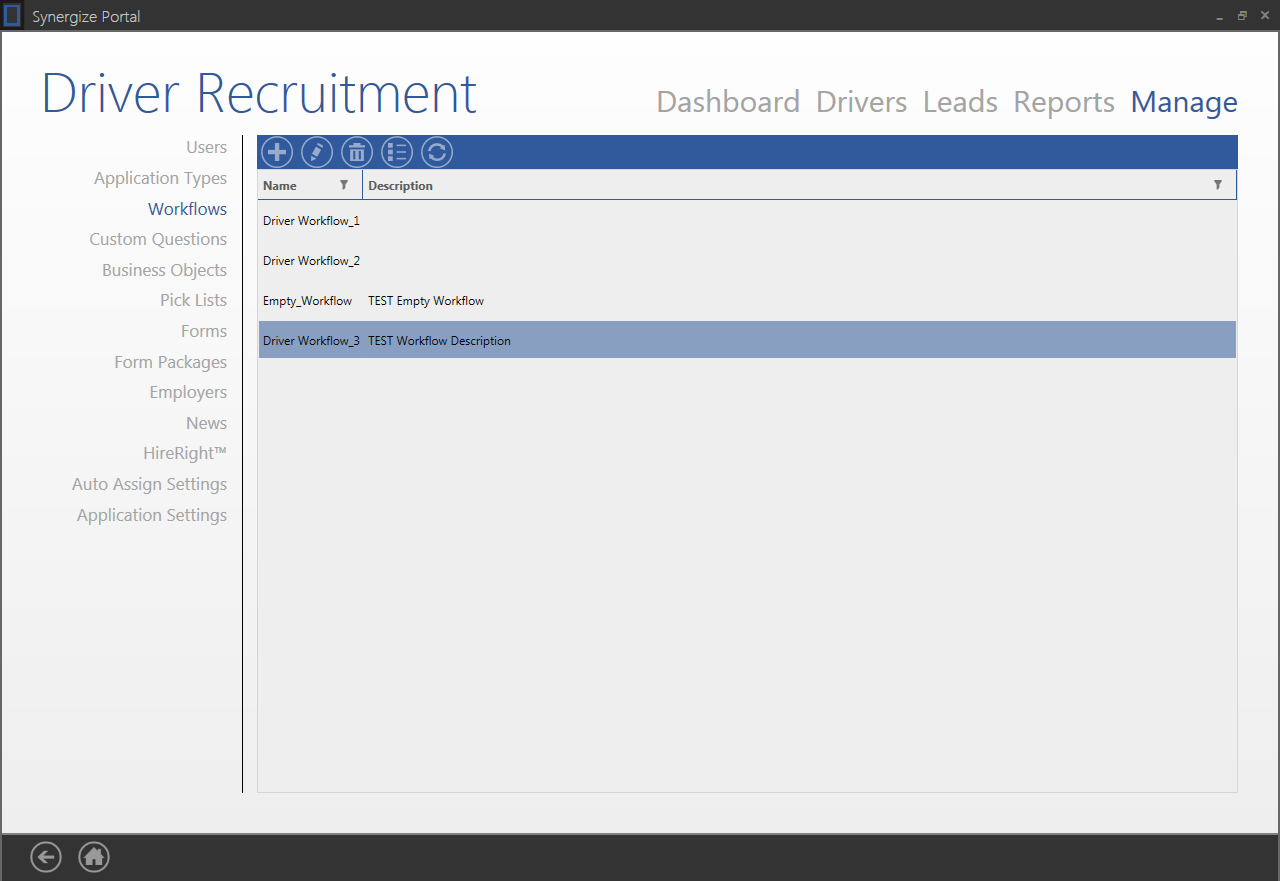
Workflows: Add
The recruiter can add a new workflow by clicking add and filling in the required information in the pop-up.
Workflows: Edit
A recruiter can edit an existing Workflow with the same pop-up listed above by selecting a Workflow and clicking the edit icon.
Workflows: Delete
A recruiter can delete an existing Workflow by highlighting it and clicking the delete icon.
WARNING: This action is irreversible.
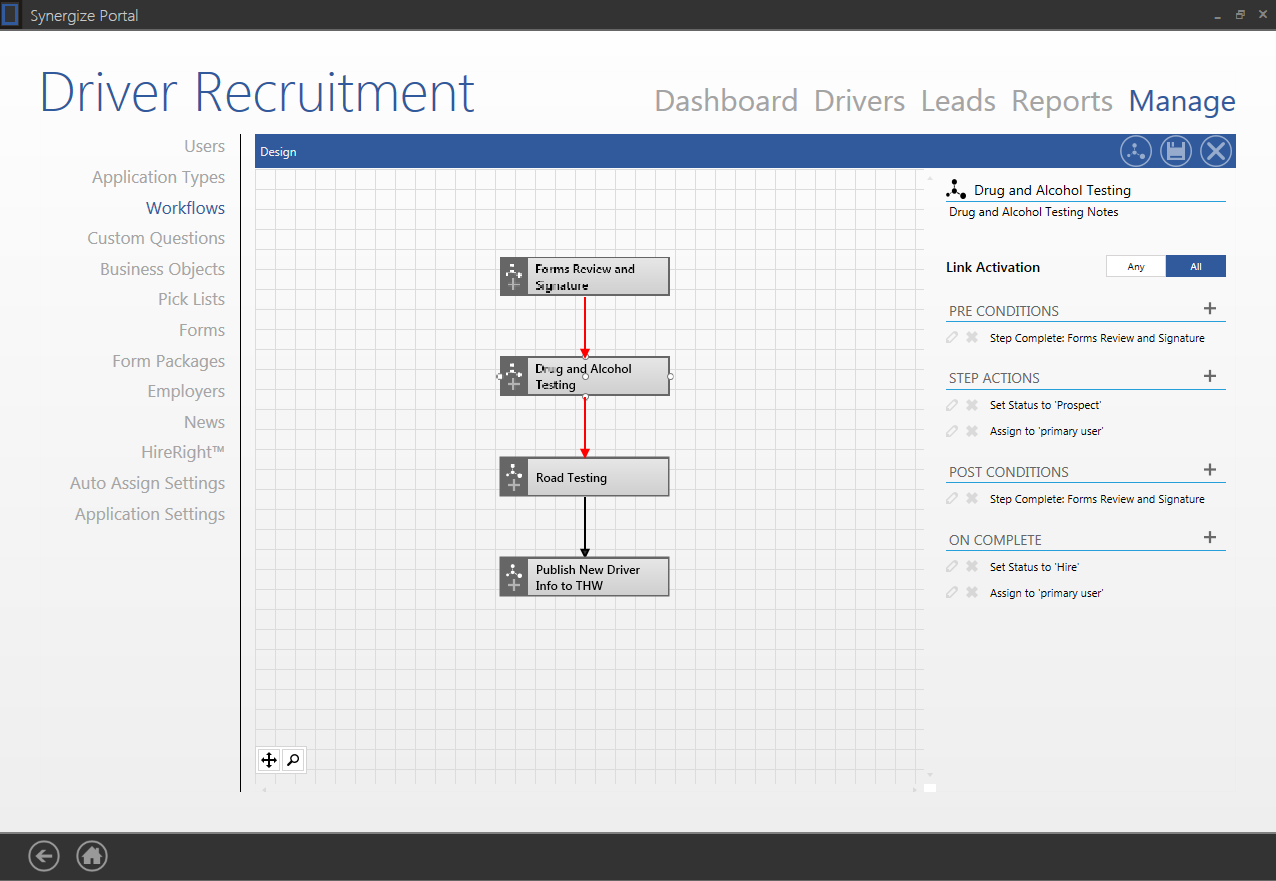
Workflows: Design Mode
In design mode, Users can add steps to the workflow by clicking on the add step icon.
Steps can be configured with pre-conditions and post-conditions as well as step actions and on-complete actions.
Design Mode: Pre-Conditions
Pre-Conditions are conditions that must be met in order to enter the workflow step.
The following options are available as pre-conditions:
-
Has Document: Performs a check to see if a given driver has a certain document type associated with their profile.
-
Step Completed: Checks to see if another step in the workflow has been completed.
Design Mode: Step Actions
After Pre-Conditions have been met, the step can begin executing Step Actions.
Step actions are activities which take place as part of workflow step.
The following options are available for step actions:
-
Order HireRight Product
-
Order HireRight Package
-
Change Application Status - Note: Application status changes now have an associated "Reason" property that is used to describe why an application status was changed.
-
Change Assigned Recruiter
-
Order HireRight Drug / Alcohol Report
The above actions are automated by the workflow engine, however HireRight orders can only be placed and will not be received until HireRight makes the document available to the system.
To check if a document has been received from HireRight, you can either configure a Post Condition for the current step or a Pre-Condition for another step later in the workflow.
Design Mode: Post Conditions
Post Conditions are conditions that must be met in order to complete a given workflow step.
The following options are available as post conditions:
-
Has Document - Performs a check to see if a given driver has a certain document type associated with their profile.
-
Step Completed - Checks to see if another step in the workflow has been completed.
Design Mode: On Complete Actions
As each step's post conditions are met, On Complete actions can be configured to execute.
The following options are available as on complete actions:
-
Order HireRight Product
-
Order HireRight Package
-
Change Application Status
-
Change Assigned Recruiter
-
Order HireRight Drug / Alcohol Report
As with step actions, these actions are automated by the workflow engine, but HireRight documents must be detected in the pre/post conditions of a later workflow step.
Design Mode: Link Activation
Link activation specifies how previous steps trigger the current step.
There are two settings:
-
Any: This means that any prior step, when it completes, can trigger this step.
-
All: This means that all prior, connected steps must be completed before this step can be triggered.
Design Mode: Connecting Steps
Workflow steps can be connected by highlighting a step and dragging from any of the dots on the perimeter of the step and connecting to a subsequent step.
Steps can connect to more than one subsequent step, but cannot connect in a cyclical manner.
Design Mode: Saving or Canceling Changes
To save changes to a workflow, click on the save icon.
To cancel changes click on the cancel icon.
Workflows are versioned, so updating a workflow will not affect drivers who are still in the old version.
Workflows: Promote Drivers
Clicking the promote drivers icon will open a pop-up with a list of all of the drivers who are in an older version of the workflow.
drivers who are selected by checking the box beside their name will be upgraded to the new version of the workflow.
Note: Workflow steps are currently evaluated up until the system finds a step that has not been started.
If a workflow is updated to add a step earlier in the workflow than a driver has been advanced to, the system will not process steps beyond the newly added steps.
For example, if a step is configured to order a HireRight document and then a step is added before that step, the next time we process workflows, the system will stop at the new step and ignore the conditions for retrieving the document until the new step is started.
If you do not wish to affect a driver or set of drivers in this manner, do not upgrade them to the latest workflow unless this issue can be mitigated properly.
Workflows: Sort By Column
Clicking on a column header sorts the rows using the values in that column in ascending order.
Clicking a second time sorts in descending order, and clicking a third time removes the sort and reverts the grid back to its original order.
Workflows: Filter By Column
The funnel icon on each column enables you to filter using the values in that column.
You have the option to apply more advanced filtering criteria to the grid.
The custom questions section allows recruiters to add their own question sets to the online driver application.
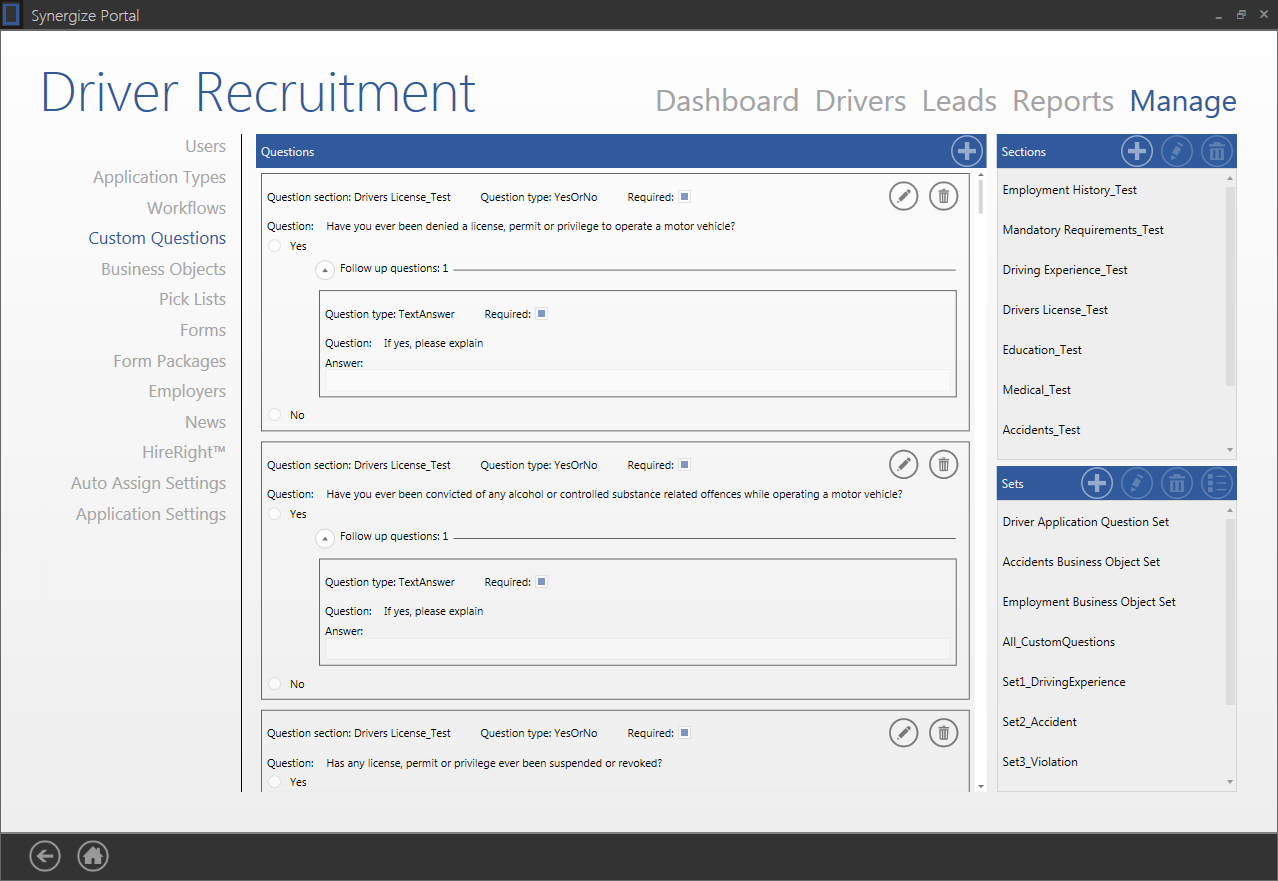
There are three components to custom questions:
-
Sections
-
Sets
-
Questions
To learn more, see Custom Questions, Sets, and Sections.
Business objects are a global configuration for questions that should be asked for each instance of a business object. This allows the web form to ask the applicant questions that are specific to each instance of each of the business objects that they add.
Example: For each license (DriverLicense) that a driver adds, ask them to answer each question in the configured set.
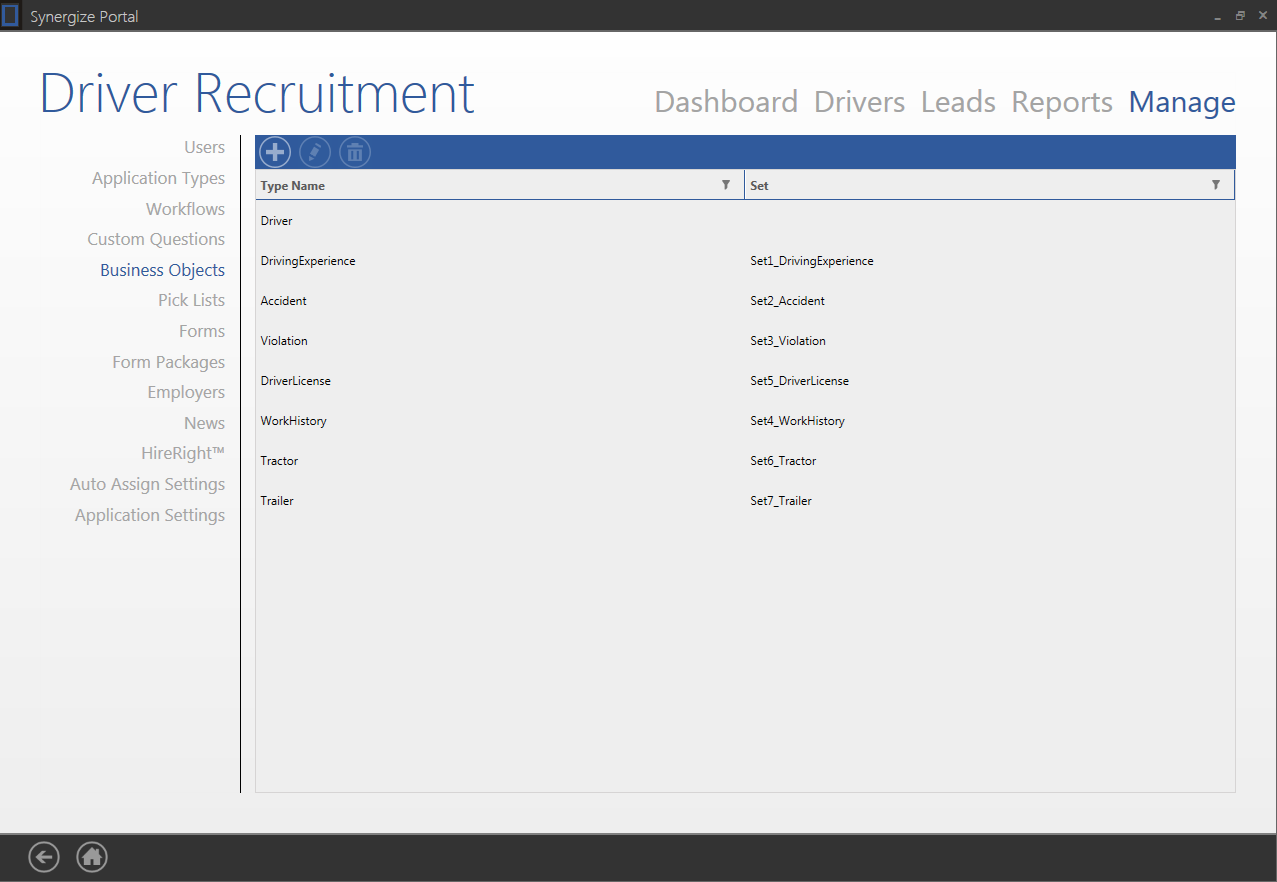
The following business objects are available:
-
Driver (Not editable)
-
DriverLicense
-
DrivingExperience (Experience with Equipment Types)
-
Tractor
-
Trailer
-
Accident
-
Violation
-
WorkHistory (Actual Employment History)
Each of these business objects can be configured to use only one question set.
Business Objects: Add
The recruiter can map a new Question Set to a Business Object by clicking add and filling in the required information in the pop-up.
Business Objects: Edit
A recruiter can edit an existing Question Set mapping to a Business Object by selecting a Business Object and clicking the edit icon. In this case, the Business Object will be read-only and only the set can be changed.
Business Objects: Delete
A recruiter can delete a Business Object mapping by highlighting it and clicking the delete icon.
WARNING: This will delete all of the answers to the questions collected for drivers in the system associated with this business object. This action is irreversible.
Business Objects: Sort By Column
Clicking on a column header sorts the rows using the values in that column in ascending order. Clicking a second time sorts in descending order, and clicking a third time removes the sort and reverts the grid back to its original order.
Business Objects: Filter By Column
The funnel icon on each column enables you to filter using the values in that column. You have the option to apply more advanced filtering criteria to the grid.
Pick lists are drop-down lists found throughout the application or associated online application form to help the user select from a list of values. As a recruiter or administrator, you can configure pick list values by selecting a pick list and using the add, edit, or delete buttons to manage the list.

Below are the pick list types that user can manage in this section:
-
Accident Type
-
Application Status (cannot be added to online driver application -- only for recruiters to assign)
-
Division (cannot be added to online driver application -- only for recruiters to assign)
-
Employment Gap Types
-
Employment Type (cannot be added to online driver application -- only for recruiters to assign)
-
Equipment Class
-
Equipment Type
-
Fleet (cannot be added to online driver application -- only for recruiters to assign)
-
Job Position
-
Lead Status (cannot be added to online driver application -- only for recruiters to assign)
-
License Class
-
License Endorsement Type
-
Origin Reference
-
Reason For Leaving Position
-
Signature Type
-
Terminal
-
Tractor Type
-
Trailer Type
Pick Lists: Add
The recruiter can add a new item to a pick list by clicking add and filling in the required information in the pop-up.
Pick Lists: Edit
A recruiter can edit an existing item in a pick list with the same pop-up listed above by selecting a pick list item and clicking the edit icon.
Pick Lists: Delete
A recruiter can delete a pick list item by highlighting it and clicking the delete icon.
WARNING: Pick list values that are associated with any drivers in the system cannot be deleted. Also, this action is irreversible.
Forms are essentially Report Design (.repx) files that are rendered and sent to the driver. Each form is dynamically rendered, which means that it can be designed to pull specific information about the driver or the company from the database before it gets rendered as a file like a PDF, which can then be sent by email or fax. Forms are meant to save the recruiter and the driver time by automating the process of filling in as many details as possible.
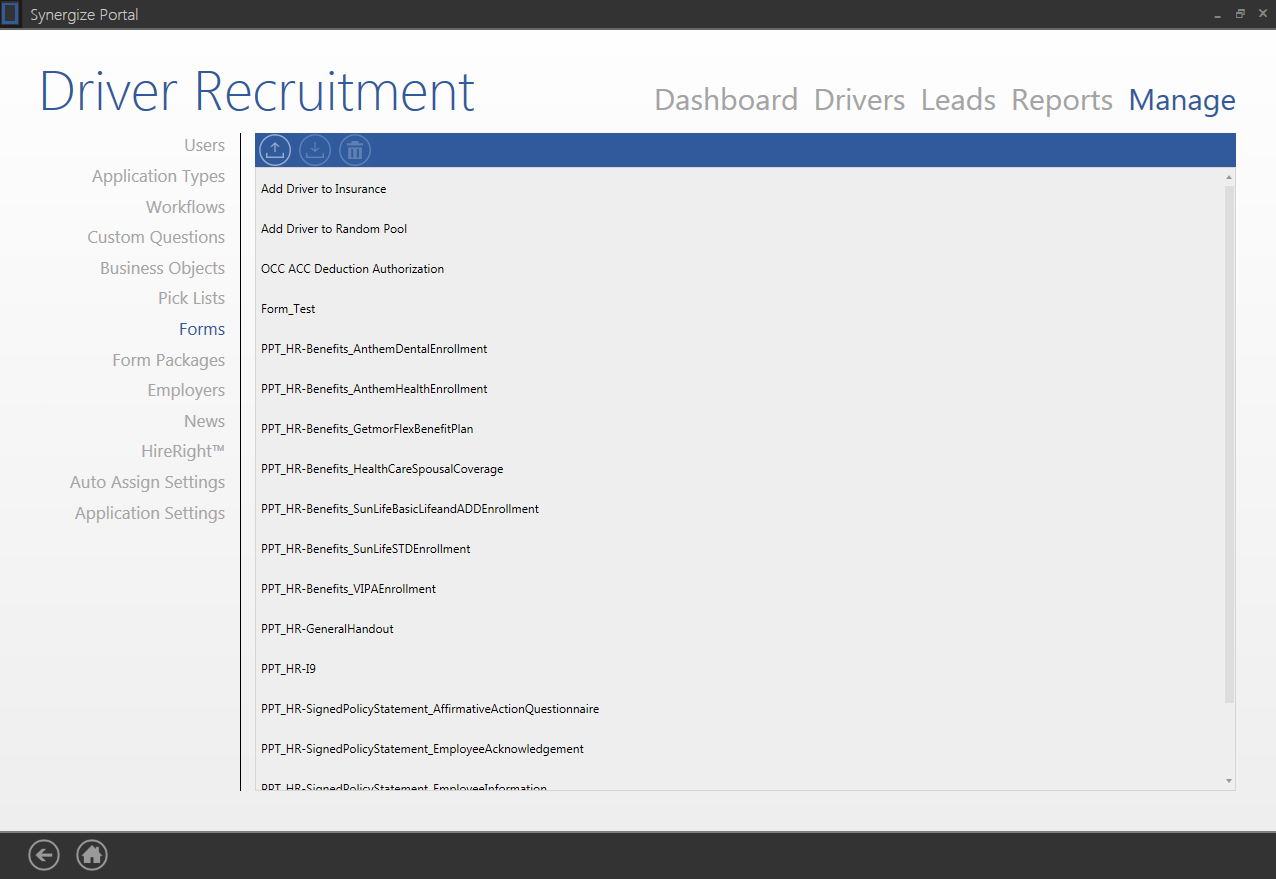
Forms: Upload
The upload function allows recruiters to upload a form (.repx file) to the system, which can then be used to send out to drivers.
Note: .repx files can be created and modified by Report Designer, and are stored and managed by Report Viewer Server.
Forms: Download
The download function allows the recruiter to download a .repx file from the system and save it to their local machine.
This is useful if a recruiter wants to make changes to a report and upload a modified version.
Forms: Delete
The delete function will delete a form from Report Viewer Server.
Once deleted, the form will no longer be available in the system, however any forms that were rendered and saved to Synergize or sent to drivers will not be affected.
WARNING: This action is irreversible.
Form Packages are collections of forms (.repx files) that are packaged together for recruiters to make use of multiple forms and send them out as one package rather than having to send out multiple files each time.
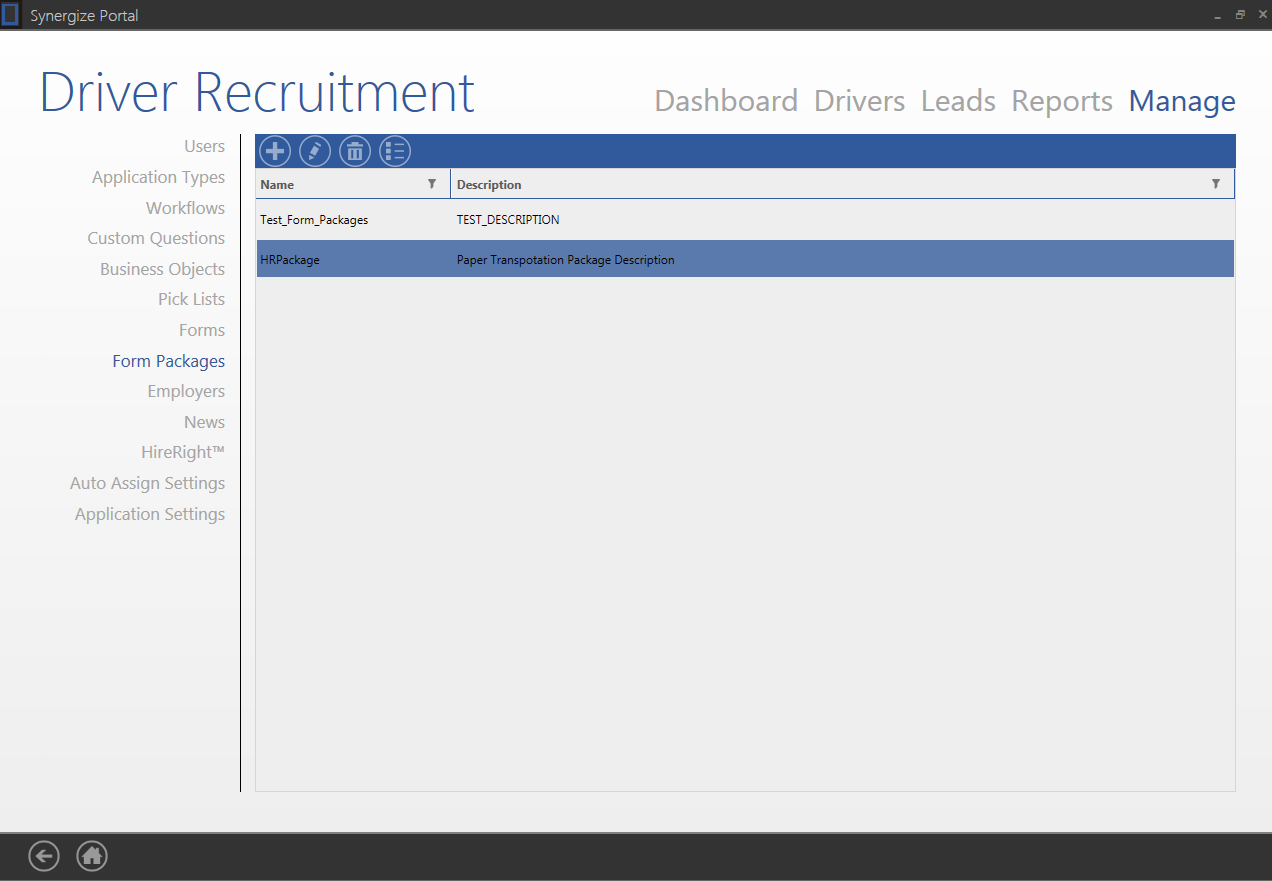
Form Packages: Add
The recruiter can add a form package by clicking add and filling in the required information in the pop-up.
Form Packages: Edit
A recruiter can edit an existing form package with the same pop-up listed above by selecting a form package and clicking the edit icon.
Form Packages: Delete
A recruiter can delete a form package by highlighting it and clicking the delete icon.
WARNING: This action is irreversible.
Form Packages: Manage
A recruiter can manage a report package, adding or removing forms from it, by selecting a report package and clicking the manage button.
The pop-up shows a list of reports in the package and not in the package, and the arrows allow the user to move forms in and out of the package.
The Employers tab is a list of verified employers in the system. This tab allows the recruiter to add, edit and delete verified employers.
If a verified employer is associated with any Work Histories in the system, the system will not allow the employer to be deleted.
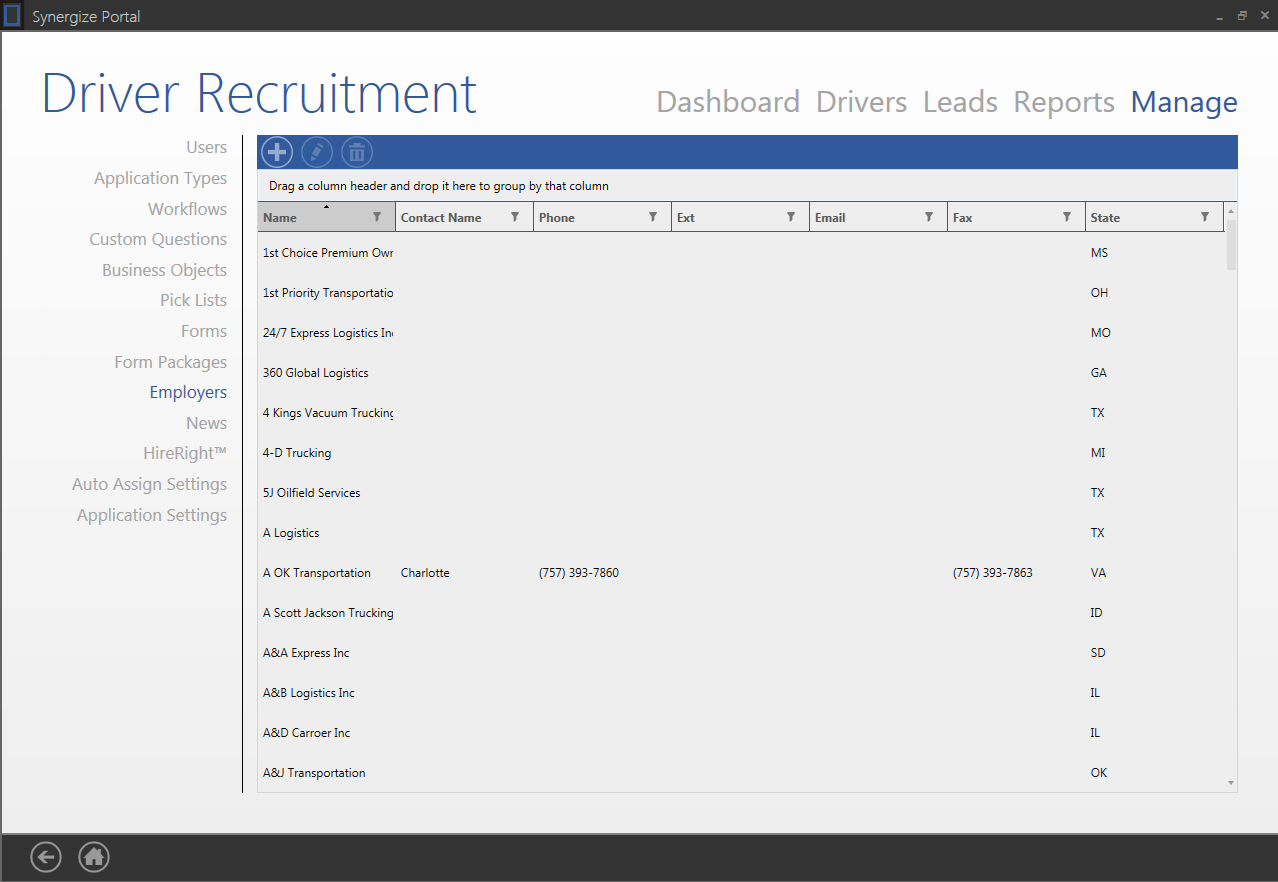
Employers: Add
The recruiter can add a verified Employer by clicking add and filling in the required information in the pop-up.
Employers: Edit
A recruiter can edit an existing Employer with the same pop-up listed above by selecting an Employerand clicking the edit icon.
Employers: Delete
A recruiter can delete a verified Employer by highlighting it and clicking the delete icon.
The system will not allow Employers that are associated with any work histories in the system to be deleted.
WARNING: This action is irreversible.
Employers: Reset Filters
This button allows you to reset all of the filters on the drivers grid (including the Sort, Filter and Group By Fields).
Employers: Sort By Column
Clicking on a column header sorts the rows using the values in that column in ascending order.
Clicking a second time sorts in descending order, and clicking a third time removes the sort and reverts the grid back to its original order.
Employers: Filter By Column
The funnel icon on each column enables you to filter using the values in that column.
You have the option to apply more advanced filtering criteria to the grid.
News items are displayed on the Driver Recruitment dashboard and are visible to all Users.
Managing news entails adding, editing and deleting these items.
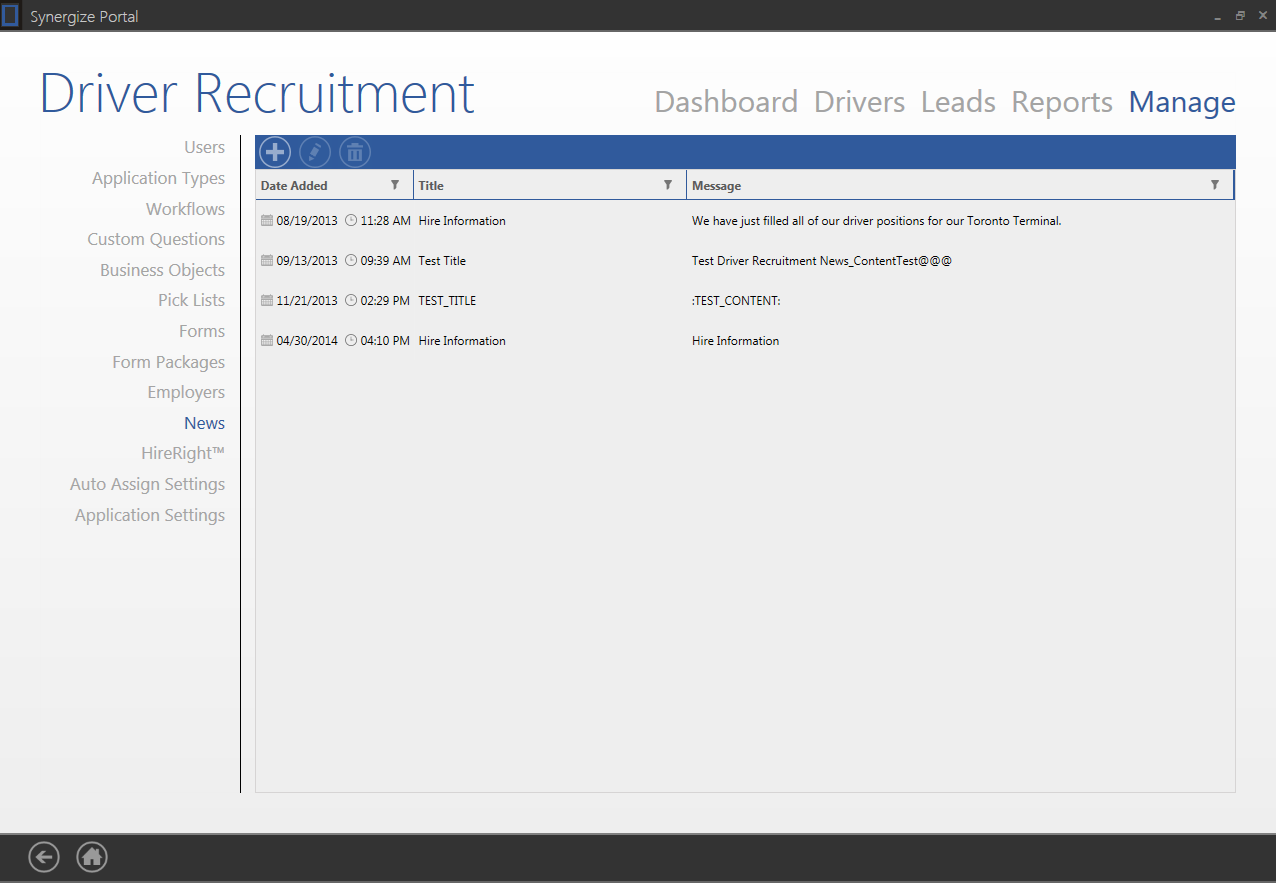
News: Add
The recruiter can add a News item by clicking add and filling in the required information in the pop-up.
News: Edit
A recruiter can edit an existing News item with the same pop-up listed above by selecting a News item and clicking the edit icon.
News: Delete
A recruiter can delete a News item by highlighting it and clicking the delete icon.
WARNING: This action is irreversible.
HireRight is a third-party integration for outsourced background checks through Driver Recruitment. Configuring HireRight is relatively simple.
Once a valid set of connection details (URL and Company Code) are filled in, the system automatically downloads a list of products and packages available to the company.
To use HireRight, the service must be enabled (under connection details) as well as set up and authorized on HireRight's end.
The system will also use the configured fax number and authorization report form when requesting permission from the driver to pull a report from HireRight.
The last field under connection details is the Synergize DocType.
When a driver returns an authorization report, this is the DocType Synergize will use when storing the document.
HireRight: Edit Connection Details
A recruiter can edit connection details by clicking on the edit icon and filling in the required information in the pop-up.
Note: Please consult your implementation specialist prior to making any changes to the HireRight™ integration settings.
MVR Search Depth has been added to allow the system to request longer MVR reports from HireRight.
There are three settings:
-
Default - Use the client's HireRight account default.
-
Standard - Use shorter search depth.
-
Extended - Use extended search depth.
HireRight: Edit HireRight Document Type Mapping
Recruiters can edit the Synergize document types that each HireRight document type is mapped to. When a mapping is created, the system will use the associated Synergize document type when saving that HireRight document to the system.
HireRight: Refresh from HireRight
Clicking the refresh icon makes a call to HireRight and returns a list of products and packages available in the company's account.
Feature First Available:
Driver Recruitment 2.0
June 2016
Prerequisites:
Synergize Server
Synergize Portal
Synergize Enterprise Server
With Driver Recruitment and the web application form you can track the source of the lead or driver application for better market analysis. Unique tokens can be generated for all marketing partners and their landing pages.
Marketing partners are provided with the tokens (one for each landing page). A token, if passed in a query string, is matched to the generated tokens so we know the source of the application.
Examples:
Driver example: Let’s say Microdea has a Driver Recruitment client called “the Company” which has some marketing partners.
The company is interested in knowing how many drivers are actually coming through specific partners, so they can choose to invest more with partners that produce higher numbers of applications.
Marketing Partners, along with their landing page URLs, can be added to Driver Recruitment.
A unique token can be generated for each paired marketing partner and landing page.
So a marketing partner like Craigslist publishes an ad on their landing page saying “Trucking Jobs at the company – Apply now”.
Our application has generated a unique token for Craigslist + this landing page.
The company provided the token to the marketing partner, so that when drivers click Apply Now, the token is passed in the query string parameters to our driver web application form which checks for a valid token.
The application is added to the system and if the token is valid, then the source of that driver application is recorded.
Lead example: Let’s say the company decides to host a micro form for leads on a marketing partner’s landing page with minimal information like name, phone, and email.
The micro form is linked to an option to Quick Apply or Have Recruiter Contact Me. Our available exposed API call will add this minimal information to the Leads tab, along with the source token.
The Auto Assign feature allows drivers coming into the system through the online application to be automatically assigned to recruiters based on a number of criteria.
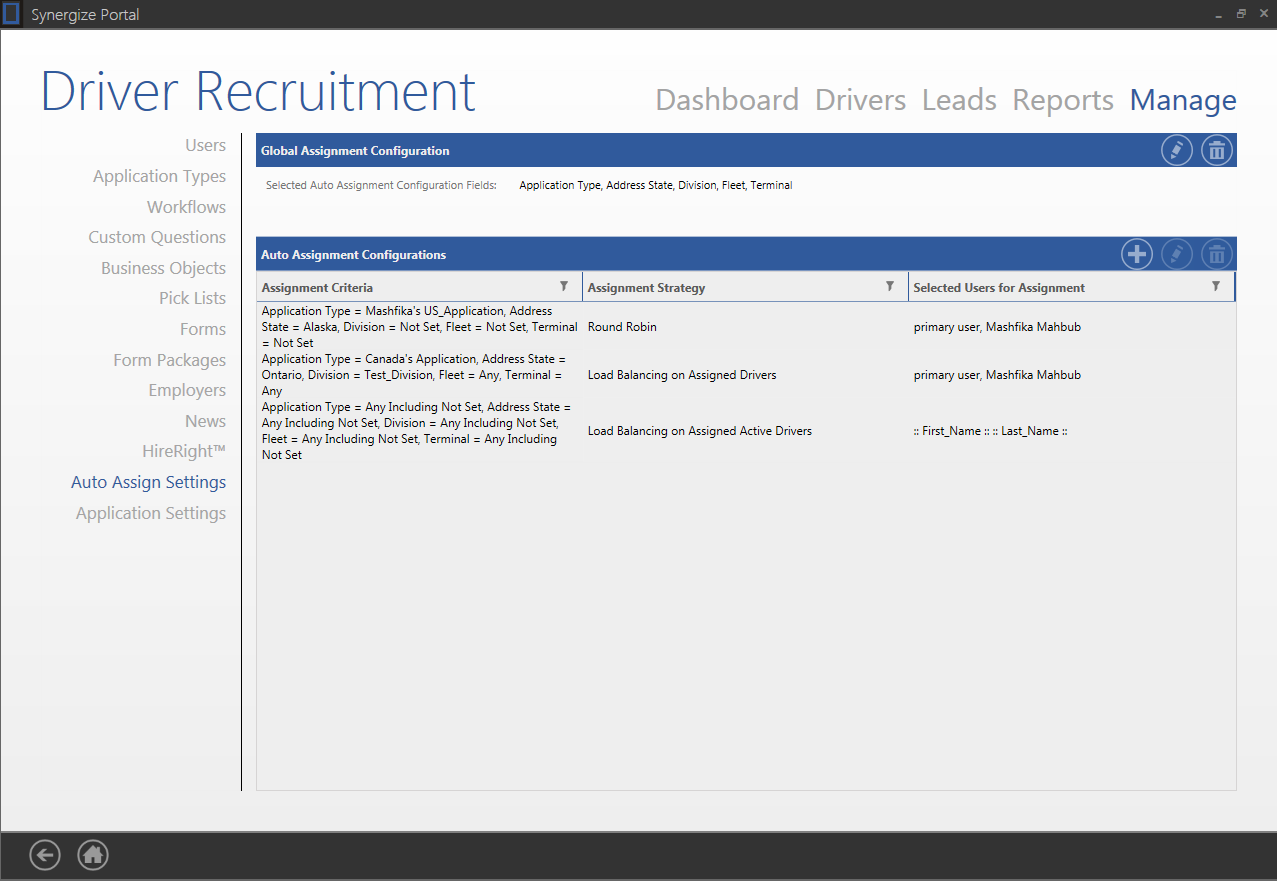
The global configuration allows the Auto Assign engine to make decisions based on the values for these fields when every application is received. The following fields are available:
-
Application Type
-
Fleet
-
Terminal
-
Division
-
Address State
Once the global configuration is set, the fields that are enabled are configurable for Auto Assignment Configurations. In general, the system will take the enabled fields and allow the user to select the values for which each rule is used. Each field can be configured with a specific value or a blanket policy (Any, Not Set or Any Including Not Set). Once the policies for each field are set, the eligible recruiters can be set by moving them in or out of the Users selected for this assignment.
Finally, an assignment strategy is chosen for the rule. The following rules are available:
-
Round Robin - This will cycle through the recruiters and assign drivers to them evenly.
-
Load Balancing on Active Drivers - This will take into account the number of active drivers each recruiter is working with, and balance the workload attempting to even out the number of active drivers assigned to each recruiter.
-
Load Balancing on Total Assigned Drivers - This will take into account the number of total assigned drivers each recruiter is working with, and balance the workload attempting to even out the number of total drivers assigned to each recruiter.
In general, the system works by looking for more specific rules before more general rules. If an application matches an entry with a specific value configured, it uses that rule instead of one with a blanket policy for the same field.
Example:Application Type and Terminal are configured globally. The rule for Application Type: American Driver and Terminal: Any with Recruiters: John, Peter and David using Assignment Strategy: Round Robin will take American Driver applications for any terminal and cycle through John, Peter, and David assigning applications to each of them in turn regardless of the number of drivers currently assigned to each of them.
Auto Assign Settings: Edit Global Configuration
A recruiter can edit the Global Configuration with a pop-up by selecting clicking the edit icon for Global Assignment Configuration.
Auto Assign Settings: Delete Global Configuration
A recruiter can also delete the Global Configuration by clicking the delete icon.
WARNING: This will delete the entire Auto Assignment configuration. Please be absolutely certain that this is what you intend to do before proceeding. This action is irreversible.
Auto Assign Settings: Add Auto Assignment Configuration (Rule)
The recruiter can add a new Auto Assign rule by clicking add and filling in the required information in the pop-up.
Auto Assign Settings: Edit Auto Assignment Configuration (Rule)
A recruiter can also edit an existing Auto Assign rule with the same pop-up listed above by selecting an Auto Assign rule and clicking the edit icon.
Auto Assign Settings: Delete Auto Assignment Configuration (Rule)
A recruiter can also delete an Auto Assign rule by highlighting it and clicking the delete icon.
WARNING: This action is irreversible.
The Application Settings section holds the majority of the Driver Recruitment's configuration. Each section has an edit icon which will open a pop-up allowing the user to edit the values for each section.
Application Settings: System
Company Name: Client's company name.
Tractors Enabled: Capture information about tractors for all drivers in the system including the online application (True/False).
Trailers Enabled: Capture information about trailers for all drivers in the system including the online application (True/False).
Default Application Status: Application status assigned to new drivers coming into the system.
Default Lead Status: Lead status assigned to new leads coming into the system.
Default Driver Import Application Type: Application type value for imported drivers.
Application Expiry Threshold (Days): Number of days after which the application expires.
Product Version:Driver Recruitment latest version number.
Application Settings: Online Application Form
Driver Recruitment Web Form URL: Base URL of the web form (Should be the URL where the welcome page is displayed).
Google Analytics Tracking ID: Configured if the client has a Google Analytics account. Tracking ID should be of the form UA-000000-01. Can be found in the client's Google Analytics account.
Default Locale: Default form locale (en-US or en-CA).
Web Form Link Time to Live: Number of hours the web form links from the Driver tab are open. Once the link expires according to the configured time, the link will re-direct to an error page and ask the user to log in with their SSN/SIN and Date of Birth.
Note: Recruiters should always ask drivers to log in using their SSN/SIN and DOB, and should not be emailing token-based links.
Can Driver Select Terminal: Shows or hides the Terminal field on the online application allowing the user to select from a drop-down list (True/False).
Require That Users Provide Their Email: Make email a required field (True/False).
Require That Users Confirm Their Email: Force driver to enter their email twice to confirm (True/False).
Pre-Qualification Fail Message: The message a user will see if they choose an unacceptable answer and then submit.
Application Summary Report: Uses a report to capture the snapshot of online application form submissions, save to Synergize and associate with the driver file.
Application Settings: Years of Information Required
Number of Years of Driver Addresses Required: Require and validate that the driver provides this number of years worth of address history.
Number of Years of Driver Licenses Required: Require and validate that the driver provides this number of years worth of license history.
Number of Years of Driver Accidents Required: Require and validate that the driver provides this number of years worth of accident history.
Number of Years of Driver Violations Required: Require and validate that the driver provides this number of years worth of violation history.
Number of Years of Driver Work History Required: Require and validate that the driver provides this number of years worth of work history.
Application Settings: Emailing
General Outbound Email Address: Email address that the system will use to send emails from.
Employment Verification Mail Merge Subject: Subject line text for Employment Verification Emails.
Employment Verification Mail Merge Body Template: .repx file used to render the body for Employment Verification Emails.
Employment Verification Mail Merge Attachment: .repx file used to render the attachment for Employment Verification Emails.
Reset Password Mail Merge Subject: Subject line text for Reset Password Emails.
Reset Password Mail Body Template: .repx file used to render the body for Reset Password Emails -- the URL for the password reset page must be updated.
Pre-Qualification Form Submission Mail Merge Subject: Subject line text for Pre-Qualification form submission confirmations.
Pre-Qualification Form Submission Mail Merge Body Template: .repx file used to render the body for Pre-Qualification form submission confirmations.
Pre-Qualification Form Submission Mail Merge Attachment Template: .repx file used to render the attachment for Pre-Qualification form submission confirmations.
Long Form Submission Mail Merge Subject: Subject line text for long form submission confirmations.
Long Form Submission Mail Merge Body Template: .repx file used to render the body for long form submission confirmations.
Long Form Submission Mail Merge Attachment Template: .repx file used to render the attachment for long form submission confirmations.
Required Documents Email Subject: Subject line text.
Required Documents Email Mail Merge Body Template: .repx file used to render the body.
Required Documents Email Mail Merge Attachment Template: .repx file used to render the attachment.
Use Inbox Monitoring: Enables or disables inbox monitoring.
Inbox Monitored Email Address: The email address to be used with inbox monitoring.
Application Settings: TMS Integration
System Name: TMW Suite/TL2000
TMS Integration URL: This is the URL of the web services in the TMS that the system calls when publishing the new driver info to the TMS.
Driver-Code Format: This is the format of the driver code that is generated by the system, prior to publishing to the TMS.
Integration Username: This is the username to authenticate with when the system calls the web services in the TMS for publishing the new driver info.
Integration Password: This is the password corresponding to the above username. It is used to authenticate when the system calls the web services in TMS for publishing driver info.
Company Code: This is the company code used when calling TMS to publish or get driver information.
SCAC Code: This is the company's SCAC code used when calling TMS to publish or get driver information.
Application Settings: Automation
Business Start Time: This is the daily start time of the business and is used for calculating notifications relating to applications that have not been looked at (refer to Max Driver Idle Time setting).
Business End Time: This is the daily end time of the business and is used for calculating notifications relating to applications that have not been looked at (refer to Max Driver Idle Time setting).
Max Driver Idle Time: This is a value in hours that the system will wait until a notification is created for the recruiters on the main dashboard. The notification alerts the recruiters that an application has not been looked at in a set amount of time. The calculation used to trigger the notification uses the Business Start Time and Business End Time settings.
Enable Workflow Automation: Allows the workflow to execute steps automatically instead of manually.
Enable Generation of Notifications for Unattended Drivers: Allows the system to generate notifications for drivers as they are processed through automation.
Application Settings: Randall App Integration
Enable Randall App Integration: Enable or disable Randall Reilly integration.
Randall App FTP Host: The host for customer's account with Randall Reilly.
Randall App FTP Username: The username for the customer's account with Randall Reilly.
Randall App FTP Password: The password for the customer's account with Randall Reilly.
Randall App Custom Fields: A comma-separated list of fields that will be a part of Randall App imports.