Request and Sign eBOL and ePOD Documents
As a driver, you can request an official signed electronic bill of lading (eBOL) and electronic proof of delivery (ePOD). As a driver, shipper, consignee, or other user, you might be asked to provide your signature on one or more electronic documents.
The next generation of document digitization and data exchange for the supply chain is here and powered by Transflo solutions that offer multiple ways for shippers and receivers to provide the necessary documents to drivers. You can upload documents electronically and enable industry-leading document scanning technology for shippers through the Transflo Mobile+ app.
Feature Highlights:
-
Take pictures of loads with embedded date-time stamping and geo-coding technology.
-
Scan, e-sign, and send documents using the Mobile+ app.
-
As a driver, you can access forms that allow them to engage shippers and receiving work teams to request e-signatures.
-
All parties have access to instructions on how to electronically send and create an e-signature on a document.
-
Documents are indexed and associated with the shipper, receiver, carrier, and driver in the secure Transflo document cloud, allowing all parties access to the documents.
-
Organize paperwork digitally at any point in the load life-cycle to increase efficiencies, enhance workflows, and improve safety including COVID-19 virus mitigation compliance.
-
After shippers submit documents, our powerful platform technology matches the documents with the driver who initiated the activity. Loads associated with specific driver events tracked through the Mobile+ app are also matched with the appropriate documents.
-
If configured by your fleet, drivers can also take advantage of available integrated KBX features.
As a driver, you can submit a request at any time to receive an official signed electronic bill-of-lading (eBOL) from a consignee or provider (carrier, broker, or shipper).
Follow these steps:
-
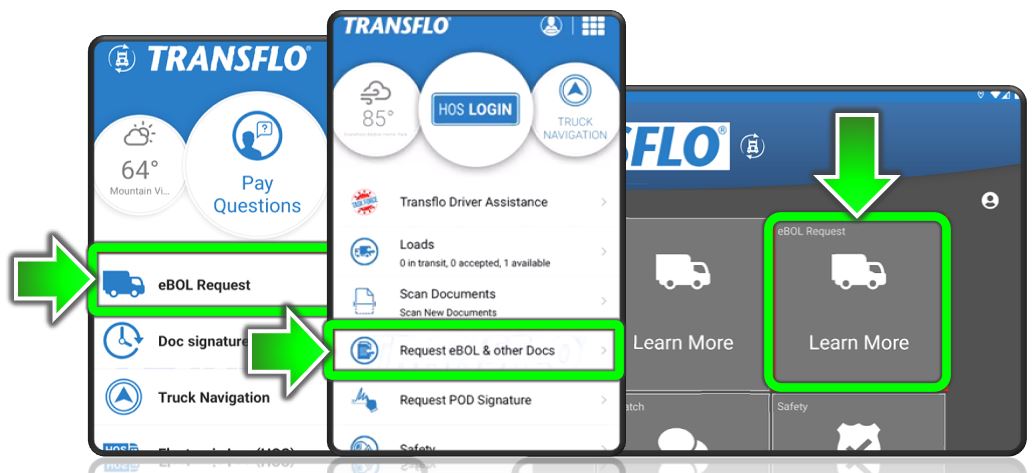
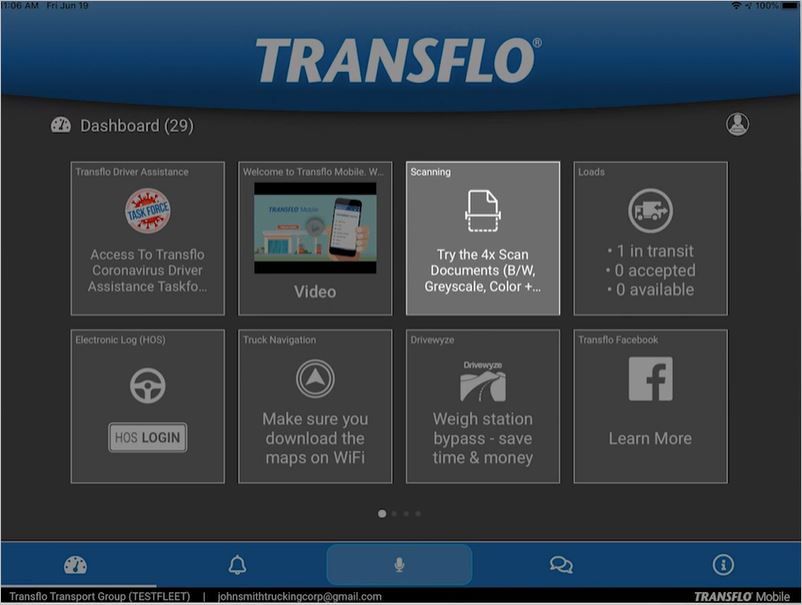
On the Home page or Dashboard, tap eBOL Request.
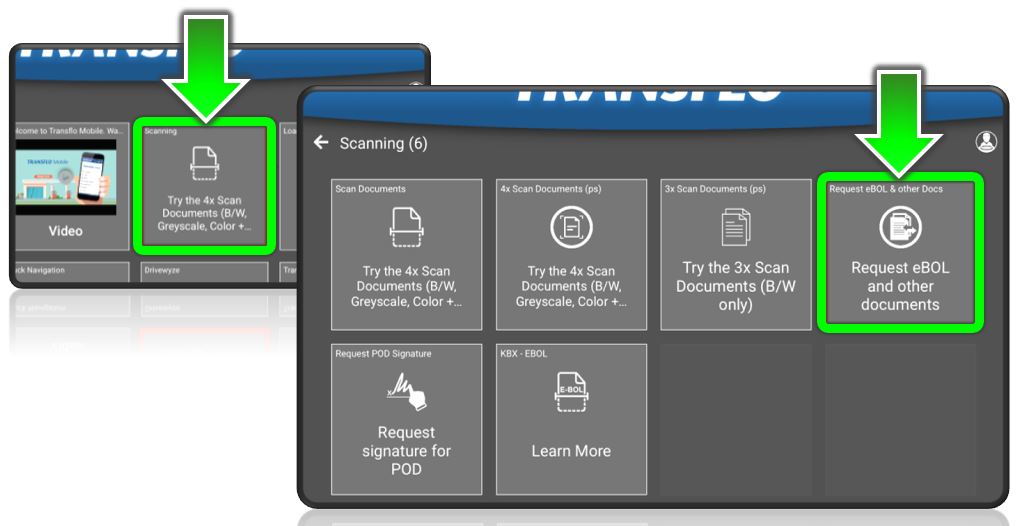
This menu item can vary depending on your fleet configuration. In the following example, the user taps a Scanning tile and then taps Request eBOL and other documents.
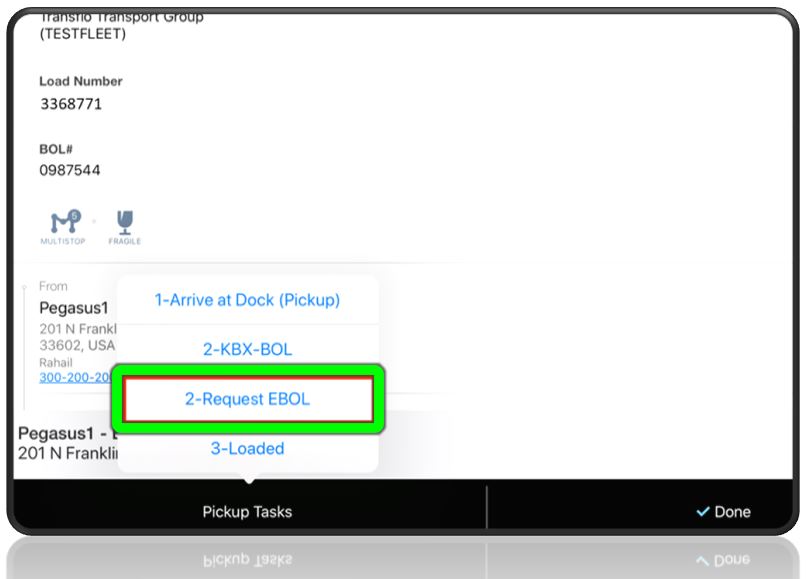
In some fleet configurations, after accepting a load and arriving at the customer pick-up location, you might tap Pickup Tasks and then request an eBOL.
-
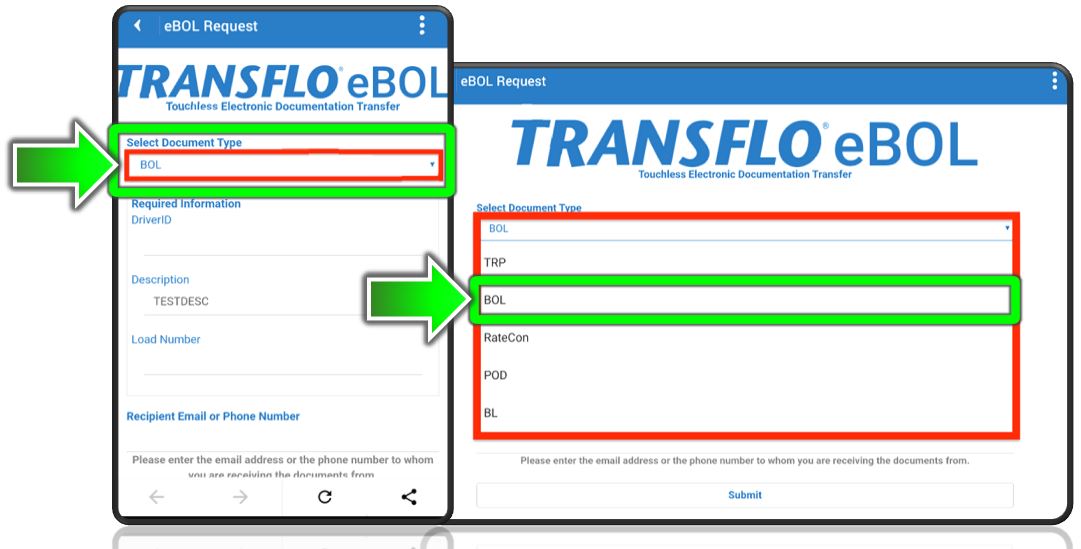
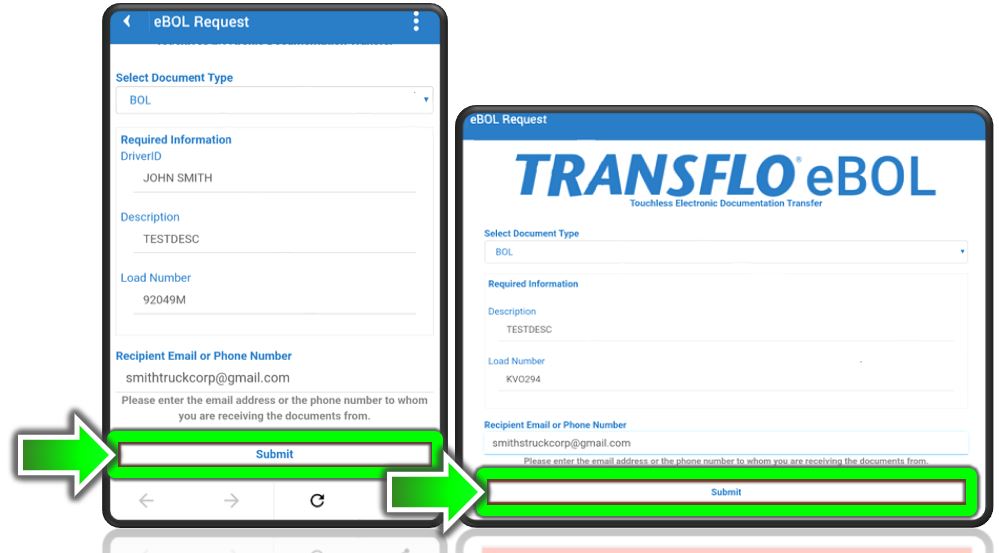
On the eBOL Request page, tap Select Document Type and choose BOL. The list of document types varies by fleet.
-
Complete the fields in the Required Information section:
-
Driver ID: Enter your name or identifier.
-
Description: Enter a brief explanation for your request.
-
Load Number: Enter the load number associated with your BOL request.
-
-
Enter the Recipient Email or Phone Number of the appropriate contact person who can receive your request (by email or by SMS text message at the mobile phone number you entered) and provide you with the eBOL when it is ready. To send your eBOL request, tap Submit.
-
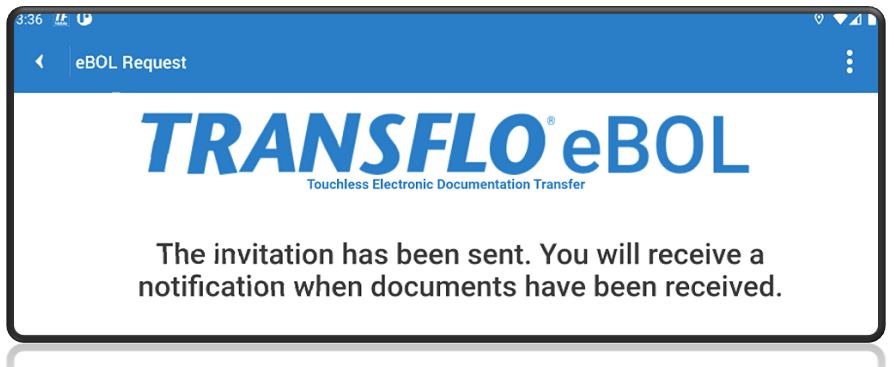
The invitation has been sent confirmation message appears to let you know your request was communicated by email or text message. Allow time for a response. The Transflo Mobile+ app notifies you when the document you requested is available.
![]() View a demonstration of these steps in one or more Transflo videos:
View a demonstration of these steps in one or more Transflo videos:
As a driver, you can use the eBOL features in the Transflo Mobile+ app on your phone or tablet to request a proof-of-delivery (POD) signature from the receiver or consignee after you deliver a load.
-
On the Dashboard, tap Scanning.

Reminder: Transflo is the premier provider of popular commercial apps, custom white label apps, in-cab tablet editions, embedded handset editions, and thousands of additional fleet-specific integrated features. Due to all the possible product configuration changes for your specific fleet, it is possible that user interface labels, buttons, links, dials, tiles, icons, colors, logos, and placement on the screen can vary. Features can also be hidden from your view based on customer account, fleet ID, or user permissions. In the documentation, we cover a default setup with screen examples that are generally similar for smart phones and tablets running either iOS or Android OS. Adjust certain steps, if needed, to reflect your actual device, product configuration, and company policies.
-
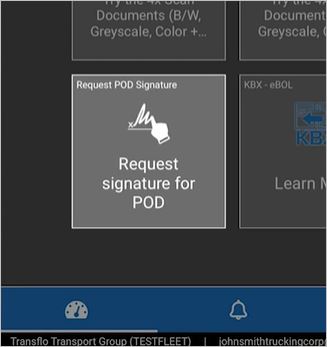
Tap Request Signature for POD.
Or, you might be able to tap Request POD Signature directly on the dashboard or Home page. The name and location of this tile can be configured by your fleet administrator.
In some fleet configurations, after accepting a load at the pick-up location, you can tap Pickup Tasks and then request an eBOL which is often used later as the ePOD. After you depart from the shipper location and deliver the load, you can request an electronic proof of delivery (ePOD) signature. At the drop-off location, tap Deliver Tasks and then tap Request POD Signature.
-
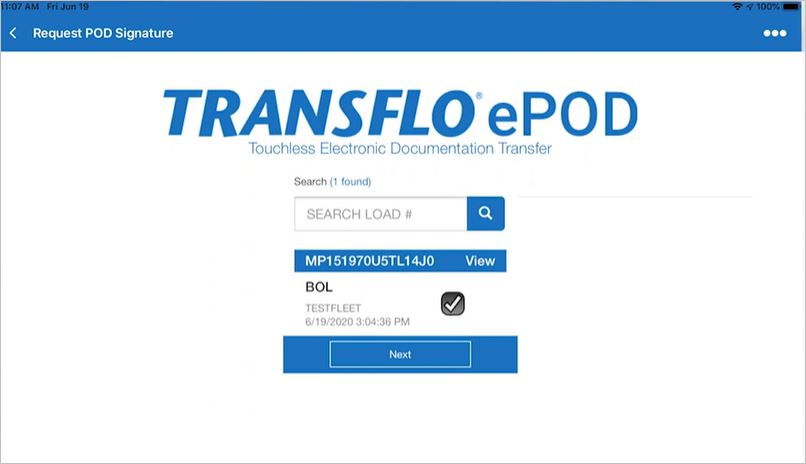
Select a document from the previous set of batches that were already created and sent to you (the driver). For example, you can choose a signed eBOL and use it to request a signature to turn it into an ePOD.
- Use the Search bar to find specific batch numbers.
-
To see batches, tap the View link. Documents appear in original upload order by their scan date and time. If you need to return to the Load workflow screen, tap Back.
- After you select a document, scroll down if necessary and tap Next.
-
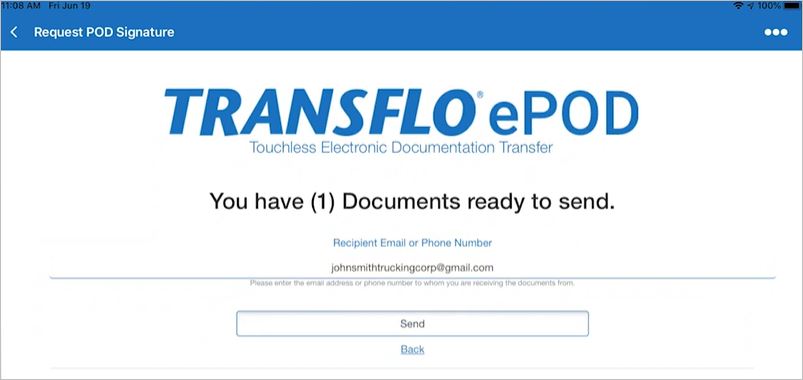
Enter the Recipient Email or Phone Number for the recipient who requested documents or the receiver or consignee and tap Send.
-
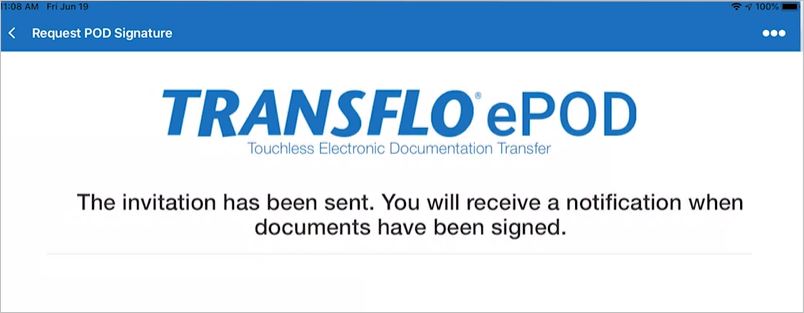
The system sends your request for a signature by email or text message and shows you a confirmation message.
-
To finalize the process and return to the load work flow screen, tap Complete.
![]() View a demonstration of these steps in one or more Transflo videos:
View a demonstration of these steps in one or more Transflo videos:
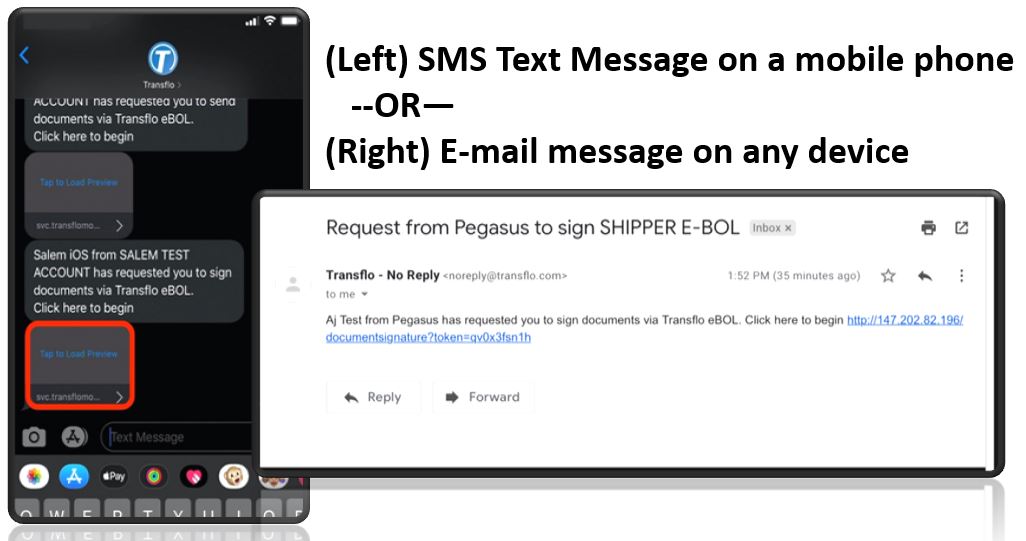
When a driver requests a signature, an SMS text message or email goes out to the consignee responsible for the load at pickup or delivery. As a consignee, shipper, broker, or carrier, make sure you update your contact info in the Transflo system (Velocity, Command Center, DMS, One Portal, or other platform) so you receive these requests for electronic signatures where you expect to receive them.
To sign the documents as requested to expedite load delivery, follow these steps:
-
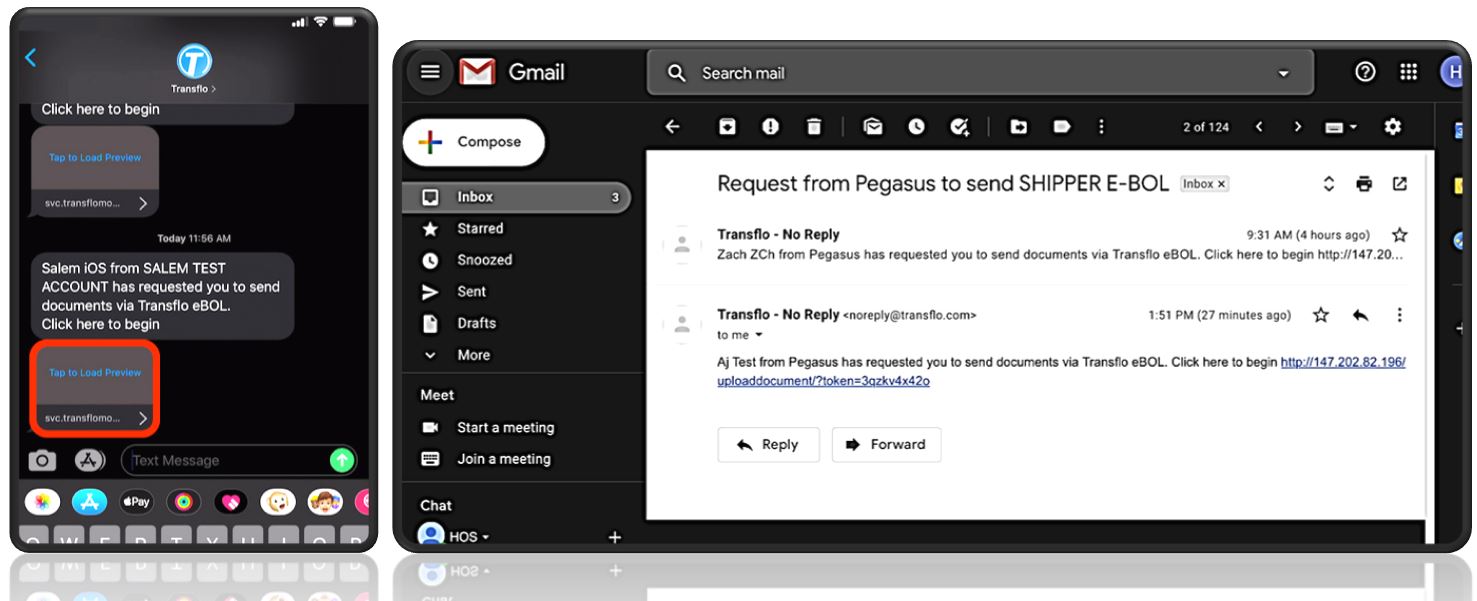
As consignee (recipient of the request to sign), open your email inbox or mobile device app for receiving text messages.
-
Tap the text message or open the email link.
-
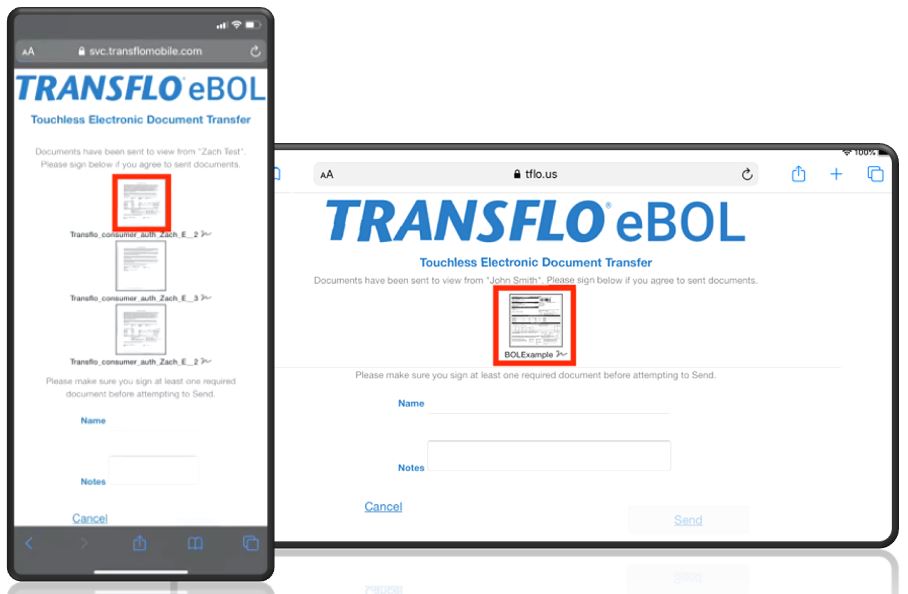
Tap any of the documents to open a new window.
-
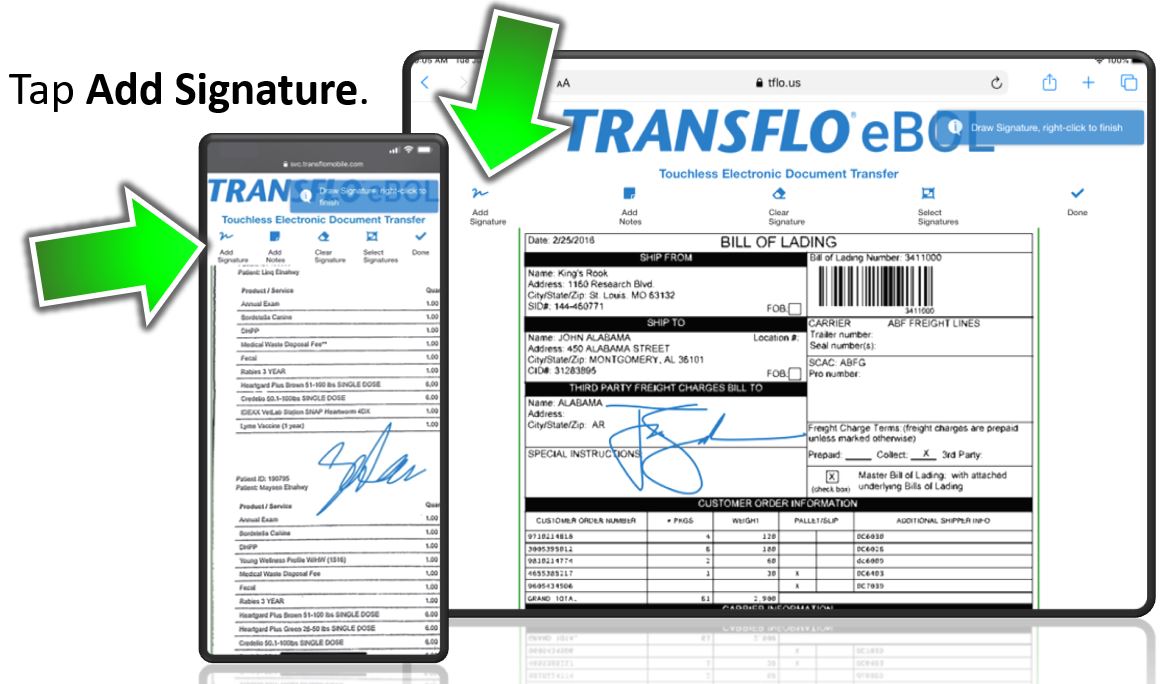
To sign the document, tap Add Signature.
Note: Once you tap Add Signature, you cannot scroll on the screen.
Options:
-
To add any notes to the document, tap Add Notes.
-
If you need to erase the signature, tap Clear Signature.
-
To select the signature created on the document, tap Select Signature.
-
To navigate between the uploaded documents, tap Previous Page or Next Page.
-
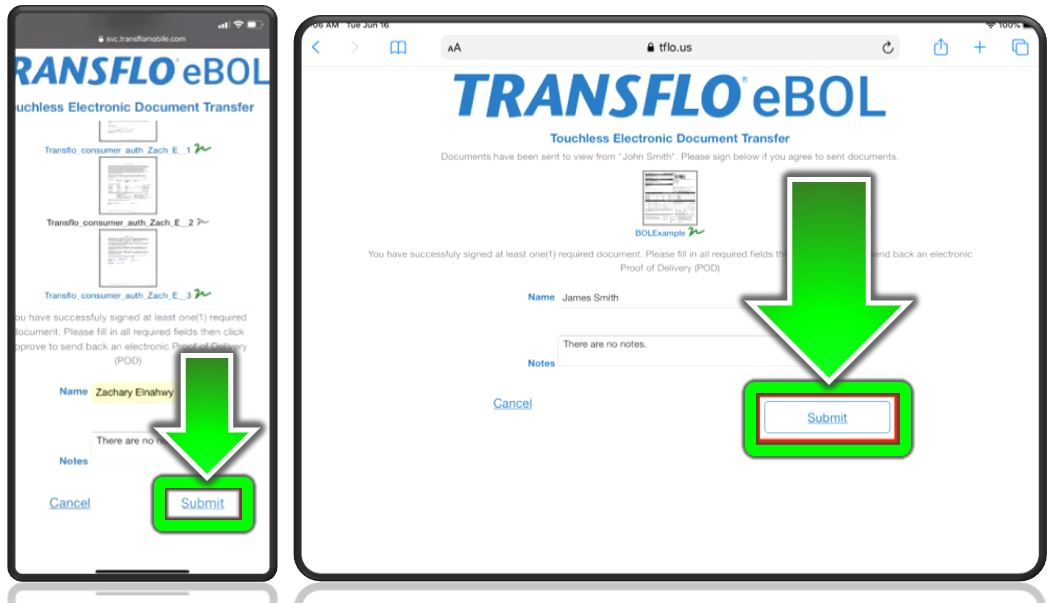
Once you’ve completed signing all the documents, tap Done. After you sign the documents, you are required to add the name of whoever is signing, and any notes.
-
-
Tap Submit after you have entered the Name and Notes.
-
After you tap Submit , you will see the Confirmation screen showing that your signed documents have been sent.
![]() View a demonstration of these steps in one or more Transflo videos:
View a demonstration of these steps in one or more Transflo videos:
As a driver, when you request documents to be uploaded by a consignee, a confirmation SMS text message or e-mail message is sent to the consignee. When the consignee receives a request to sign documents, an invitation message is also sent.
-
Tap the link in the SMS text or e-mail message.
-
The Document Request page appears where you can upload one document or multiple documents at the same time. The following types of documents can be uploaded: PDF, TIF, TIFF, JPG, JPEG, and PNG.
-
Tap
 Upload Document.
 -
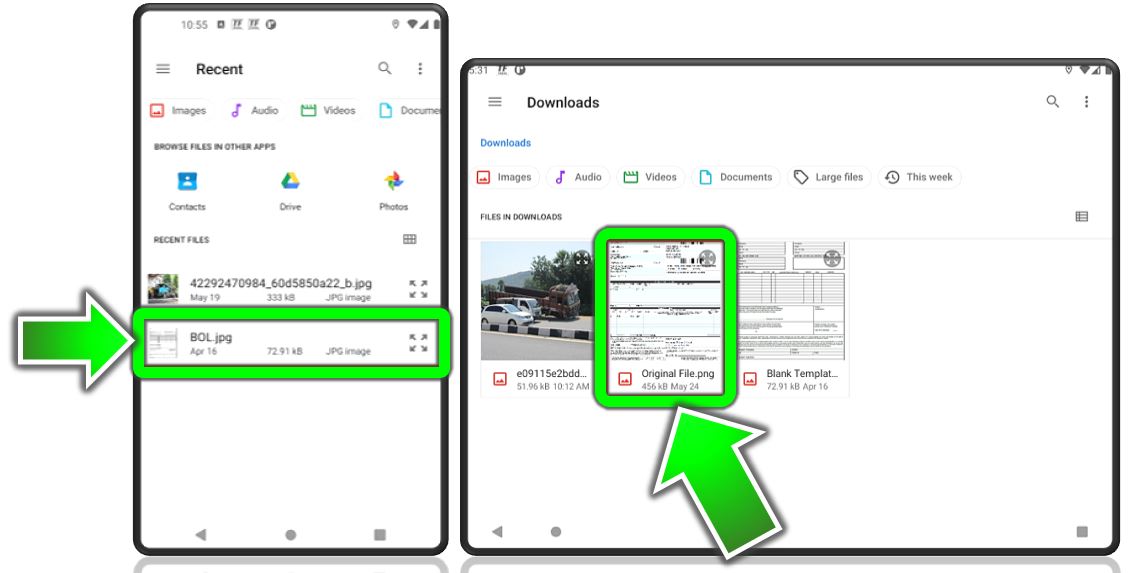
Upload your documents. You can take a photo, upload a picture from your Photo Library, or choose a file from your device by browsing your files.
Apple iOS Example: To add a document from the files on your device, tap Files.
Android Example: Select a document from your files on your mobile device.
- After uploading a document, enter your name in the Name field.
-
Review the documents that you uploaded. If you need to remove one, select it and tap Delete.
-
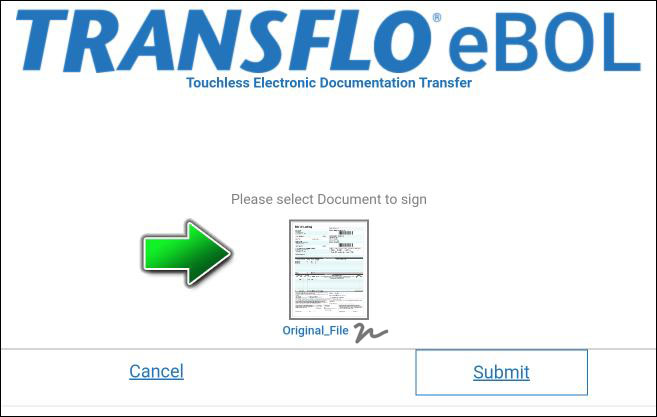
To sign a document, tap one or more of its pages.
-
The signature icon is gray when a document is ready to be signed.
-
The signature icon is green after a document has been signed.
-
-
The document opens in a new window where you can use the following features:
-
To sign the document with a stylus pen for touchscreen devices or your finger, tap Add Signature.
-
To add any notes to the document, tap Add Notes.
-
To erase the signature, tap Clear Signature.
-
To move a signature, tap Select Signature and drag it where you want it.
-
To rotate the document 90 degrees to the right, tap Rotate.
-
When you are done signing all the documents, tap Done.
-
-
Documents display a green
 signature icon to indicate that it is signed and ready to be sent.
 -
To send the documents, tap Submit.
-
The Confirmation screen appears with your confirmation number.
![]() View a demonstration of these steps in one or more Transflo videos:
View a demonstration of these steps in one or more Transflo videos:
After documents are uploaded (by a driver, dispatcher, broker, carrier, shipper or other office staff), you and other users can access the documents using the Transflo Mobile+ app on your phone or tablet.
-
On the Notifications screen, tap the name of the eBOL document you received.
-
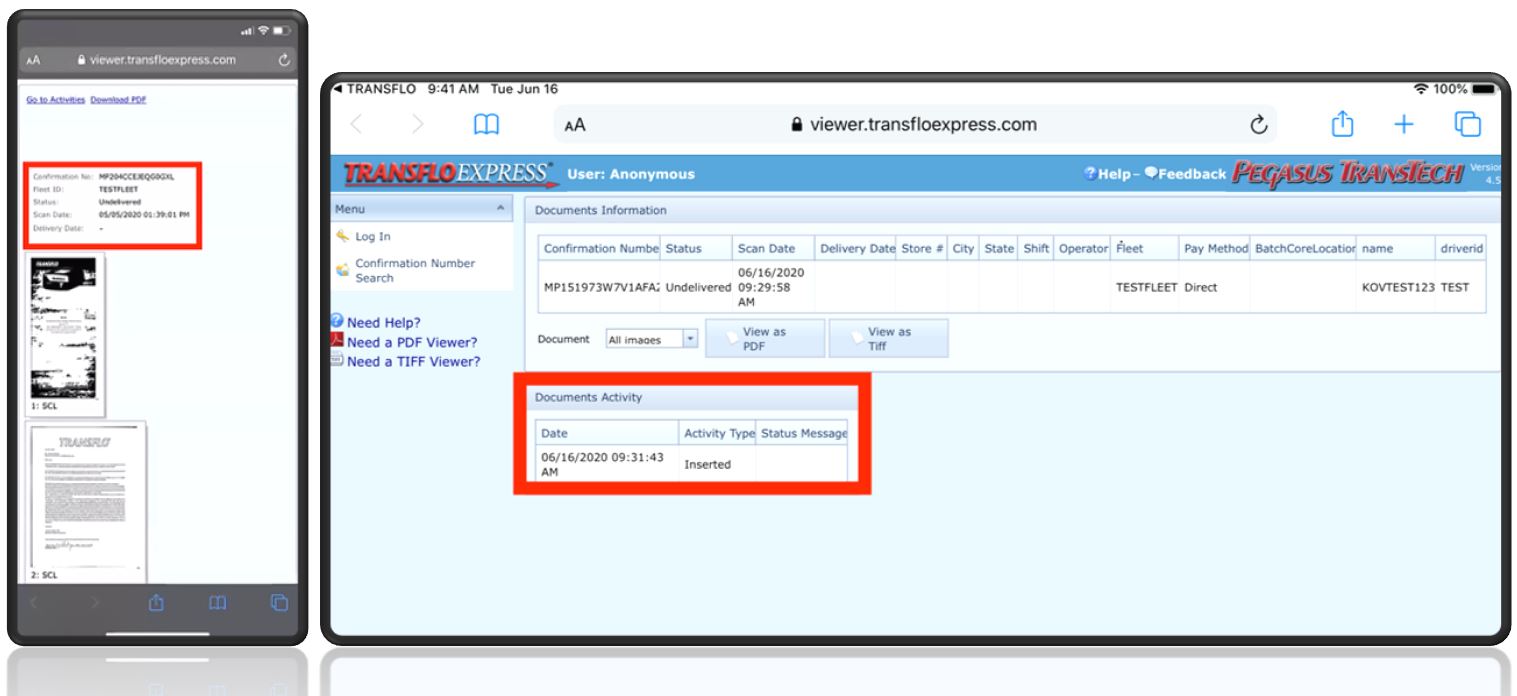
Tap View Documents to see the uploaded documents on the Confirmation Viewer.
-
All documents are date-stamped and uploaded to the Confirmation Viewer where you can also review the following information:
-
Swipe up or down to view the remaining documents in the list.
![]() View a demonstration of these steps in one or more Transflo videos:
View a demonstration of these steps in one or more Transflo videos:
