Transflo Workflow AI Factor User Guide
In Transflo Workflow AI for Factors, load documents are received in batches one at a time through e-mail or an API import and then processed through the Transflo OCR engine. The documents are processed in Transflo Workflow AI and ultimately sent to one or more of the following downstream systems:
-
Transflo Workflow AI for Factors
-
Transflo Workflow AI for Brokers
-
Additional Factor Systems
-
Additional Broker Systems
-
Integrated Transflo Systems such as Velocity Plus Command Center, DMS, or Synergize
At some point, a human-in-the-loop might be required by your organization to resolve missing data or approve work items. The following sequence of common events and concepts summarizes a typical factoring operation:
-
Leverage the Speed and Power of Transflo Automation: Documents without any errors might flow through the entire system untouched. You will see these work items marked IN PROCESS. Allow the system to process these work items based on rules and only allocate staff time to resolving work items with other status values such as NEEDS ATTENTION or FINAL REVIEW.
-
When Margins are Low, Cash Flow is King: As a business user at a factoring operation, your customer is typically a carrier and the debtor role is typically a broker, also known as the payer. Like many debtors, brokers often set high standards for the digital paperwork you submit, sometimes causing delays. As a factoring professional or commissioned agent, you want to minimize delays and resolve work items so that your customer (the carrier) and ultimately your organization are compensated.
-
Rules Vary by Organization: Working with your Transflo system administrator, your organization can configure the Workflow AI for Factors product to meet its requirements. For example, your work items might go from IN PROCESS to FINAL REVIEW or might skip FINAL REVIEW and go directly to APPROVED. The following short list provides other examples of custom rules:
-
An invoice cannot be processed because it is missing a rate confirmation.
-
A document requires manual verification because it is flagged as a duplicate.
-
A document is assigned NEEDS ATTENTION status because it is missing a load number or signature.
-
A rule requires the system or a user to get the load number from a document type of proof-of-delivery (POD) and apply that same load number to a purchase order (PO).
-
To resolve a document in NEEDS ATTENTION status, the skilled eye of an employee or auditor is required to locate the pickup and destination addresses and enter them in the appropriate fields for processing.
-
A trained user can apply business rules to determine whether to fix or ignore a given work item flagged by the system.
-
A user might place a work item in a PAUSED state to allow time to discuss it with a supervisor.
-
An admin user can apply business rules to determine when a work item is automatically approved or rejected.
-
After each document is approved, it is uploaded into a system-of-record for the factoring company and only kept on the Transflo Workflow AI dashboard for 60 days and then purged. Another organization might need to archive their documents for 90 days, 6 months, or even longer.
-
An auditor might want to review an audit log with a history of user actions by date and time.
-
-
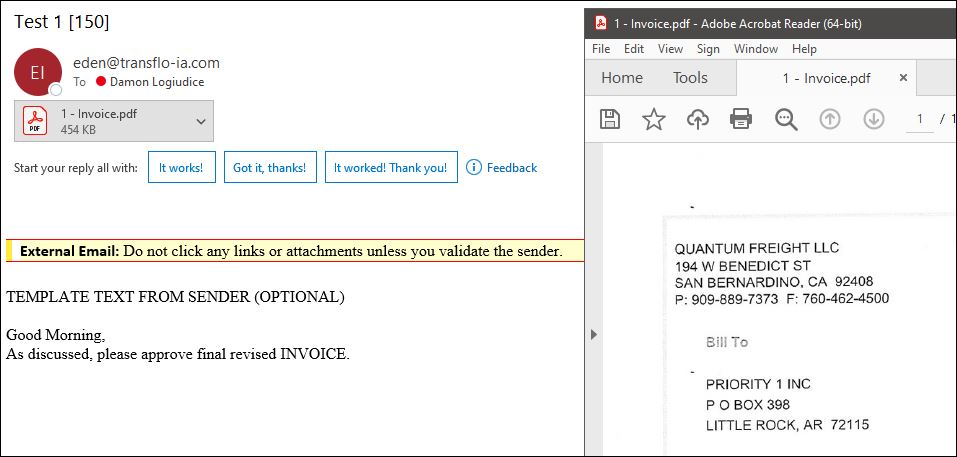
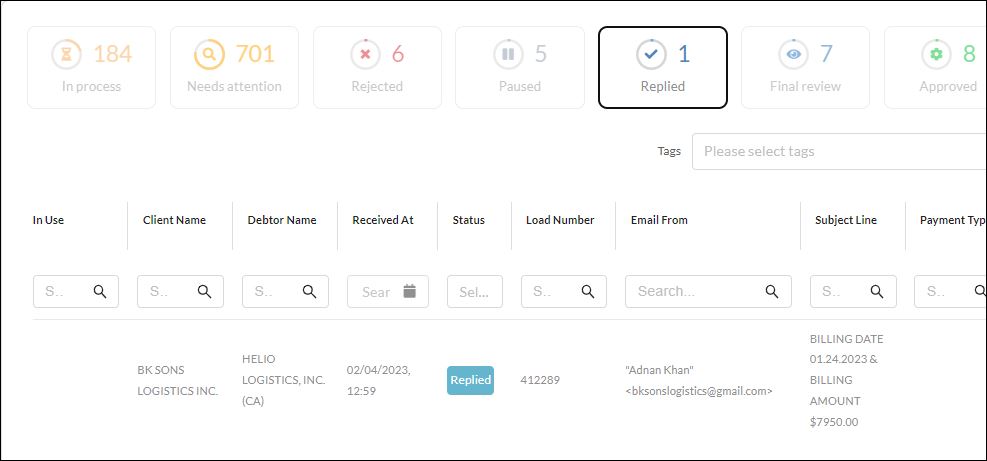
Send Documents to Clients with Convenient E-Mail Templates: As a factoring professional using Transflo Workflow AI, you can easily send documents for clients to review using pre-designed e-mail templates. For example, you might set up a template to show Missing Rate Confirmation in the subject line. The work item status changes to PAUSED. When the client responds, the work item status changes to REPLIED.
-
Search Filters: Users can search for work items by entering client names, team tags, and other filter criteria.
-
Completed Items: When items are finally ready to be paid by wire or ACH, their status shows COMPLETED. Some organizations track PAID status in another system-of-record.
-
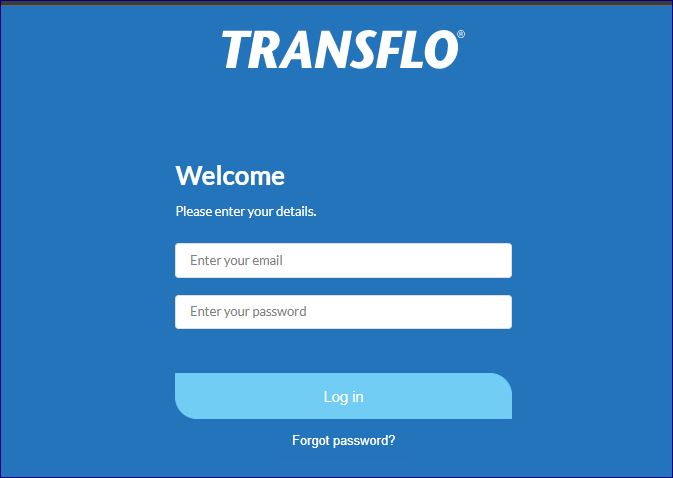
In a supported web browser, navigate to the URL for your organization assigned by Transflo.
-
Click Forgot Password?
-
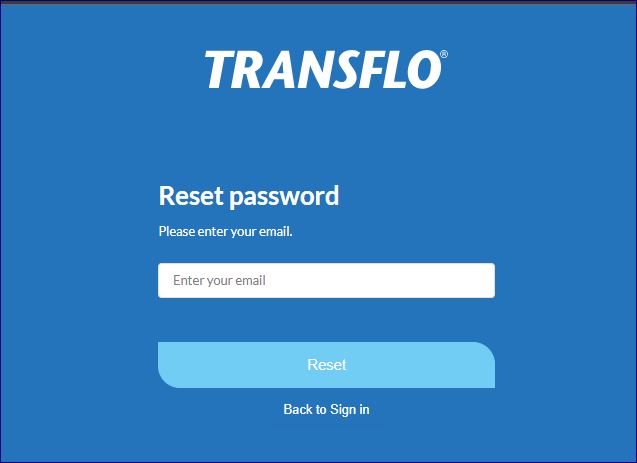
On the Reset Password page, enter your e-mail address and click Reset.
-
After a few minutes, open your e-mail inbox.
-
Click the link in the e-mail from Transflo to open a page where you can set a new password.
-
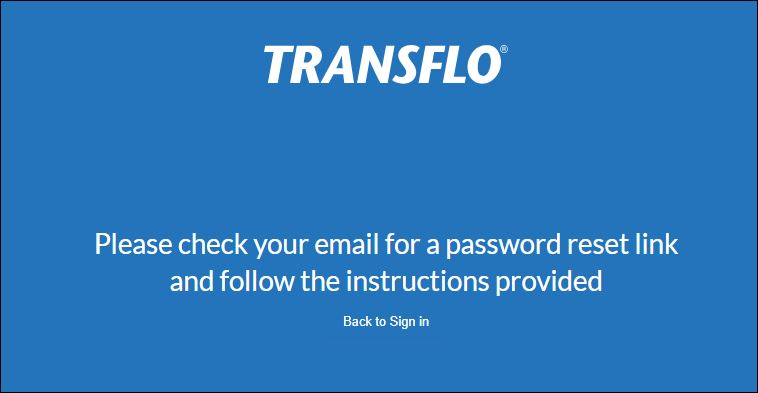
After you set and confirm your new password, click Back to Sign in where you can now log in with your e-mail and the new password you just created.
Review these steps to learn about the common settings you can use at any time to adjust your view, column, and page settings.
-
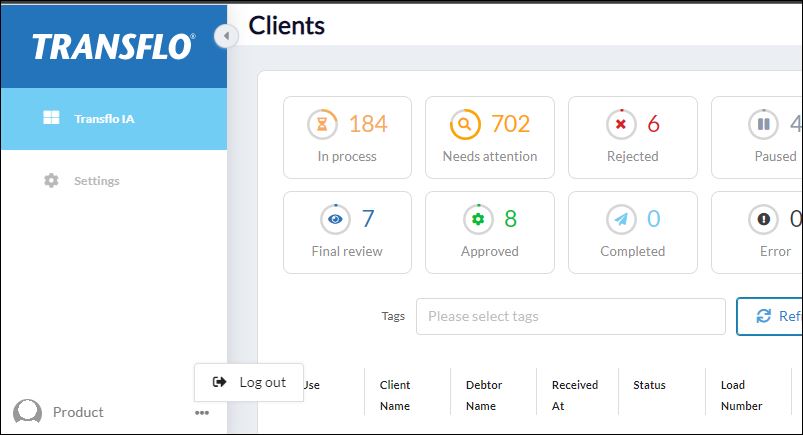
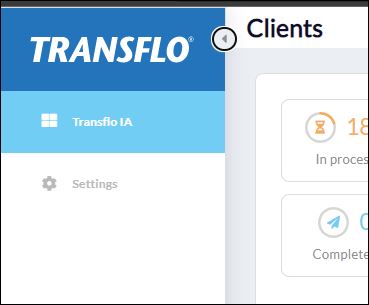
If your left navigation pane is expanded (as shown below), click Collapse to minimize the left navigation pane. When collapsed, you can view more items on each page.
-
To adjust the column width, drag the | Column Border between each column left or right.
-
To sort the current list by the ascending or descending values in any column, click the column label at the top of the list.
-
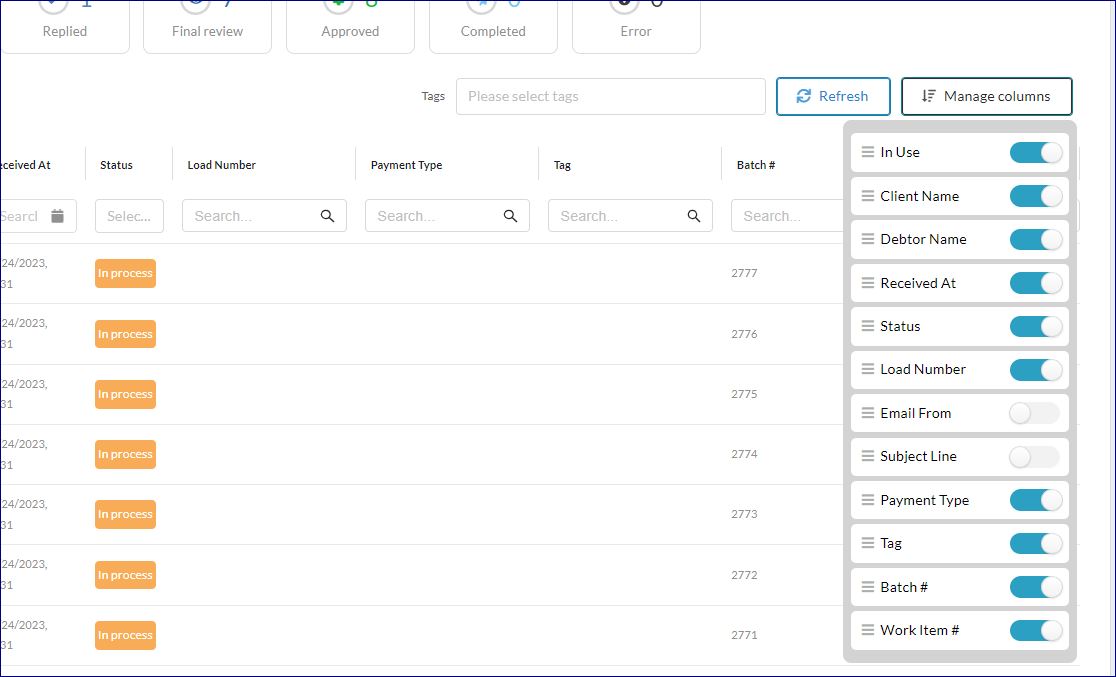
To show or hide each column in a list of items or change the order of the columns, click Manage Columns. Another name for columns is fields. Columns represent fields in a list.
-
Slide the visibility control for each field to Hide (OFF) or Show (ON).
-
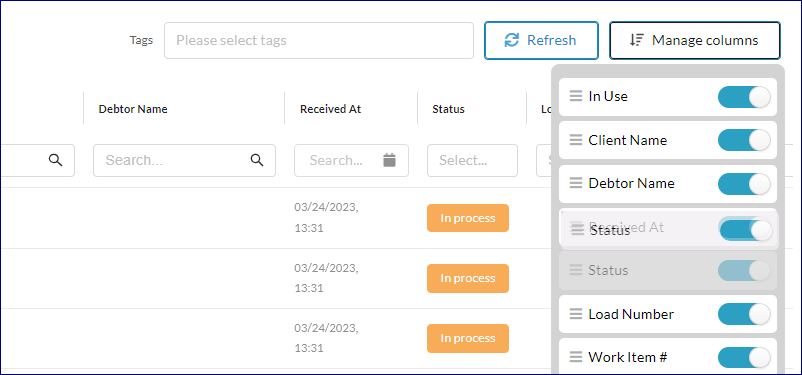
To change the order of the columns, click the ≡ Column Name and drag it up or down in the list of columns. In the following example, the user is moving the Status column up in the Manage Columns menu. The top-down order in the menu determines the left-to-right order of the columns in the list on the page.

Tip: Any column changes you make are applied to other lists for your current browser session. If you log out, the application restores the default appearance of columns in each list.
-
-
When a long list of items requires more than one page to display, you can adjust the following pagination controls:
-
Previous: To view the previous page in the list, click Previous.
-
Next: To view the next page in the list, click Next.
-
Page Number: To go to a specific page, click its page number. The current page shows a blue circle around its page number.
-
Page Number Ranges in Long Lists: When the total number of pages is greater than five (5) a series of three dots (ellipsis or ...) indicates a series of hidden pages. To help you navigate multi-page lists, you can click the first or last page.
-
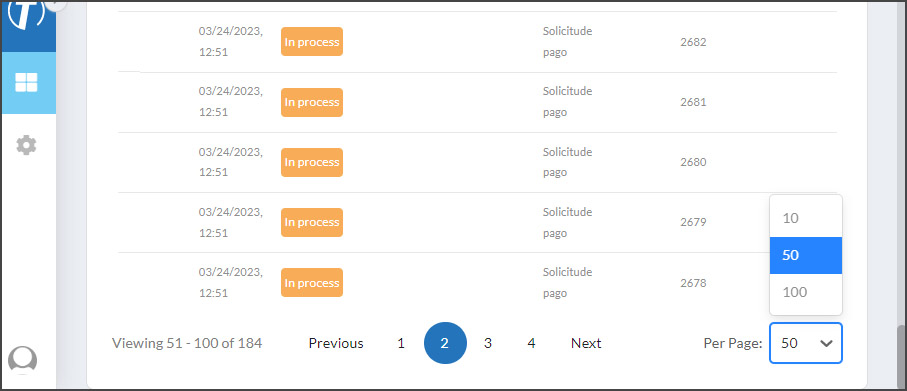
Items Per Page: To set the number of items you want to appear on each page, click Per Page at bottom right and choose a value from the resulting menu. When set to 10, a 220-item list appears on 12 pages. When set to 100, the same 220-item list appears on just 3 pages. (Tip: depending on your device and network connection, loading more items per page can sometimes result in slower performance.)
-
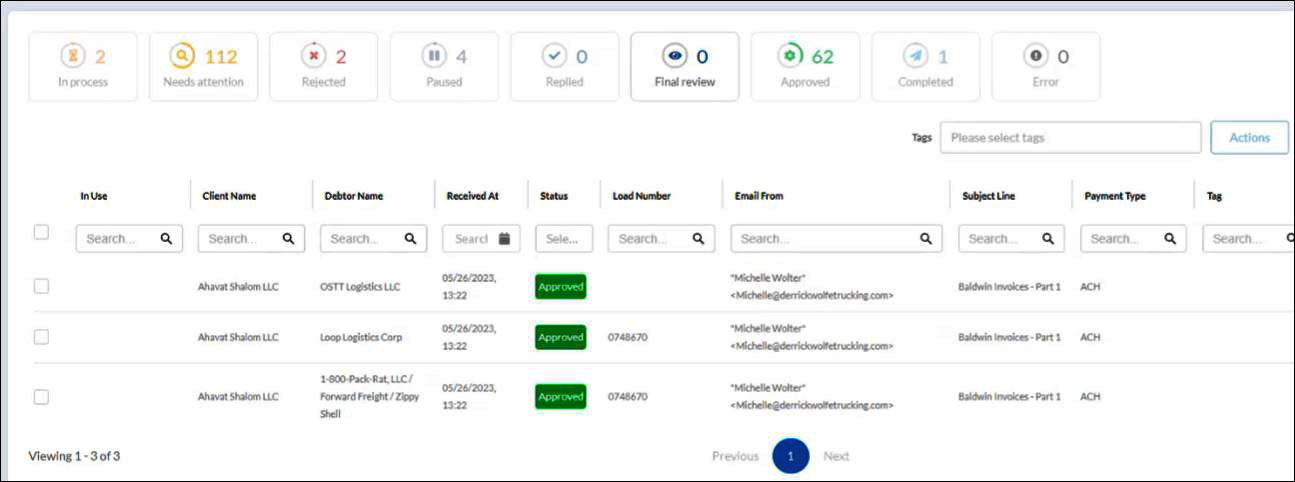
To reduce the number of work items and focus only on the items with a specific status, click one of the large Status buttons at the top of the Work Items page:
The following work item status values are available; however, depending on your permissions and settings, you might not be able to view them all:
-
IN PROCESS
-
NEEDS ATTENTION
-
REJECTED
-
PAUSED
-
REPLIED
-
FINAL REVIEW
-
APPROVED
-
COMPLETED
-
PAID
-
ERROR
-
DELETED
The large buttons correspond to the Status column values of work items in the list. Click any of these large buttons to filter the matching work items that have that status. As a general rule, when you want to filter by one status value, click the large buttons. If you need to filter on more than one status value, or want to apply additional filters, use the filter fields or tags.
To reduce the number of work items and focus only on the items that match your search criteria, apply one or more work item search filters at the top of each column. To learn more about filters, try the following steps on your own:
-
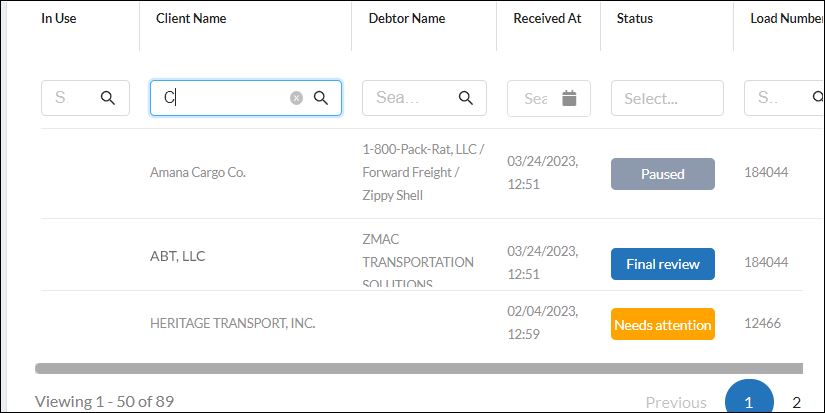
In the Client Name column search filter, enter only the letter C.
In the following example, 89 total rows were found with the letter C appearing anywhere in the Client Name field.
-
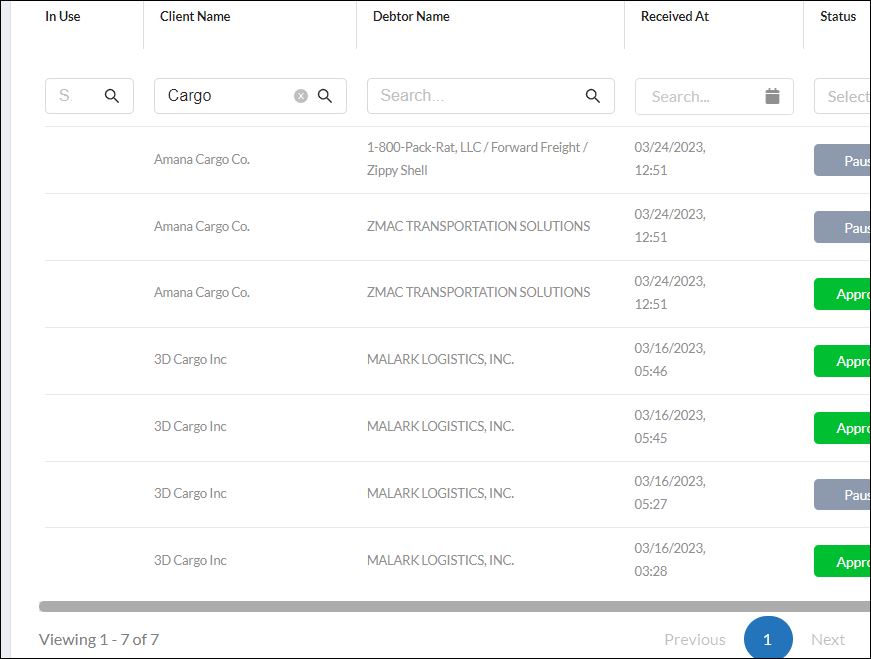
Continue entering the letters in the word Cargo. The search results are dynamic, also known as a progressive or incremental search. As you type, fewer matching rows appear. Just seven (7) contain the word Cargo in the Client Name field.
-
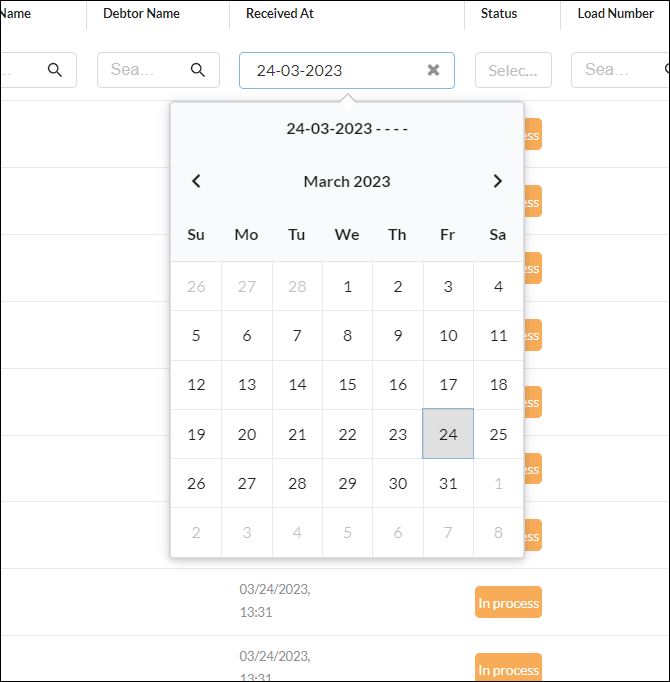
To filter by the Received At date field, use the pop-up calendar to enter a date:
-
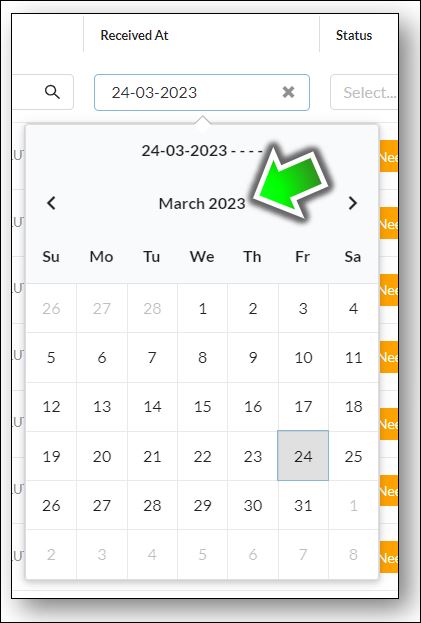
To go from month to month, click < Previous and > Next.
-
To select a day, click a numbered cell or box on the monthly calendar.
-
To select a different month or year, click the current month and year (for example, March 2023). You can continue to click this part of the calendar to toggle through different calendar views.
-
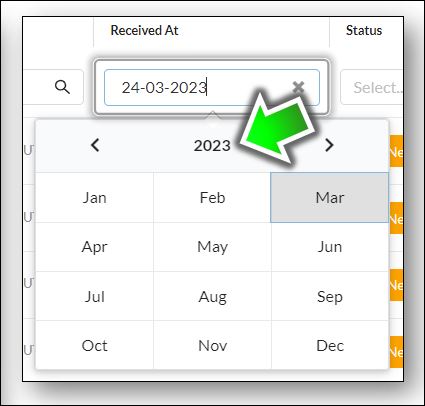
To go from year to year, click < Previous and > Next. To select a month, click one of the twelve (12) boxes for each month of that year. To select a different range of years, click the year (for example, 2023). You can continue to click this part of the calendar to toggle through different calendar views.
-
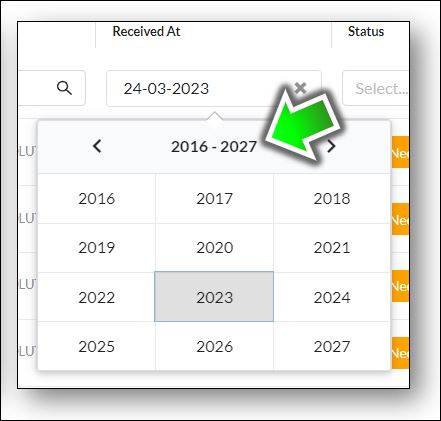
To go back or forward by a range of 12 years, click < Previous and > Next. To select a year, click one of the twelve (12) boxes for each year. To restore the original monthly calendar view, click the current 12-year series (for example, 2016-2027). You can continue to click this part of the calendar to toggle through different calendar views.
-
To get out of the calendar, pick one specific day or click any neutral white space on the page.
-
-
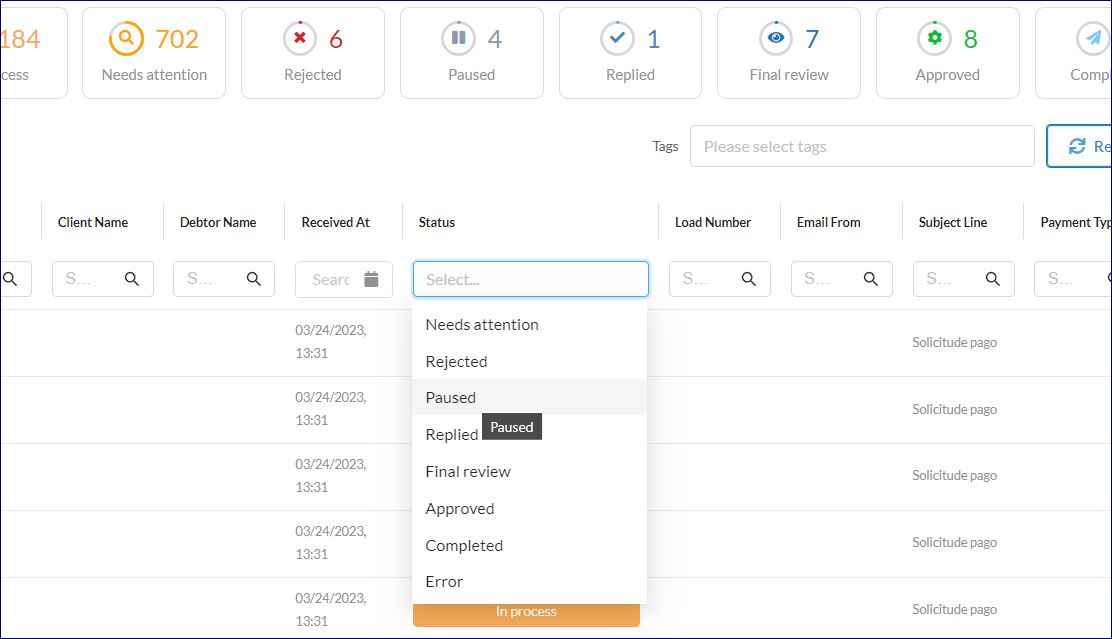
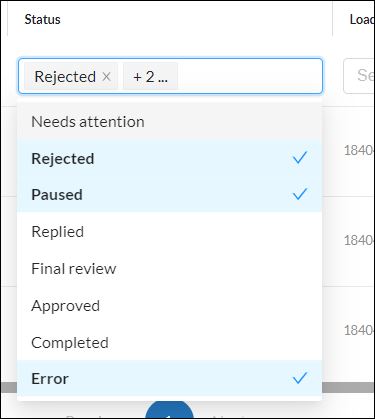
To apply more than one search filter value in the Status field, click each status value. In this example, the user is able to search for rows with any of the following values:
-
To clear the filters, click X Remove in each column filter field.
-
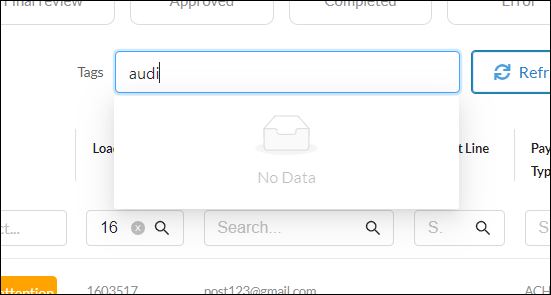
If your search on Tags shows No Data, try your search again or work with your admin to create and apply meaningful tags.
-
If your search criteria results in No work items, try removing some search filters and then try your search again.
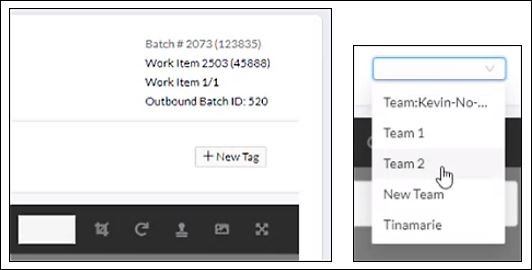
Tags allow you to assign a work item to yourself or a team. Using tags to assign owners to work items can reduce confusion and help teams be more successful by dividing up responsibilities.
You can assign one or more tags to work items and then apply search filters to find work items with matching tags.
The system can also assign tags to work items in automated workflow business logic. For example, to distribute a large volume of items between two teams, the system could assign the first 1,000 to team A, the next 1,000 to team B, and so on.
As a user, you want to try to resolve or fix as many work items as you can. However, when a given issue is minor or outside the scope of your team or department, you can ignore it to send it to the next phase in its journey toward final approval and completion.
-
Click one of the following buttons at the top of the page:
-
NEEDS ATTENTION
-
REJECTED
-
REPLIED
-
FINAL REVIEW
-
ERROR
-
-
Apply any search filters you might need to find the work items that you are assigned to resolve or approve.
-
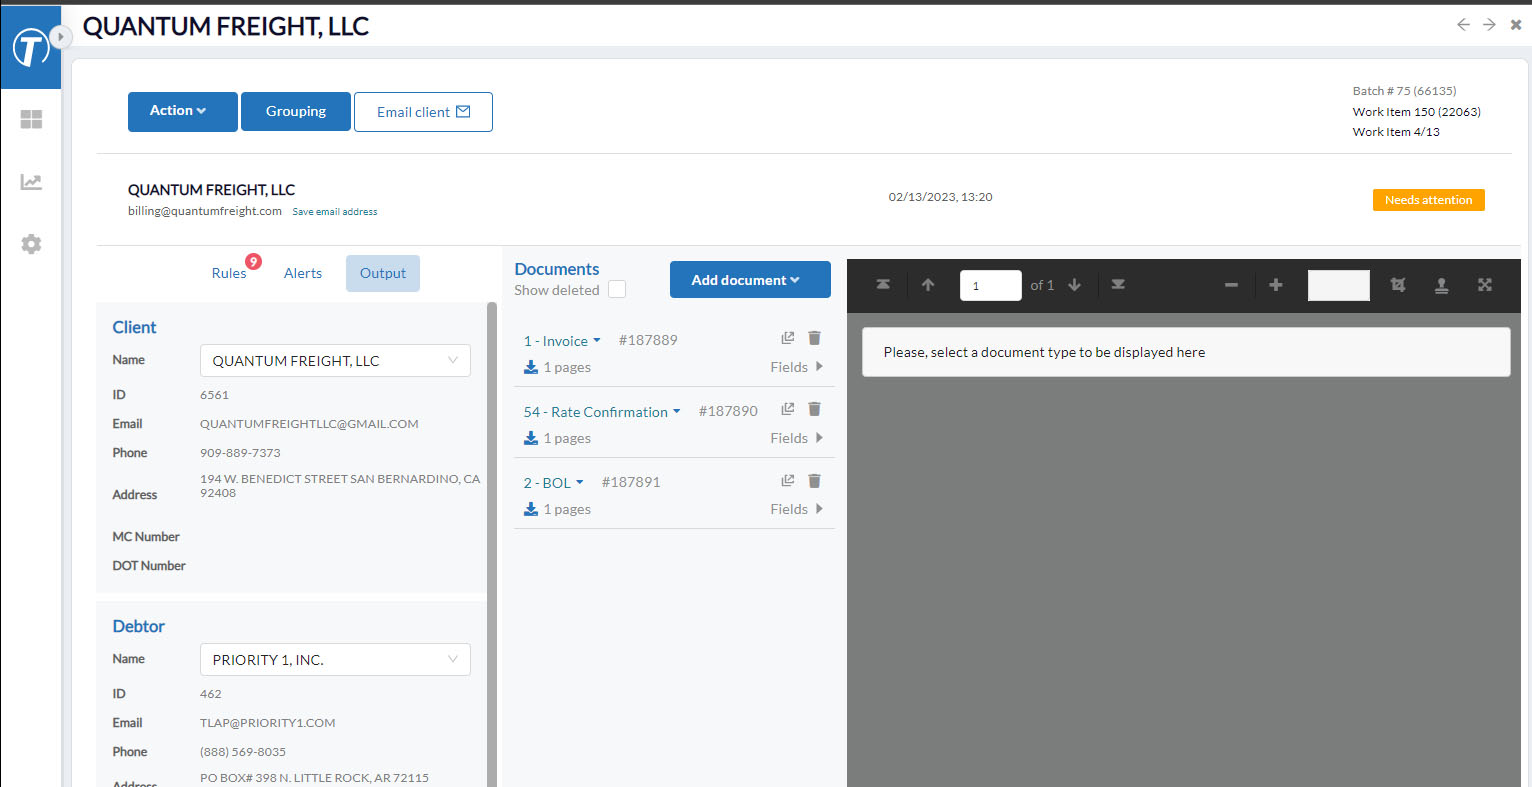
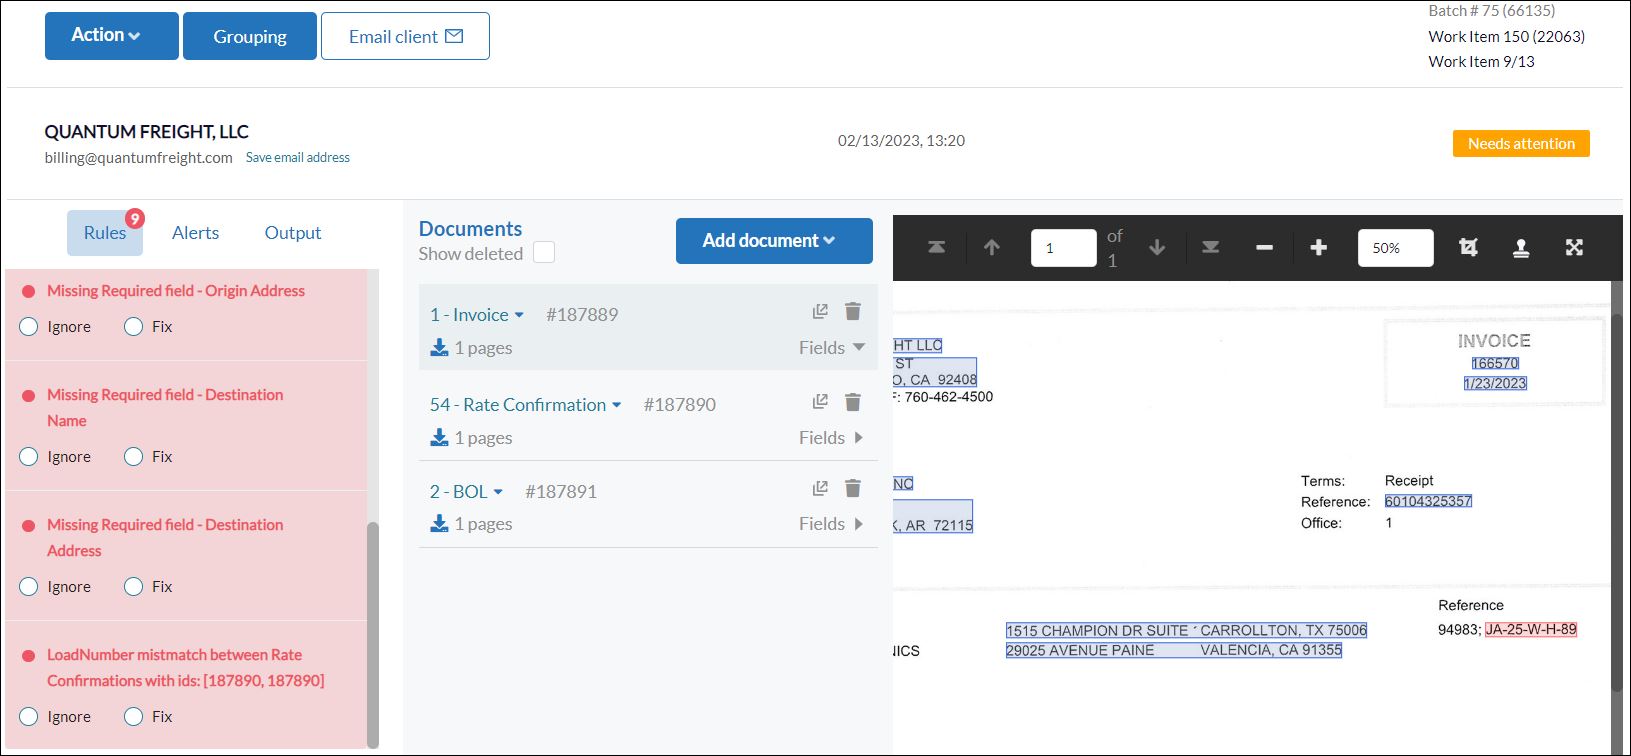
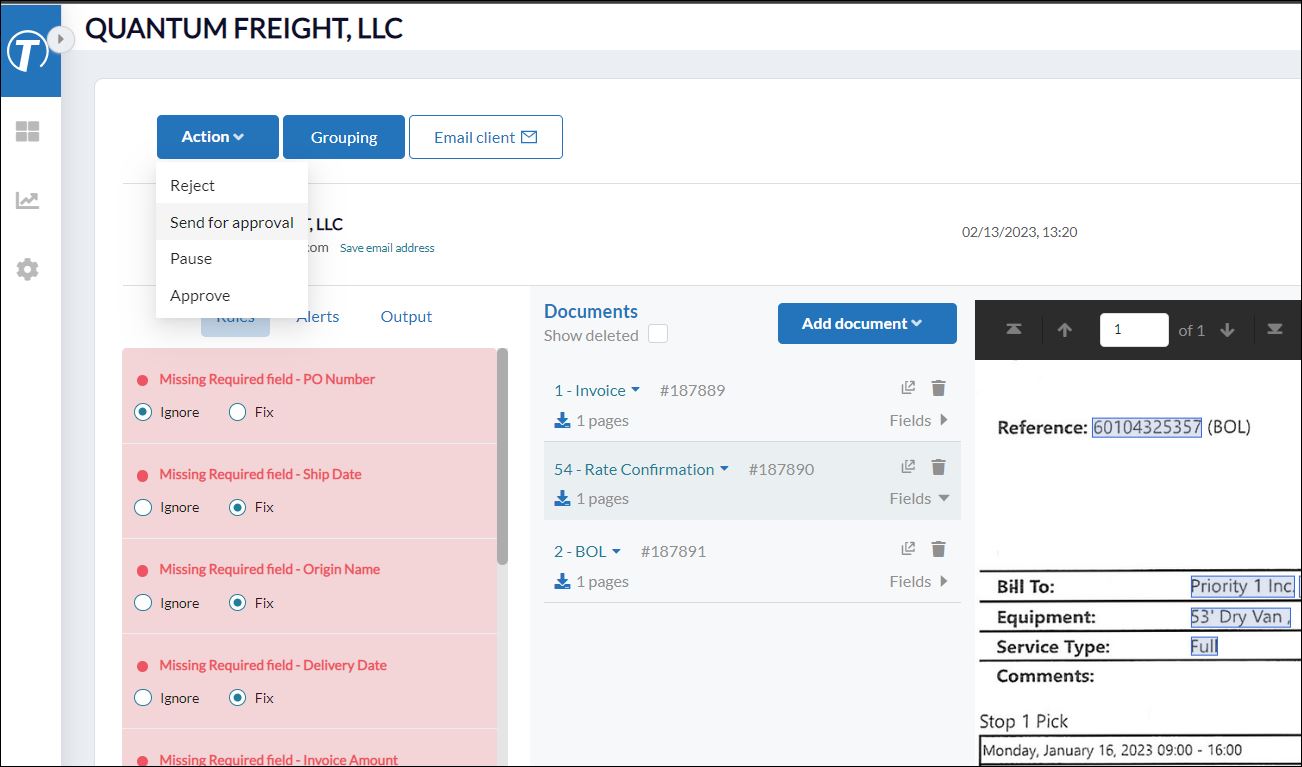
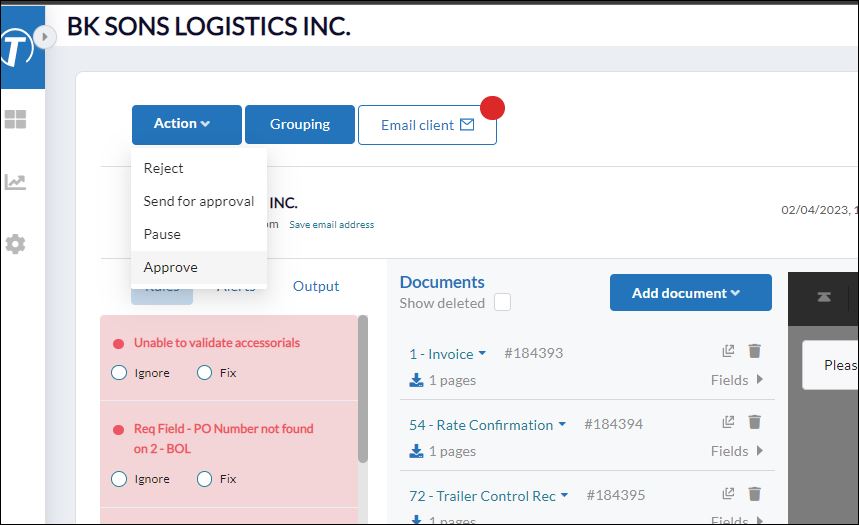
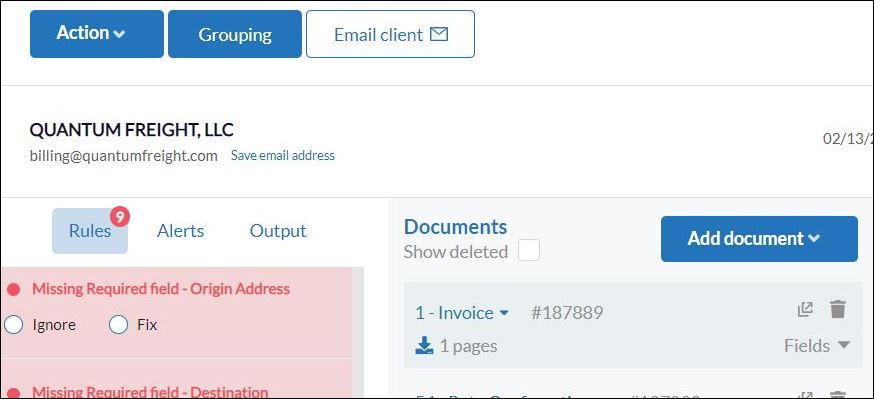
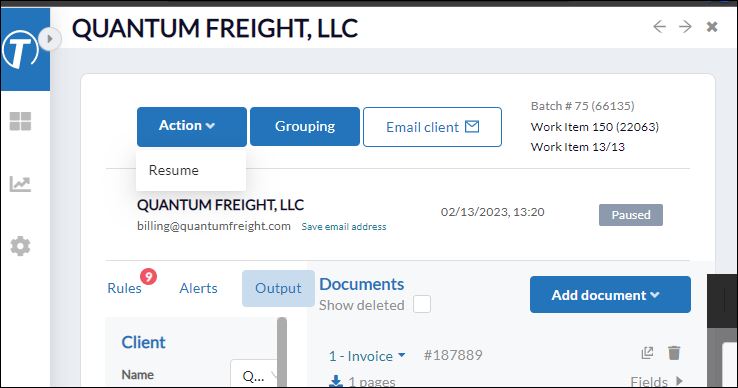
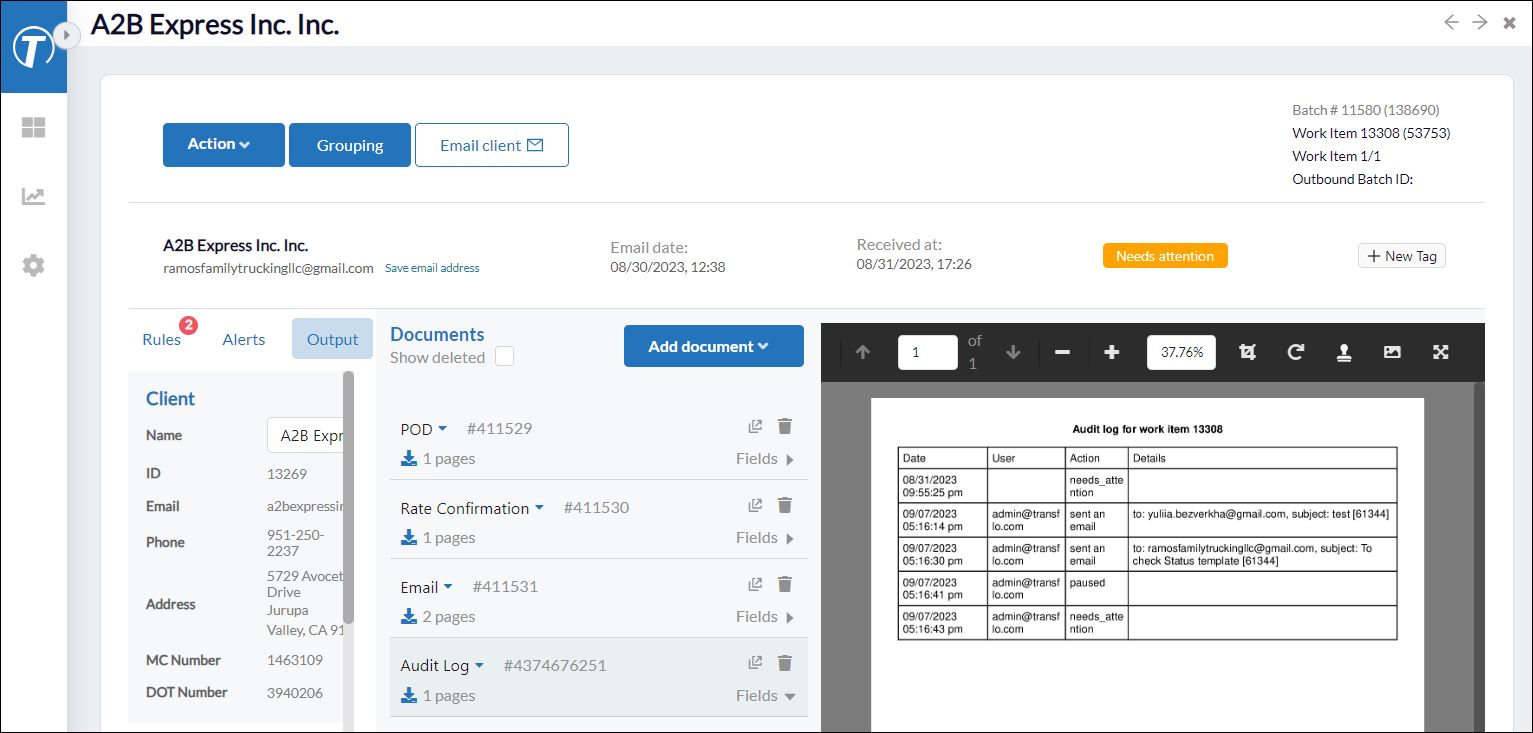
To open a work item, double-click it in the list. Familiarize yourself with the following screen elements:
-
Action, Grouping, and Email Client buttons
-
Rules, Alerts, and Output tabs on the left
-
Documents list in the center
-
Document viewer on the right
-
-
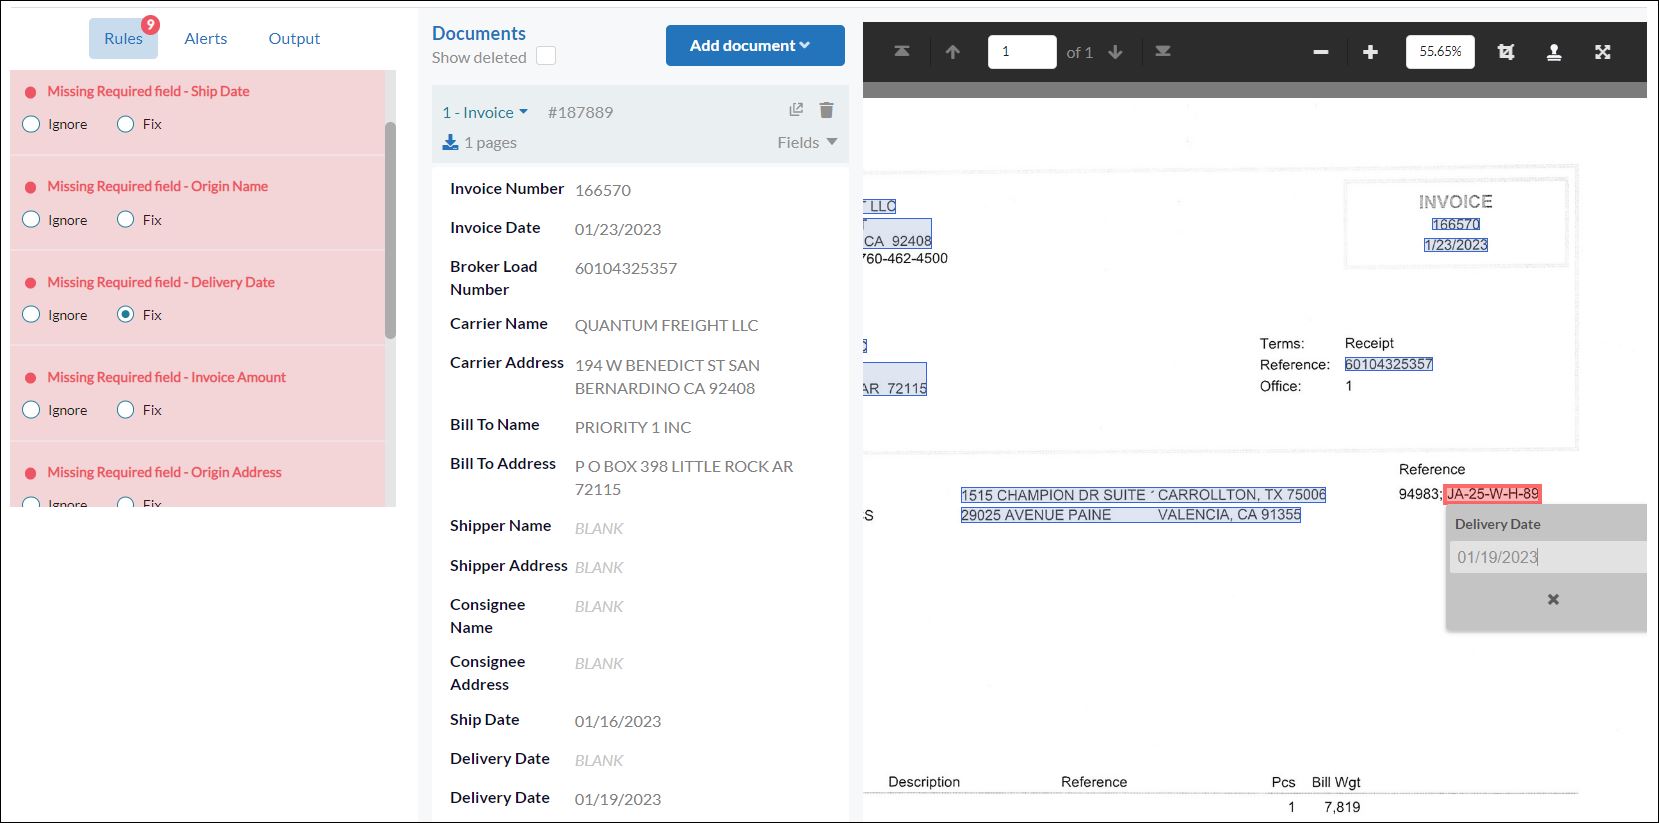
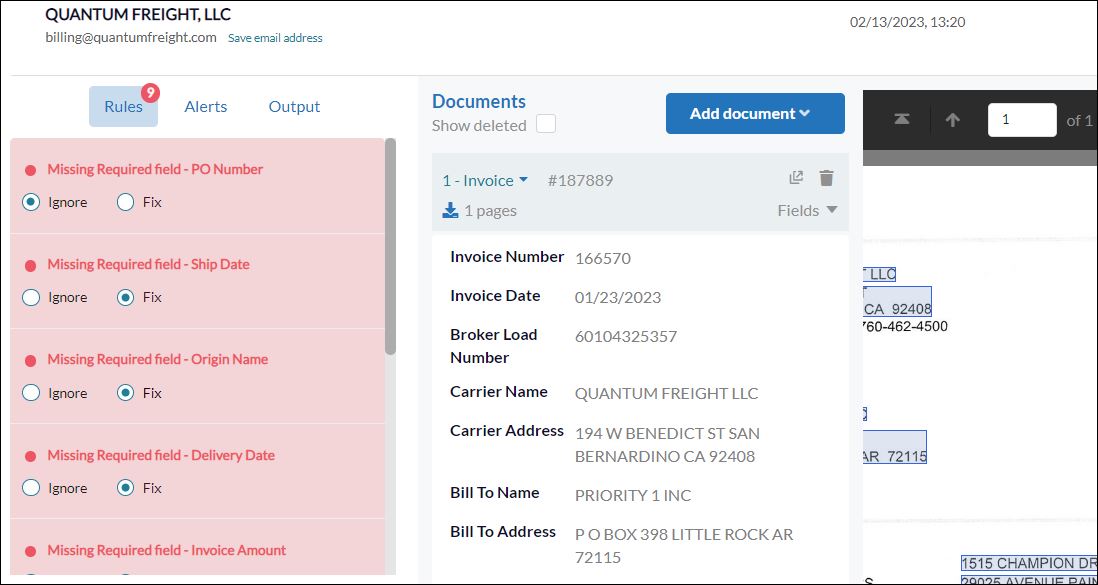
Click the Rules tab. Review the list of issues that need attention and mark each one Ignore or Fix. In the center Documents list, click a document such as an invoice or BOL to view it on the right.
-
On the right, click a red area in the document viewer to enter any corrections. In the Documents list, expand Fields to view the field data.
-
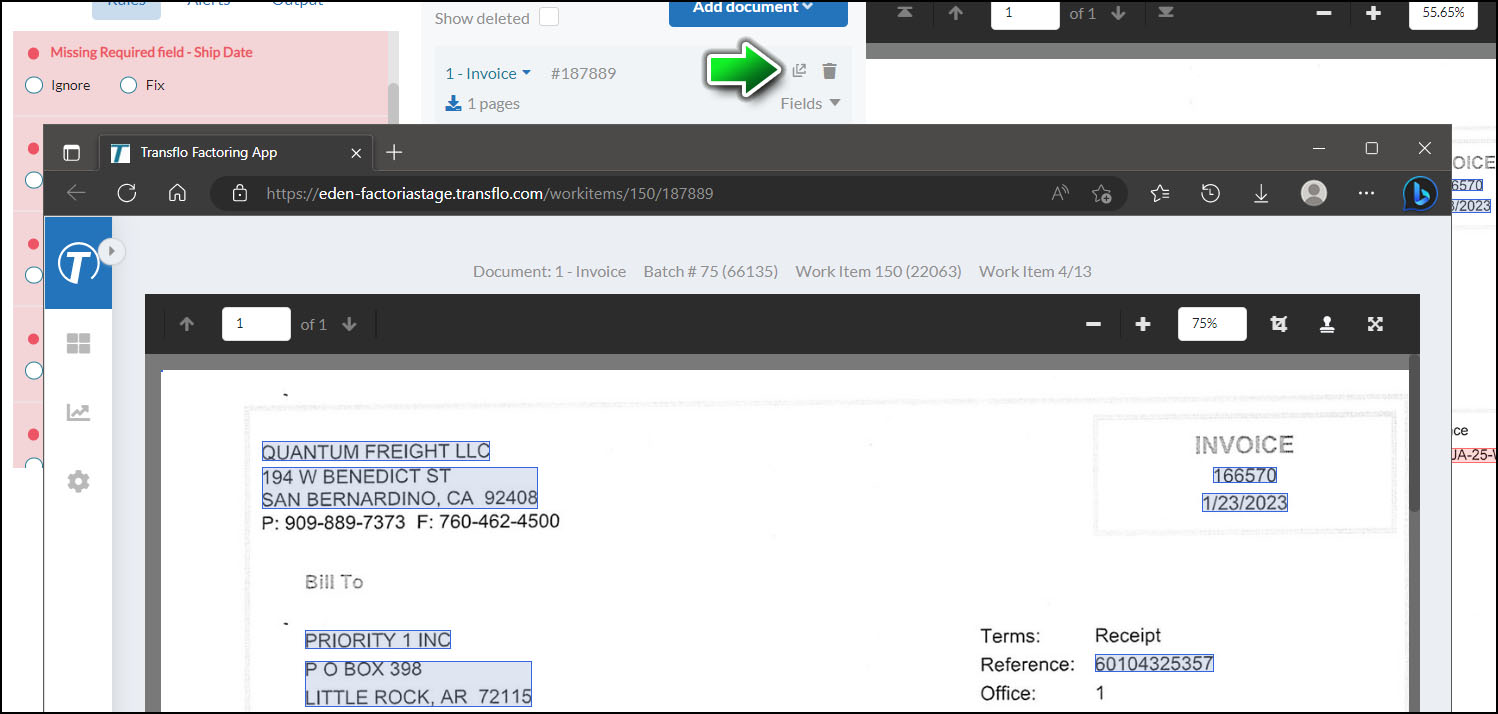
(Optional) To view a document in its own browser tab or full window, click Open in New Tab.
-
Continue to review the list of issues that need attention on the Rules tab and mark each one Ignore or Fix. Continue reviewing each document in the Documents list to resolve missing, blank, or mismatched data.
-
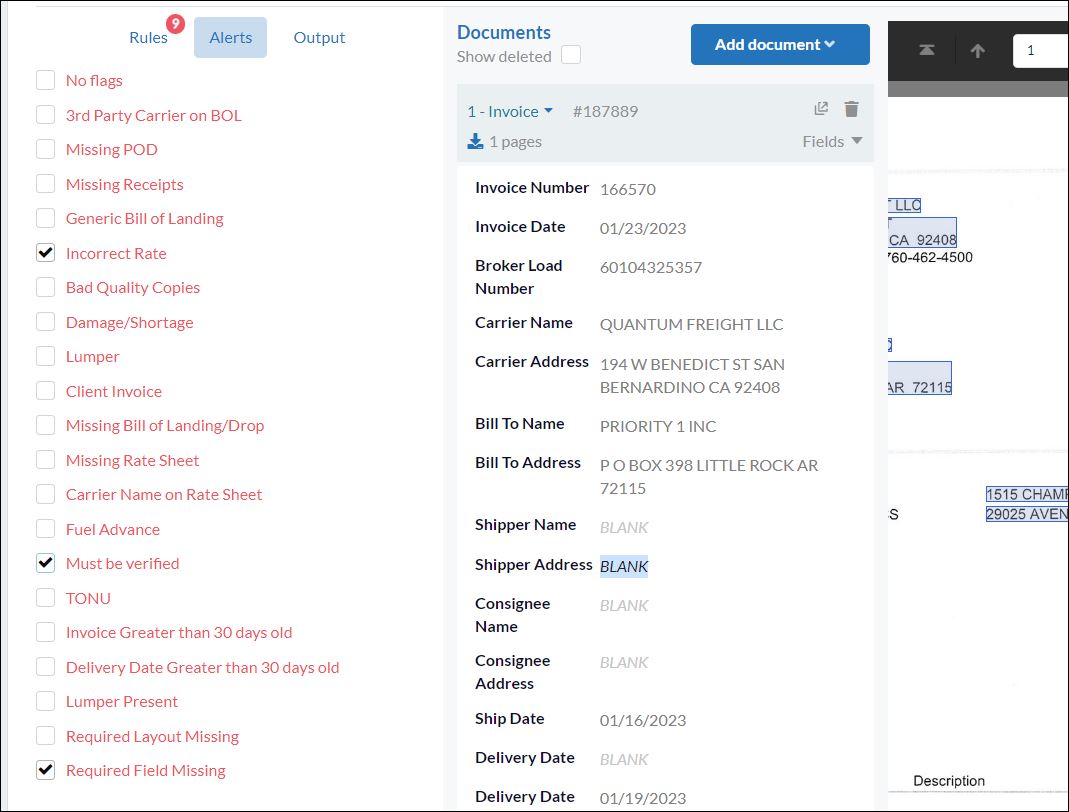
Click the Alerts tab. Based on your department, role, or current goals, select the check boxes for the types of rule violations you expect to review, fix, or ignore.
-
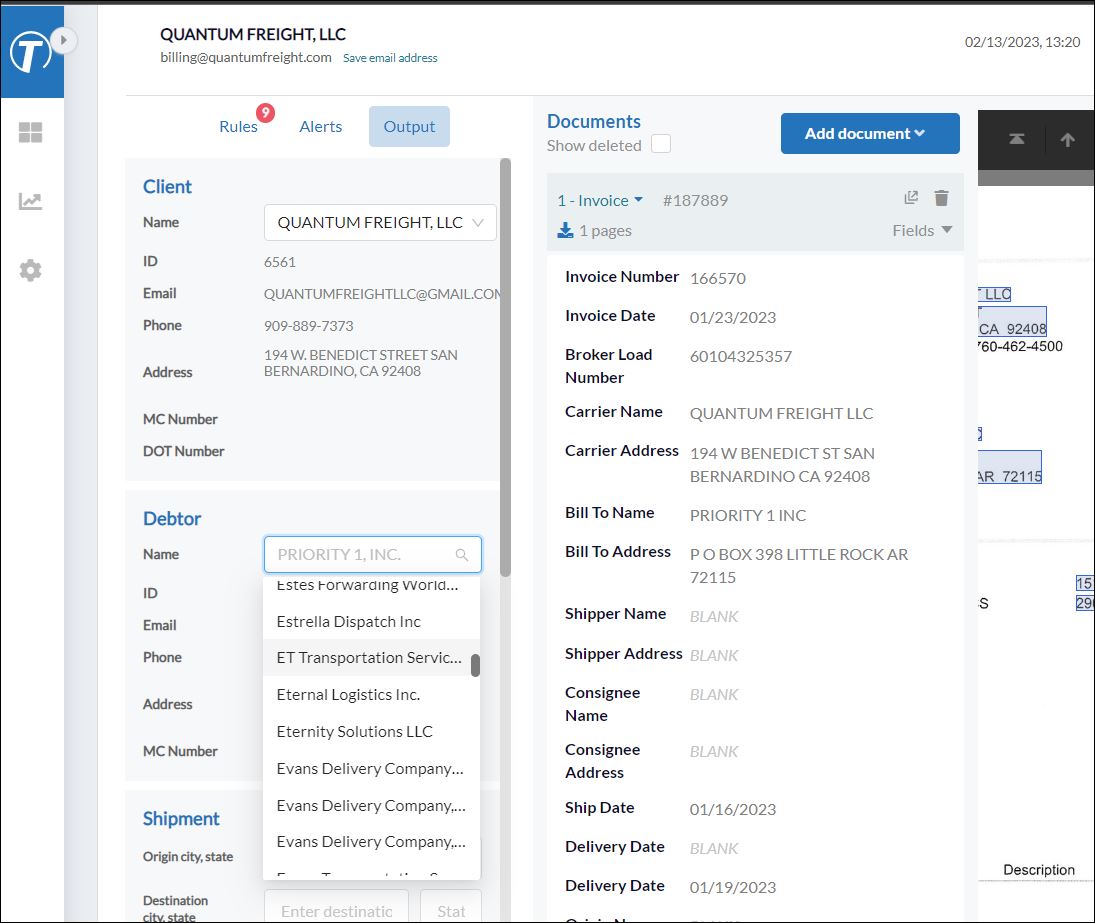
Click the Output tab. Verify the names of the client and debtor are correct.
-
On the Output tab, examine each field and scan for rule violations.
-
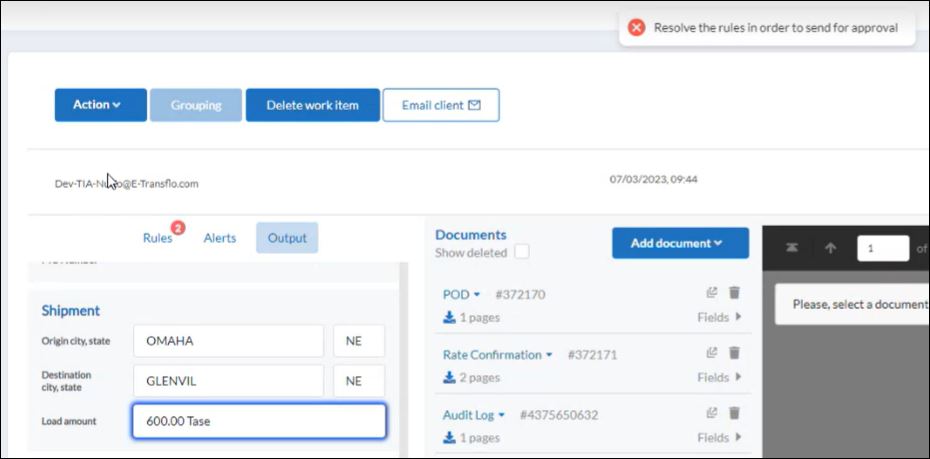
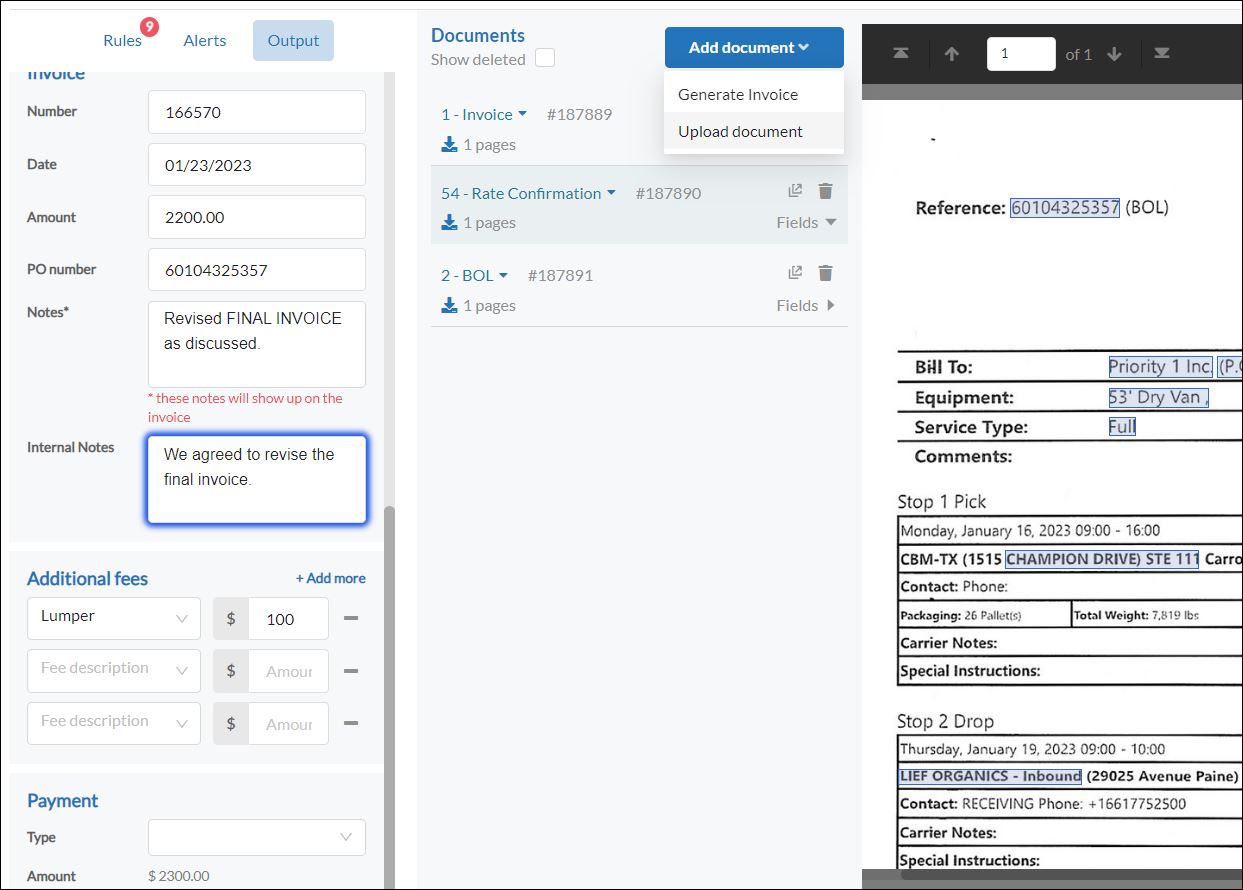
Edit any fields with missing or incorrect data. The system attempts to validate your entries. Verify common errors such as text in a numeric currency field as shown in the following example image:
-
In the Notes field, enter any client-facing details that you want to appear on the invoice.
-
In the Internal Notes field, enter any internal (private) notes that won't appear on the invoice but remain in Workflow AI and other integrated factoring systems.
-
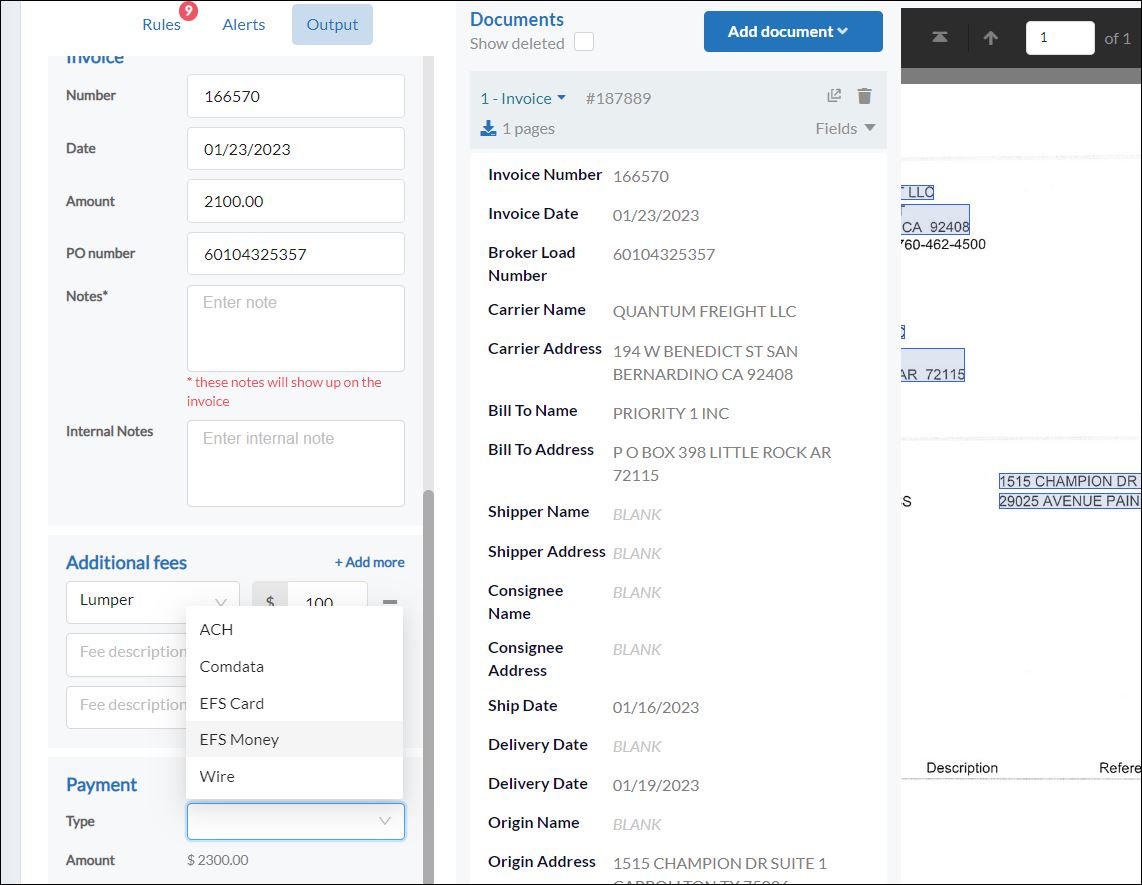
You can also add any additional fees and specify the type of payment.
-
-
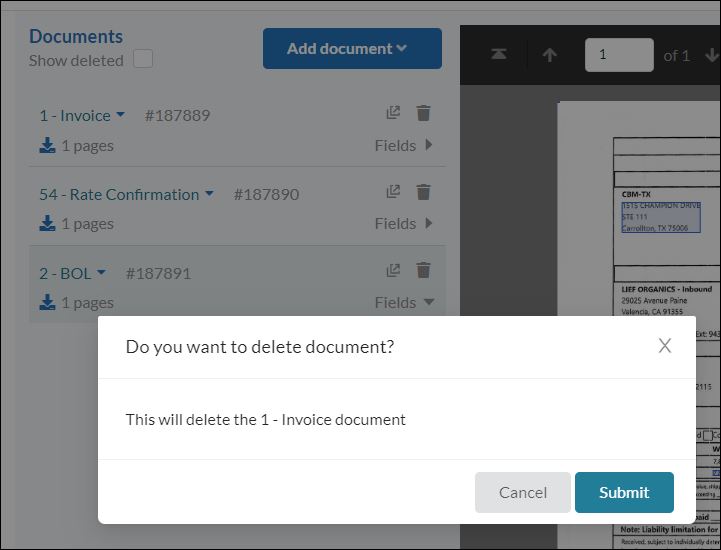
Add or delete documents as necessary:
-
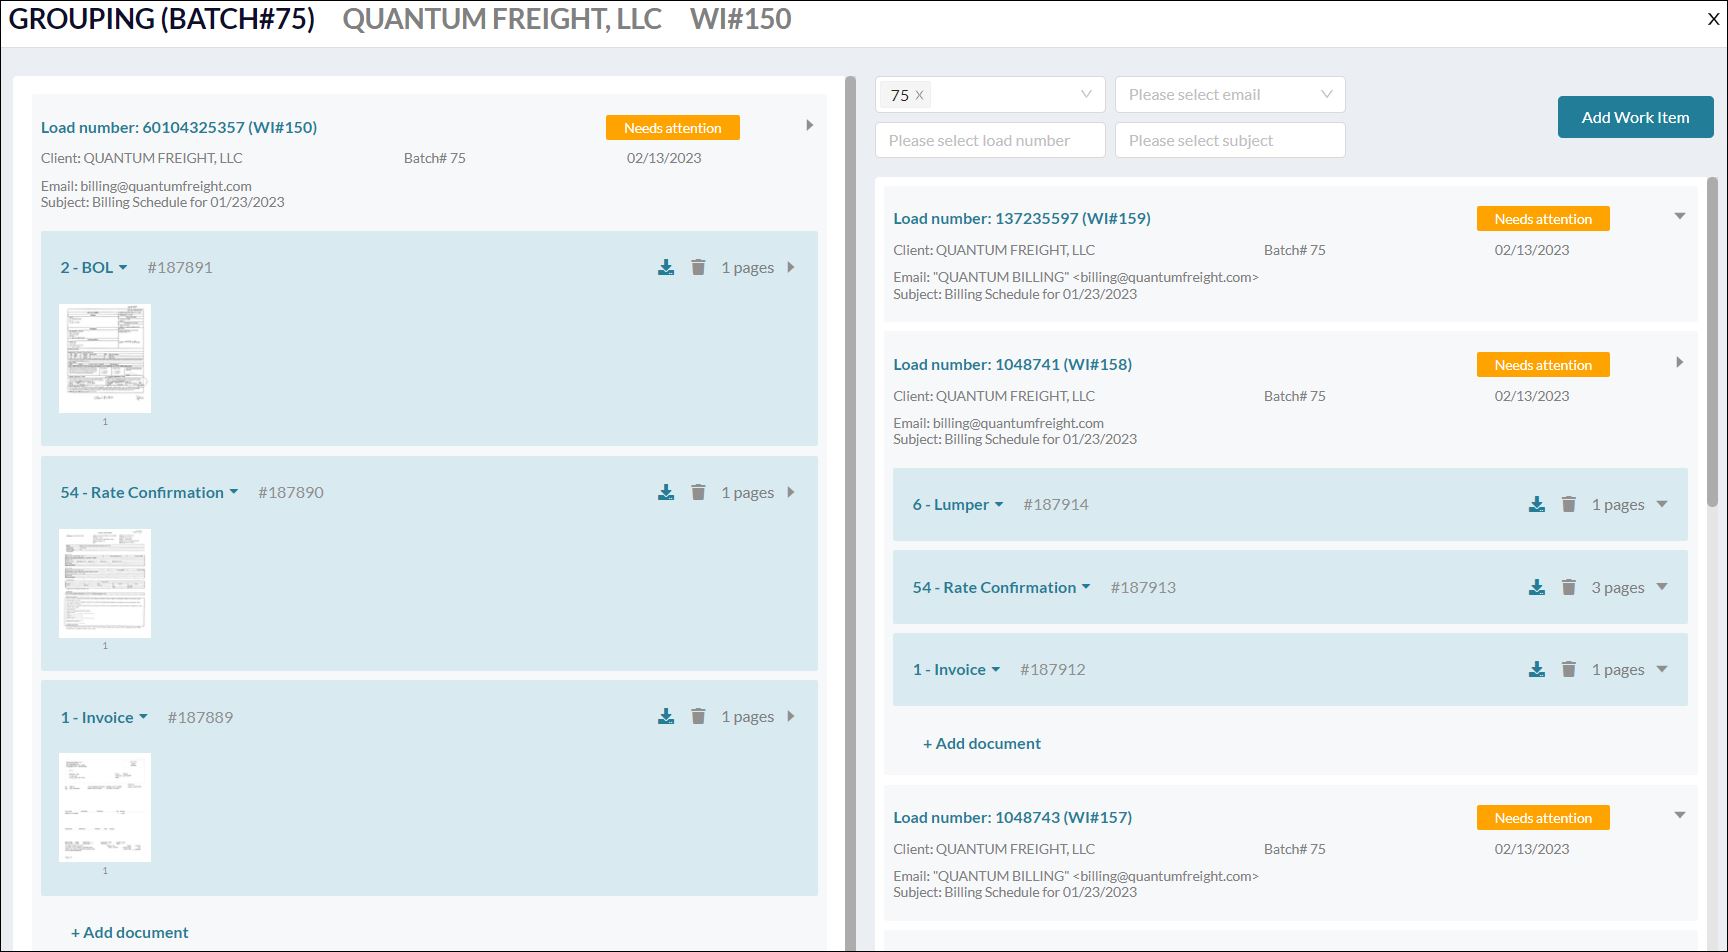
To verify you have all of the related documents for a particular client, load, or batch, click Grouping.
-
To request needed information from the client, click Email Client and follow the steps in the next section. When you e-mail the client, your work item changes to PAUSED status until the client can respond (REPLIED status).
-
When you are finished with your changes to fields and documents, click the Action button and choose one of the following values from the Action drop-down menu:
-
Reject: After reviewing the documents, fields, and rules for this work item, select Reject if you cannot approve or re-work this item. Rejection can indicate any number of issues including poor staff performance, training issues, automation mistakes, missing data, or user error.
-
Pause: Select this option if you need to place the work item on hold until you can take further action.
-
Send for Approval: Select this option to send the work item to FINAL REVIEW status.
-
Approve: Select this option if you have permissions to approve the item and send it to COMPLETED status.
-
As a user, you can add stamps, mark up, annotate, or crop a document.
-
Click one of the following buttons at the top of the page:
-
NEEDS ATTENTION
-
REJECTED
-
REPLIED
-
FINAL REVIEW
-
ERROR
-
-
Apply any search filters to find the work items that you are assigned to resolve or approve.
-
Open a work item.
-
In the Document list, open a document.
-
(Optional) To view a document in its own browser tab or full window, click Open in New Tab.
-
To crop the document, select the Crop tool and define the area of the document that you want to keep.
-
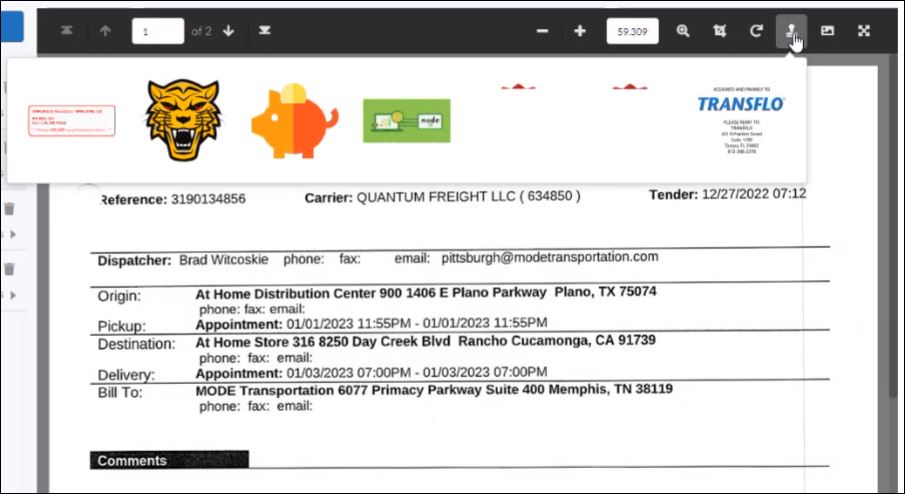
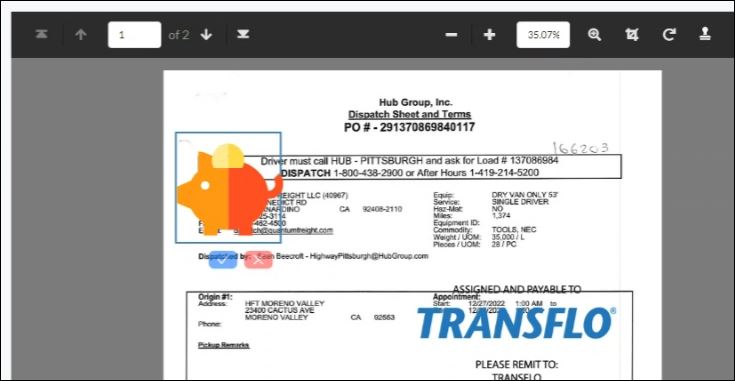
To apply stamps, select the Stamp tool and select a pre-defined stamp. After you add a stamp, you can move it and resize it.
-
Contact your administrator to configure one or more document annotation stamps. These stamps can be placed on documents and can be resized, moved with drag-and-drop simplicity, and support opaque use (to cover an area) or transparency (the original document shows behind the shape of the stamp).
-
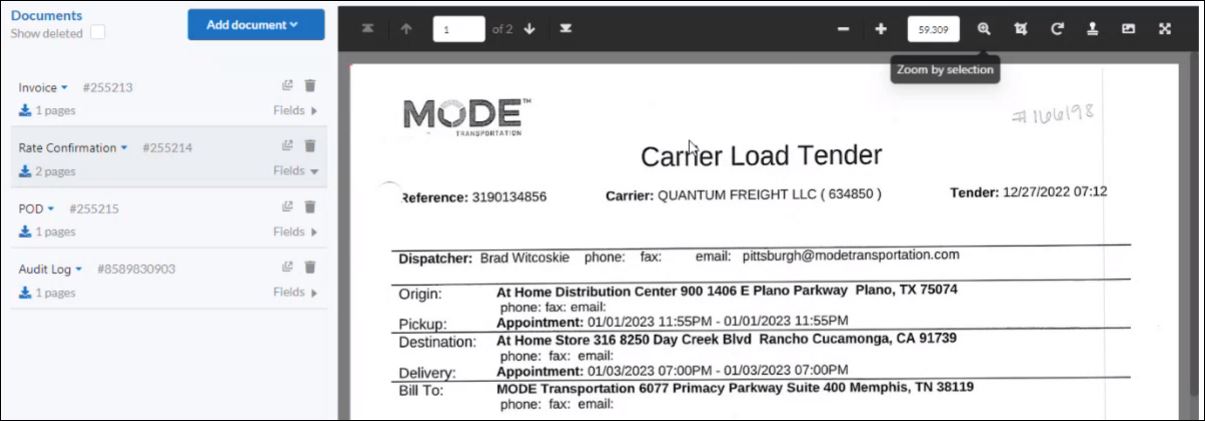
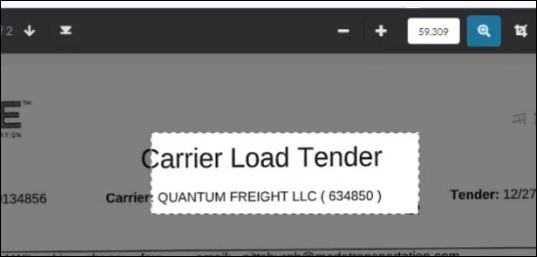
To magnify or zoom the document view larger or smaller, click –Zoom Out or +Zoom In. To magnify a specific area, click Zoom by Selection in the toolbar.
-
Draw a box around the area you want to enlarge.
-
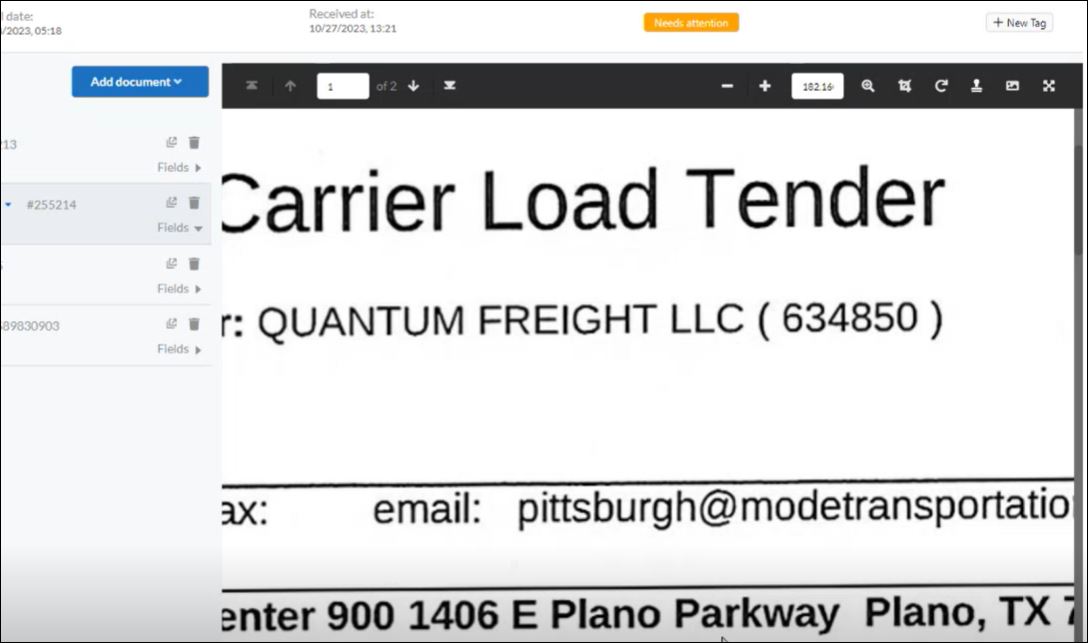
The document viewer zooms in and the area you defined fills the document viewer. Zoom by selection is a fast and efficient way to zoom in. In this example, the zoom percentage automatically changed from 59% to 182%, maximizing your view of just the portion of the document that you needed.
-
To resolve issues with a work item that prevent you from processing it successfully, you can request more information or assistance from someone by e-mail. For example, send the item and your comments to the original sender, a client, another team, or a supervisor. The system automatically sets the work item status to the next status (defined by your admin in the Settings section for e-mail templates). For example, after you send a request to resolve missing information about a work item, it might be routed to a status queue of PAUSED until a response is received.
-
Click one of the following buttons at the top of the page:
-
NEEDS ATTENTION
-
REJECTED
-
ERROR
-
-
Apply any search filters you might need to find the work items that you are assigned to resolve.
-
To open a work item, double-click it in the list.
-
Prepare one or more documents in the Documents list in the center of the page.
-
On the Output tab for invoices, edit any fields and enter any client-facing or internal (private) notes.
-
To add a document, click Add Document and then choose Generate Invoice or Upload Document.
-
-
Click E-mail Client.
-
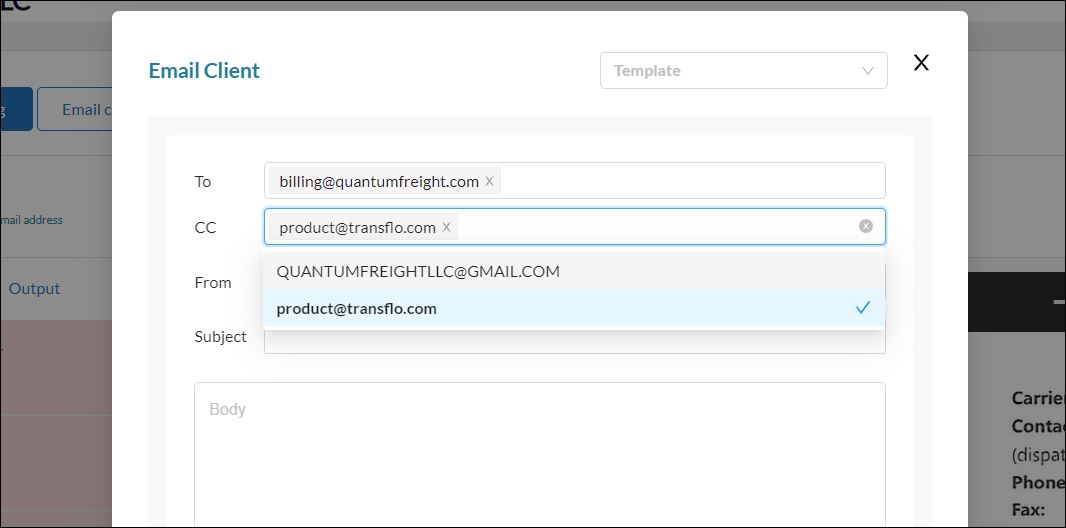
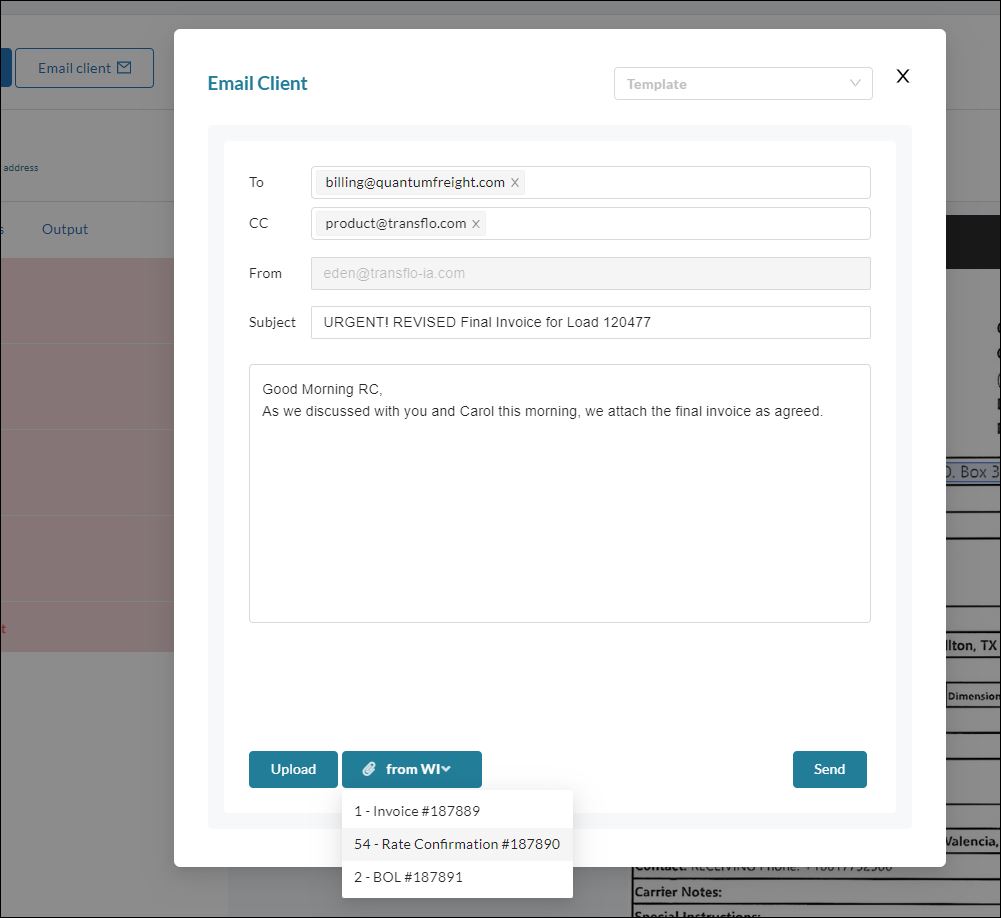
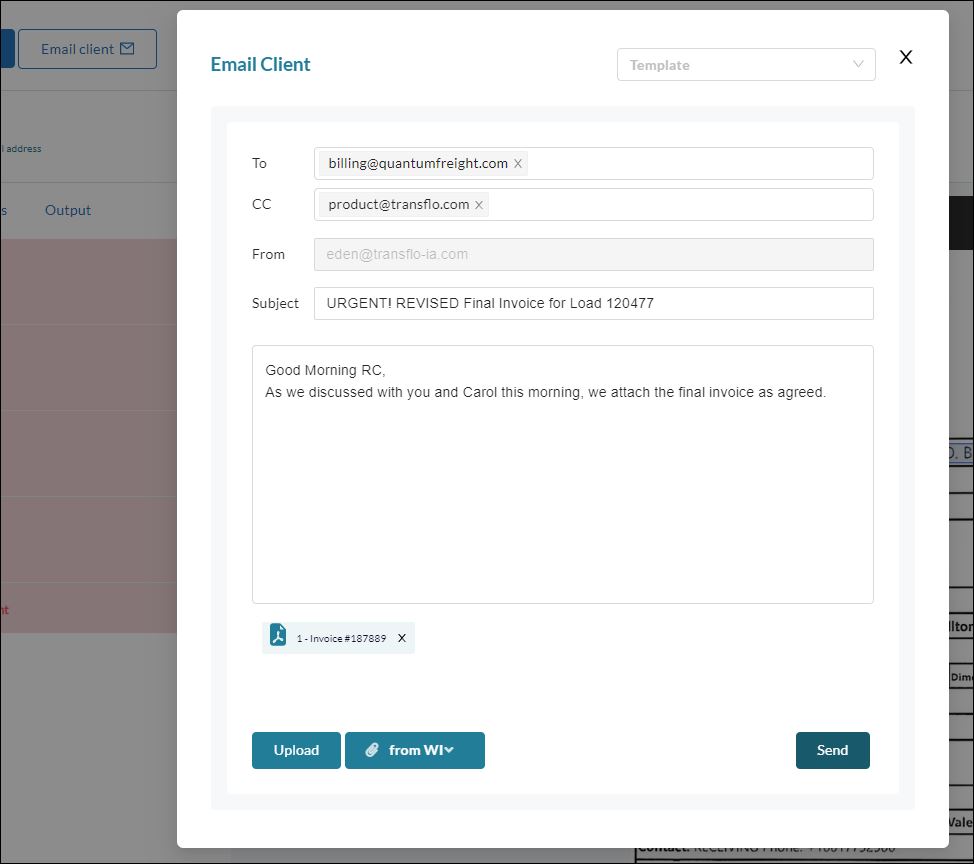
In the Email Client window:
-
Select a template.
-
In the To field, enter one or more direct recipients.
-
(Optional) In the CC (carbon copy) field, enter one or more indirect recipients
-
In the Subject field, enter a short description about the purpose of this e-mail to inform recipients.
-
In the Body field, enter a greeting, the main body of the message, and a closing.
-
To upload one or more documents to attach to this e-mail, click Upload.
-
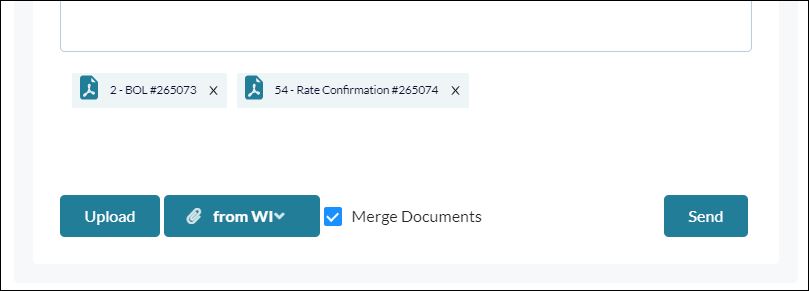
To attach documents from the work item, click the Attach from WI button.
-
Decide whether it is more convenient for your client to receive multiple uploaded and attached documents or just one PDF. To merge multiple documents into one PDF attachment, click the Merge Documents check box. (Your administrator can also configure the e-mail template to always merge multiple documents. Depending on your permissions, you might or might not be able to clear the Merge Documents check box.)
-
Review all the fields and attachments one final time.
-
When ready, click Send.
-
-
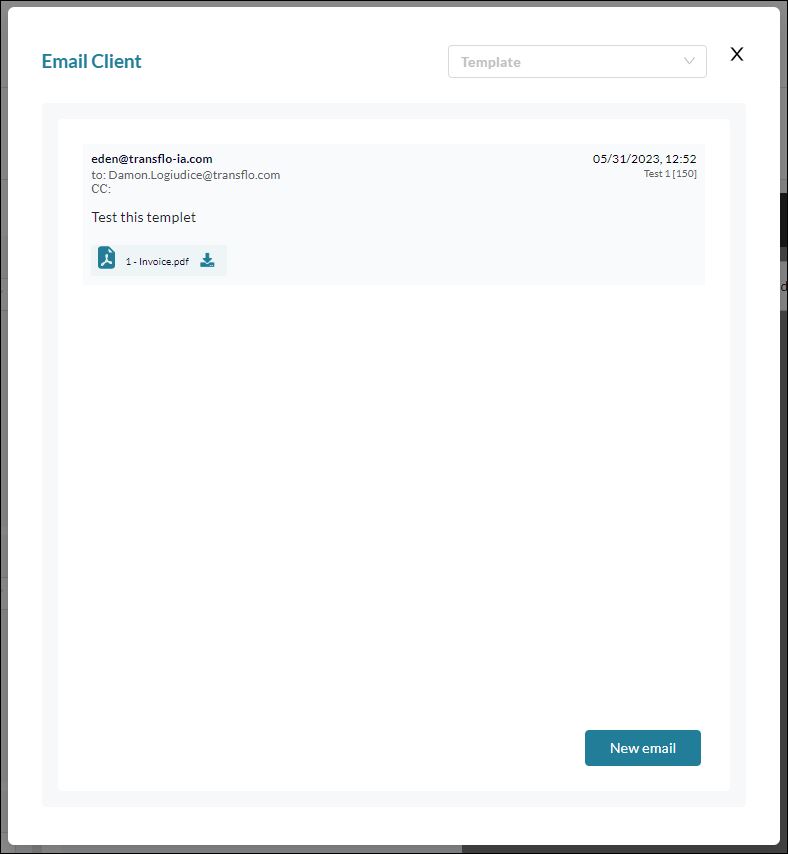
To close the Email Client window, click X Close. (Optional) To prepare a separate e-mail message for the same work item, click New Email.
-
Until the recipient responds, your work items with pending e-mail messages to the client are placed in a PAUSED state.
-
Allow time for your recipients to respond. They will receive your e-mail including any attachments and instructions provided in the template you selected.
-
Replies are automated so when your recipient responds, you can resume activity on the work item by clicking the REPLIED status button.
- A red dot also appears to remind users that a reply from the client has been received. Based on the client response, you should now be able to approve the item or send it for approval.
With permission to approve work items, you can review and approve them one at a time or approve multiple items simultaneously. Although you might have permissions to approve work items in NEEDS ATTENTION and other queues, in a typical workflow the work items you are about to approve are prepared by other users who send them to the FINAL REVIEW queue.
-
Click the FINAL REVIEW button at the top of the page.
-
Apply any search filters to find the work item that you want to approve.
-
Open the work item.
-
Click the Action button and choose Approve.
-
Click the FINAL REVIEW button at the top of the page.
-
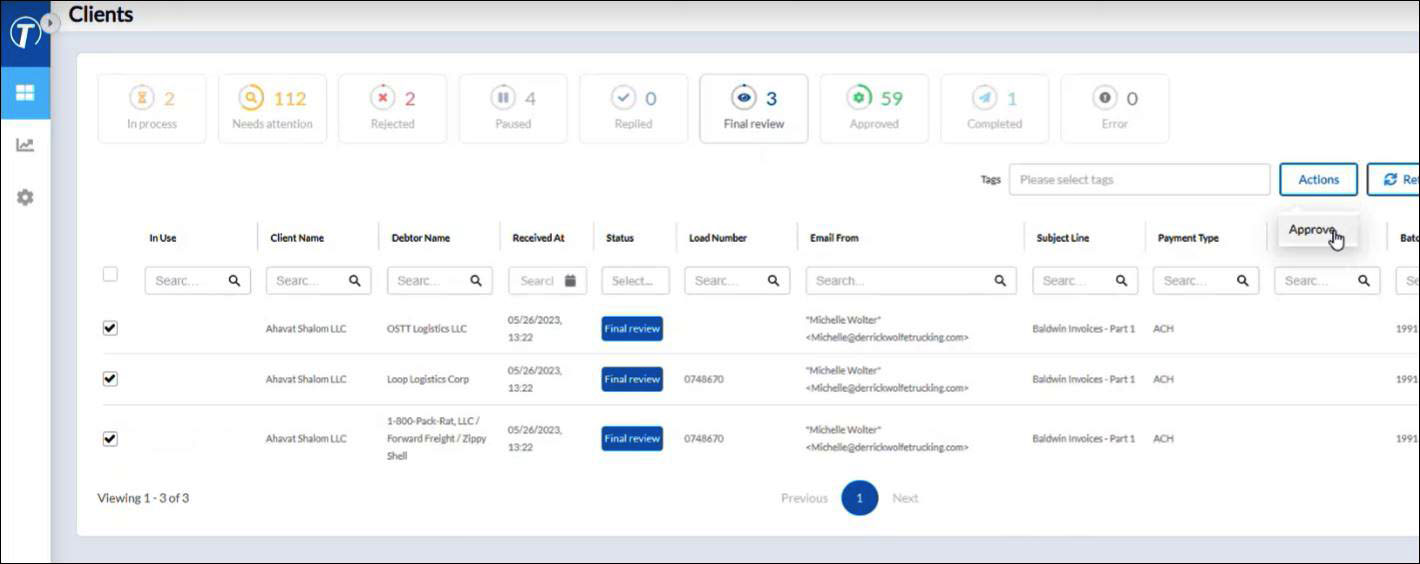
Apply any search filters to find the work items that you want to approve.
-
Select the check box for one or more work items. To select them all at once, click the check box at the top of the list.
-
Click the Actions button and choose Approve.
-
The work items are now approved.
