Configure the Transflo Import Server Application
TRANSFLO® Import is a server application that imports images and their associated index data into an image repository. The DMS Import application provides the option to merge multiple images containing identical index values before importing to the image repository. As an administrator, you can configure DMS Import to interface with image repositories from Gauss Enterprise, Docubase Systems (no longer supported), or FileNet Corporation.
To start TRANSFLO® Import Configuration, follow these steps:
-
Click the Start button on the Windows task bar.
-
Point to Programs, point to TRANSFLO, and click Import Configuration.
The TRANSFLO® Import Configuration window opens.
-
From here you can create and modify the Import.INI file. If you are using a Gauss Enterprise image repository, you can also modify the Document.INI file.
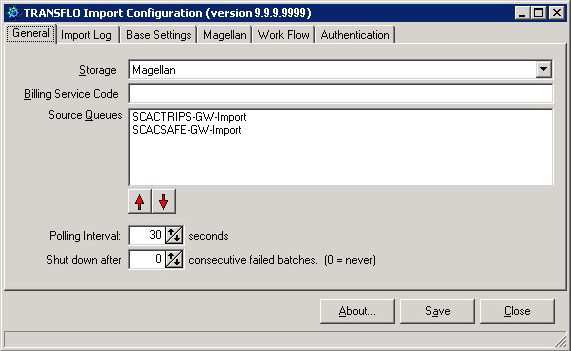
Use the General tab to configure basic Transflo DMS import configuration settings to interface with your image repository.
-
Stop the TRANSFLO Import Service before you edit any DMS import configuration settings.
-
On the General tab, select an image repository from the list of values in the Storage field. Tabs and buttons appear based on your selections. Use these dynamic screen elements to configure the respective repositories.

-
The default repository is Gauss™ VIP Enterprise™ (formerly called Magellan). A corresponding Magellan tab appears after the Base Settings tab.
-
If you select Docubase, the Docubase tab appears instead. (Docubase is no longer supported.)
-
If you select FileNet, a FileNet Settings button will be accessible via the Base Settings tab.
-
If you select TRANSFLO®, a tab for configuring the repository does not appear because the Transflo repository is configured in the TRANSFLO® Administration Tool. See Transflo DMS Enterprise Administration Tool.
-
-
As a Transflo administrator, enter an appropriate value in the Billing Service Code field.
-
In the Source Queues field, define the TRANSFLO® Import Queues that the DMS import tool should poll for image data.
-
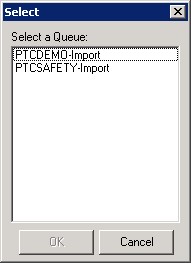
To add a source Queue, right-click in the Source Queues box and click Add Source Queue in the shortcut menu. The Select dialog box appears. In the Select dialog box, click the name of the TRANSFLO® Queue that you wish to add, and then click OK.

The selected queue now appears in the Source Queues box.
-
To delete a Queue from the Source Queues box, first click the Queue to select it. Right-click the Queue and click Delete Source Queue in the shortcut menu.
-
If the Source Queues box contains multiple Queues, the Queues will be polled in the order in which they appear in the box. The up and down arrow buttons found below the box allow you to rearrange the sort order of the Queues.

To change the position of a queue in the sort order, select it and click the appropriate button to move it up or down in the order.
-
-
The default polling interval is 30 seconds. To change this interval, enter the desired number of seconds in the Polling Interval box, either by typing the number or by clicking the up or down arrow buttons next to the box.
-
By default, polling will never stop due to failed batches. To force polling to stop after a specified number of consecutive failed Batches, enter that number in the Shut down after <x> consecutive failed batches box, where <x> is the number of failed batches. To enter the number, either type it, or click the up or down arrow buttons next to the box.
-
Click the Save button to save your changes.
-
Once you are finished saving your changes you can restart the TRANSFLO Import Service.

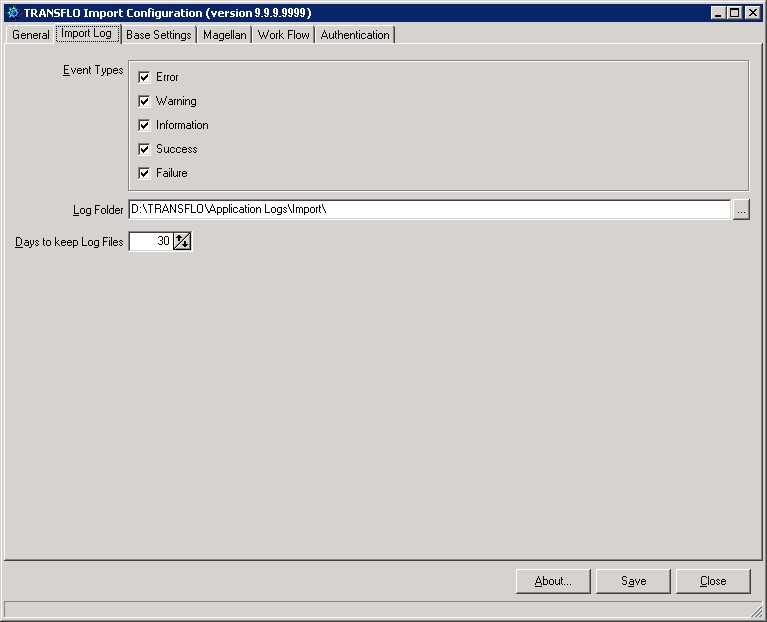
The Import Log tab is used to identify the event types that should be logged, the folder where log files should be saved, and the number of days that log files should be retained before deletion.
A single daily log file stores data for all selected Event Types.
To configure the Import Log tab:
1. In the Event Types area, select the check boxes of the Event Types to be logged.
-
To log errors, select the Error check box (selected by default).
-
To log warnings, select the Warning check box (selected by default).
-
To log non-error information messages, select the Information check box (selected by default).
-
To log success messages, select the Success check box.
-
To log failure messages, select the Failure check box.
2. In the Log Folder box, enter the path to the folder where log files should be saved.
Click the browse button to the right of the box, navigate to the desired folder in the dialog box that appears, and then click OK.
Alternatively, you can type the path in the box.
3. In the Days to keep Log Files box, enter the number of days that each log file should stored before deletion.
Either type the number of days directly in the box, or click the up or down arrow buttons to change the number of days.
The valid number of days ranges from 0-365.
The default duration to keep a log file is 1 day.
4. Click the Save button to save your changes.
The Base Settings tab is used to configure TRANSFLO® Import profiles for TRANSFLO® system bases (databases).
These profiles include the fields required for a successful import, the routing queues for both successful and failed batches, activity log settings, and other options.
To configure the Base Settings tab:
-
To modify the default Base profile settings before adding any Base profiles, proceed with the steps below before adding any bases.
Note that not all options are available when configuring default Base profile settings.
If the desired Base profile was previously added to the Bases box, click the Base’s name to select it.
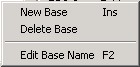
To add a new TRANSFLO® Import Base profile, right-click anywhere in the Bases box and then click New Base in the shortcut menu.

Type a new name for the Base profile, and then press [Enter].
To rename a Base profile later on, right-click the Base name, click Edit Base Name in the shortcut menu, and then type a new name for the Base.
To delete a Base profile, right-click the Base name, click Delete Base in the shortcut menu, and then click Yes when prompted to confirm the action.
-
The Billing Code box is for internal use by Pegasus TransTech.
This box should be configured only by Pegasus TransTech personnel.
-
In the Options area, select the check boxes of the options that should be applied to the selected Base.
-
If successfully processed batches should be moved to the next Queue in the associated TRANSFLO® Gateway work flow, select the Move Successful Batches to Post Import Queue check box.
You will configure this Queue in a moment.
-
To allow the TRANSFLO Import Service to create Workflow case initiator files, select the Create WFI check box.
The Work Flow tab will appear, on which further Workflow settings must be configured after you have finished configuring the Base Settings tab.
See for instructions on configuring the Work Flow tab.
-
To prevent pages without index information from being imported, select the Fail Pages With All Empty Fields check box.
Note: If all of the Field data is deleted in the Exception Manager, the Document will still be imported. This is a known issue.
-
To merge pages containing the same index information into one multi-page TIF file prior to being imported, select the Merge Identical Pages check box. (This option works only with TIF files.)
-
-
To change settings for the Merge Identical Pages feature, check the Merge Identical Pages check box, then click on the Edit Merge Settings button.

Note: The Merge Identical Pages feature is not available if you are using the TRANSFLO® Repository.
-
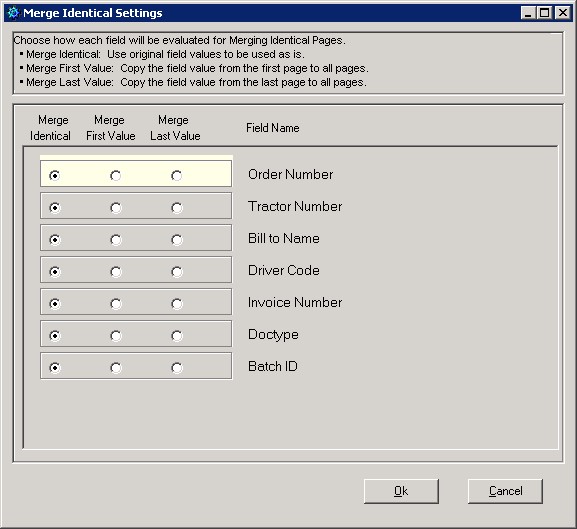
The Merge Identical Settings dialog box opens.

-
For Import Fields that must be identical to merge the documents select the corresponding radio button in the Merge Identical column.
-
For Import Fields that can be different when you merge them, you must determine if the value of the first document or the value of the last document in the collection will be saved.
To save the value of the first document select the corresponding radio button in the Merge First Value column.
To save the value of the last document select the corresponding radio button in the Merge Last Value column.
-
Click OK to save your changes and to close the Merge Identical Settings dialog box.
Note: The TRANSFLO® Database will be different from your imaging system.
The TRANSFLO® Database will contain the original images and data, whereas your imaging system will contain only the multi-page tiff with the merged data.
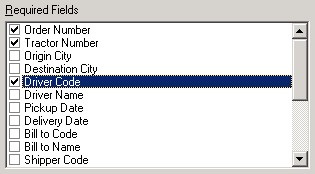
The Required Fields box contains a list of all of the available fields for the selected Base.
Select the check box next to each field that should be required.


-
Optional: If you have installed TRANSFLO® Index Validation and wish to enable it for the selected Base, select the Enable Index Validation check box.
The Settings button is then enabled.
Click the Settings button to open the Index Validation Settings dialog box.
For instructions on configuring this dialog box, please refer to the TRANSFLO® Index Validation System Administrator’s Knowledge Base.
Note: The Index Validation feature in Import only works using the Parsed Procedure.
The Simple Query is not implemented.
-
In the Batch Failed Queue list, select the TRANSFLO® queue to which failed batches should be sent.
Click the arrow button to expand the list, and then click the name of the desired queue.
-
In the Post Import Queue list, select the TRANSFLO® queue to which successfully imported batches should be sent.
Click the arrow button to expand the list, and then click the name of the desired queue.
Note: This list is available only if the Move Successful Batches to Post Import Queue check box has been selected.
-
In the Activity Log list, select the type of activity log that Import should create. When configuring a Base for the first time, the default list setting is No Activity Log. With this setting selected, no log is created. To select a log type, expand the Activity Log list, and then click one of the following:
-
No Activity Log: An activity log is not created.
-
Log Per Batch: Creates an individual log file for each batch.
-
Log Daily: Creates a daily log file as a compendium of all batches processed on a single calendar day.
-
Log Batch Unique Name: Creates an individual log file for each batch, as with the Log Per Batch option, while allowing you to configure a custom file name prefix and file extension for the log files.
-
-
In the Activity Log Folder box, enter the path to the folder where log files should be saved.
Click the browse button to the right of the box, navigate to the desired folder in the Browse for Folder dialog box that appears, and click OK.
Alternatively, you can type the folder path in the box.
-
In the Activity Log Options area, select the check boxes of the available options that should be used to define the logged information:
-
Log All Categories - Logs activity per batch, per day, and per unique batch name, instead of just one of these ways, regardless of which of these three methods was selected in the Activity Log list.
-
Log Date Time - Logs the scan, index, and import time stamps.
-
Quote Activity Data - Places double quotes around all fields in the log file. This is important if any of the field values contain commas.
-
Include All Fields - Logs all fields, not just the fields being imported into the image repository.
-
-
In the Activity Log Field Order box, arrange the fields so that they are in the order in which they should be logged.
To change the position of a field in the list, click the field’s name, and then click either the Move Up or Move Down button until the field is in the desired position.
-
Expand the Batch Key Field list, and click the name of the field that should be the key field for Batches.
-
Click the Save button to save your changes.
Note: If you are using McAfee® VirusScan 8.0.0 you must apply Patch #16 to be able to save your configuration. If you are using VirsusScan 8.5.0 you must apply Patch #7.
If you are using FileNet as the image repository, the Panagon client should already have been installed.
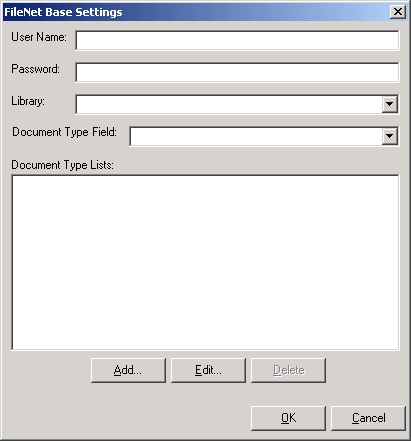
Click the FileNet Settings button to open the FileNet Base Settings window.
This button is visible only if FileNet was selected in the Storage list on the General tab.
The FileNet Base Settings window appears.
TRANSFLO® Import can interface directly with FileNet Image Manager to store images in the FileNet repository.
The FileNet Base Settings window is used to associate FileNet document types with batch file fields containing document type data.
The window is accessed via the FileNet Settings button on the Base Settings tab.
To associate a FileNet document type with a batch field:
In the User Name box, type the proper login ID for your FileNet installation.
-
In the Password box, type the password for the login ID you entered.
-
Select an available FileNet library from the Library list.
Click the arrow button to expand the list, and then click the name of the desired library.
-
Next, indicate the type of batch field with which the FileNet document type is being associated. Select the appropriate type of field from the Document Type Field list.
Click the arrow button, and then click the name of the desired type of field.
-
In the Document Type Lists box, click the name of the document type to be used.
If the desired document type does not appear in the Document Type Lists box, you must add the document type and associate it with a FileNet document class before continuing.
Click the Add button below the box to open the FileNet Document Type List window.
To edit an existing document type entry, click the document type to select it, and then click the Edit button.
-
If you clicked Add, the Document Types dialog box appears.
Type the name of the document type that you wish to add to the Document Type Lists box, and click OK.
-
The FileNet Document Type List window is opened.
Associate the document type with a FileNet document class as explained in
figuring the document type, return to these instructions and continue.
-
To save the configuration you have entered, click OK.
The FileNet Base Settings window is closed, and you are returned to the Base Settings tab.
To close the window without saving, click Cancel.
The FileNet Document Type List window is used to associate each TRANSFLO® document type with a FileNet document class, and then to associate each field within the FileNet document class with its corresponding batch field.
The FileNet library selected from the Library list in the FileNet Base Settings window determines which document classes are available for selection.
The document class selected determines which FileNet fields must be configured.
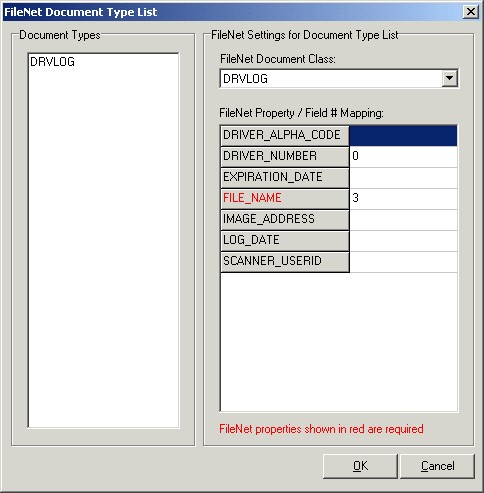
To associate a document type with a FileNet document class and configure the document class fields:
1. If you have not already done so, click the Add button below the Document Type Lists box in the FileNet Base Settings window, type the name of the document type that you wish to add, and click OK.
2. In the FileNet Document Type List window, select a document class from the FileNet Document Class list.
Click the list arrow, and then click the desired document class.
3. In the FileNet Property / Field # Mapping box, associate the displayed FileNet fields with their corresponding batch file fields.
To do this, type the position number of the corresponding batch field next to each FileNet field.
Remember that batch field position numbers are zero-based, so the first field in a batch file is numbered 0.
Required FileNet fields are displayed in red, and these fields must be associated with a batch field before you can successfully associate a batch document type with FileNet document type.
4. When you have finished configuring the FileNet document class fields, click OK.
The FileNet Document Type List window closes, and you are returned to the FileNet Base Settings window.
You can now finish configuring the FileNet Base Settings window.
Return to Step 8.
Configure a Gauss VIP Enterprise Image Repository
If you are using Gauss VIP Enterprise as the image repository (you selected Magellan in the Storage list on the General tab), you should have already installed the DocView client.
The Gauss VIP Enterprise content management application was formerly known as Magellan, and is referred to as Magellan within the TRANSFLO® Import application.
Import connects to VIP Enterprise via the Gauss DocView™ application, and page images are stored in the Gauss repository.
This topic contains instructions for configuring Import to interface with VIP Enterprise. Gauss VIP Enterprise is configured via the Magellan tab. This tab appears only if Magellan is selected from the Storage list on the General tab.
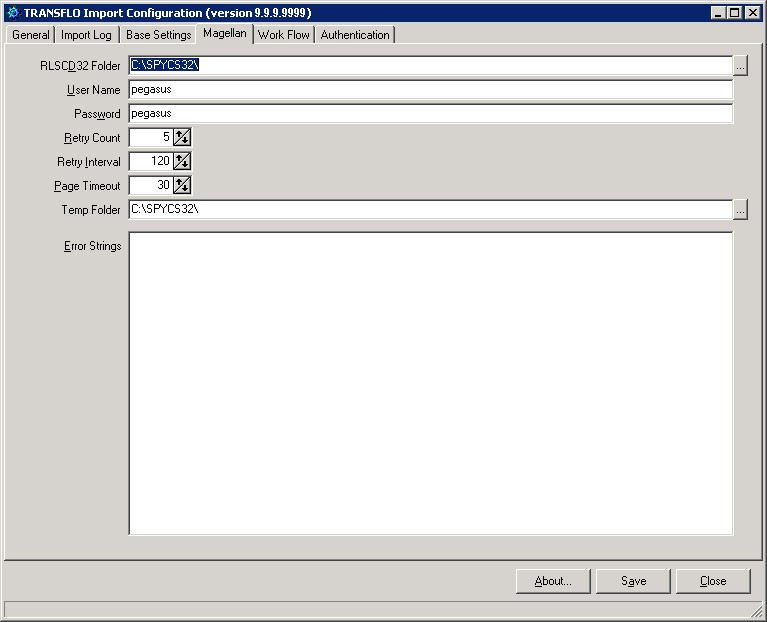
To configure the Magellan tab:
-
In the RLSCD32 Folder box, enter the location of the RLSCD32.exe file. You can click in the box and type the new path or click the browse button to the right of the box and navigate to the correct path in the dialog box that appears.
-
By default, the box contains the default installation folder for the Gauss DocView interface.
-
If DocView was installed to its default installation directory, you do not need to change the RLSCD32 location.
-
-
In the User Name box, type the login name that will be used to connect to Gauss VIP Enterprise.
-
In the Password box, type the password for the user name you entered.
-
In the Retry Count box, enter the number of times that DocView should attempt to send a batch to Gauss VIP Enterprise before failing. Enter a number or click the up or down arrow buttons.
The default retry count is 5 attempts.
-
In the Retry Interval box, enter the number of seconds that DocView should wait between attempts to send a batch to Gauss VIP Enterprise.
Either type a number in the box, or adjust the number by clicking the up or down arrow buttons.
The default retry interval is 120 seconds.
6. In the Page Timeout box, enter the number of seconds that DocView should spend trying to send a page of a batch to Gauss VIP Enterprise before moving on to the next page in the batch.
Either type a number in the box, or adjust the number by clicking the up or down arrow buttons.
The default page timeout is 30 seconds.
7. In the Temp Folder box, enter the path of the working folder to be used by DocView as it interfaces with Gauss VIP Enterprise.
Click the browse button to the right of the box, and navigate to the correct path in the dialog box that appears.
Alternatively, you can type the path directly into the box.
8. When you have finished configuring the Magellan tab, click Save.
9. The Error Strings box displays any Gauss-related error strings contained in the TRANSFLO® Import log file.
Should you encounter problems using Import with Gauss VIP Enterprise, refer to the Error Strings box for details.
If you are using Docubase™ as the image repository (you selected Docubase in the Storage list on the General tab), you already should have installed the Docubase client.
As of 2024, Docubase configurations are no longer supported.
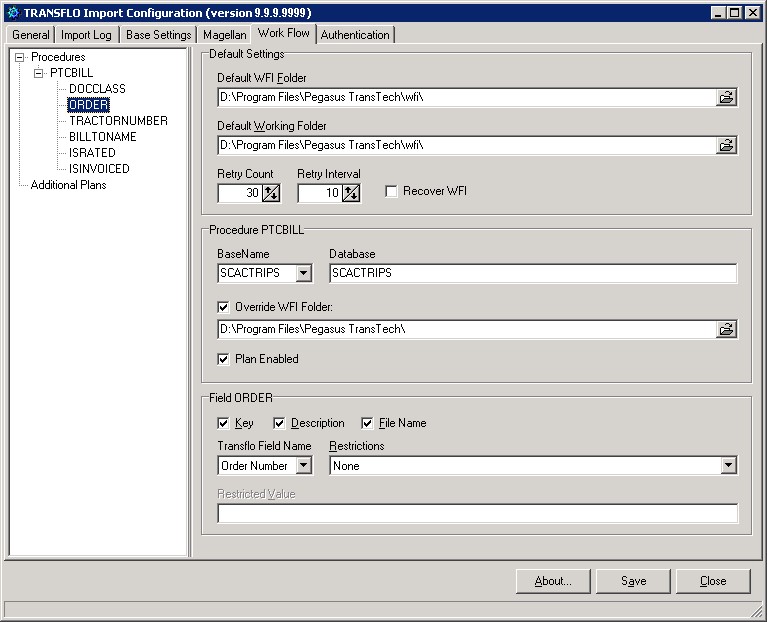
The Work Flow tab allows you to configure TRANSFLO® Import to interface with the TRANSFLO® Workflow module, which in turn communicates with the popular process management application TIBCO.
The tab is used to define procedures that will be carried out by Workflow. For each Procedure, Workflow fields are added, and for each field, the relevant BaseName and Database are entered and field settings are defined.
Work Flow will hand the values of these fields off to TIBCO, so the Work Flow fields must match the corresponding TIBCO fields.
To finish configuring the Work Flow tab, the WFI file destination folder, working folder, retry, and failure settings must be completed.
Note: The pane on the left side of the Work Flow tab contains a node called Additional Plans.
This feature is no longer used and has been omitted from the instructions for this tab.
If the Work Flow tab does not appear in the TRANSFLO® Import Configuration window, click the Base Settings tab, and then in the Options area select the Create WFI check box.
The Work Flow tab is added to the tabs in the window.
Click the Work Flow tab, and proceed with the instructions below.
To configure the Work Flow tab:
-
Create a new Procedure. In the pane on the left side of the tab, right-click the Procedures node. In the shortcut menu that appears, click New Procedure.
A Procedure is added below the Procedures node. Rename this new Procedure by typing a new name. This Procedure name should match one that has been deployed.
-
In the Default WFI Folder box, in the Default Settings area, enter the path of the default WFI input folder on the WFI server, where the finished WFI file will be written by Import.
This is the default folder from which Workflow will retrieve the file.
Click the browse button to the right of the box, navigate to the desired folder in the Browse for Folder dialog box, and click OK. Or, enter the path in the box.
-
In the Default Working Folder box, enter the path of the folder where Import should create the initial WFI file. This folder must be local on the server running the TRANSFLO Import service, so that the file is not lost in the event of a network connectivity failure.
Enter the path or click the browse button to the right of the box, navigate to a folder in the Browse for Folder dialog box, and click OK.
-
In the Retry Count box, enter the number of times that Import should attempt to create Workflow files in the working folder and copy them to the WFI folder before failing.
Either type the desired number of retries in the box, or click the up or down arrows to enter the number.
The valid range is 0-199, and the default number of retries is 30.
-
In the Retry Interval box, enter the duration (in seconds) that Import should wait between retry attempts.
Either type the desired duration in the box, or click the up or down arrows to enter the number.
The valid range is 0-199, and the default duration is 10 seconds.
-
Select the Recover WFI check box, so that Import will save a copy of the WFI file in the event of a failure.
A recovered WFI file is typically found in C:\TRANSFLO\Data\WFIWorking, but can vary by installation.
-
In the BaseName list in the Procedure area, select the TRANSFLO® Base to which this Procedure belongs.
Click the arrow button to expand the list, and click the name of the desired Base.
-
In the Database box, type the name of the Workflow database that corresponds to the selected Base.
Typically, a Base and its database share the same name.
-
If you wish the WFI files for the selected Procedure to go to a different folder than the one configured in the Default WFI Folder box, check the Override WFI Folder check box and enter the path of the WFI input folder for this Procedure on the WFI server.
Click the browse button to the right of the box, navigate to the desired folder in the Browse for Folder dialog box, and click OK.
Alternatively, you can type the path in the box.
-
To disable a Workflow plan from getting Workflow Cases un-check the Plan Enabled check box.
-
In the pane on the left side of the screen, right-click the Procedure that you created, and click New Field in the shortcut menu.
A new field called DOCCLASS is added below the Procedure.
This field corresponds to a field in the batch file.
Do not change the name of this field.
-
Right-click the Procedure again, and click New Field in the shortcut menu.
This time, a Field called Field 1 is added below the Base Field.
The new Field is automatically selected for editing.
Type a new name for the Field.
The name that you type must match the name of the corresponding Field in the first step of your TRANSFLO® Workflow procedure.
The Field name must also match the corresponding Field names on the TRANSFLO® Server and in your image repository.
Warning: Do not create a Workflow field called “KEYFIELDS” because this is an internal Field that cannot be defined properly in Import.
-
In the Field area on the right side of the tab, configure the available settings to determine how Import will write the field information when the WFI file is created.
Begin by selecting the necessary attributes for the field:
-
Key - Select this check box if the field is part of a key.
-
Description - Select this check box if the field should be included in the Workflow description. (This attribute is presented for backwards compatibility with Teamware and may not apply to your installation.)
-
File Name - Select this check box if the field should be included in the WFI file name.
Typically, all three of these attributes are selected for a key field.
Note: The Workflow Case Initiator requires at least one field to be designated as a key field.
If a WFI file is generated without a key field, it will be moved to the failed folder and an error will be generated in the System Agent log file.
-
-
In the TRANSFLO Field Name list, select the TRANSFLO® system field that should supply the field value.
Click the arrow button to expand the list, and click the name of the desired field.
Note: When mapping a Field, make sure the Import Field name is the same as the TRANSFLO Server (Administration Tool) Field name, and the Workflow Server Field (Workflow Studio) name.
-
In the Restrictions list, select the restriction level that should be enforced for this field.
Click the arrow button to expand the list, and click the desired option.
The available options are:
-
None - No restrictions will be enforced on the field value.
-
Non Blank - If the field has a null value, a WFI file will not be created.
-
Literal - The field must have a specific value (defined in the next step).
-
-
(Conditional) If the Literal option is selected in the Restrictions list, the
Restricted Value box is enabled.
In this box, type the specific value that the TRANSFLO® system field must have in order for the WFI file to be created.
-
Add and configure the remaining required fields as described above.
-
Click the Save button to save your changes.
Note: If WFI files are manually changed they may be corrupted.
Corrupted WFI files will be moved to the Failed folder.
The Authentication tab is used to select the type of authentication that TRANSFLO® Import will use to access the TRANSFLO® server.
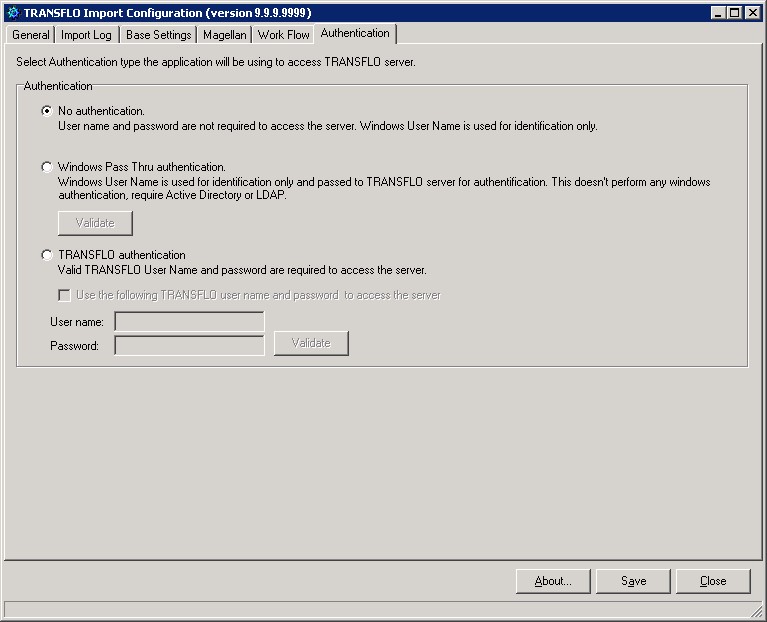
To configure the type of authentication that will be used, select the desired option, either No authentication, Windows Pass Thru authentication, or TRANSFLO authentication.
See the appropriate section below for specific information about each authentication type.
When you have selected (and configured, if necessary) the desired option, click the Save button to save your settings.
If you select the No authentication option, a user name and password are not required to access the TRANSFLO® server.
The Import User’s Windows user name will be used for identification only.
If you select the Windows Pass Thru authentication option, the Import User’s Windows user name and password will be passed to the TRANSFLO® server for authentication.
Either Active Directory or LDAP is required in order to use this option.
To ensure that this option works properly, click the Validate button.
If you select the TRANSFLO Authentication option, a valid TRANSFLO® user name and password are required for Import to access the TRANSFLO® server.
If desired, the authentication process can be automated so that the TRANSFLO® Import User does not have to enter a user name and password.
To use this option, select the Use the following TRANSFLO username and password to access the server check box, and type the appropriate TRANSFLO® username and password in the boxes provided.
To ensure that the username and password are valid, click the Validate button.
Note: If you do not wish to automate connections to the TRANSFLO® server, do not select the Use the following TRANSFLO username and password to access the server check box.
The Import User will be prompted for a valid username and password.
Best Practice: If LDAP authentication is configured on your TRANSFLO Server (via the TRANSFLO Administration Tool), it is recommended that you use TRANSFLO Authentication for your Import Service.