Transflo DMS Enterprise Transfer Service
TRANSFLO® Transfer Service allows document images to be transferred locally or by FTP. The service also allows images to be printed and provides event logging for the transfer and printing processes. The Transfer Service supports document transfer by a secure FTP connection. Once configured, the TRANSFLO® Transfer Service runs as a Windows service, requiring user interaction only to start or stop the service.
Supported Operating Platforms
-
Microsoft Windows® 2003 Server R2, SP2
-
Microsoft Windows® Server 2008 (x86 and x64)
For installation instructions see Install Transflo DMS Server Components.
As an option, the TRANSFLO® Transfer Service can also be installed with the Rendition Print Service. See Install Transflo DMS Rendition Print Service.
To start the TRANSFLO® Transfer Service Configuration utility where the Transfer Service is configured:
On the Windows task bar, click the Start button.
On the Start menu, point to All Programs, point to TRANSFLO® and click Transfer Service Config.
The Transfer Service Configuration dialog box appears.
For instructions on configuring Transfer Service via this dialog box, please see the remaining topics.
Note: If the Transfer Service is running while you make configuration changes, these changes will not take effect until the service is restarted.
TRANSFLO® Transfer Service creates log files detailing its daily transactions. The location where these log files are saved, the level of detail with which the files are written, and the number of days that the files are saved are all configurable via the Logging tab.
To configure the logging tab:
1. Click the Logging tab if it is not already active.
![]()
2. In the Log Files Folder box, enter the complete path of the folder where TRANSFLO® Transfer Service log files should be saved.
To do this, either type the path in the box or click the browse button to the right of the box and navigate to the desired folder.
If you type a folder path that does not exist, a prompt will be displayed asking if you want to create the folder.
3. From the Logging Level list, select the desired level of logging detail.
To do this, click the arrow button to the right of the list box to expand the list, and then click the desired logging level.
The available logging levels are:
-
0 - No Logging
-
1 - Errors Only
-
2 - Errors and Warnings
-
3 - Detailed
-
4 - Trace
4. In the Days to Keep box, enter the number of days that each log file should be saved before it is purged from the system.
To do this, either type the number of days in the box, or click the up or down arrows to change the number of days.
The default number of days to keep log files is 30.
When you have finished configuring the Logging tab, click Apply to save your changes.
To configure TRANSFLO® Transfer Service print settings, click the Printing tab.
To configure transfer task settings, click the Tasks tab.
Otherwise, click OK to close the Transfer Service Configuration utility.
For trouble shooting purposes you can temporarily override the Log Level of the logs found in the folder configured in the Log Files Folder box from the file system.
To override the log level:
1. Navigate to the folder configured in the Log Files Folder box.
2. Create a text file in the log folder and rename it to Log.Config.
3. Open the file with a text editor and add the following line to the file:
<Config LogLevel="[Level]" />
where,
[Level] is an integer between 0 and 4 indicating the log level.
The available log levels are:
-
- No Logging
-
- Errors Only
-
- Errors and Warnings
-
- Detailed
-
- Trace
Example: For the log level to be set to Trace the entry in the Log.Config file will be:
<Config LogLevel="4" />
4. Save and close the Log.Config file.
The log level has changed.
5. To disable this feature and revert to the configured log level, rename the Log.Configfile to Log.Config.Old.
In addition to sending and receiving documents, TRANSFLO® Transfer Service can print the documents that it receives if the Print option is selected in the Task type area of the Task Settings dialog box (accessed from the Tasks tab -- see “Adding Tasks” on page 11 for more information).
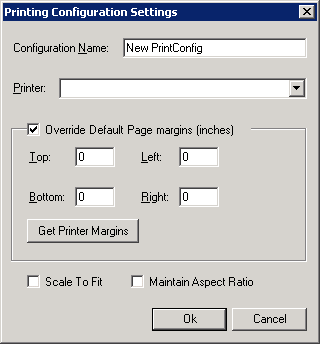
You can select one or more printers to use for printing and configure page margins for that printer. You can configure any printer for which you might receive printcontrol.xml files.
![]()
-
Click the Printing tab if it is not already active.
-
To add a new printer configuration to the Printing Configurations table, click the Add button.
-
To edit an existing configuration, click that configuration’s name to select it, and then click Edit.
The Printing Configuration Settings dialog box appears.
-
-
Enter a name in the Configuration Name field. If you are adding a new configuration, you can change the default New PrintConfig name.
-
In the Printer field, select the printer that you want to use for this printing configuration. The drop-down list displays all printers currently configured for the host computer. If the printer that you want is not listed, add the printer through the Add Printer utility in Microsoft Windows.
-
Each printer has its own default page margins (usually 0.5 inches). To override the default margin settings, follow these sub-steps:
-
Select the Override Default Page margins (inches) check box.
-
Enter the top, bottom, left, and right page margins as decimal values in the four (4) fields.
-
To restore the printer margins to their defaults click the Get Printer Margins button. A Confirmation box warns you that the current printer margins will be overwritten with the defaults from the Printer. Click OK.
-
-
To scale oversized or undersized images to the size of the printing area as defined by your printer and current choice of paper or tray, check the Scale to Fit check box.
-
If you checked the Scale to Fit check box and would like to maintain the aspect ratio of the original image on the paper, select the Maintain Aspect Ratio check box.
-
When you have completed configuring the Printing Configuration Settings dialog box, click OK.
-
On the Transfer Service Configuration window, in the Failed Path box, enter the path to the folder where transferred ZIP files should be placed if they fail to print. Enter the path in the box, or click the Browse button and navigate to a folder.
The icon of the default printing configuration contains a small check mark indicating its default status.
At any time, you can change the default TRANSFLO® Transfer Service printing configuration.
To do this, in the Printing Configurations table click the name of the printing configuration that you wish to make the default, and then click the Set Default button.
To delete a printing configuration from the Printing Configurations table, click the name of the configuration that you wish to delete, and then click the Delete button.
Click Yes when prompted to confirm the configuration deletion.
When you have finished configuring the Printing tab, click Apply to save your changes.
To configure TRANSFLO® Transfer Service logging settings, click the Logging tab.
To configure transfer task settings, click the Tasks tab.
Otherwise, click OK to close the Transfer Service Configuration utility.
To start TRANSFLO® Transfer Service in GUI mode once it has been configured:
1. From a Command Prompt type "C:\Program Files\Pegasus TransTech\Transflo Transfer Service\Transflo.TransferService.Service.exe" /gui.
The Transfer Service is installed in the root of the Transflo Transfer Service folder. If you installed Transfer Service in a path that is not the default, adjust the path above accordingly.
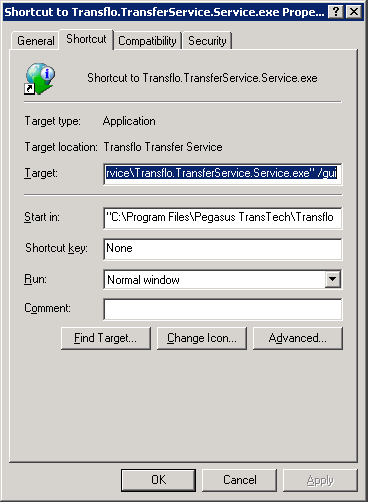
To create a shortcut to Transfer Service GUI mode interface, right-click the Transflo.TransferService.Service.exe file, point to Send To, and select the Desktop (create shortcut) menu item.
Right-click the Shortcut to Transflo.TransferService.Service.exe on your desktop and click the Properties menu item.
The Properties window opens.
On the Shortcut tab replace the text in the Target box with “C:\Program Files\Pegasus TransTech\Transflo Transfer Service\Transflo.TransferService.Service.exe" /gui.
Click OK to save your changes and close the Properties window.
Note: The Transfer Service GUI mode application does not control the Windows Transfer service and should not be run with the Windows Transfer service.
If you plan to use the GUI mode, make sure the Windows Transfer Service is not running.
It is a good practice to set the Windows Transfer Service service to start manually, if you routinely use the GUI mode.
2. The TRANSFLO® Transfer Service window appears.

This window provides an easy-to-use method of controlling TRANSFLO® Transfer Service.
The utility interface contains buttons for starting, stopping, pausing, and resuming the service.
To start TRANSFLO® Transfer Service, click the Start button.
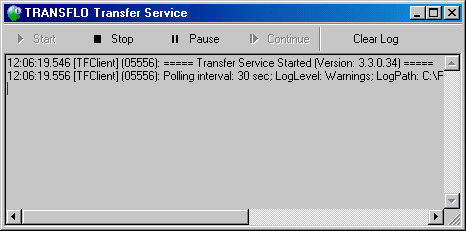
The log area confirms that the service was started.
In addition to the Start button, the TRANSFLO® Transfer Service window also contains the Stop, Pause, Continue, and Clear Log buttons.
-
Clicking the Stop button stops the service if it is running or if it is paused.
-
Clicking the Pause button pauses the service if it is running, and clicking the Continue button resumes the service.
When a button is clicked, the action is reflected in the log area of the TRANSFLO® Transfer Service window.
At any time, you can delete all of the messages contained in this log area by clicking the Clear Log button. Clicking the Clear Log button does not clear the log file generated and updated by TRANSFLO® Transfer Service. It only clears the log information from the TRANSFLO® Transfer Service window.
As an option, you can also control Transfer Service using the Services window in your Windows installation. To use the Services window, see your Microsoft Windows documentation.
The TRANSFLO® Transfer Service Configuration utility interface consists of three (3) tabs. The first of these is the Tasks tab. This tab is used to configure the FTP connections that Transfer Service will use for sending and receiving remote files, and also allows you to establish one or more tasks to be completed by the service.
The Tasks tab is divided into four main areas: Polling Interval, Connections, Tasks, and Archive Path.
![]()
The polling interval determines how often the TRANSFLO® Transfer Service checks for files to transfer and then begins transferring those files. The default polling interval is 30 seconds.
To set the polling interval, enter an interval in seconds in the Polling Interval box or click the up or down arrow to increase or decrease the interval.
![]()
The Connections box displays the FTP connections that have been configured for TRANSFLO® Transfer Service. If you will be connecting to one or more remote servers, you must configure a connection for each server.
![]()
To add a connection to an FTP server:
1. Click the Add button.
The Connection Settings dialog box opens.
![]()
2. In the Connection Name box, type a name for the new connection.
3. In the Primary FTP Server area, enter the server and login information for the FTP server.
In the Server box, type either the name or IP address of the FTP server to be used.
In the User box, type the user ID that will be used to log into the FTP server.
In the Password box, type the password corresponding to the user ID that you entered.
To secure your connections using FTP over SSL select “Ssl” from the Authentication drop down.
To secure your connections using FTP over TLS select “Tls” from the Authentication drop down.
Securing your FTP connections this way is called FTPS.
If you are using FTPS select a value from the Data protection drop down.
The possible values are:
-
Clear: Do not secure the data channel. Data is sent out in clear.
-
Integrity: The data won't be encrypted, but a checksum will be performed.
-
Confidential: The data will be encrypted, but no checksum will be made.
-
Private:The data will be encrypted and a checksum will be performed.
To test your FTP connection click the Test button. The FTP results of the test connection appear in a pop-up window. If all connections with the FTP server should be initiated by the local computer, select the Use Passive Mode check box. This feature can be helpful for avoiding connectivity issues through a local firewall.
4. Optional: In the Backup FTP Server area, enter the server name or IP address, the login name, and the password for the backup FTP server that will be used in the event that TRANSFLO® Transfer Service cannot connect with the primary FTP server.
If you are using FTPS, set your FTPS Authentication and Data Protection settings.
Select the Use Passive Mode check box if necessary.
Known Issue: If the Transfer Service fails to connect to the Primary FTP connection, but the host server is still responsive it does not switch to the backup FTP. There must be a complete communication outage of the host before the backup FTP connection is used.
5. When you have finished configuring the Connection Settings dialog box, click OK.
At any time, you can edit the settings for any of your FTP connections if necessary.
To do this, follow these steps:
-
Click the connection name in the Connections box.
-
Click the Edit button to open the Connection Settings dialog box for that connection.
-
Make your changes and click OK.
To delete an FTP connection, in the Connections box click the name of the connection that you wish to delete, and then click the Delete button.
At the confirmation prompt that appears, click Yes.
The Tasks box contains the names of the TRANSFLO® Transfer Service send, receive, and print tasks that have been created.
![]()
To add a task for TRANSFLO® Transfer Service to perform:
-
Click the Add button. The Task Settings dialog box appears.

-
In the Task Name box, type a name for the task that you are creating.
-
If this task should be active, select the Enabled check box. The Enabled check box allows you to deactivate a task without having to delete it.
-
In the Transfer type area, select either the Local or Remote Connection option, depending on which type of transfer this task will perform.
-
If you select the Remote Connection option, the list to right of the option is activated.
-
Click the arrow button to expand the list, and click the name of the FTP connection that should be used for the remote connection.
-
If you have not already configured an FTP connection, you must do so before you can configure this task. See Configure FTP Connections for more information.
-
In the Task type area, select the option for the kind of transfer that you wish TRANSFLO® Transfer Service to make. The available options are Send, Receive, and Print.
-
A Send task will transfer files from the host computer to another local computer or to an FTP server, depending on the option selected in the Transfer type area.
-
A Receive task will transfer files from another computer or an FTP server to the host computer, again depending on the type of transfer that was selected earlier.
-
A Print task performs the same functions as a Receive task, and also prints the received documents.
Files are transferred in order of their Last Modification date, with the oldest files being transferred first. Once files have been transferred, the Last Modification date of each source file is changed to match the Last Modification date of the file at its destination (that is, the current date).
-
-
In the From box, enter the full path of the location from which files will be transferred. If the location is on the host computer or on the local network, either type the location in the box or click the browse button to the right of the box and navigate to the appropriate folder.
-
If you type a folder path that does not exist, a prompt will be displayed asking if you want to create the folder.
-
If the From location is located on an FTP server, you must type the path; the browse button cannot be used for FTP servers.
-
If two or more tasks use the same From folder, first-in-first-out functionality cannot be guaranteed. For best results, assign a separate From folder to each task.
-
-
In the To box, enter the full path of the location to which files will be transferred. The same instructions and rules that apply to the From box in the above step also apply to the To box.
-
(Optional) In the Task Options area, type a file name mask in the File mask box. A file name mask will cause TRANSFLO® Transfer Service to transfer only those files whose names match the mask. For example, if you wanted only files whose names begin with the string “BOL” to be transferred, you would type “BOL*” in the File mask box, where the asterisk (*) is the wildcard character. Filename masks can also include file extensions. For example, a mask of “BOL*.txt” would return only TXT files whose names begin with the string “BOL”.
Due to the way Windows ® assigns filenames’ short (8.3) filenames, three letter extensions configured in the File mask box will pick up files with longer extensions that begin with the three letter filename extension. For example, if you used *.spl as your file mask, file names with extensions *.spl1, *.spl2, *.spl3, etc. will be picked up for processing.
-
(Optional) If the transferred files should be deleted from the From folder once they have been sent, select the Delete Source Files After Transfer check box.
Important: It is strongly recommended that you select this option. If you do not, Transfer Service will continue to transfer the source files repeatedly.
-
(Optional) If you selected the Remote Connection option, you can configure TRANSFLO® Transfer Service to give a temporary file extension to each file as it is being transferred. Once the file’s transfer is complete, it is saved at its destination with its correct file extension. This way, if the transfer is interrupted, you can tell if a file was transferred completely simply by looking at its file extension in the destination folder. To enable this feature, select the Use Temporary Extension check box.
-
(Optional) To prevent identical files at the transfer destination from being overwritten, select one of the options in the If File Exists At Destination drop down.

-
If you do not wish identical files to be transferred to the destination, select the Do Not Transfer option.
-
To transfer identical files and always overwrite identical files at the destination, select the Always Overwrite option.
-
To transfer identical files only if the existing file is older than the file that will be transferred, select the Overwrite if Older option.
-
If you only want to transfer all identical files but not overwrite existing files, select the Transfer Under Unique Name option. The file will be renamed,
<filename>_<increment>
where
<filename> is the original filename
and <increment> is the next available sequence number needed to make the file name unique.
-
-
(Optional) To archive transferred files in a separate folder, select the Archive Files For n Day(s) check box, and enter the desired number of days in the box provided. The files will be archived in a branch beneath the folder specified in the Archive Path box at the bottom of the Tasks tab. A sub-folder bearing the task name will be created beneath the archive folder, and a date sub-folder named in the format YYYYMMDD will be created beneath the task sub-folder.
-
When you have finished configuring the Task Settings dialog box, click OK to return to the Tasks tab.
At any time, you can edit the settings for any of your tasks if necessary.
-
Click the task name in the Tasks box, and then click the Edit button to open the Task Settings dialog box for that task.
-
Make your changes and click OK.
To delete a task, in the Tasks box click the name of the task that you wish to delete, and then click the Delete button. At the confirmation prompt that appears, click Yes.
Remember that if you simply want to temporarily deactivate a task, you do not have to delete it. You can deactivate the task by clicking the Edit button and clearing the Enabled check box for the task.
TRANSFLO® Transfer Service executes tasks in the order in which they are listed in the Tasks box. To change the position of a task in the order, select a task and then click the up or down arrow to move it into position.
As an option, you can archive files sent or received by the host computer in a folder separate from the From or To folder. The archive folder is specified by entering its complete path in the Archive Path box.
-
To do this, either type the folder path in the box, or click the Browse button to the right of the box and navigate to the folder. If you type a folder path that does not exist, a prompt asks if you want to create the folder.
When files are archived, a sub-folder bearing the task name is created in the archive folder, and a date sub-folder in the format YYYYMMDD is created under the task subfolder. If Transfer Service places a file in sub-folder, and the file’s name is identical to another file already in that folder, Transfer Service will append the newer file’s name with “_nn” where nn is a unique, iterative number.
For example, if a file already existed with the name “20250826”, the new file would be named “20250826_01”. A second new identically named file would be named “20250826_02”, and so on.
-
You must also select the Archive Files For n Day(s) check box in the Task Settings dialog box. See Adding Tasks for more information.
-
When you have finished configuring the Tasks tab, click Apply to save your changes.
-
To configure TRANSFLO® Transfer Service printing settings, click the Printing tab.
-
To configure transfer logging settings, click the Logging tab.
-
Otherwise, click OK to close the Transfer Service Configuration dialog box and utility.
If you need any assistance while running this application, contact Customer Service at Pegasus TransTech Corporation.
Hours of operation: Monday through Friday 8:00 a.m. to 8:00 p.m. EST
E-mail: helpdesk@transflo.com for new support cases
For existing support cases: support@transflo.com -
Support Telephone Number: (813) 386-2327