Upgrade the Transflo DMS Workflow Server Components
All released versions of TRANSFLO® Workflow Server components can be upgraded to the latest release. The TRANSFLO® Workflow Server components are:
-
Workflow Engine
-
Workflow Engine Add-On
-
Workflow Web Client
-
Workflow Workspace
-
Pegasus TransTech cannot provide an estimate for how long the upgrade might take because of the number of customer-specific factors that can have an impact and the complexity of their interaction. For example, the amount of data in your existing system, the configuration of your database, and the hardware setup you are running can vary widely.
-
The TRANSFLO® Server must be upgraded to version 2012 R2 before running any Workflow 2012 R2 upgrade installer or performing any pre-upgrade steps.
-
Running Workflow 2012 R2 with TRANSFLO® Serverversion 2010 or a previous edition is not supported.
-
Upgrading to Version 11.3 can involve significant changes to iProcess data and data structures. The upgrade process is complex and can take a significant amount of time to complete if the system being upgraded has a large amount of case data.
-
We strongly recommend that you test the upgrade before performing it on your target system, either in a representative production (staging) environment, or using a copy of your production system. This practice allows you to determine how long the upgrade is likely to take and to identify any specific factors that may affect the success or duration of the upgrade.
Before you upgrade your Workflow Server components you must perform the following pre-upgrade steps to backup the iProcess Engine file.
-
Get all Users to log out of TRANSFLO® Workflow.
-
Log in to the computer running the TRANSFLO® Workflow server as a Local Administrator.
-
Stop the iProcess Engine:
-
In Windows® Administration Tools open Services.
-
Stop the iProcess Sentinels service.
-
Disable the iProcess Sentinels service.
-
Open the Windows® Task Manager.
-
Click the Process tab and click the Show process from all users button.
-
End all process that are running by the tfwfsvc user.
-
Repeatedly run “swadm show_processes” at the command line prompt until all processes have been stopped.
Note: Some Processes may appear to be suspended or stopping when they are already stopped. If this occurs after a few minutes it is safe to proceed with the upgrade.
-
-
Make a backup of the swserver folder (for example, E:\swserver\TFLOWF) on a backup server:
-
Grant the Administrator User you are logged in “Owner” privileges on the swserver folder (E:\swserver\TFLOWF).
-
Remove the read-only attribute for the “pro” and “queues” folder if they are set to read-only. These folders are sub-folder to the swserver folder.
-
Copy the swserver (AKA SWDIR) folder and all sub-folders to your backup server.
-
-
Back up the IIS root folder.
-
Backup the SQL Server iProcess Engine database schema (TFLOWF).
-
Upgrade SQL Server. If you have not already done so, upgrade your SQL Server to either SQL Server 2005 SP 4 or SQL Server 2008.
-
(Upgrade from 2010 R1 only) Uninstall Workflow components:
-
In the Windows® Services window, stop the iProcess Sentinels service. Verify the iProcess Sentinels processes have stopped by running swadm show_processes from a command prompt.
-
Uninstall Hawk. Select all options when asked, then reboot manually when done.
-
In the Windows® Services window, stop the iProcess Sentinels service. Verify the iProcess Sentinels processes have stopped by running swadm show_processes from a command prompt.
-
Uninstall TRANSFLO® Workflow Agent.
-
In the Windows® Services window, stop the iProcess Sentinels service. Verify the iProcess Sentinels processes have stopped by running swadm show_processes from a command prompt.
-
Uninstall TIBCO iProcess Web Service Plugin (JETTY) – select yes to all when asked, then reboot manually when done. (If you are prompted for the location of Java, enter the path:
C:\Program Files\Java\jre6\bin\java.exe
-
In the Windows® Services window, stop the iProcess Sentinels service. Verify the iProcess Sentinels processes have stopped by running swadm show_processes from a command prompt.
-
Uninstall TIBCO EMS. Select Yes to All when asked.
-
In the Windows® Services window, stop the iProcess Sentinels service. Verify the iProcess Sentinels processes have stopped by running swadm show_processes from a command prompt.
-
Uninstall TIBCO Rendezvous (labeled: TIBCO Universal Installer D:\swserver). It may show a different path for swserver depending on where it was installed.
-
When install starts, confirm it is removing TIBCO Rendezvous and nothing else.
-
Select Yes to All when asked, then reboot.
-
-
Remove all User-Defined triggers from the iProcess Engine schema tables:
-
Run the following script on your TFLOWF database to remove all User- Defined triggers from the iProcess Engine schema Tables:
use TFLOWF GO
drop trigger tfwfowner.tftr_i_user_names
drop trigger tfwfowner.tftr_i_tsys_user_names drop trigger tfwfowner.tftr_d_case_information drop trigger tfwfowner.tftr_i_audit_trail
drop trigger tfwfowner.tftr_i_case_data
drop trigger tfwfowner.tftr_i_case_information drop trigger tfwfowner.tftr_i_proc_index
drop trigger tfwfowner.tftr_u_case_data
drop trigger tfwfowner.tftr_u_case_information drop trigger tfwfowner.tftr_u_proc_index
GO
-
Run the following statement on your TFLOWF database to validate the user-defined triggers on your database have been removed:
SELECT object_name(parent_id) as [Table Name], name as [Trigger Name]
FROM sys.triggers WHERE name like 'tf%' ORDER BY [Table Name]
Note: The usp_pre_workflow_upgrade stored procedure that is uninstalled with your TRANSFLO® Server can be run manually from the SQL management studio to drop the user-defined triggers.
-
-
Uninstall Symantec Antivirus if it is installed on the TRANSFLO® Workflow server. Uninstall any Antivirus software installed on the iProcess Engine. Reboot the TRANSFLO® Workflow server.
-
Stop the iProcess Engine:
-
In Windows® Administration Tool open Services.
-
Stop the iProcess Sentinels service.
-
Open the Windows® Task Manager.
-
Click the Process tab and click the Show process from all users button.
-
End all process that are running by the tfwfsvcUser.
-
Repeatedly run “swadm show_processes” at the command line prompt until all processes have been stopped.
Note: Some Processes may appear to be suspended or stopping when they are already stopped. If this occurs after a few minutes it is safe to proceed with the upgrade.
-
-
Disable Backup Exec and Big Brother Services if installed or running.
-
If your iProcess Engine is running on a Windows® 2008 server, turn off User Access Control.
-
Go to the Control Panel and select User Accounts.
-
In the User Accounts Window click the User Accounts link.
-
Click the Change the User Account Control settings link.
-
Click on Turn User Account Control On or Off.
-
Move the slider all the way down to Never notify.
-
Click OK.
-
The User Access Control pop-up asks you if you want to make the change.
Click Yes.
-
If prompted to do so, restart your server for the changes to take effect.
-
If you restarted the server, repeat Step 11 to stop the iProcess Engine again.
-
-
Ensure the latest version of the TIBIPE folder is in the same folder as the TRANSFLO Workflow Engine Setup.exe file.
To upgrade the Workflow Engine, follow these steps:
-
Launch TRANSFLO® Workflow Engine Setup.exe from the installation CD.
-
The TRANSFLO® Workflow Engine Setup Wizard opens. Click Next.
-
The installer checks for prerequisites. If the installer does not find the Microsoft.NET Framework it will attempt to install it.
See the Third Party Software Requirements section of the TRANSFLO® Hardware Specification System Administrator's Knowledge Base for .NET Framework requirements and installation instructions.
-
If you are installing any Workflow server module on Windows Server 2008 and the User Access Control window pops up, click Yes.
-
The installer checks your system and starts installing necessary components for your TRANSFLO® Workflow Engine. This may take several minutes. Wait until the TIBCO iProcess™ Engine installer initializes.

-
The TIBCO iProcess™ Engine splash screen opens indicating that TIBCO iProcess Engine installer is initializing. The TIBCO iProcess™ Engine InstallShield® Wizard initializes showing you the progress.
-
The TIBCO iProcess™ Engine Setup Welcome window opens. Ensure that all other Windows applications are closed and click Next.

-
The Software License Agreement window opens. Scroll down to read the entire agreement. When you reach the bottom of the Software License Agreement the Yes button is enabled. Click Yes.

-
The Setup Type window opens. Select the Custom radio button and click Next.

-
The Upgrade or New Install window opens.
-
Select the Upgrade existing installation radio button.
-
In the list of node names, select the iProcess Engine/Process Engine that you want to upgrade (TFLOWF).
-
Check the Upgrade Files and the Upgrade Schema check boxes.
-
Click Next.

-
-
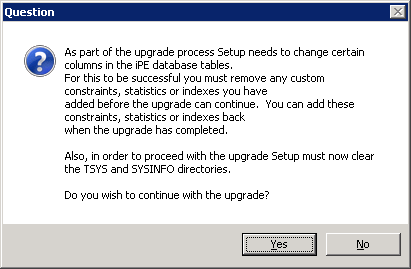
Setup reminds you to remove database constraints, triggers, etc. It also reminds you to back up the “swserver” folder. Click Yes.

-
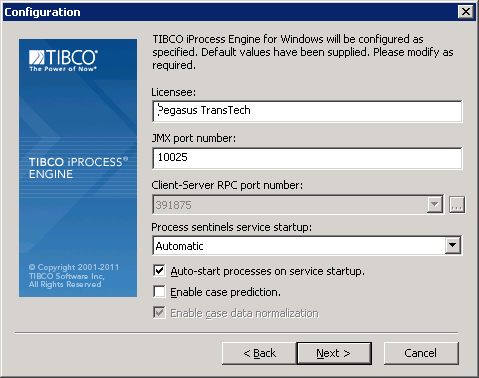
The Configuration window opens. Do not change any of the defaults in this window. Click Next.

-
The Operating System Users Location window opens. Select a location and click Next
-
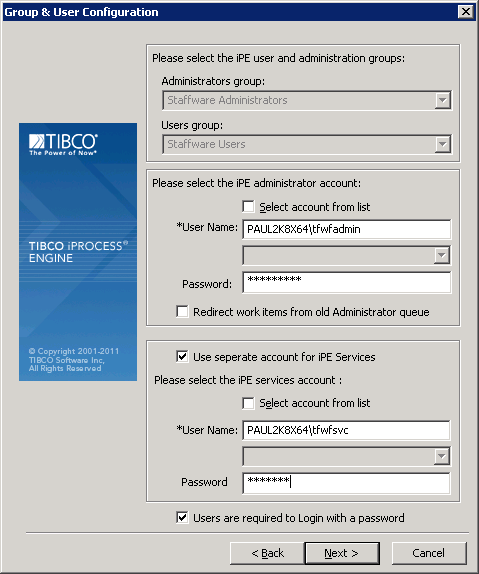
The Group & User Configuration window opens.

-
Enter the fully qualified user name and password for the iPE administrator account in the User Name and Password text boxes respectively.
-
Check the Use separate account for iPE Services check box.
-
Enter the fully-qualified user name and password for the iPE services account in the User Name and Password text boxes respectively.
-
If you want TRANSFLO® Workflow to check for a valid domain user (end user accounts) but not require the user to enter a password, un-check the Users are required to Login with a password check box. (This is not a recommended practice.)
-
Click Next.
Note: It is recommended that two separate Users that belong to the Administrators group be created prior to installation. One will be used as the iPE administrator account. The other will be used as the Administrator account for iPE Services.
The recommended convention is:
iPE Administrator: tfwfadmin
iPE Services Administrator: tfwfsvc
-
-
Click Yes in the Warning pop-up.

-
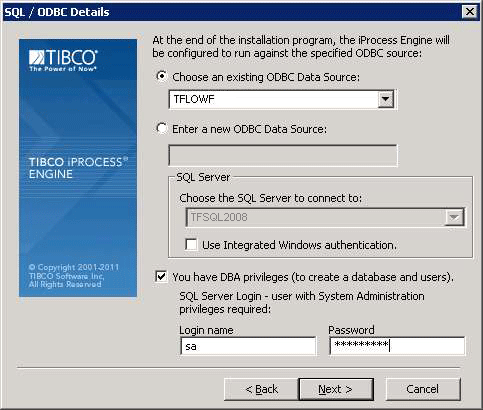
Select the Choose an existing ODBC Data Source radio button and check the You have DBA Privileges (to create a database and users) check box.
-
Enter the SQL Server DBA username and password in the corresponding Login name and Password boxes. Click Next.

-
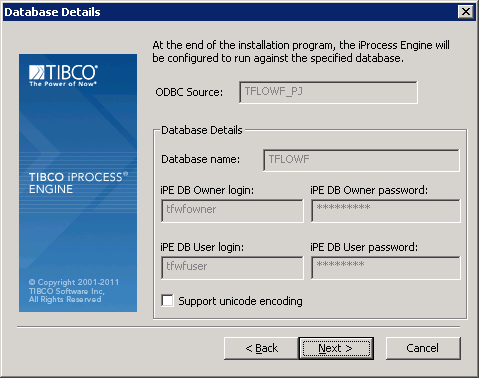
The Database Details window opens. Un-check the Support unicode encoding check box, and click Next.

-
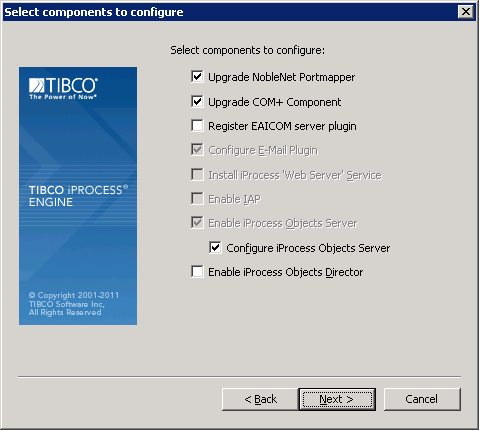
The Select components to configure window opens.
Ensure that the following check boxes are not checked:
-
Register EAICOM server plug-in
-
Enable IAP
-
Enable iProcess Objects Director.
Ensure that the following check boxes are checked:
-
Upgrade NobleNet Portmapper
-
Upgrade COM+ Component
-
Configure E-Mail Plug-in
-
Enable iProcess Objects Server
-
Configure iProcess Objects Server.
Click Next.

-
-
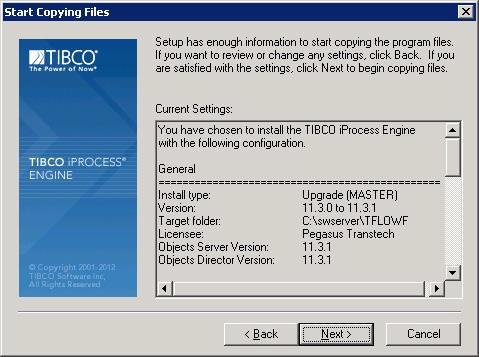
The Start Copying Files window opens. Review the contents to ensure they reflect the configuration you chose in the previous steps of this installation. Click Next to execute the installation scripts.
-
The Preparing Database Items for Upgrade progress window opens.
-
The Running Database Scripts window opens. It will run the database scripts to upgrade the TFLOWF database.

-
The installer now copies the iProcess engine program files to your file system.

All of the components of the iProcess Engine are then installed. This may take a few minutes.

This window may go blank several times. If this happens the installer is still running in the background.
-
The TIBCO iProcess Objects – Server Configuration Utility opens.

-
Click the TCP tab.
-
In the Settings section, verify that the Name in services file identifying port number for client connections box is populated with the Workflow node name (for example, TFLOWF_spo and not DEFAULT. If it is DEFAULT, change it to the Workflow node name.
-
Click Apply.
-
A message will appear letting the user know that the changes will be made and saved. Click OK.

-
-
The installer checks all of the configured Events.

-
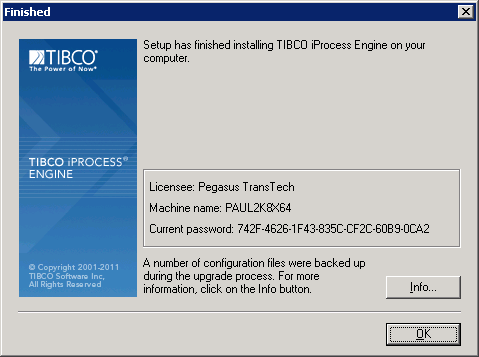
The window below notifies you that the Workflow Engine has been successfully upgraded. It contains information about your license, machine name and password as a GUID. Click OK.

-
You will be prompted to restart your computer. Since you still have another server installation to complete, select the No, I will restart my computer later radio button. Click Finish.

-
Click OK in the warning window below. You will reboot your computer after you upgrade the TRANSFLO® Workflow Engine Add-on.


To upgrade the Workflow Engine Add-On do the following:
1. Launch TRANSFLO® Workflow Engine Add-on Setup.exe from the installation CD.
2. The Welcome screen for the TRANSFLO® Workflow Engine Add-on Setup opens.
Click Next.
3. The Workflow Database Connection Properties window opens.
![]()
-
Ensure the name of your Workflow database server is in the Server Name box.
-
Ensure “TFLOWF” in the Database Name box.
-
Type “sa” in the DB Admin User ID box.
-
Type the password for the sa user in the DB Admin Password box.
-
Type “tfwfowner” in the Schema Owner box.
Note: If this window does not appear it is because it is behind the Setup window. To give it focus, select Workflow Database Connection Properties from the Windows® Task Bar.
4. Click the Validate button.
The Validation Successful message box opens.
Click OK.
![]()
5. The Ok button is enabled on the Workflow Database Connection Propertieswindow.
Click Ok.
![]()
6. Setup installs the Workflow Engine Add-on.
![]()
7. The window below indicates that your installation is complete.
Select the Yes, restart the computer now check box, and click Finish.
8. Your computer will restart.
To upgrade the Workflow Web Client,
1. Launch TRANSFLO® Workflow Web Client Setup.exe from the installation CD.
2. The Setup - TRANSFLO® ® Workflow Web Client welcome window opens.
Click Next.
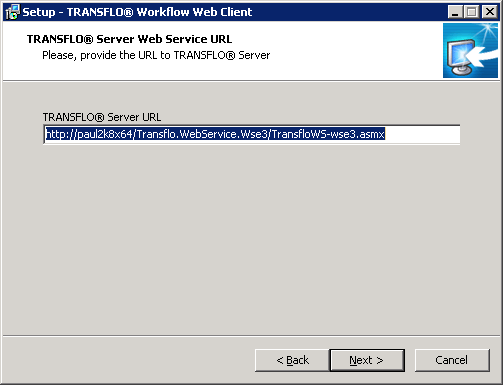
3. The TRANSFLO® Server Web Service URL window opens.
Verify that the Web Service URL is correct.
If your server name is not TRANSFLO change the URL to http://<Transflo Server Name>/ Transflo.WebService.Wse3/TransfloWS- wse3.asmx where <Transflo Server Name> is the name of your TRANSFLO® Server.
Click Next.
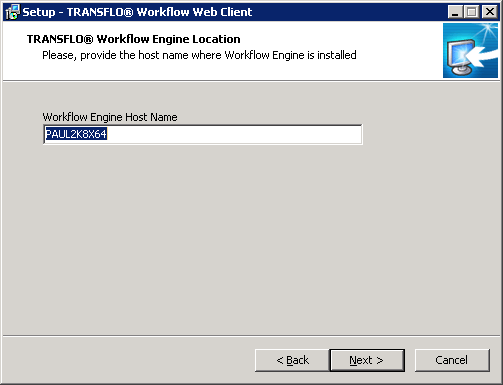
4. Setup prompts you for the host name of your TRANSFLO® Workflow Engine.
Enter the host name in the text box.
Click Next.
Note: If you would prefer that the Workflow Server name not be used in the URL of the Web Clients do the steps below.
-
Enter “Workflow” in Workflow Engine Host Name the text box.
-
Once installation is complete, open your hosts file with a text editor
(C:\Windows\System32\drivers\etc\hosts),
and add the following entry:
<IP Address> Workflow
where <IP Address> is the IP address of your Workflow Web Server.
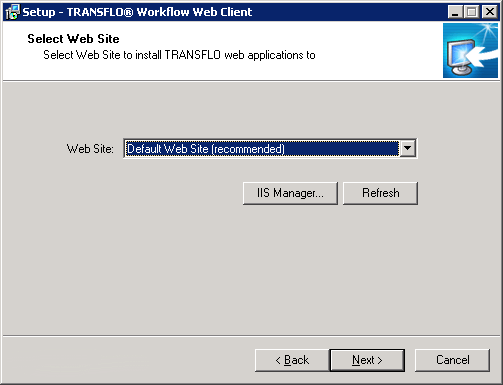
5. The Select Web Site window opens.
Click Next.
6. Setup installs the Workflow Web Client on your Web Server.
7. The Completing the TRANSFLO® Workflow Web Client Setup Wizard window opens.
Click Finish.
To upgrade the Workflow Workspace, follow these steps:
-
Launch the Workflow Workspace setup.exe file on your installation CD.
-
The Welcome to the TRANSFLO® Workflow Workspace Setup Wizard window opens. Click Next.
-
Setup starts the installation. The Choose Setup Language pop-up window opens. Select a language from the drop down, and click OK.
-
The TIBCO iProcess™ Workspace InstallShield® Wizard initializes showing you the progress.

-
The TIBCO iProcess Workspace (Windows) window opens. Close all programs and click Next.

-
The Software License Agreement window opens. Read the agreement and select Yes.

-
The Choose Destination Location window opens. Verify that the path is correct, and click Next. Click the Browse... button to change the Destination Folder if necessary.
-
Setup detects your existing installation in the selected location. In the Question message box, click Yes.

-
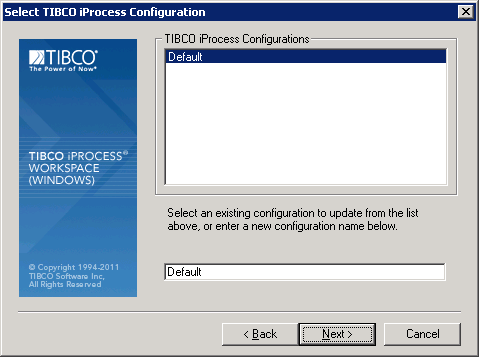
The Select TIBCO iProcess Configuration window opens. Select “Default” from the TIBCO iProcess Configurations box, and click Next.

-
The Setup Type window opens. Select Administrator in the list and click Next.

-
The Select TIBCO iProcess Engine window opens.
-
Enter your default iProcess Engine Machine Name in the first text box.
-
Do not change the RPC program number in the second text box.
-
Click Next.

-
-
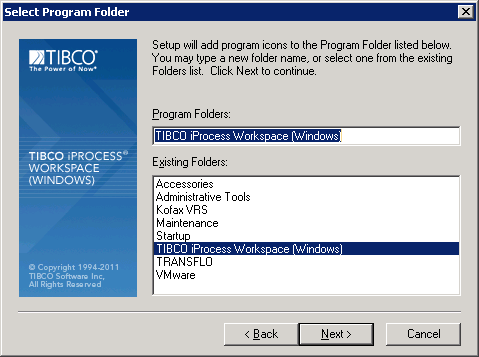
The Select Program Folder window opens. Click Next.

-
The Start Copying Files window opens. Review the settings. To change any settings, click Back. If the settings are correct, click Next.

-
The setup utility installs the components.

-
The Install Complete window opens indicating that your installation completed successfully. Click Finish.

After you upgrade all of the Workflow Server components, do the following post-upgrade steps:
-
If you are upgrading from TRANSFLO® Workflow 2010 R2 or TRANSFLO Workflow 2012 R1, transfer configurations from backup files.
-
Verify that the previous iProcess Engine installation was either 10.6, 10.7, or 11.x.
-
Transfer any custom configurations from your old configuration file (which is now named config_old.xml) to the new config.xml file.
-
Transfer any custom user access profile settings from your old user access profile file (which is now named userAccessProfiles_old.xml) to the new userAccessProfiles.xml file.
-
As an administrator, the config.xml and UserAccessProfiles.xml files you modify are located at:
<IIS RootFolder>\Transflo.Workflow\JSXAPPS\ipc.
-
-
Disable the IAPJMS process:
-
Open a Command Prompt as Administrator.
-
Run the following command: swadm DISABLE_PROCESS 1 IAPJMS 1
-
Reboot the Workflow server.
-
-
Re-enable iProcess Sentinels services.
-
Start iProcess Sentinels services and confirm upgrade is successful.
-
Re-enable Backup Exec and Big Brother if previously disabled.
-
Re-install anti-virus if previously uninstalled.
-
Reboot and test again.
-
Recreate All User-Defined Triggers on the iProcess Engine Schema Tables. The add-on will create some of the triggers. The balance of the triggers is associated with Workflow Management Reports. To create these triggers:
-
Log in to the TRANSFLO® Administration Tool.
-
Click the Workflow menu item.
-
In the main panel, click the Upgrade\Re-Install Workflow Reports button. This will re-create the Triggers.
-
Verify that the triggers have been recreated by running the following SQL statement against your Workflow database in SQL Server:
SELECT object_name(parent_id) as [Table Name], name as [Trigger Name]
FROM sys.triggers WHERE name like 'tf%' ORDER BY [Table Name]
-
-
If you are using SQL Server 2005 with Service Pack 4, follow these sub-steps to run the SQL Server Surface Area Configuration Utility:
-
Stop the iProcess Engine as described in the “Pre-upgrade Steps” section above.
-
Select Microsoft SQL Server -> Surface Area Configuration from the Programs menu.
-
Select Surface Area Configuration For Features.
-
Select OLE Automation, and ensure that the Enable OLE Automation check box is selected.
-
Press OK.
-
When the utility has finished running, restart SQL Server and restart the iProcess Engine.
-
-
To verify that the Workflow Web Client is running, follow these sub-steps:
-
Open a browser and enter the TRANSFLO® Workflow Web Client URL:
http://<WebServer>/TRANSFLO® .Workflow/
-
The Web Client opens at the login page. Log into the Workflow Web Client with the “tfwfadmin” account.
-
At the top of your browser window, a red banner opens with the following caption:
TRANSFLO® Document Viewer is not installed or is disabled.
-
Click the Install button in this bar. You might need to close your browser to install or upgrade the TRANSFLO® Document Viewer.
-
The installer for the Document Viewer ActiveX component opens. Run the installer accepting all of the defaults.
-
The red banner closes indicating that Workflow Web Client is running.
-