New Synergize Explorer HTML5 Edition
Transflo Synergize offers a modern HTML 5 browser-based interface to access files in the repository in most modern web browsers. We recommend using the latest version. Features vary by license and assigned permissions.
Use Synergize Explorer to:
-
Search for documents, video, audio, or other files
-
Access files based on current access level (authentication and authorization)
-
Modify information or properties about the files, like invoice number or date created
-
Process documents from one workflow queue to another
-
Process documents in an Accounts Payable workflow
-
Configure workflows to split batch documents into individual files for indexing and storage
-
Email one or more documents directly from the Synergize repository
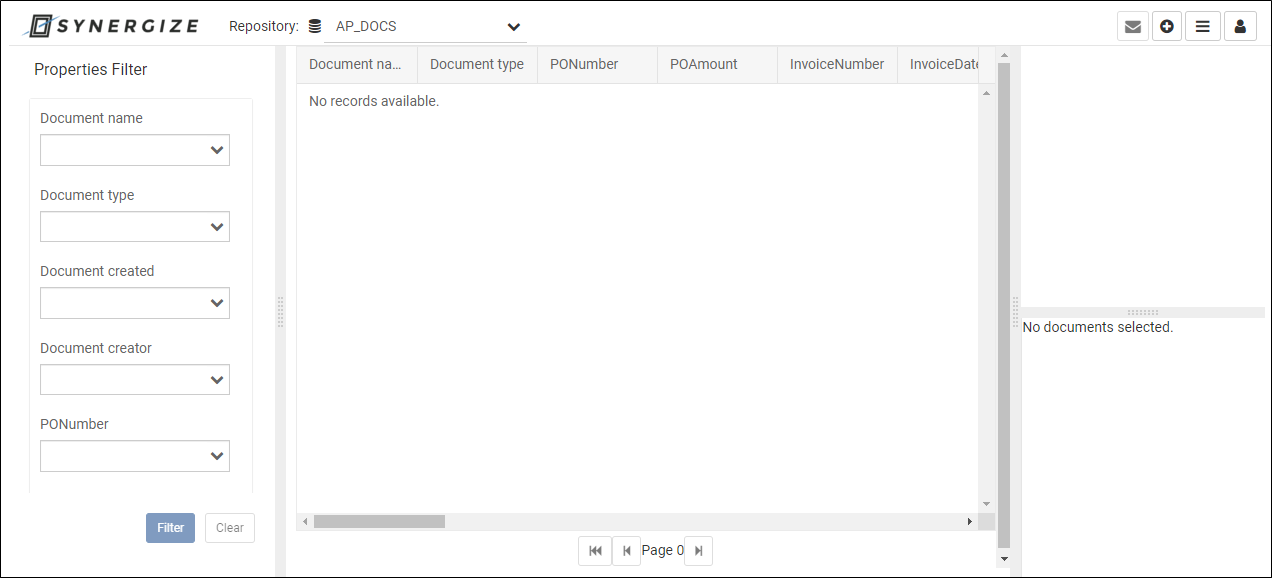
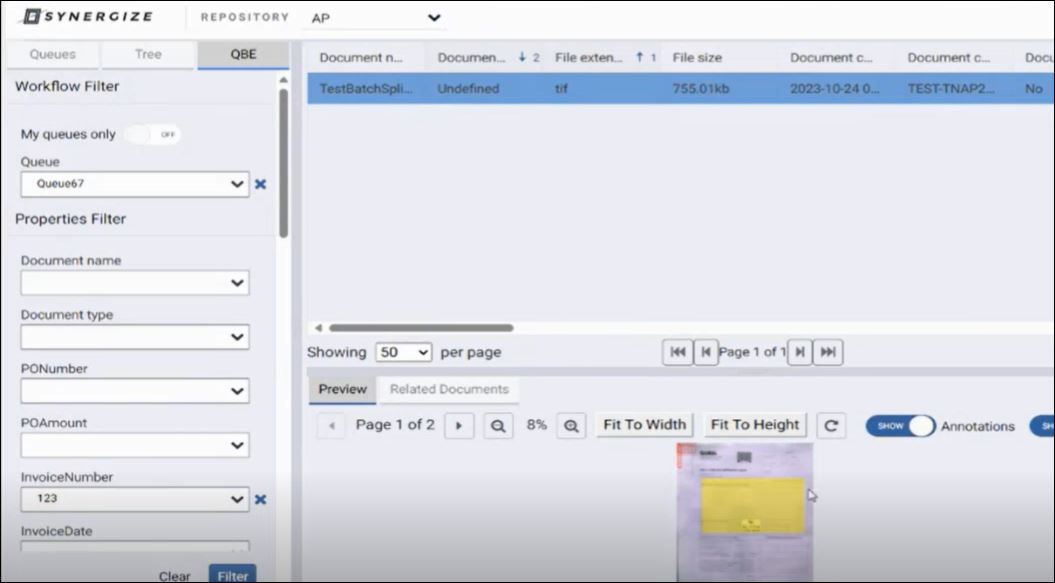
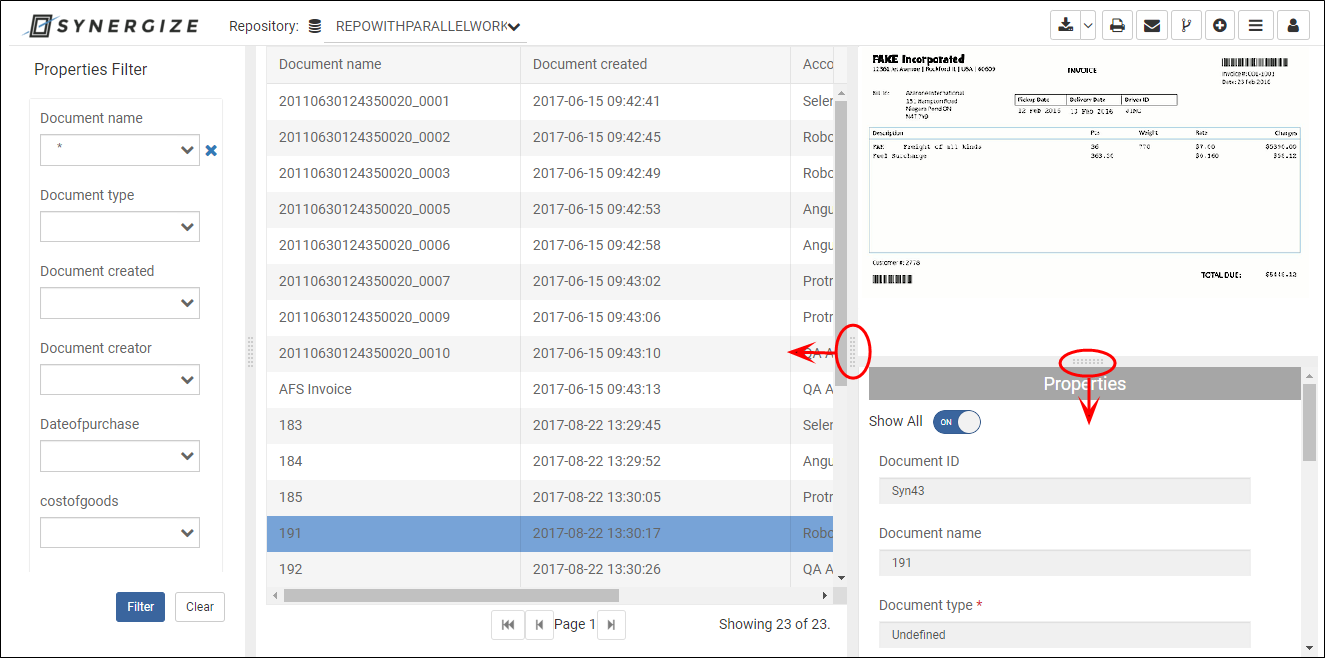
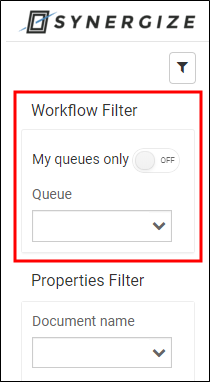
The image below shows the basic Explorer interface. To view a list of documents, enter criteria in the Properties Filter area and click Filter.
Synergize Explorer 15.3.1 (December 2023) allows users to display batch indexing data and then split a document into multiple documents with one or more pages. Batch splitting is a key feature that sets Transflo Synergize apart as a leading enterprise document management system. Synergize continues to impress new and existing customers alike with its powerful feature set, SaaS delivery model, support for true multi-tenancy in a secure cloud environment, and now batch indexing and batch splitting process workflow capabilities. These features were enhanced in the 15.3.2 release (Feb 2024).
As a member of a document processing team (such as billing, finance, AP, or factoring), you can now leverage the power of initialized batch indexing and splitting using the data returned from our front-end OCR scanning engine so that your team can streamline your document processing workflow and reduce manual errors.
Synergize Explorer 15.3.1 (Dec 2023) now allows users to display batch indexing data and then split a document into multiple documents with one or more pages. These features were enhanced in the 15.3.2 release (Feb 2024).
-
The Synergize system receives batch data for a set of documents from the advanced Transflo platform including our front-end enterprise OCR scanning engine (it might be through e-mail attachments, Transflo Velocity , Transflo Express, or the Transflo Mobile app).
-
The system parses and interprets the batch data to determine the appropriate indexing and splitting parameters for each document in the batch.
-
The system initializes the batch indexing and splitting process with the appropriate parameters for each document in the batch, tracks the progress of each document in the batch through the splitting process, and updates the status accordingly.
-
Synergize can generate a report of any errors or exceptions encountered during the indexing and splitting process for review and correction by your document processing team.
-
Synergize components have been updated to support this new feature.
-
EMC has a new batch splitting table.
-
A new API endpoint can now save batch splitting data.
-
When you create a new repository, EMC adds a new WorkflowIndexingState table.
-
New document services return initial data for batch splitting for a document queue and can delete items and clean up batch splitting table entries after processing by your team.
-
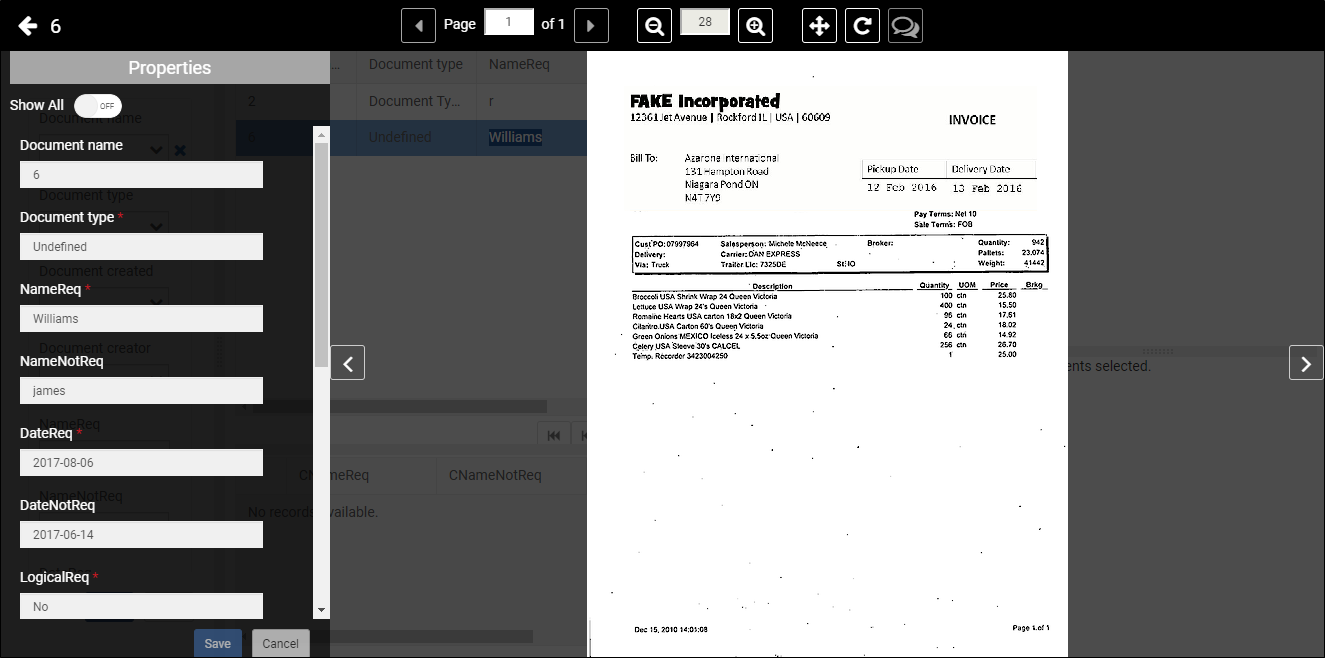
The Synergize Explorer user interface now supports the initial state of the data and includes a new button to save or discard user edits to the indexing state in scenarios where the user wants to apply batch splitting (see the following example).
-
You can split one or more pages of a document from its original batch into a separate batch and adjust the unique properties of each document. To split a batch, follow these steps as an example (your specific use case will vary):
-
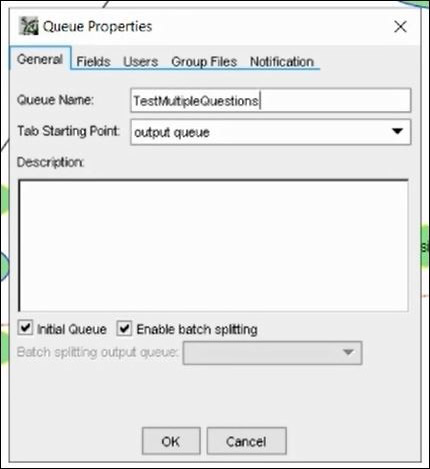
Open your workflow in Synergize Workflow Designer. On the General tab of the Queue Properties window, select the Enable Batch Splitting option.
-
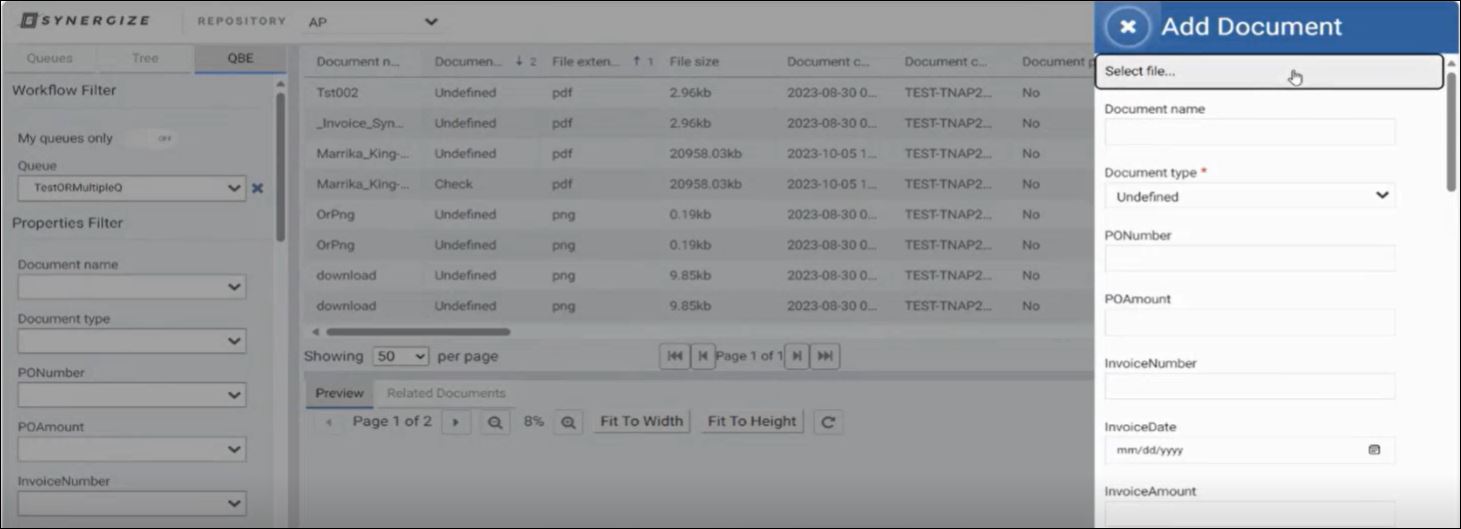
In Synergize Explorer, open a workflow repository and click the QBE (query by example) tab.
-
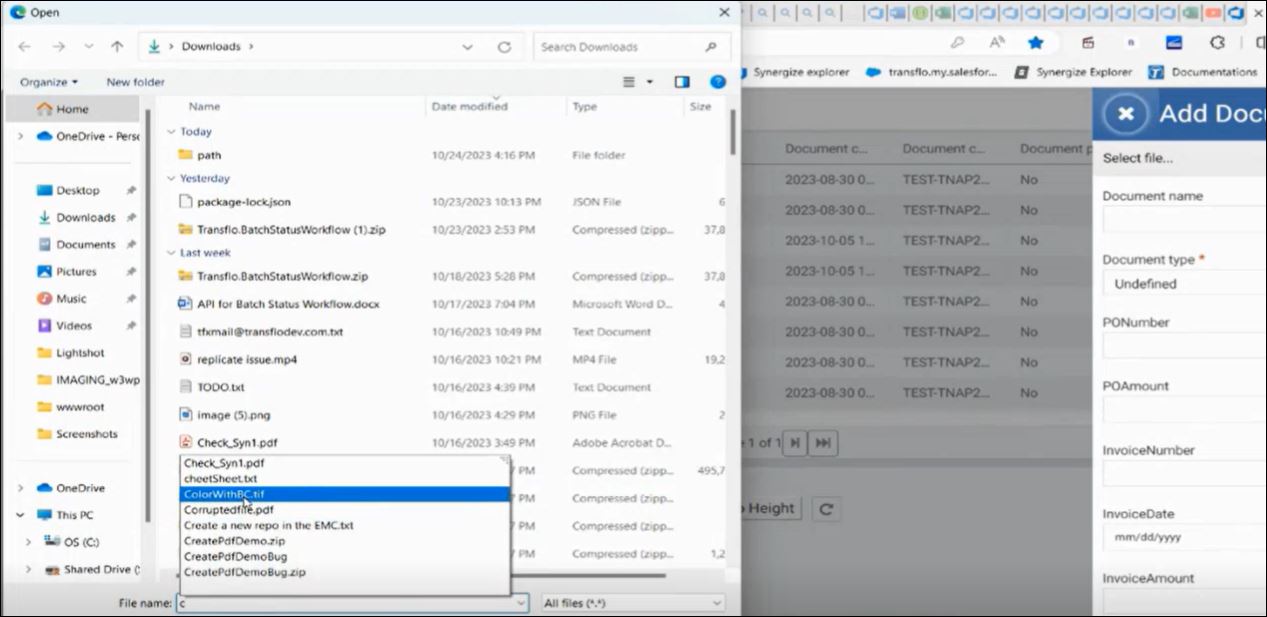
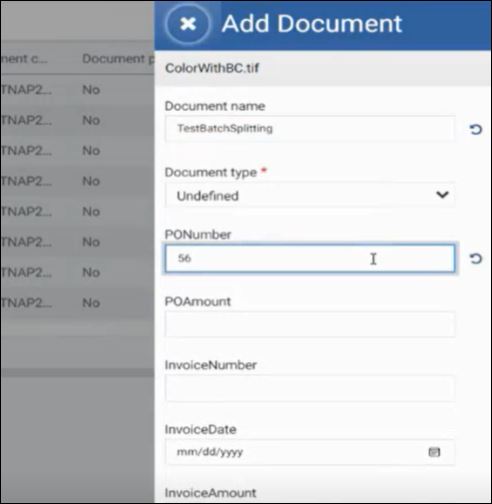
At top right, click Add Document. In the Add Document panel on the right side, select a document file.
-
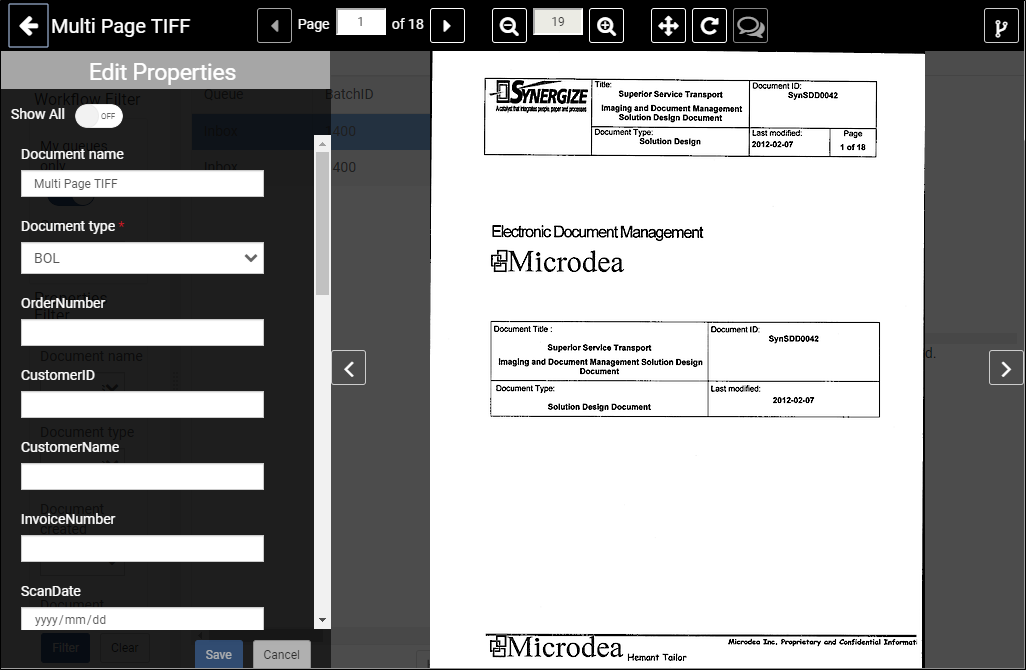
In this example, the user selects a TIFF file for a multi-page scanned document.
-
In the Add Document panel, you can edit one or more properties such as Document Name, PO Number, and other batch index fields configured by your administrator.
-
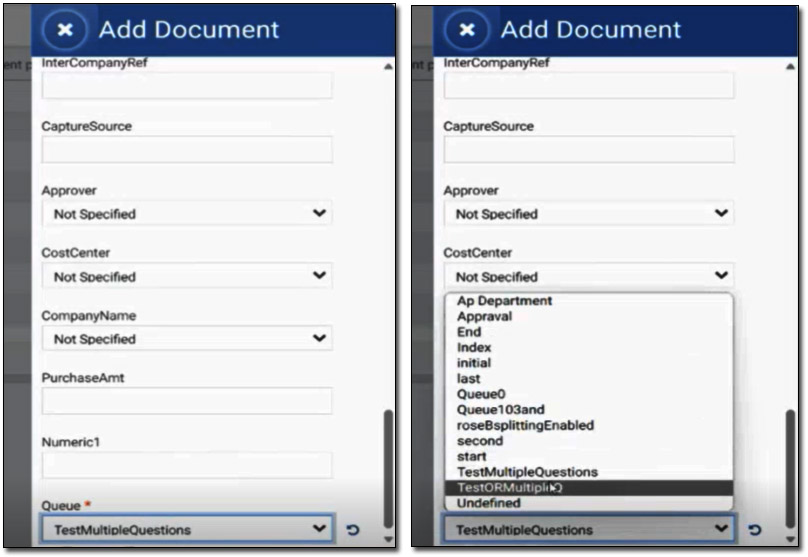
Assign the document to a required queue by choosing a pre-defined value in the pop-up list for the Queue field.
-
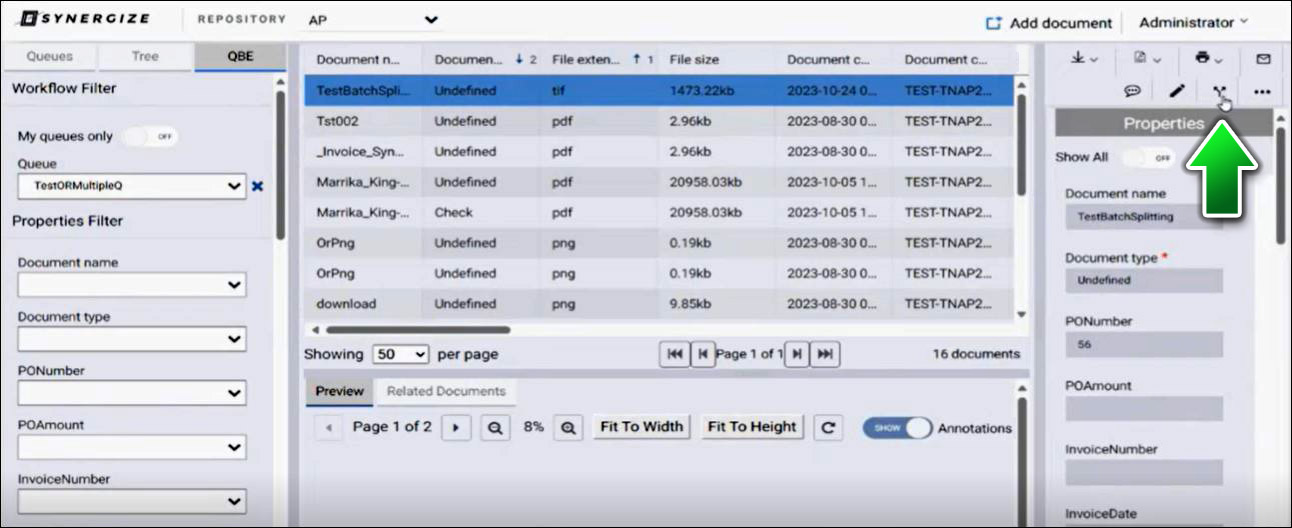
Click the Open document in workflow mode tool button on the right or press Ctrl+Alt+P.
-
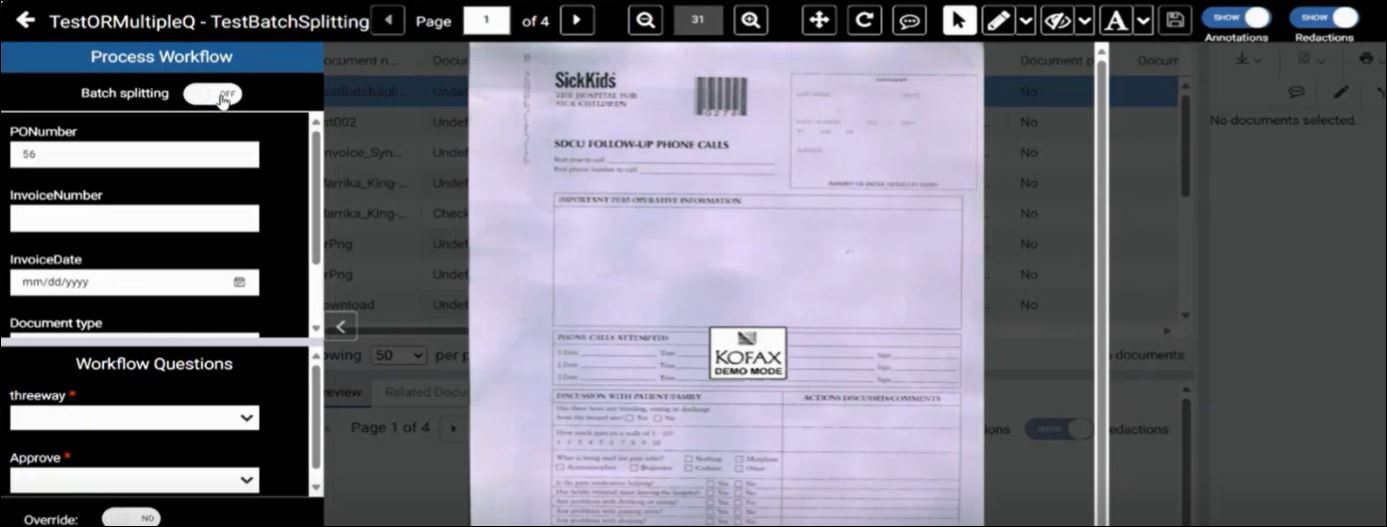
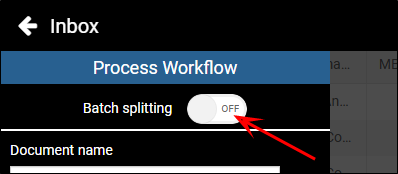
In the Process Workflow pane on the left, Batch Splitting might be set to OFF.
-
Set Batch Splitting to ON.

- Set your own values for any required workflow fields. In this example, the user sets the Threeway field to 1 and sets the Approve field to Approve.
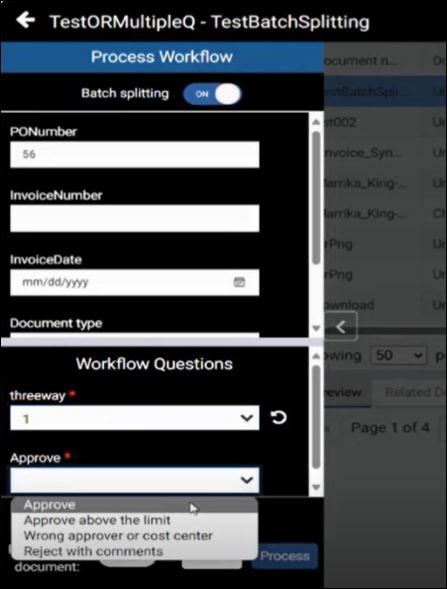

Tip: The +New document button on the right is disabled (grayed-out) until you enter the required fields under Workflow Questions on the left.
-
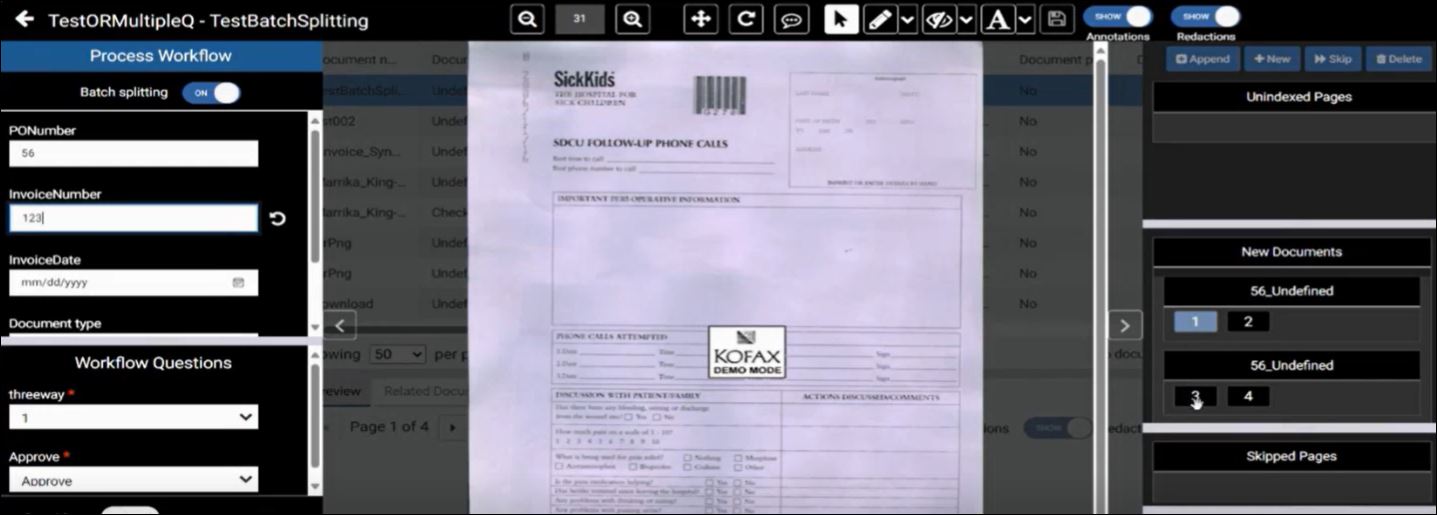
At this point, we have an original two-page document in this batch that we can split into another two-page document. On the right side, select page 1 and click +New to create a new document with page 1 of 1 and then click page 2 and the Append button to append page 2 to page 1 in the new split document. To highlight the differences between the two documents, click page 1 on the right and set the Invoice Number field to 123.
-
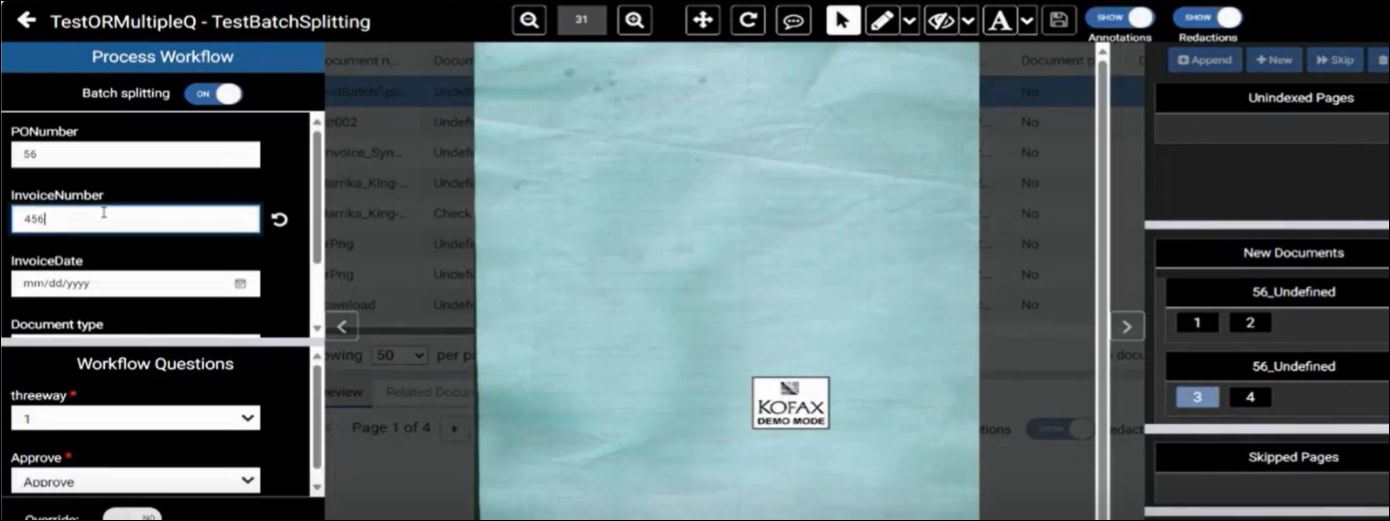
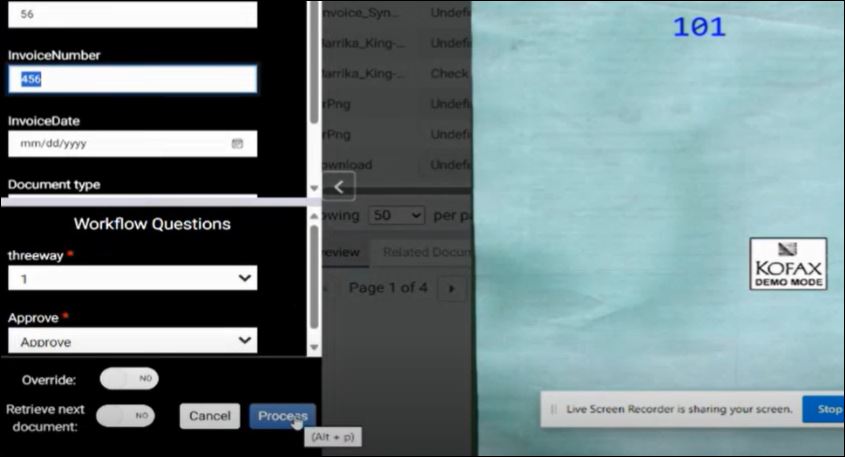
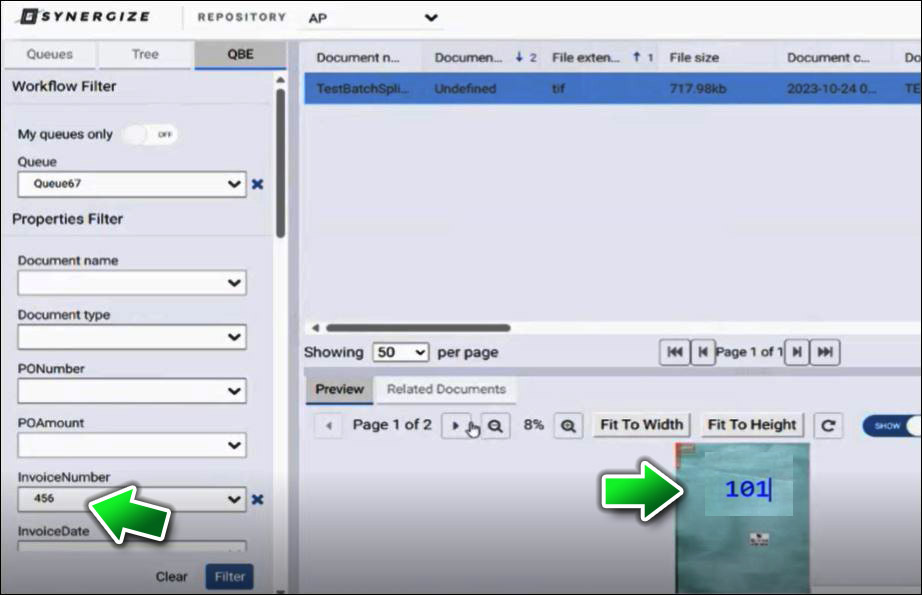
Click page 3 on the right and enter 456 in the Invoice Number field.
-
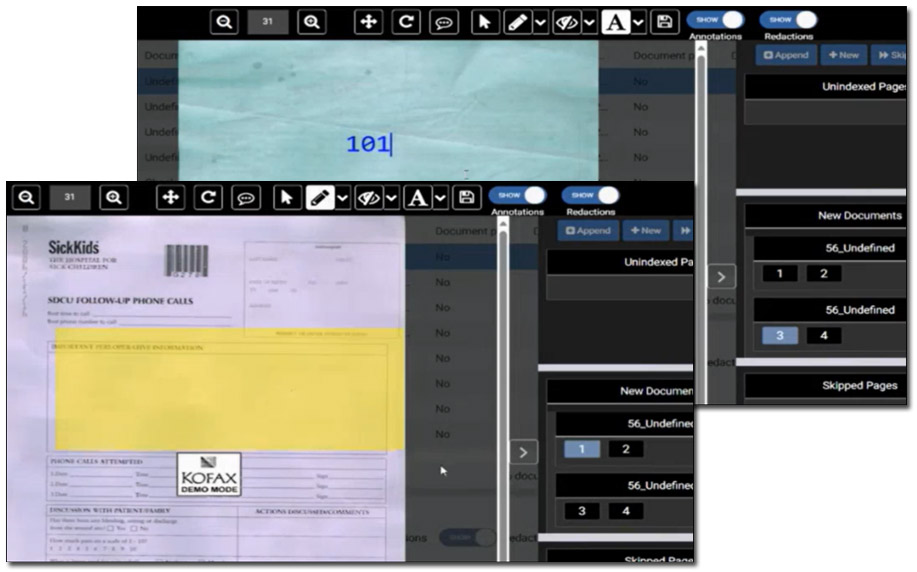
Again, to demonstrate these are separate documents derived from the same original batch you might add one or more annotations to one document and not the other. In this example, the user adds 101 on page 3 and highlights a block on page 1 in yellow.
-
To save your edits, click Save in the toolbar at top.
-
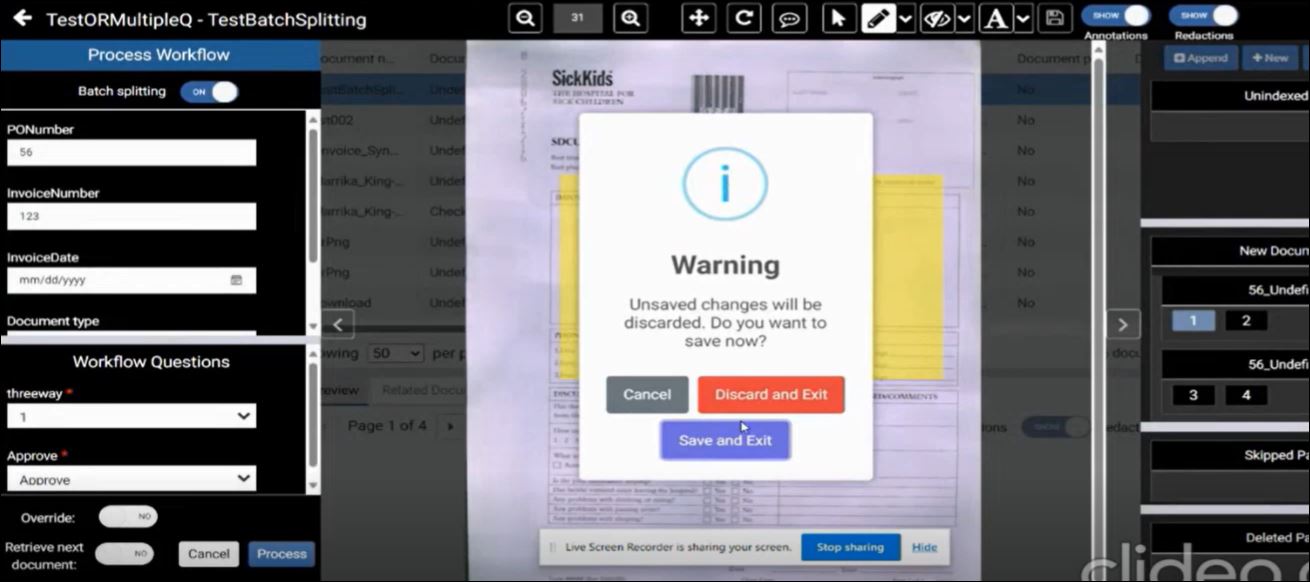
(Optional) If you have unsaved changes and click Cancel, you are prompted to choose one of the following options:
-
To apply and save all your changes and stop making edits, click Save and Exit.
-
To cancel making a decision and go back to your unsaved changes in progress, click Cancel.
-
To discard your unsaved changes and exit, click Discard and Exit. Your unsaved changes are not saved and are no longer available.
-
-
To process the workflow (workflows are pre-defined in Workflow Designer), click the Process button at bottom left.
-
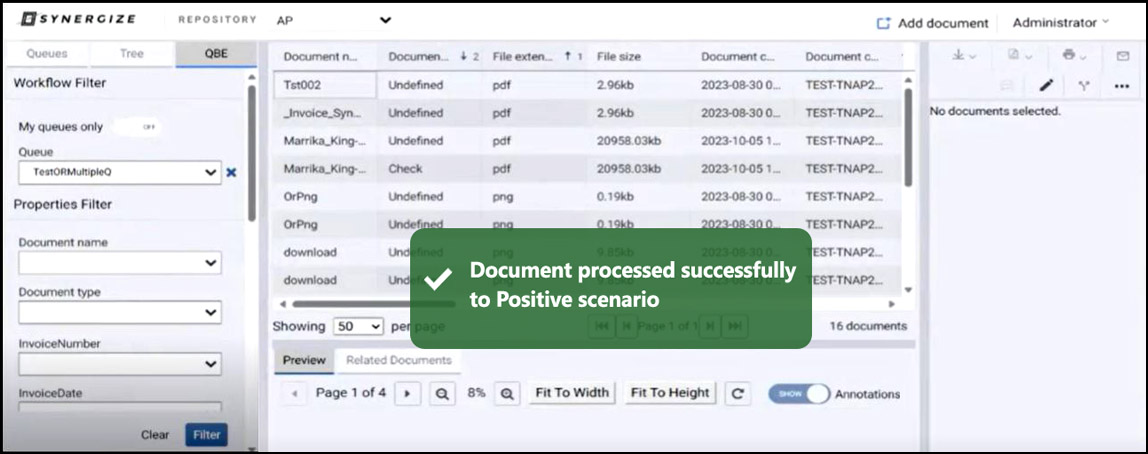
A green Document Processed Successfully message appears.
-
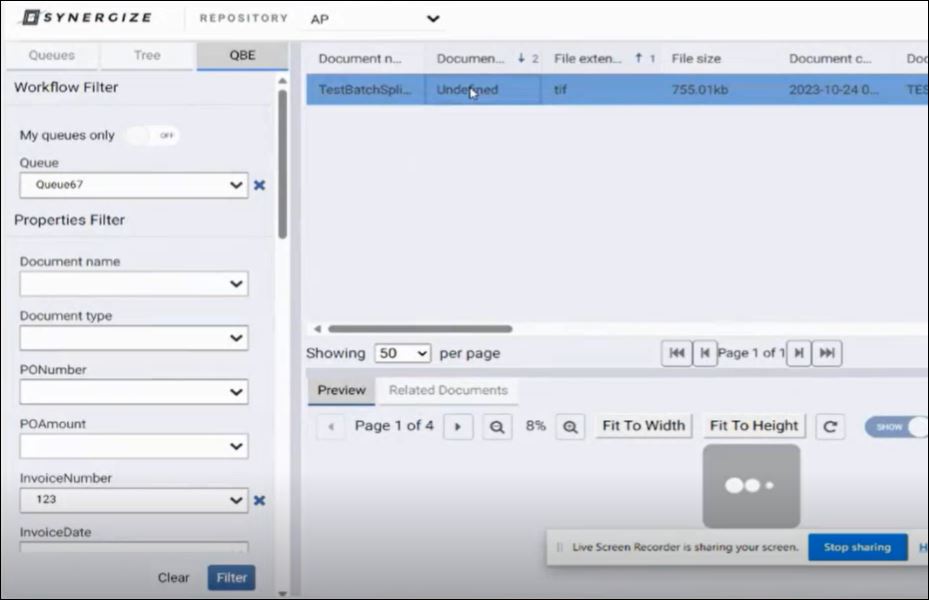
To verify that your new split pages were processed through the workflow, you can find them quickly with your filter criteria. For example, in this example, we pre-defined the workflow process to put the new document in Queue 67. You can now set the Queue filter field to your own appropriate queue.

-
We also set the Invoice Number to 123 in a previous step so we can enter 123 and click Filter.
-
Our 2-page document with its distinctive yellow highlighted annotation region appears.
-
When we filter on Invoice Number 456, we also can verify the second 2-page document with its distinctive 101 annotation appears.
You have successfully split the original document into two batches.
New Workflow Grouping features in Synergize Explorer 15.3 (September 2023) and newer editions allow you to update fields for multiple documents together at the same time. You can group documents during workflow processing so when one document is processed all documents in the same workflow queue with the same value are processed in the same queue as the initial document.
Within the grouping, you can update the fields shared across all documents. For example, if the Order Number on a document is updated while your current workflow is processing other documents grouped with that document, the Order Number values for all those associated documents are also updated.
To update multiple related document fields in a grouping, follow these steps:
-
Open your workflow in Synergize Workflow Designer.
-
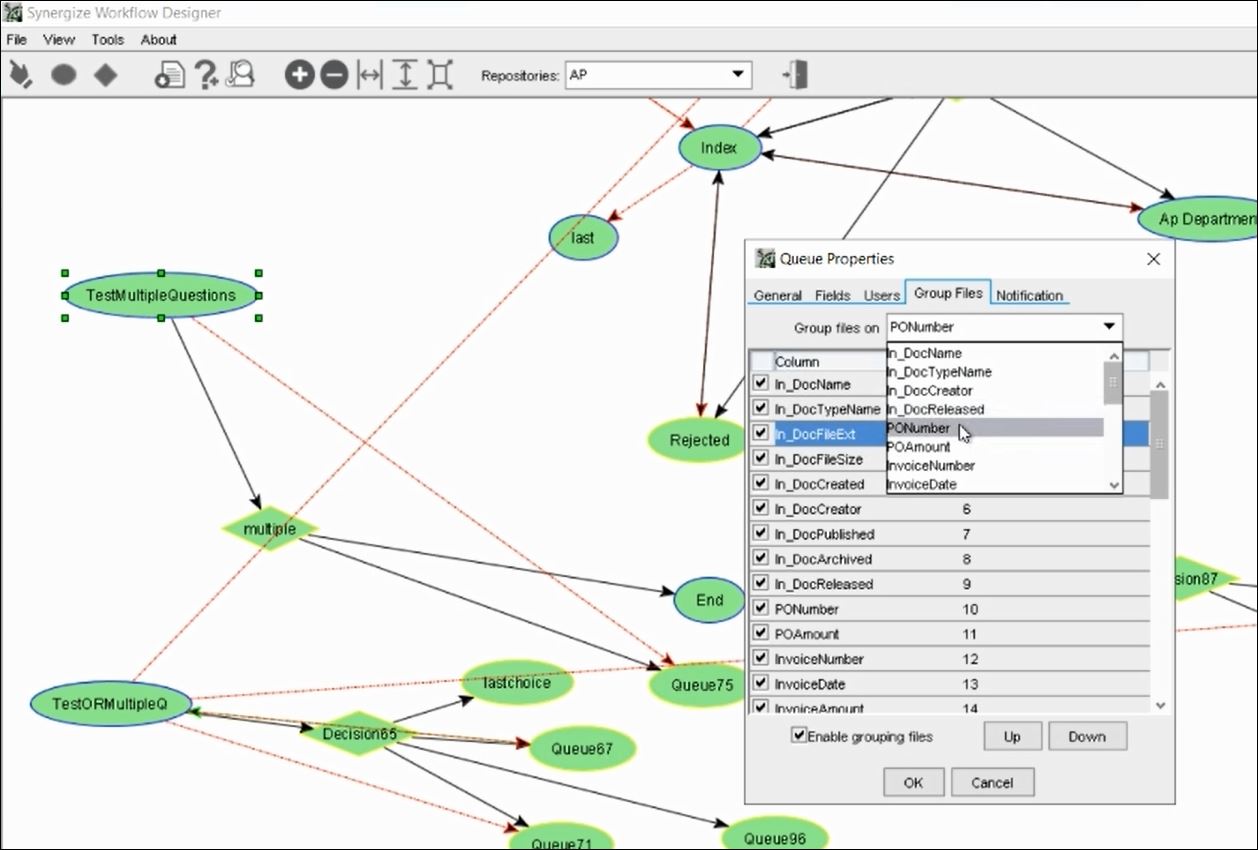
Configure at least one grouping field in a queue. In the Queue Properties window, on the Group Files tab, choose a field to group similar documents based on shared common values. For example, group all documents with the same PO Number. Select the Enable Grouping Files check box. Click OK.
-
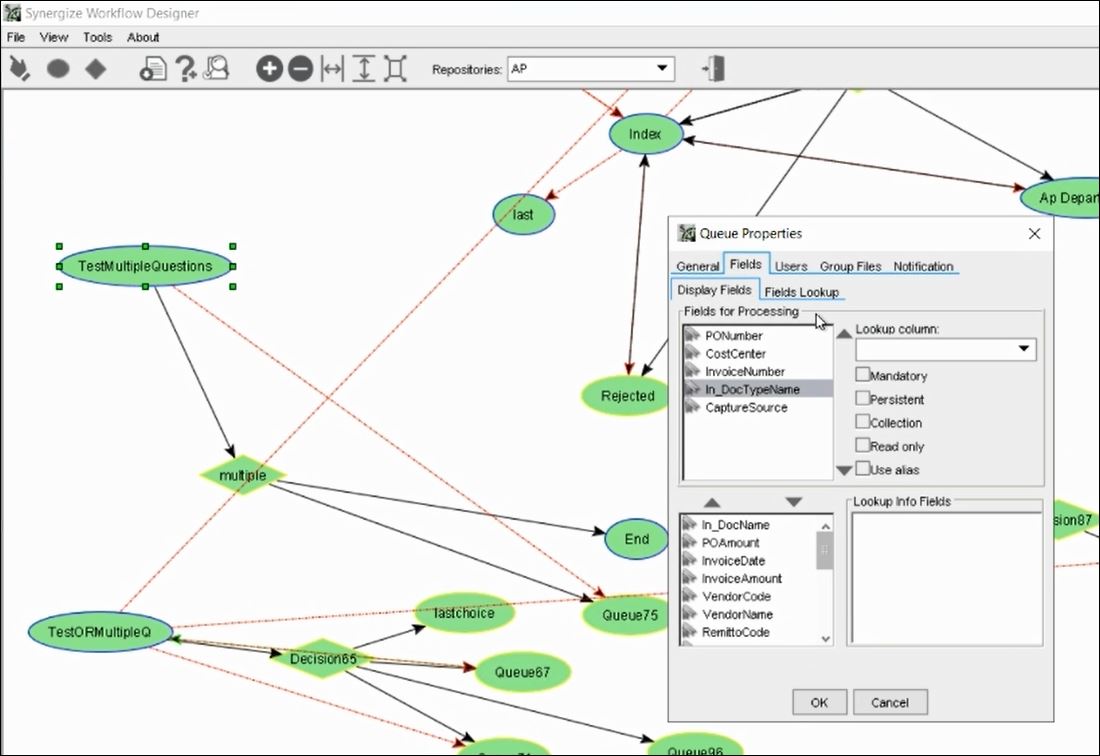
In the Queue Properties window, on the Fields tab, configure one or more fields for processing.
-
-
In Synergize Explorer, select a queue in the Queue workflow filter.
-
Click the new Process Group icon. When you position your mouse pointer over this button icon, a tool tip shows Open document in workflow grouping mode (Ctrl+Alt+G).

All the documents with the same value for the Group Field Name as the selected document are locked for workflow processing. You can now easily identify and group related documents and edit the relevant fields for each document.
-
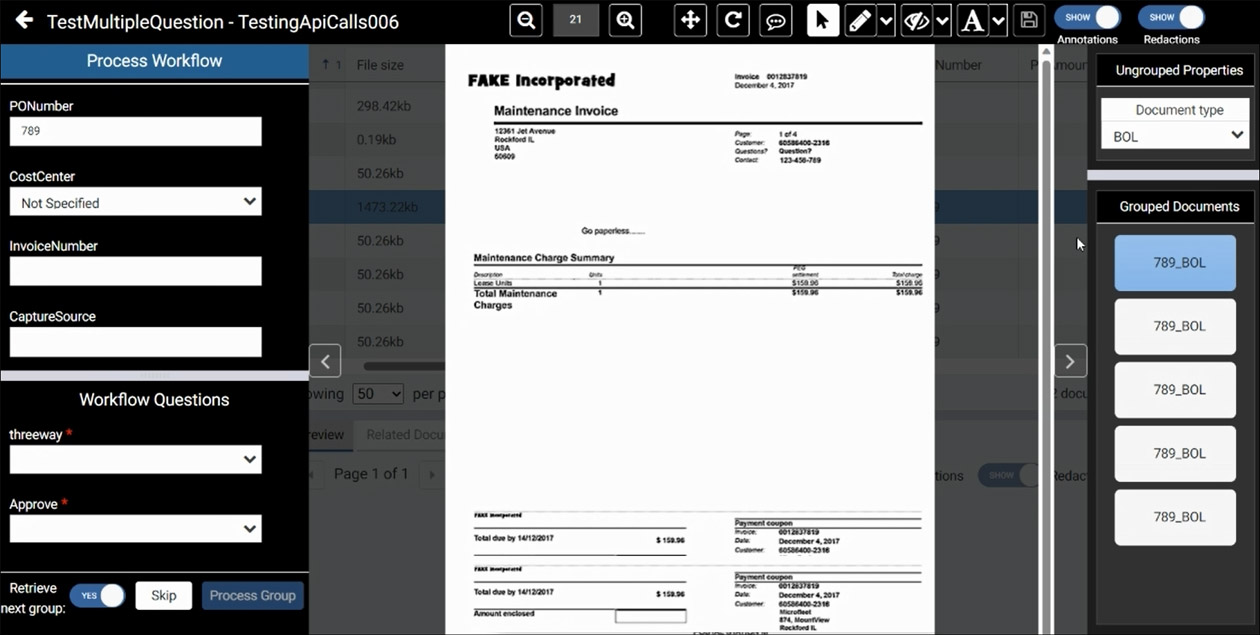
The three (3) main parts of the Workflow screen appear:
-
On the left, all the fields of the queue other than the In_DocTypeName are listed the same way as a worfklow processing a single document.
-
The middle section shows the currently selected document in the group.
-
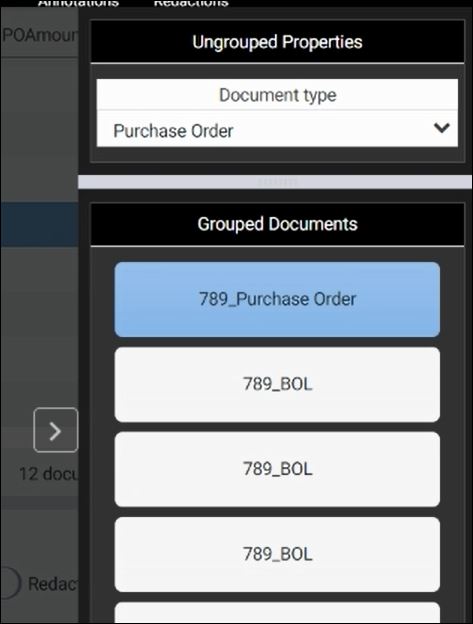
The right side shows the Document Type field and the Grouped Documents list. If the In_DocTypeName field is configured for editing (the read-only check box is clear) in the queue, users can edit the document type of each document.
The Grouped Documents list includes the initial document selected for group workflow processing.
-
-
Click Process Group. When a document is processed, all other documents in the same workflow queue with the same value are processed together.
-
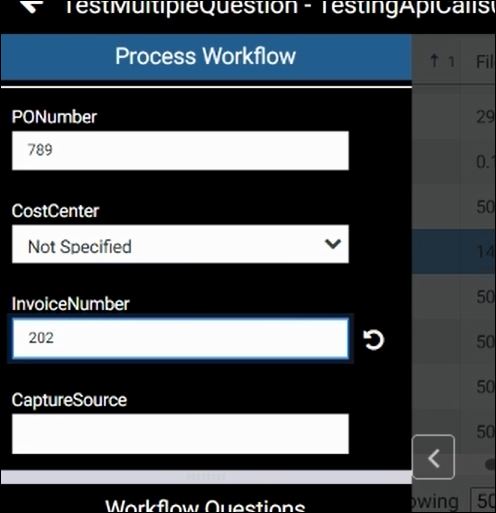
Update a shared field such as Invoice Number on one document in your workflow group.
-
The change is automatically applied to all other documents in the group, without requiring you to manually update each one.
Example: In this example, the Invoice Number value of 202 is applied to all of the documents in the group already sharing the common 789 PO Number value.
-
The updated values are saved and can be retrieved and displayed accurately in subsequent processing steps or reports.
Introduced in Release 15.2.0 (July 2023), the new Tree View feature allows you to categorize and search documents based on index fields that you can arrange in a hierarchical tree with the ability to expand and collapse. For example, you can easily retrieve documents based on search criteria such as (Amount > $2500) Amount greater than $2,500 and limited to Document Type of invoice. You can then drill down into an Accounts Payable repository to see only matching documents.
Tip: You might need to contact your administrator to set up this new feature.
-
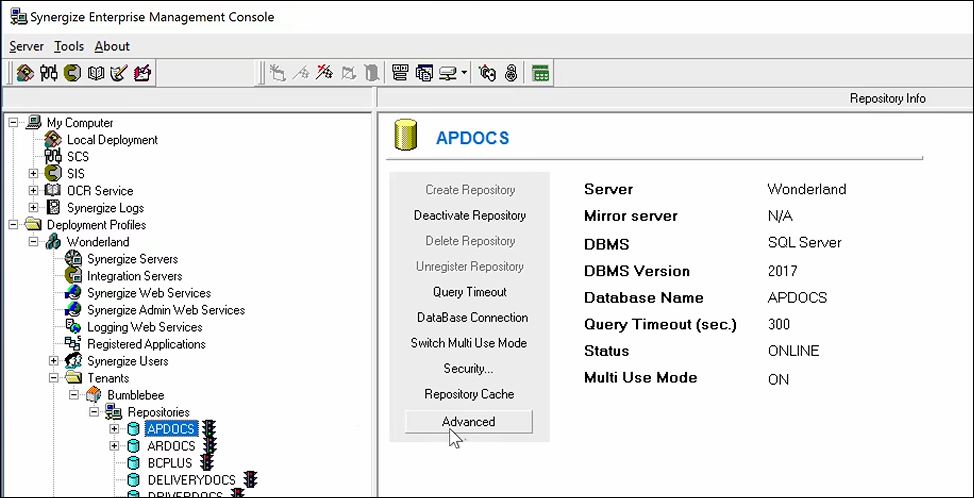
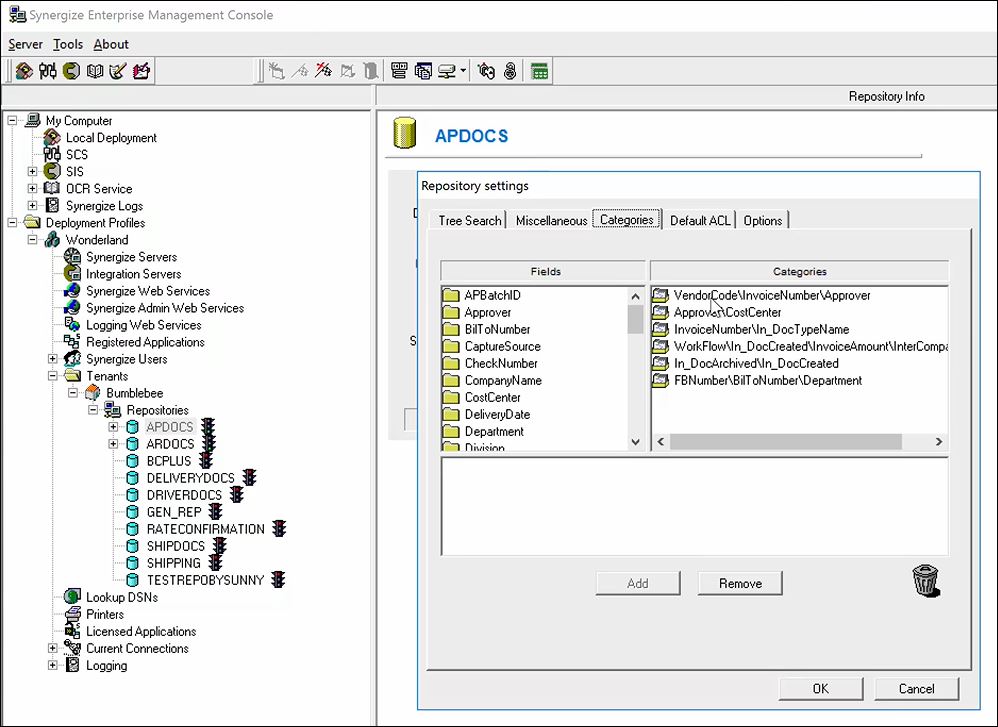
In Synergize EMC, open a repository and click Advanced.
-
In Repository Settings, click the Categories tab.
-
Click Add or Remove to add or remove the defined set of hierarchical fields you want to include as tree view search categories.
-
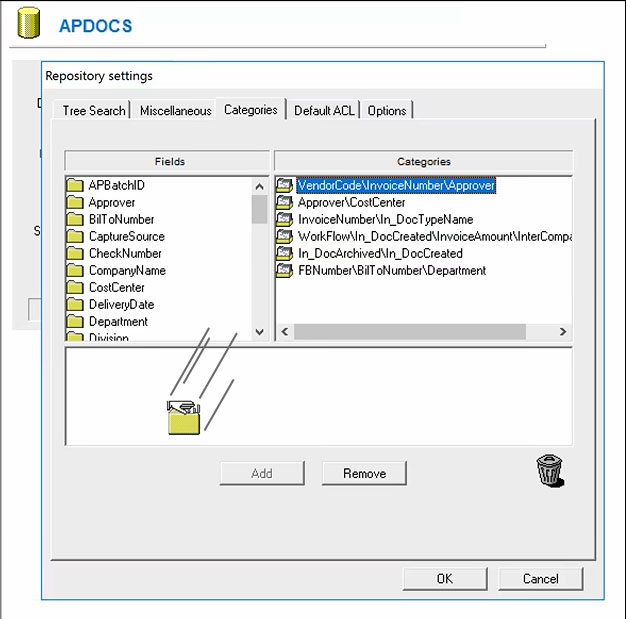
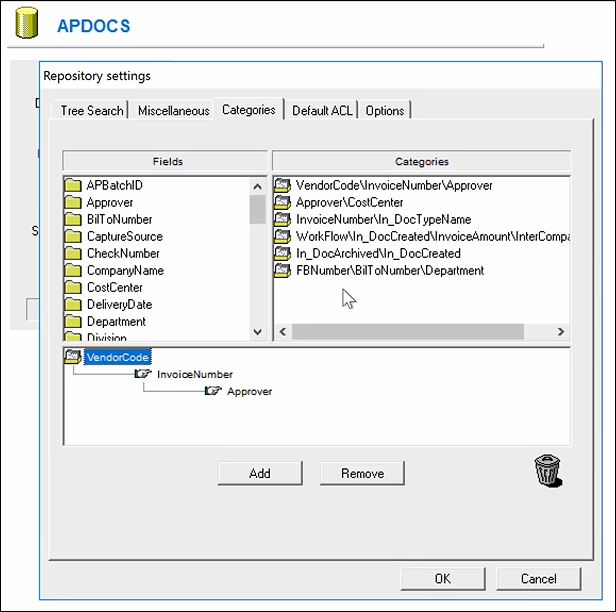
To visually confirm a category, drag-and-drop it to the empty preview area of white space below the fields.
-
In this example, users will be able to drill-down into the Explorer tree view to find matching documents for a selected vendor code and, under that vendor code, a selected invoice number, and under that, a selected approver.
-
Click OK to save your changes.
-
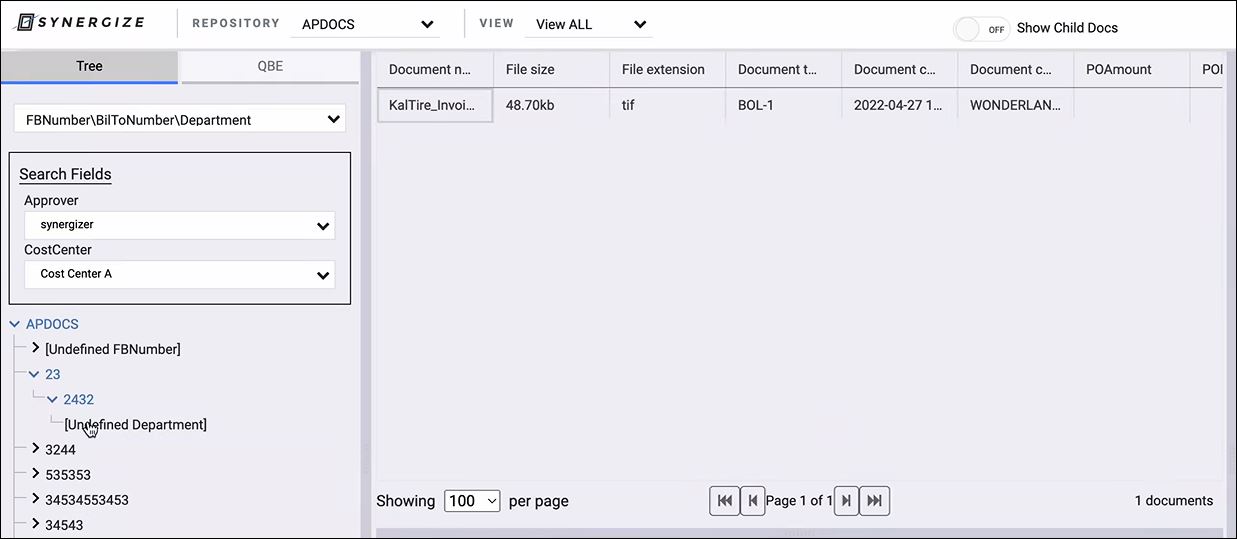
The following example shows how the last entry under Categories above will appear in the Explorer tree. A user can find matching documents after selecting a FB Number (23), a Bill-to-Number (2432), and Department (in this case, blank or undefined).
-
-
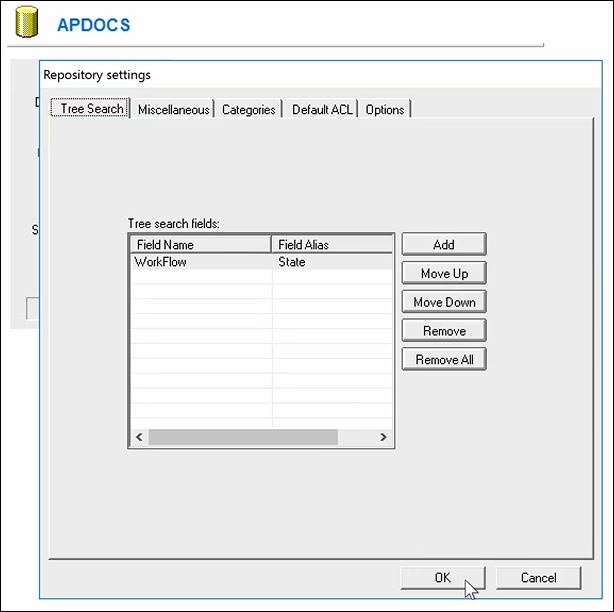
(Optional) Click the Tree Search tab. On this tab, you can set up one or more optional search fields for users that appear above the tree view categories in Explorer.
-
Add or remove fields. You can also move them up or down in sequence. In this example, the admin has configured one tree search field.
-
Field Name: The original name of the defined field (for example, Workflow).
-
Field Alias: The label for the field that you want users to see in Explorer tree view (for example, State).
-
-
Click OK to save your changes.
-
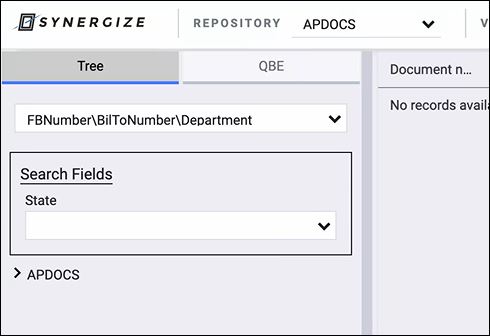
In this example, under Search Fields, the user sees only the default State field that was configured by the administrator.
-
-
As a user, log in to Explorer.
-
On the left, click Tree.
-
In the REPOSITORY field at the top, select a repository (for example, APDOCS) in the drop-down list.
-
Above the Search Fields, select a category. In the example image, the user wants to search a tree view by FB Number then Bill-to-Number, and then Department.
-
-
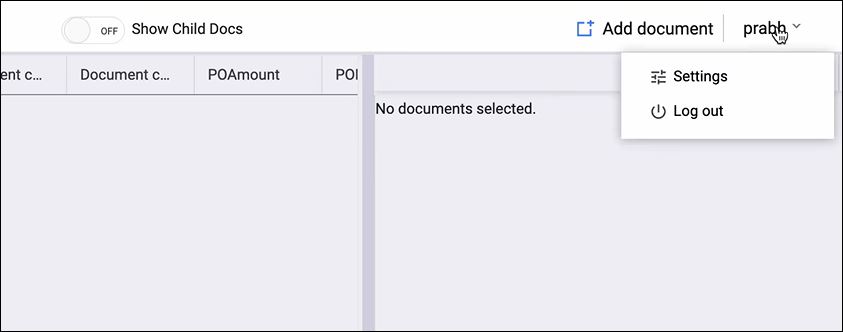
To configure the Tree view, click your username at top right and choose Settings.
-
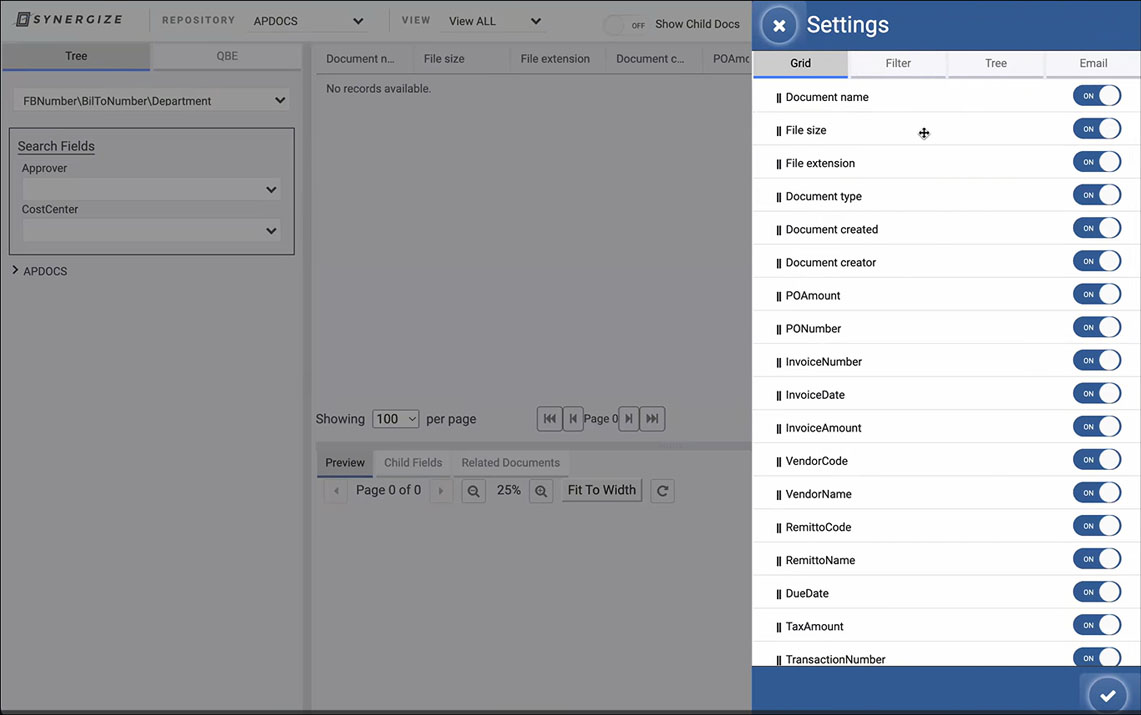
In the Settings pane:
-
Switch from the Grid tab to the Tree tab (click Tree).
-
Decide if you want to view the default tree view search fields or your custom search fields.
-
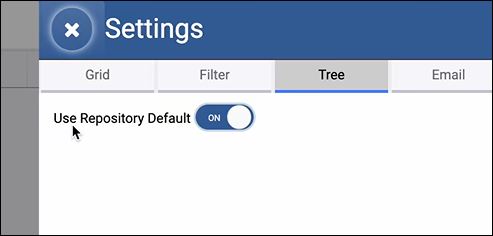
To view the default search fields defined by your admin in EMC on the Tree Search tab, set Use Repository Default to ON.
The tree search fields from EMC appear in Explorer:
-
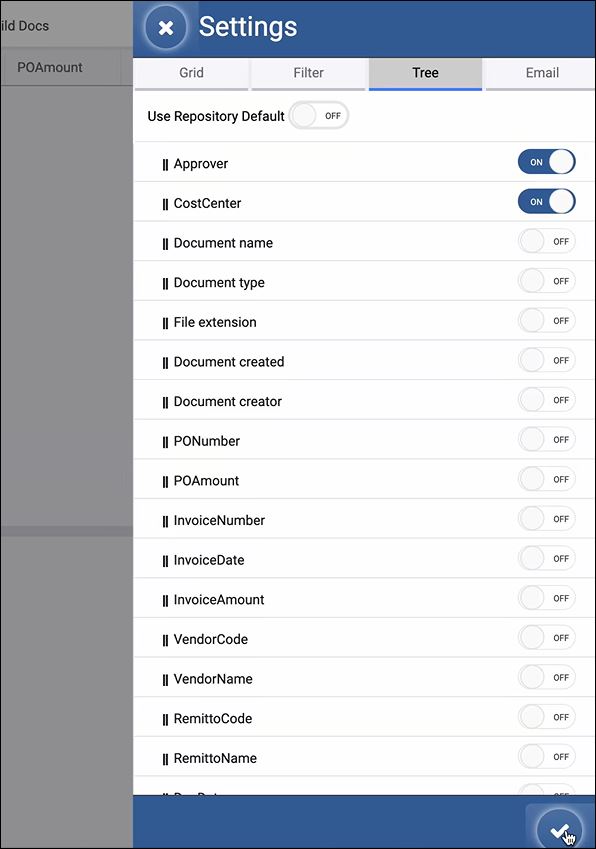
To view your own search fields, set Use Repository Default to OFF and continue the sub-steps below.
-
On the Tree tab in Settings, turn each field ON or OFF.
-
To set the order of the fields, drag-and-drop each field up or down.
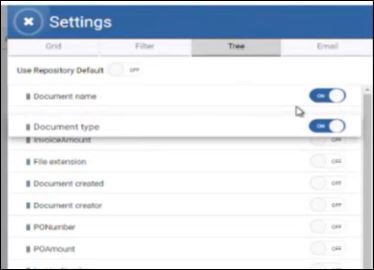
-
Click the check mark at the bottom to save your changes and close the Settings pane.
-
-
-
-
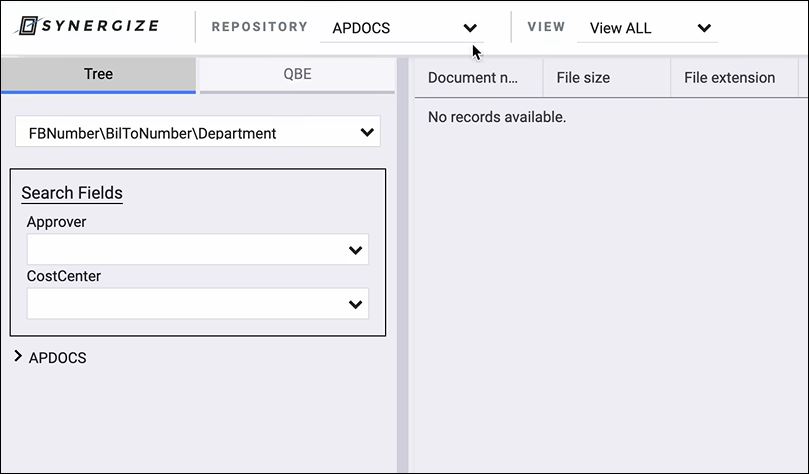
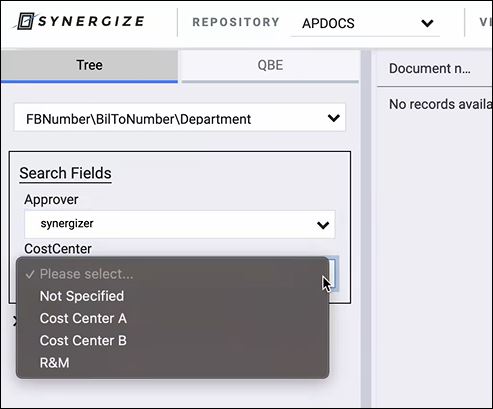
In the Tree view, enter your search criteria for each field.
-
Approver and Cost Center appear in this example because they were configured in Settings in an earlier step.

-
In this example, the user enters their search criteria in the Approver and Cost Center fields.
-
-
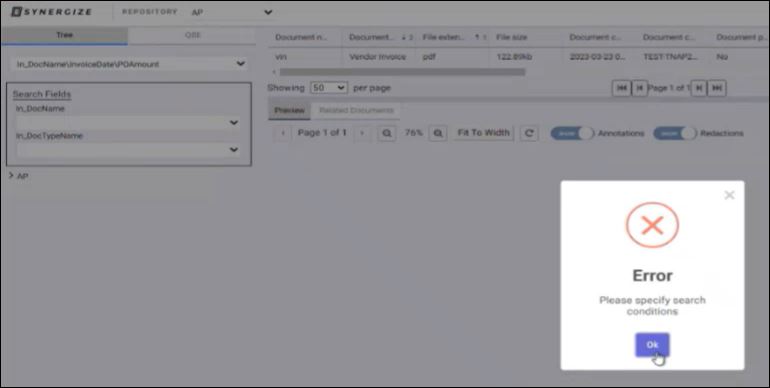
If you try to expand a repository without entering your search criteria, you might get the following pop-up message:
Error: Please specify search conditions
To resolve this error, click OK and enter your search values.
Tip: Your repository data can get quite large over time. To improve performance, configure appropriate search fields to filter and reduce the amount of data that appears in the hierarchical tree view categories.
-
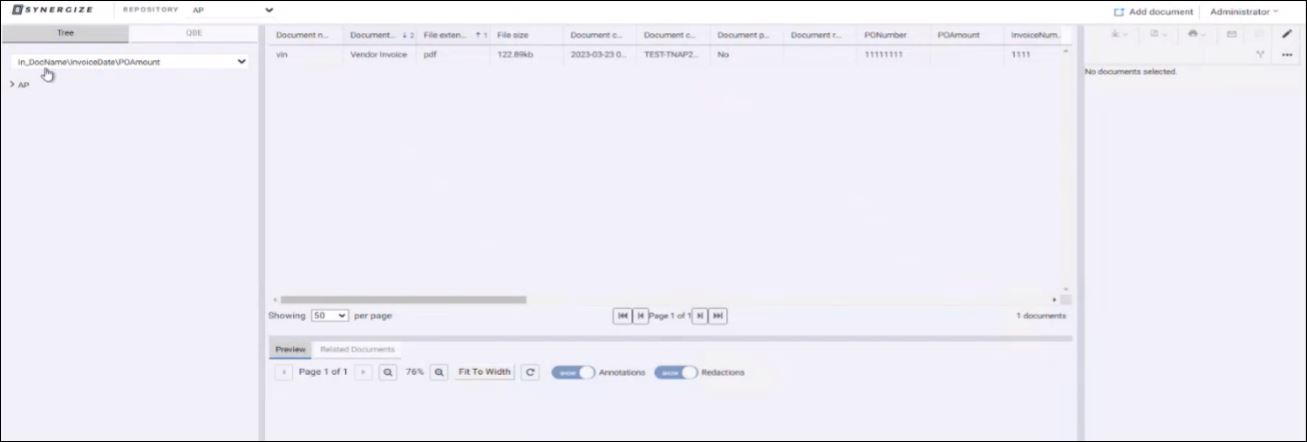
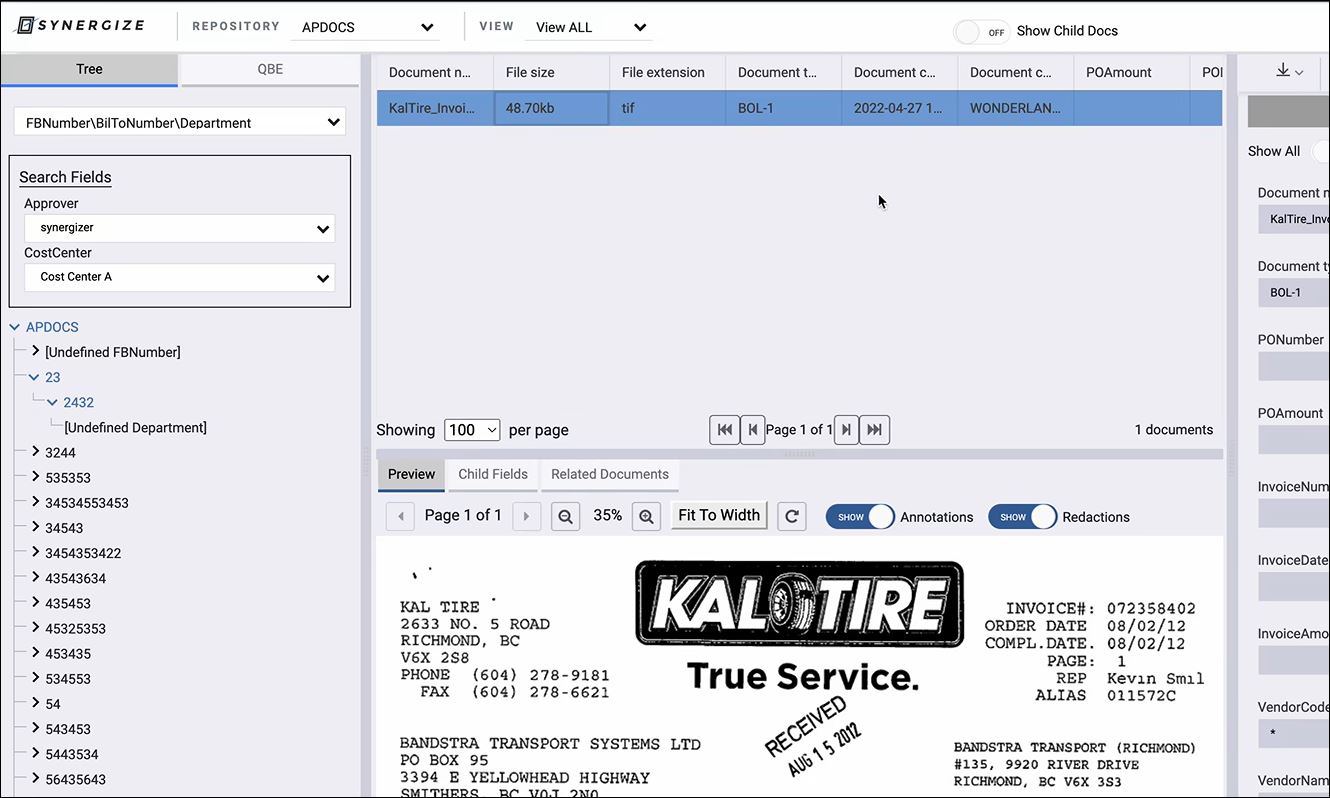
After you enter your search criteria, expand the repository on the left, drill-down through the hierarchical field data, and select a matching document in the list.
-
Continue processing your documents. For example, if multiple entries with no defined department appear, you can now assign these entries to the appropriate department.
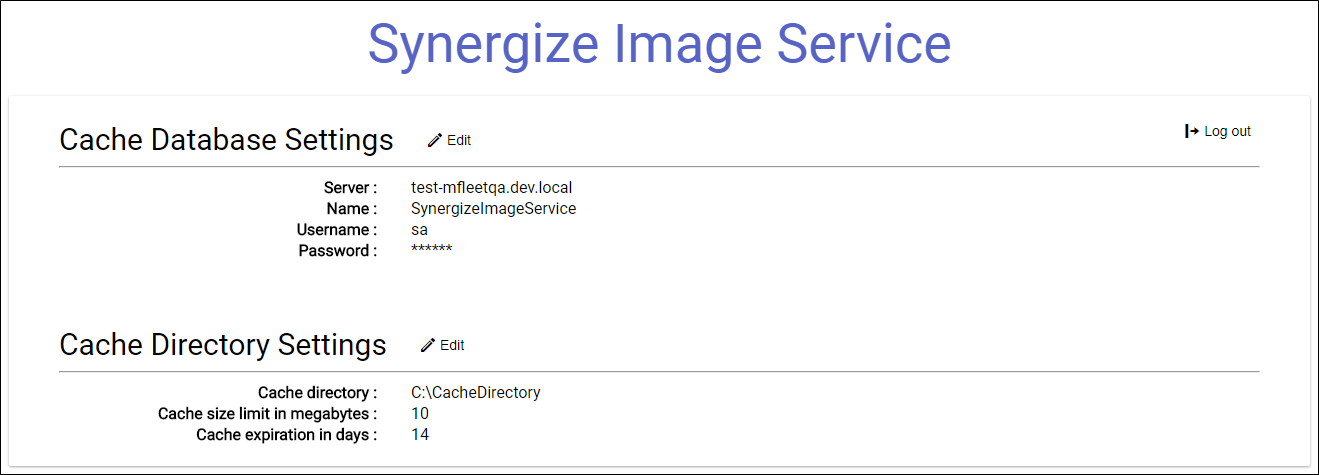
Before using the product, you need to set up the Image Service.
-
Open the link to the Image Service. The default URL for accessing the Image Service Configuration is:
http://<your-domain>:<your port>/SynergizeEnterpriseServer/ImageServiceUI/#/login
-
Specify the server it is running on, its name, and the credentials to access it.
-
Specify the cache directory location, as well as its limits in terms of space and time.
To process many documents in a short period of time, we offer the following time-saving keyboard controls or shortcuts. You may need to press Tab one or more times to set the focus onto a particular field or area of the user interface before the controls become active.
|
Current State |
Shortcut |
Action |
|---|---|---|
|
Overlay |
Esc |
Hide overlay |
|
Overlay (Image Controls) |
Ctrl+Alt+R |
Rotate current page clockwise |
|
Ctrl+Alt+F |
Fit to window |
|
|
Ctrl+Alt+. (period) |
Zoom in |
|
|
|
Ctrl+Alt+, (comma) |
Zoom out |
|
Overlay (Navigation) |
Ctrl+Alt+P |
Enter Workflow Processing mode |
|
|
Tab |
Next field |
|
|
Shift+Tab |
Previous field |
|
|
Arrow Down |
Next item in drop down list |
|
|
Arrow Up |
Previous item in drop down list |
|
|
Enter |
Execute or select (depends on item with focus) |
|
Overlay (Document Navigation) |
Arrow Down / Page Down |
Next page |
|
Arrow Up or Page Up |
Previous page |
|
|
Arrow Right |
Next document in grid |
|
|
Arrow Left |
Previous document in grid |
|
|
Overlay in Workflow Processing mode |
Alt+P |
Process document |
|
Overlay in GL Entry Table or Detail Rows |
Alt+Arrow Down |
Add a row to the table |
|
Ctrl+Z |
Undo new entries |
|
|
Ctrl+X |
Delete existing row |
In Explorer (or a supported Synergize Explorer integration), you can do a one-time setup of email and then send documents to email recipients.
One-Time Setup
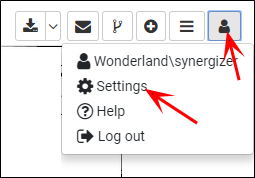
-
Under your user avatar, select Settings.
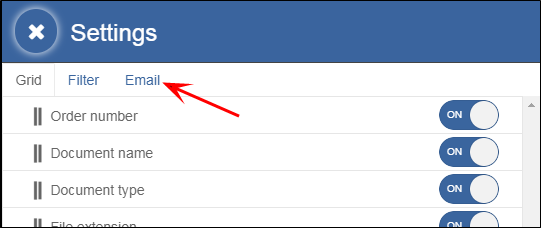
-
Select Email.
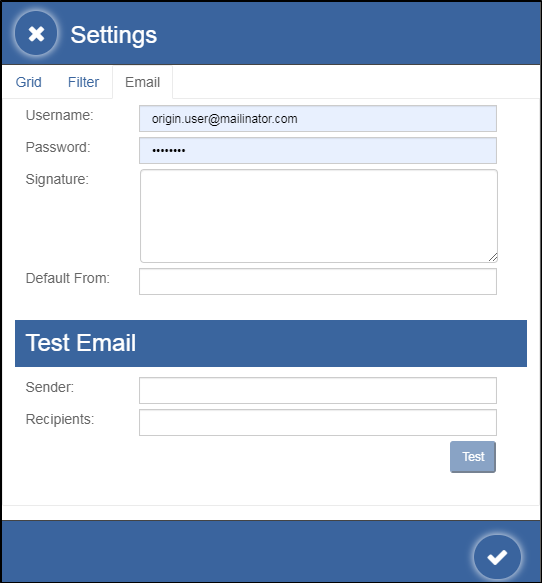
-
Enter any changes to the defaults and make sure you enter the username and password for your company SMTP server. You can send a test email to check the settings.
-
Save the settings with the check mark button or cancel with the X button.
Send Selected Documents
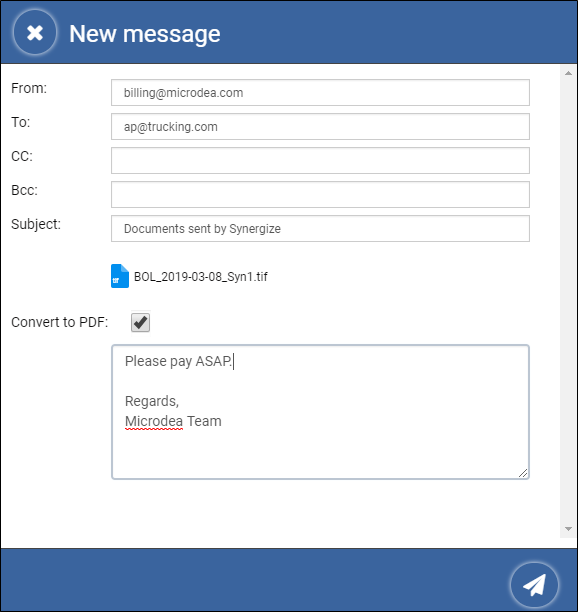
Once you have configured email settings, when you select one or more documents in the main grid, one of the options is email.

-
The "from" field contains the default address from email settings. It can also show any other "from" addresses you have previously used.
-
The "to" address shows addresses to which emails were previously sent by anyone.
-
The subject line has a default which you can change.
-
The body text includes the signature from your email settings which you can change and add any other body text you want.
-
Click the paper airplane icon to send the email with the attachments, or cancel sending with the X button.
Introduced in Synergize Explorer 14.1.0 (April 2019), this feature allows you to enter batch splitting mode if the queue assigned to a document supports batch splitting, which is often called batch indexing or document splitting. When you're processing a workflow, if the queue supports document batch splitting, then you'll see the Batch splitting toggle.
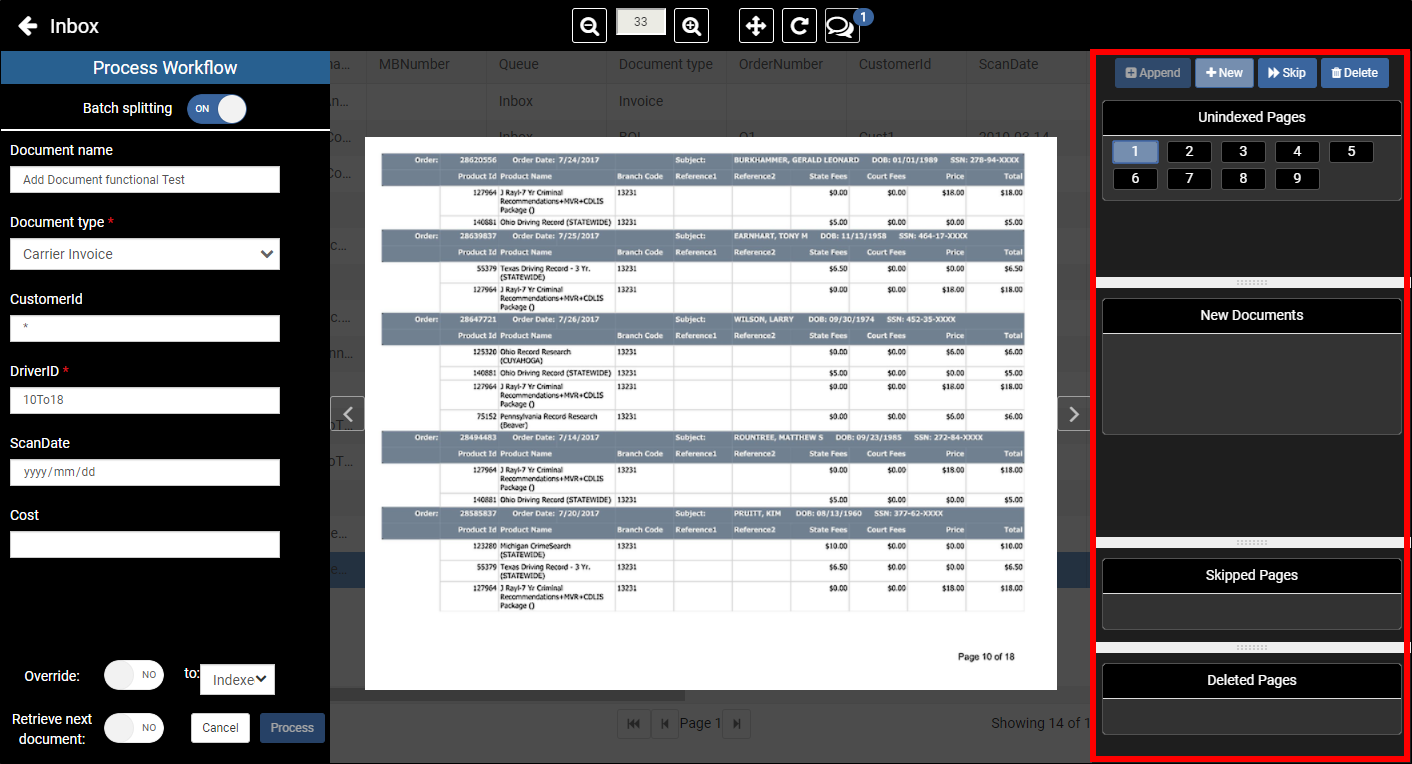
When a user toggles the batch splitting mode ON, a new panel for managing and indexing split documents appears. The Batch Splitting panel has four sections:
-
Unindexed pages
-
New documents
-
Skipped pages
-
Deleted pages
-
You can run through a batch, page by page.
-
To place a page in the current document, click Append on the properties panel or press Enter.
-
To start a new document with the current page as its first page, click New or change a document property and press Enter.
-
Document properties are assigned to each new document, based on the current values shown in the properties panel. As you update the properties, they become the properties of the unindexed section.
-
If you don't have enough information about which document a page should be assigned to, you can click Skip. Skipped pages form a future unindexed batch.
-
If you know that the page is not relevant, is blank, or should otherwise be discarded, click Delete.
Workflow for Batch Splitting
In a standard batch splitting workflow the following things need to be configured using Workflow Designer:
-
For an unindexed batch, the queue batch splitting support must be turned on (if it is not, then the Batch splitting option cannot be switched on).
-
A queue with batch splitting must have an "batch splitting output queue" where the original unindexed batch will be placed; this is sometimes referred to as the "deletion" queue because the original batch usually gets discarded once it has been split into its constituent documents
-
One or more standard output queues can be set up for the newly split documents to go.
For example, you can have an inbox queue to get the unindexed batch and push all new documents to an indexed queue for further processing. Then the system automatically pushes the original unindexed batch to a to be deleted queue.
When you select a document, you see an image of the document on the right side of the Explorer window. If you have selected multiple documents, the most recent selection is shown in the preview as the top document on a metaphorical stack of documents.
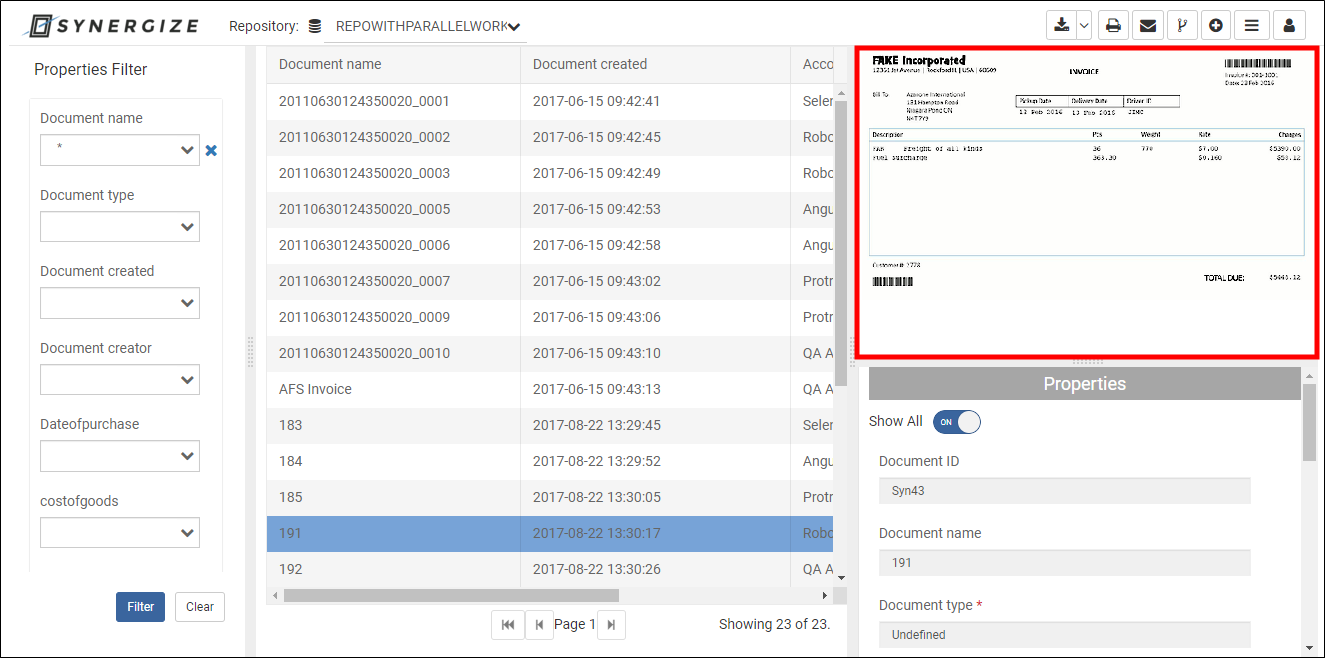
You can expand and contract the document image depending on whether you want to focus on the image itself, the other documents in the list, or the data about the selected document. To re-size the image, click and drag the handles on the edges of the preview pane.
View Document Details
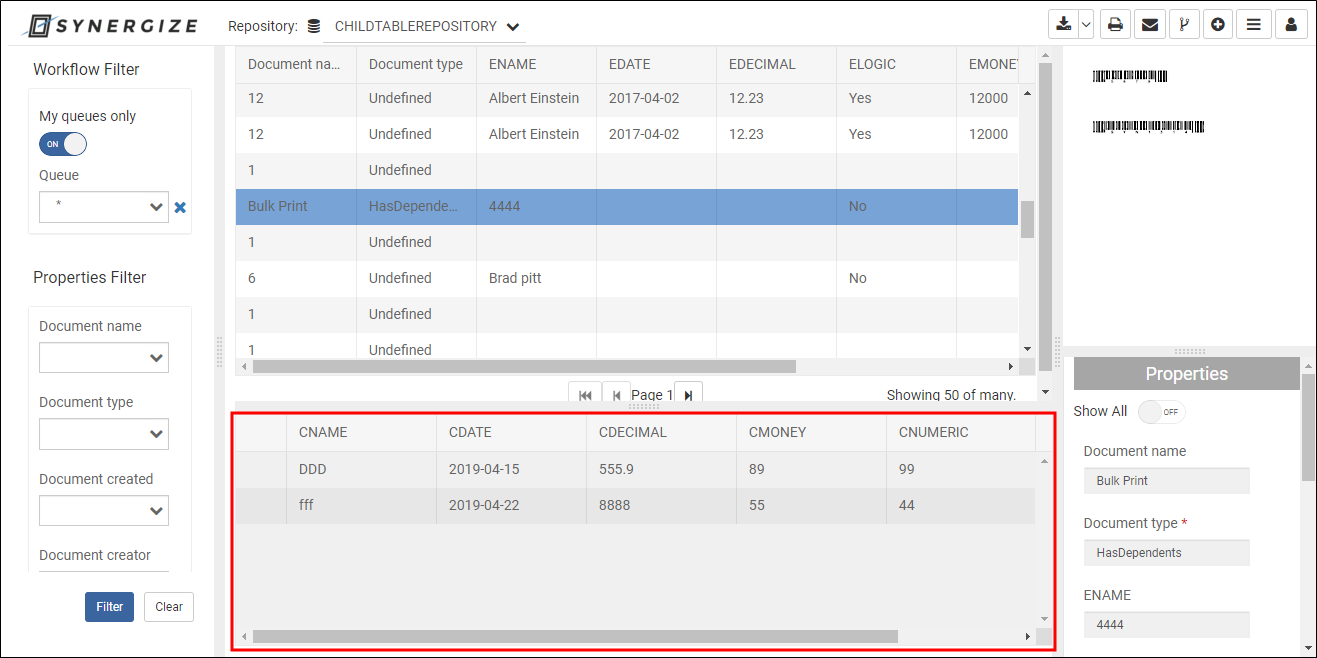
If a repository has a child table enabled, the detail (or child) records have a reserved position below the grid of search results. Once you select a document, its details appear in the separate details grid.
If your administrator adds a child table to an existing repository, only new documents created after the child table was added will behave as described. This is because adding a child table represents a change to the database model. To address this issue, your administrator needs to run a script to do a bulk change so that the existing documents are linked to the child table.
Document and Grid Actions
You can download document or documents, print them, email them, add a document, and view annotations or logged document actions. You may also be able to delete a document.

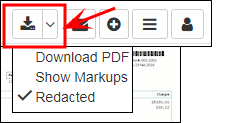
You can download a PDF version of the image and, depending on your access rights, choose whether or not the downloaded image has markups or redactions.
You can print a document or a merged set of documents. You can email a document.
Add a Document
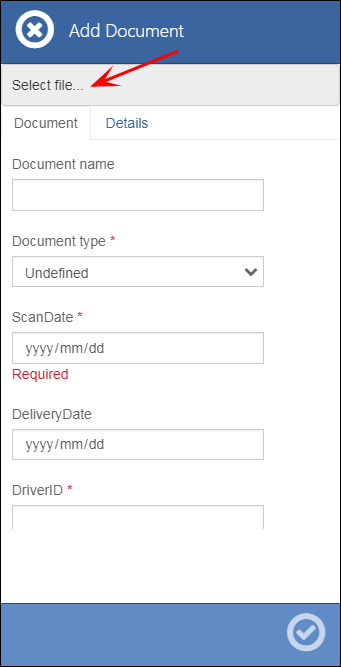
You can add a document.

When adding a document, the first step is to select the file that will serve as the document image.
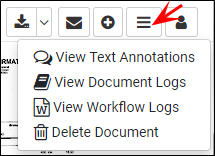
Click the ≡Options menu to view annotations or logged actions for the selected document. If you have sufficient access rights, you can delete the selected document.
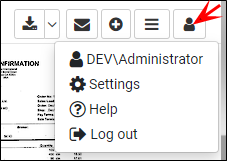
You can personalize your experience with Explorer with the options under the avatar menu. The first item is read-only to tell you who you are logged in as.
Next, you can customize grid column order by dragging and dropping them up and down the list. You can also turn them on or off for display purposes only (the actual columns in the database are unaffected). You can access this online help and log out of your session too.
Multiple Selection
You can use Shift-Click or Ctrl-Click, to select more than one document in the grid. You can then download, print, or email the documents.
To indicate which documents are selected, they are highlighted. The "current" document which is on the top of the stack in the preview window, is highlighted in a darker color. The "stack" of documents is represented by additional lines under the preview image.

For printing, the selected documents are merged into a single PDF and presented in your printer dialog to allow you to change any printer settings you want.
Note: For printing, if a file cannot be converted to PDF, you'll see an error.
For downloading, if the Download as PDF option is selected, the selected documents that can be converted to PDF are zipped into a single attachment.
Note: For downloading, if a file cannot be converted to PDF, it will be included in the zip file in its native format.
Document Overlay Mode
If you double-click on an entry in the grid, you see the overlay mode.
Navigation
You can move from one document to the next using the side arrows. Within a document, you can see what page you're on and move to the next or previous page. You can also move directly to a specific page by typing its number. If any navigation would have no result (for example if there is no next document or page), then the option is disabled.
Image Manipulation
You can quickly zoom so the image fits across the overlay window, which is the starting zoom level too. You can zoom in or out on the image in increments of 25 percent, to a maximum of 200 percent and a minimum of 25 percent.

The zoom percentage is related to the actual number of pixels on an image; 100 percent represents a 1:1 ratio of image pixels to screen pixels. This means that for a document with pages scanned at different resolutions, the pages will appear to have different sizes at the same zoom level in the Document Overlay.
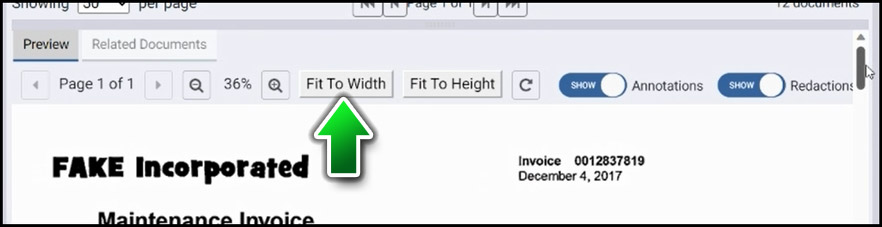
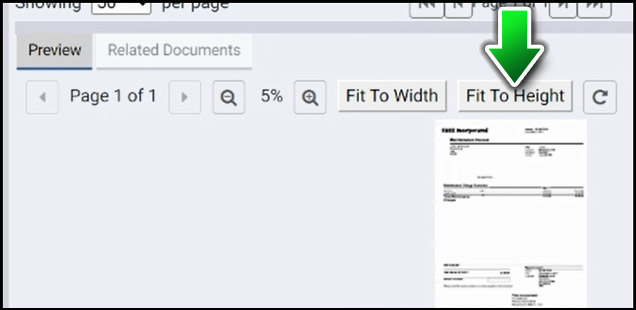
In 15.3 and newer releases, Synergize Explorer also includes new options for viewing a workflow document in a viewer window with buttons for Fit to Height and Fit to Width.
Example: Fit to Width
Example: Fit to Height
You can also rotate the image clockwise in increments of 90 degrees.

Text Annotations
You can see if there are text annotations on the document and view them by clicking. In this example, there are two text annotations attached to the current document. As of version 14.1.1 you can add new text annotations as well. Synergize Explorer 15.3 SMS Workflow Batch Splitting allows you to accept text annotations per indexed document.

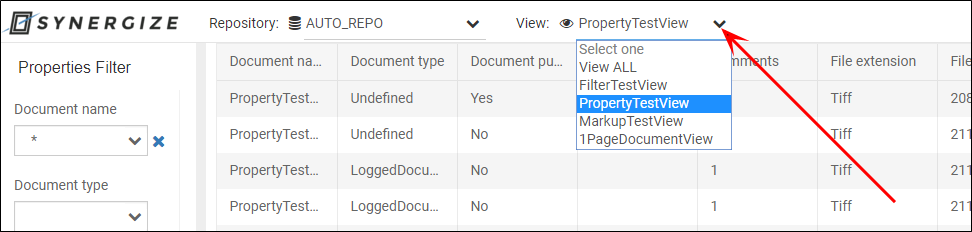
Repository Document Views
If your repository has document views enabled, you will see additional choices beside where the repository is usually displayed. The drop-down list of views allows you to select any view of documents that you have permission to see.
If you edit the properties for a document so that it is no longer a part of the selected view (because the new property you gave it would filter it out of the view), the view may refresh and default to a generic view. A Synergize Explorer Integration configuration can have a default view, but you may not have access to the default that is defined. You'll still be able to select a view to which you do have access. If you do not have access to any of the views in the repository, you may get an error.
Edit Document Properties (Indexing)
If you have sufficient access rights, you can update document properties. Once you have a list of documents, depending on your access level, you can edit the properties for one document at a time. Double-click on a document in the search results grid to open the overlay.
To undo an edit, select the undo  icon.
icon.
Detail Records
Some documents have information on them that are repeating rows (like invoice detail lines or deliveries on an LTL trip envelope). These are called details in Explorer.
If a repository has detail records enabled, they are displayed on the overlay under the document image. To add a new detail row, click on the plus icon or press Alt + Down Arrow.
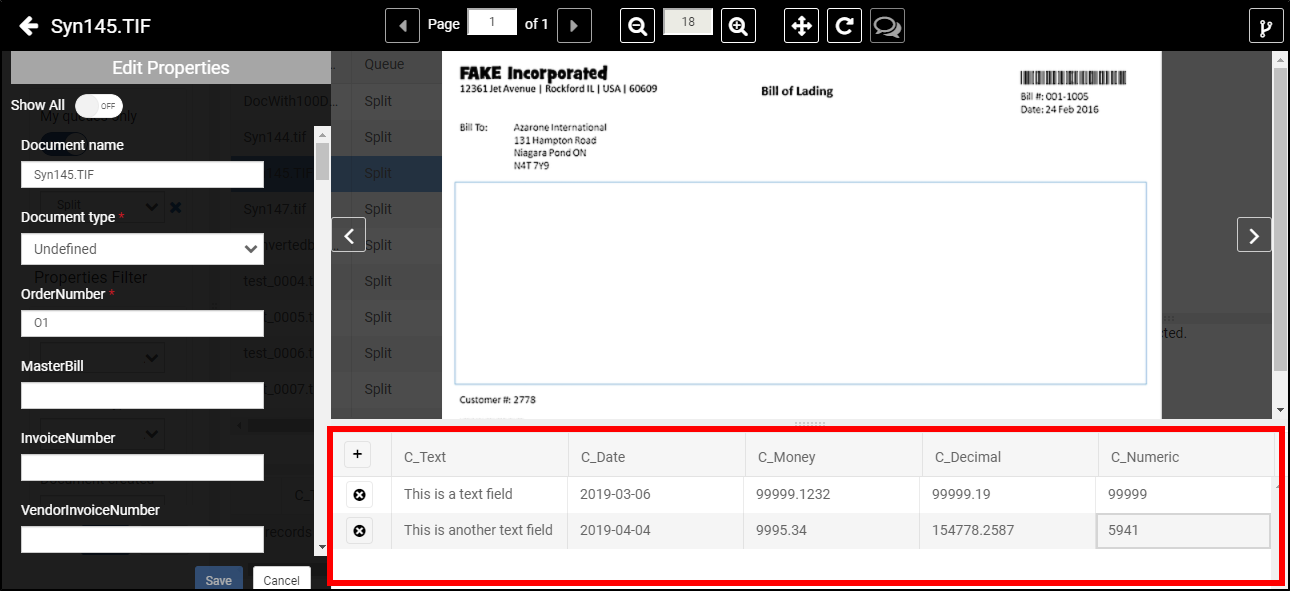
To delete an existing row, click on the X icon or select a row and press Ctrl + X.
In Workflow
If you have Workflow and are processing documents, the same screen layout is used but the editable fields are those specified in the Workflow design.
To look for documents in the Synergize repository, you can create a search filter. The filter is made up of values that you want to see in the list of documents. Each value has its own field, which is labeled. For example, there could be a Company Name field which could be used to filter the list down to only documents related to a certain company.
When a document is in the repository, the fields are either required or not required. If a value is not required for a particular field, then the value could be unspecified. Each field in the filter can be set to Not specified. In other words, you can specifically look for documents where a field value has not been set.
If you enter something in the filter and later wish to remove it from the filter, use the X control to clear the value and no longer include it as part of the filter.
Note that not using a value at all is different from selecting the Not specified value.
Examples:
-
Document ID = "Syn11"
-
DocumentPublishedToPublic = TRUE
-
DocumentPublishedToPublic = Not specified
A boolean value is represented as TRUE or FALSE. Common variations like T and F, YES and NO, or 1 and 0 are not supported. Also, a not required or non-mandatory boolean field could be one of: TRUE, FALSE, or Not specified.
Wildcard
To include all values in a filter set (including blanks and empty values), use the asterisk character (*) as a wildcard.
Queues
A workflow queue is a special type of property.
With a Workflow License
You can see an additional Workflow Filter area where you can specify filters. This allows you to find documents in a specific queue. A switch allows you to limit your possible filter to only those queues from which you are allowed to process (My queues only).
Two things to consider for My queues only:
-
Queues that are final queues (from which you cannot process to another queue) do not appear on the queue list.
-
Only those documents which are assigned to you as approver will show up in your approval queues.
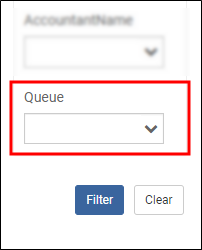
Without a Workflow License
If you are not licensed for the workflow module, you can still filter based on a queue name. The queue field is usually the last field that shows up in the Filter Properties pane.
Setting Properties Filter Fields
As of version 14.1.1, you can set the visibility of properties filter criteria and show the filtering fields in any order you want with a drag and drop settings panel.
Default Sort
By default, your search results arrive in the order of document type (In_DocTypeName) but if that column is not a displayed column, then the sort is based on the first (leftmost) displayed column.
You can change the sort, by clicking on the title area of the column you want to use as sort criteria (ascending or descending).
Dates in Results
You can see whatever information is stored in the Synergize repository. Explorer validates information like numbers and dates as you enter them. This makes it less likely for you to enter invalid data. However, you might still see invalid data.
For example, someone could have used another method (other than Explorer), to enter information into the database, potentially creating invalid data. In Explorer, if you try to save document properties which still include an invalid date, you may see a warning, but you may be allowed to save the document anyway.
A new Collection tab in Release 16.4 (Feb 2025) added the ability to email, download, export, and print documents in a collection. For example, use this feature to audit a group of documents from one or more workflows or search results.
Tip: The new functionality in the HTML5 edition of Synergize Explorer is similar to the Collection tab in the classic Synergize Web Explorer. See Open, Export, E-Mail, or Print a Collection of Documents and review the following KB articles (the steps are similar):
-
Add or Remove Documents on the Collection Tab
-
Open Documents on the Collection Tab
-
Save a Copy of Documents to a Folder
-
Print Documents on the Collection Tab
-
Email Documents on the Collection Tab
-
Export Document Data
-
Generate a Dynamic Link to a Collection
Related Topics: