Configure Transflo DMS Document Manager
After Document Manager and all its prerequisites are installed, you are ready to configure Document Manager for your specific image repository (for example, Gauss). As an administrator, you would typically follow these steps:
-
Install RP Service
-
Use the TRANSFLO Document Manager Configuration Window to configure the credentials needed to query the Transflo platform.
-
Test and verify your settings.
To configure Document Manager for your Gauss (formerly named Magellan) image repository:
-
Click the Start menu, All Programs, TRANSFLO, and click Document Manager Configuration.
-
Select Transflo Repository Bridge.

-
Skip the remainder of this KB article and go to Configure the Transflo DMS Document Manager Repository Bridge.
The remaining options are no longer valid system types:
-
Gauss (formerly Magellan): This option is described on this page. (This configuration has been retired.)
-
Simulator: This option is described on this page. (This configuration has been retired.)
-
Docubase: See Configure Transflo DMS Document Manager for a Docubase System. (This legacy option is no longer supported.)
Note: DMS features and configuration parameters have changed over the last few years. As of December 2024, administrators no longer connect Document Manager directly to Gauss or Magellan; instead, the system goes directly to the Transflo platform and Transflo handles the connection to Gauss. Other system types generally do not work unless you configure the Transflo Repository Bridge.
For example, you can no longer connect directly to Magellan. Any configured connection would break unless you:
-
Configure your Gauss repository in the Transflo admin site.
-
Set up the Repository Bridge. See Configure Transflo DMS Document Manager Repository Bridge.
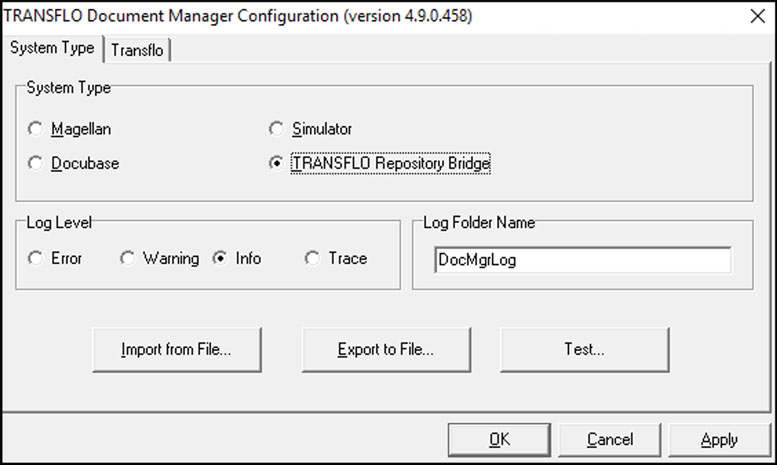
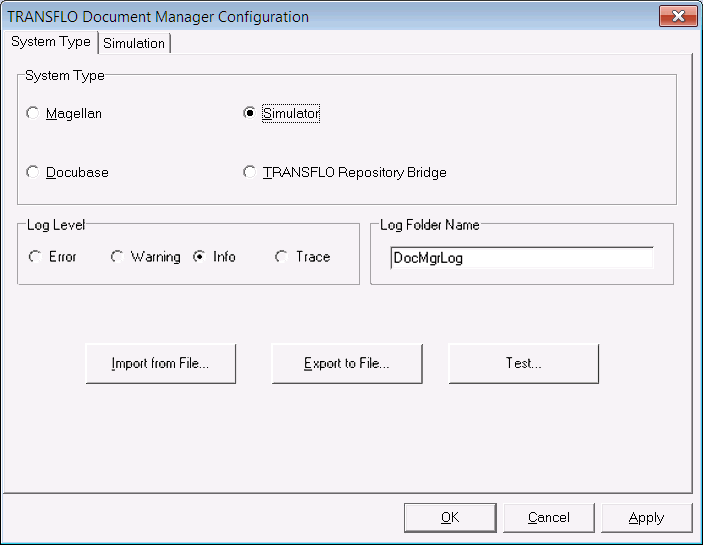
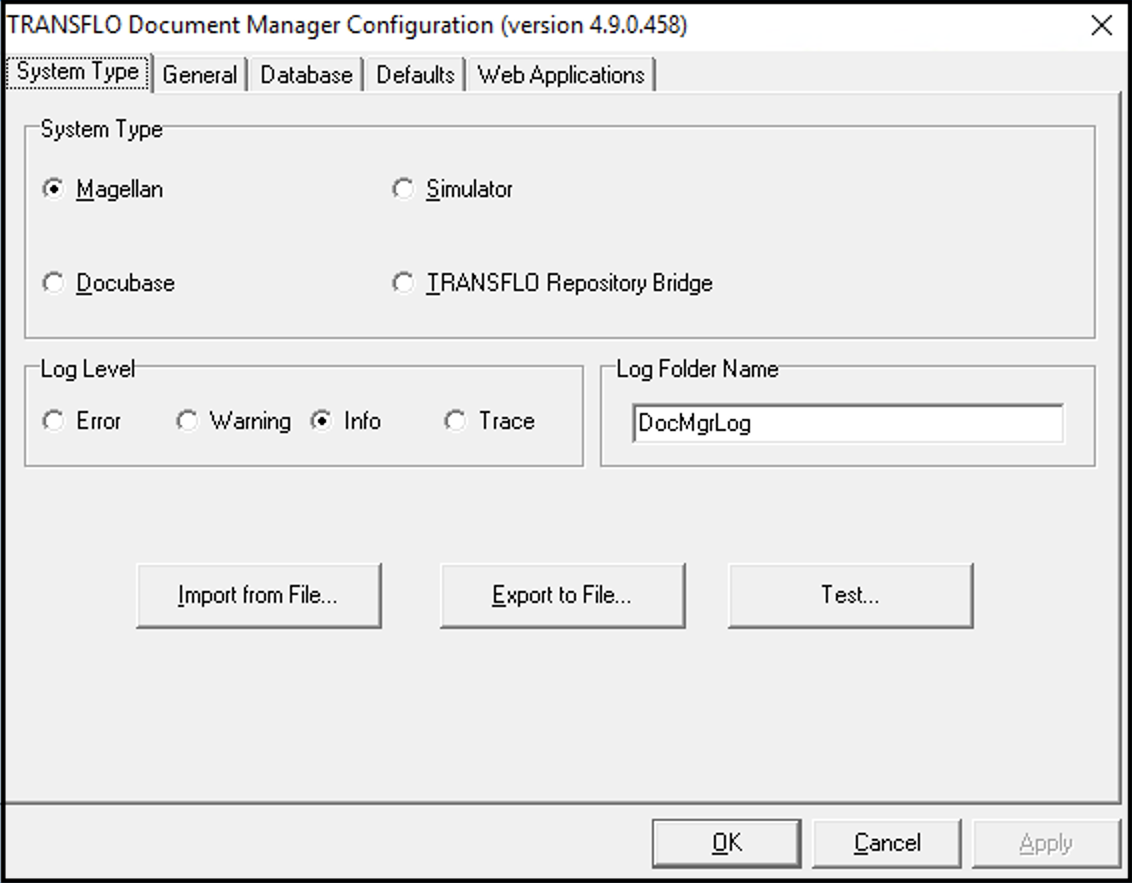
When you start the TRANSFLO Document Manager Configuration Window open on the System Type tab.
To configure the System Type tab:
-
Select an option in the System Type group box. As of January 2025, TRANSFLO Repository Bridge is the only valid option (the other legacy options have been retired).
-
Select a Log Level from the Log Level group box. The available log levels are:
-
Error: Errors Only
-
Warning: Errors and Warnings
-
Info: Detailed Logging
-
Trace: Trace Logging
-
-
Enter a name for your log folder in the Log Folder Name box. The default folder path name for the log folder is:
C:\Program Files (x86)\Pegasus TransTech\<calling application installation folder>\DocMgrLog\
The <calling application installation folder> is the application root folder of the application that is using Document Manager.
Example: If the calling application is Rendition Print Service the path name of the log folder would be:
C:\Program Files (x86)\Pegasus TransTech\Rendition Print Service\DocMgrLog\
-
To import the configuration from an INI file click Import from File.
-
To save the configuration to an INI file click the Export to File... button. Navigate to the folder and save it.
-
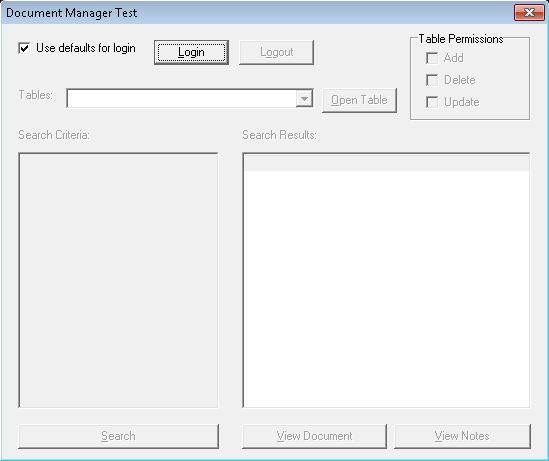
To test the configuration, click the Test... button. If you are prompted to apply the changes, click Yes in the message box.
The Document Manager Test window opens; however, the configuration test is performed after you have completed the Document Manager Configuration.

-
Choose one:
-
To log in using the default user and password check the Use defaults for login check box and click the Login button.
-
To use a different user un-check the Use defaults for login check box and click the Login button. You are prompted to enter a User and Password.
-
-
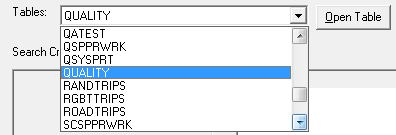
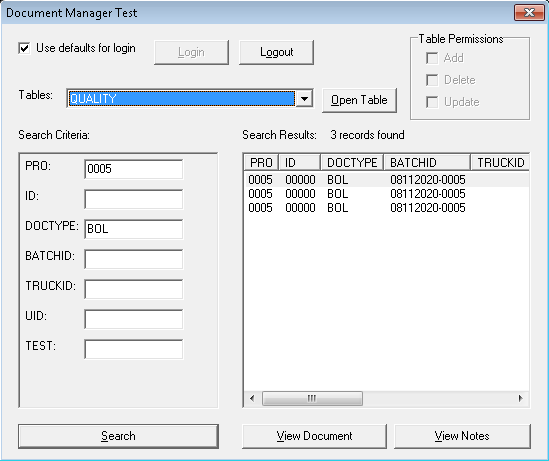
Select a table from the Tables drop down and click the Open Table button.

-
The table fields open in the Search Criteria pane. Enter search criteria in the boxes next to the fields and click the Search button.
-
The search results open in the right pane.

-
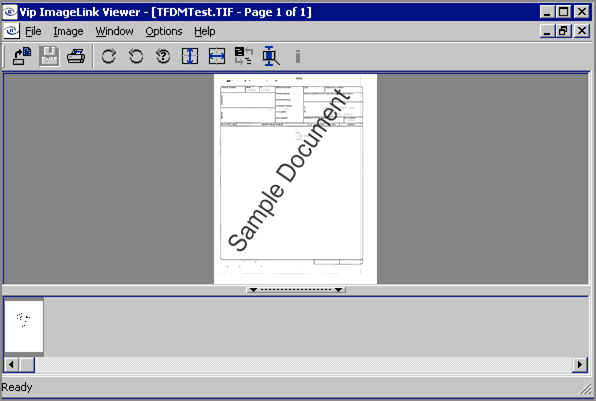
Click a row in the Search Results pane, and click the View Document button. The Vip ImageLink Viewer window opens with an image of the document you selected.

-
Close the viewer.
-
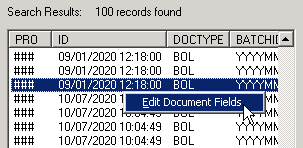
To edit Field data for a Document, right-click the Document row, and select Edit Document Fields.

Tip: The changes you make to your Document Fields will be made directly in your Image Repository database and will not record an activity in the Transflo system.
-
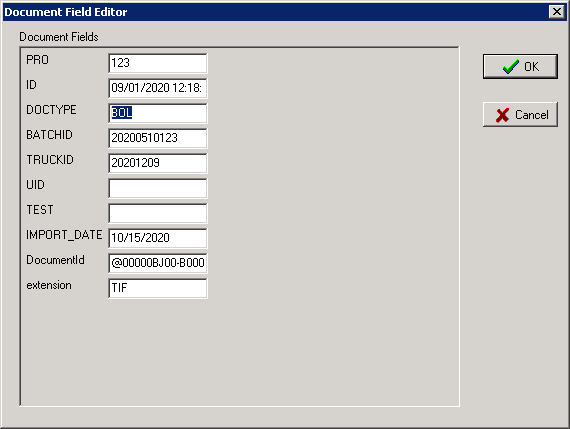
The Document Field Editor window opens.

-
Change the Index Fields value(s) as needed, and click OK to save your changes.
Tip: You will not be able to edit IMPORT_DATE, DocumentId, or extension.
Note: The legacy or classic functionality described in this section is no longer available.
To allow for easier development of applications when there is no imaging system available, the Document Manager has a simulator feature. The simulator emulates all features of the Document Manager in such a way that the application using the simulator will not know the difference between a simulation and accessing a real imaging system.
To configure the System Type tab for simulation:
1. Click the System Type tab.
2. Select the Simulator option in the System Type group box.
3. Click the Simulation tab.
4. Enter the full path and filename of a TIF file in the Simulation document file name that will be used to simulate the retrieval of a document from the imaging system, or click the Browse… button to navigate for a TIF file.
5. Click OK to save your files.
Note: The legacy or classic functionality described in this section is no longer available.
The Document Manager supports both Magellan/400 and Magellan/NT products. The Document Manager uses the SpyWeb API to interact with Magellan.
The General tab is used to configure the folder where the SpyWeb API is installed, the Gauss server platform, the number of rows to return from Gauss, and Thread-safe settings.
To configure the General tab:
1. Click the General tab.
In the Toolkit/Server Settings group box, the default SpyWeb Toolkit directory is automatically entered in the SpyWeb Directory box.
If your SpyWeb Toolkit is installed in a different directory, modify the SpyWeb path either by typing in the box or by clicking the Browse button and navigating to the correct location.
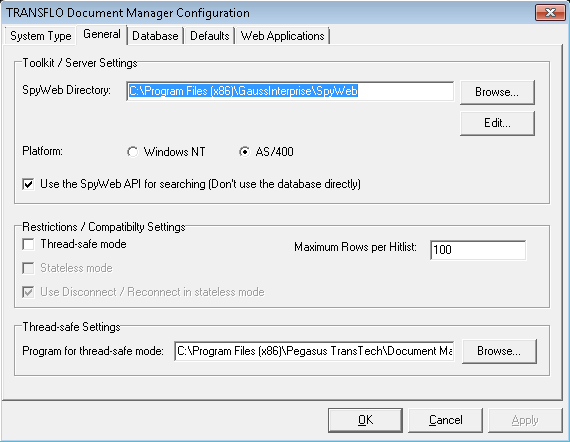
2. Click the Edit button.
The spyweb.cfg file opens.
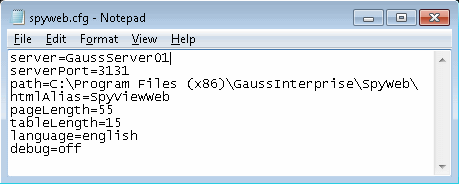
Note: If the Edit... button doesn't launch an editor, you need to associate the .cfg file extension with an application.
You can do this by double-clicking on the spyweb.cfg file from the Windows Explorer, then selecting an associated application such as notepad.
Once the association has been made, the Edit... button will launch the spyweb.cfg file.
-
Replace the server value with the server name of your Gauss server.
-
Change the ServerPort value with the port used to connect to your Gauss server.
-
If the path value is not pointing to the SpyWeb folder, change it.
Important: If Document Manager is running on a 64 bit machine you must change the path value in the spyweb.cfg to C:\Program Files (x86)\ GaussInterprise\SpyWeb\.
-
Save and close the file.
3. Select the platform that your Gauss imaging repository is using.
The supported platforms are Windows NT and AS/400.
If you select AS/400 you can choose not to use the SpyWeb API by deselecting the Use the Spy Web API for searching check box.
If you choose not to use the SpyWeb API Document Manager will query the Gauss database directly.
4. In the Restrictions / Compatibility Settings section enter the number of Documents to be returned at a time in the Maximum Rows per Hitlist box.
Note: If you select Use the Spy Web API for searching, all of the settings on the Database tab must be blank.
5. Since the Magellan SpyWeb API is not thread-safe, the Document Manager must accomplish thread-safeness itself.
Check the Thread-safe mode check box if thread-safeness is required, such as when the Document Manager is being used by a web application.
Tip: If you select the Thread-safe mode check box, Document Manager launches the TFMagellanEXE.exe process which connects to the imaging system to perform queries and return results.
6. If you do not select the Thread-safe mode check box, Document Manager will connect to, disconnect from and execute queries directly against the imaging system database.
Note: Do not select the Thread-safe mode check box unless thread-safeness is required. Interaction with Magellan is slower, as a result of being thread-safe.
7. If you selected the Thread-safe mode check box, the Stateless mode check box is enabled. Some applications, such as web applications, are stateless. Stateless applications require that the components used by the application not retain any state between uses of the component. Document Manager allows for stateless operation if you select the Stateless mode check box.
Tip: Because performance is typically slower in stateless mode, do not use stateless mode unless it is required.
Tip: If you select the Stateless mode check box, Document Manager launches the TFMagellanEXE.exe process, passes the query parameters to it, gets the results, and closes the process for every query. If you do not select the Stateless mode check box, Document manager server launches only one TFMagellanEXE.exe process to perform all the queries against the imaging system.
8. If you selected the Stateless mode check box, the Use Disconnect/Reconnect in stateless mode check box is enabled.
When in stateless mode, the “disconnect / reconnect” feature of the SpyWeb API allows for a way to more quickly disconnect and reconnect to the Gauss server for better performance.
To achieve better performance in stateless mode select the Use Disconnect/Reconnect in stateless mode check box.
Tip: If you select the Use Disconnect/Reconnect in stateless mode check box, Document Manager resumes the current session, executes the query, and suspends the session (waReconnect, waDisconnect SpyWeb API calls). If you do not select the Use Disconnect/Reconnect in stateless mode check box, Document Manager keeps one SpyView session alive across queries.
Note: Not all versions of Gauss support the “disconnect / reconnect” feature. In this case if the Use Disconnect/Reconnect in stateless mode option is selected, Document Manager will not generate an error. Instead, it will detect that “disconnect / reconnect” is not working and will circumvent it. This detection will degrade performance slightly.
9. The Document Manager achieves thread-safeness by forwarding all access to the Magellan SpyWeb API through an external executable (TFMagellanEXE.exe), included with the Document Manager, which is launched on demand.
Each access to Magellan forces a new executable to be launched. It is possible and even likely that more than one executable will run at the same time while in thread-safe mode. The Document Manager is designed to handle this.
In the Thread-safe Settings group box enter the pathname of the TFMagellanEXE.exe program in the Program for thread-safe mode box.
You can also click the Browse… button, navigate to the folder that has TFMagellanEXE.exe.
Note: The legacy or classic functionality described in this section is no longer available.
The SpyWeb API does not offer functions for updating the index values in Gauss. To allow updates, the Document Manager bypasses the SpyWeb API and accesses the Magellan database directly. The Document Manager uses Microsoft ADO technology to access the Magellan database.
If you are bypassing the SpyWeb API (see General Tab) you must configure an ODBC data source for the Gauss database and a connection using this data source on the Database tab. To configure your Gauss database connection:
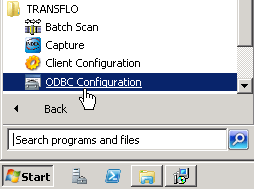
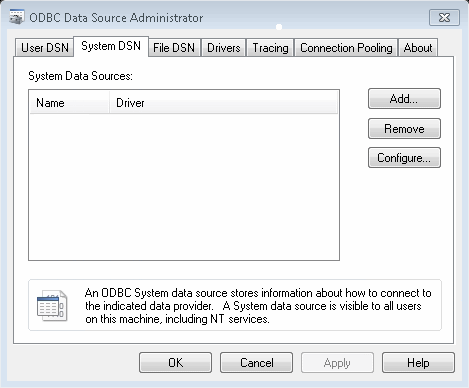
1. In Windows Administrative Tools open Data Sources (ODBC).
WARNING: If you are configuring an ODBC connection on a 64 bit machine, be sure to use the ODBC Configuration shortcut in the Start menu under the TRANSFLO Group instead of the shortcut in the Administrative Tools window.
2. Select the System DSN tab and click the Add button.
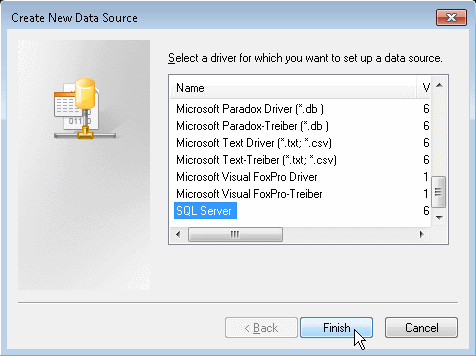
3. If your Gauss repository is on a Windows platform:
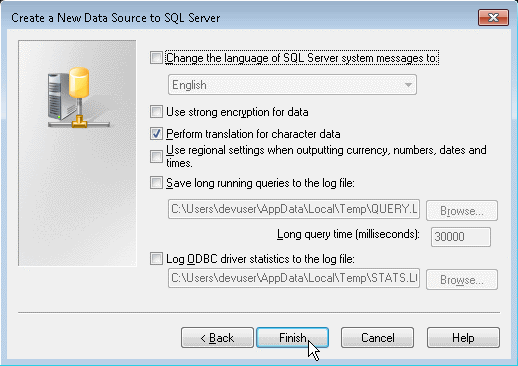
a. Select SQL Server in the Create New Data Source window, and click Finish.
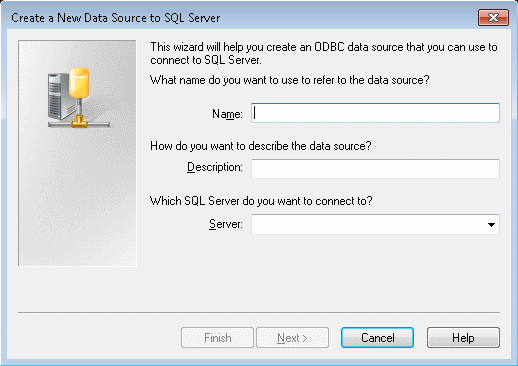
b. Enter a Name for the ODBC data source in the Name box and select the host server in the Server drop down.
Click Next.
c. Select the SQL Server authentication and enter a login id and password in the Login ID and Password boxes respectively.
Click Next.

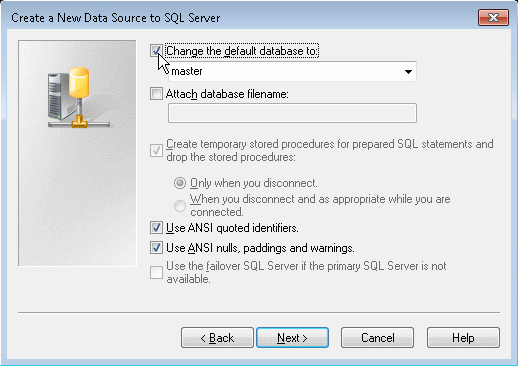
d. Check the Change the default database check box, and select your Gauss database from the drop down.
Click Next.
e. Accept the defaults, and click Finish.
f. Click the Test Data Source button on the ODBC Microsoft SQL Server Setup window.
g. Click OK to close the SQL Server ODBC Data Source Test window.
h. Click OK to close the ODBC Microsoft SQL Server Setup window.
i. Close the ODBC Data Source Administrator window.
4. If your Gauss system is on an AS/400:
a. Select iSeries Access ODBC Driver in the Create New Data Source window, and click Finish.
Note: The Client Access ODBC must be installed to use the update features of the Document Manager for Gauss on the AS/400.
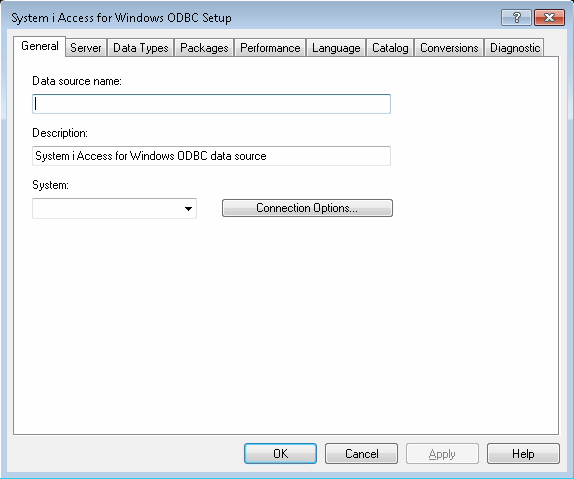
b. The System iAccess for Windows ODBC Setup window opens.
Enter a name for your data source in the Data source name box.
Select a system from the System drop down.
If your system is not in the drop down, enter the system name in the System drop down.
Click Apply.
c. Click the Server tab.
Enter the default SQL library name in the SQL default library box.
Click Apply.
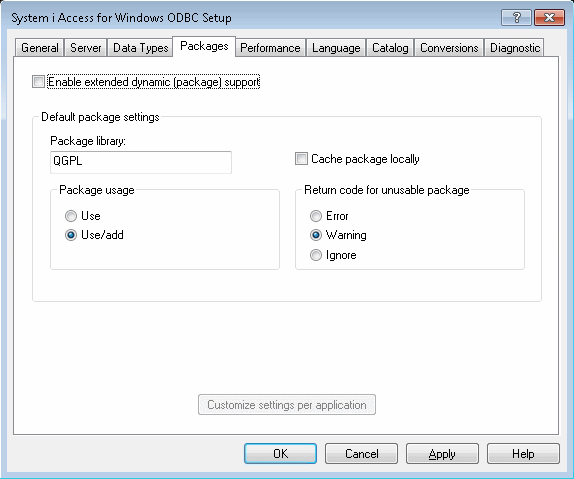
d. Click the Packages tab.
Deselect the Enable extended dynamic (package) support check box.
Click Apply.
e. Click the Conversions tab.
Select the Convert binary data (CCSID65535) to text check box.
Click OK.
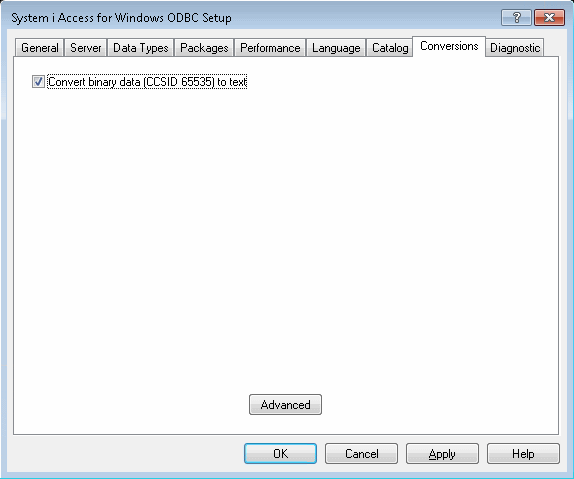
Note: In older versions of Client Access, the Conversions tab was the Translation tab.
f. Close the ODBC Data Source Administrator window.
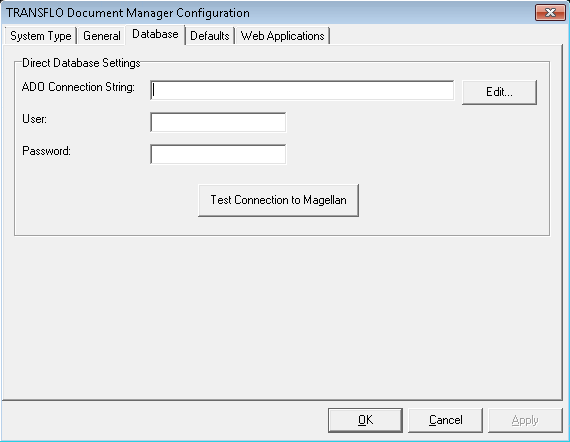
5. In Document Manger Configuration tool click the Database tab.
In the Direct Database Settings group box click the Edit… button to configure the ADO Connection String.
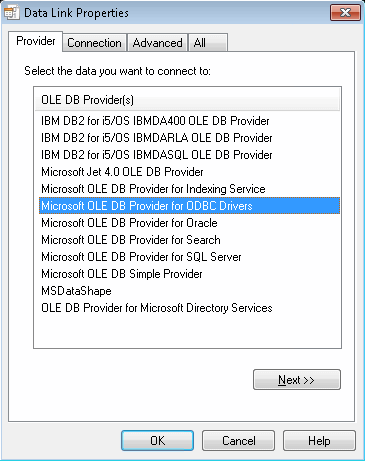
6. The Data Link Properties Window opens.
Select Microsoft OLEDB Provider for ODBC from the list.
Click the Next button.
7. The Connection tab of the Data Link Properties window opens.
Select the Use data source name radio button.
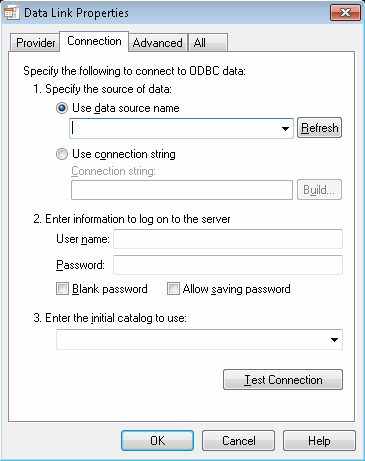
8. Select the ODBC data source from the Data Source drop down.
9. Enter the User Name and Password for the Gauss server in the User Name and Password boxes respectively.
10. Select the Allow saving password check box.
11. Click the Test Connection button.
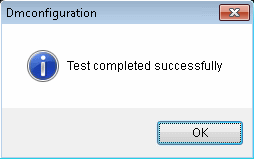
The message box indicates that the test succeeded.
Click OK to close the message box.

12. Click OK to close the Data Link Properties window.
13. The Document Manager Configuration window opens with the connection string in the ADO Connection String box.
Enter the Gauss User ID and password in the User and Password boxes respectively.
14. Click the Test Connection to Magellan button.
The message box indicates that the connection to Gauss test succeeded.
Click OK to close the message box.
15. Click Apply to save your changes.
Note:Direct Database Settings as described here will not work for Gauss 8.7 NT and Gauss 8.8 NT.
Note: The legacy or classic functionality described in this section is no longer available.
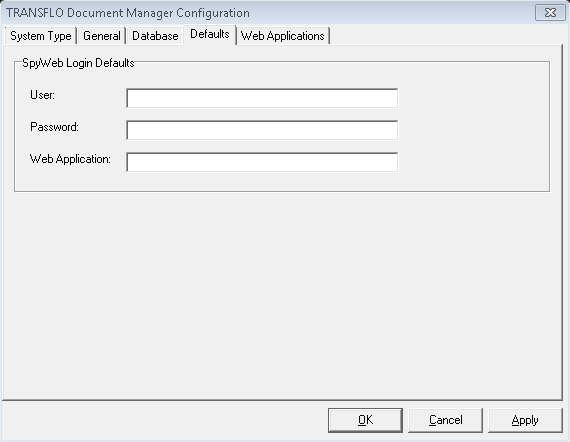
Many applications that use the Document Manager rely on your login defaults to access Gauss. These defaults are configured on the Defaults tab. To configure the Gauss login defaults:
-
Click on the Defaults tab.

-
Enter the default Gauss user name in the User box.
-
Enter the default Gauss password in the Password box.
-
Enter the default Gauss Web application in the Web Application box.
-
Click Apply to save the default settings.
Note: The legacy or classic functionality described in this section is no longer available.
The Gauss SpyWeb API behaves strangely in many instances when an invalid web application is passed.
To prevent such strange behavior, the Document Manager allows a simple validation of the web application via a text file.
The configuration for this validation is on the Web Applications tab of the Document Manager Configuration.
To configure Web Application Validation:
1. Click on the Web Applications tab.
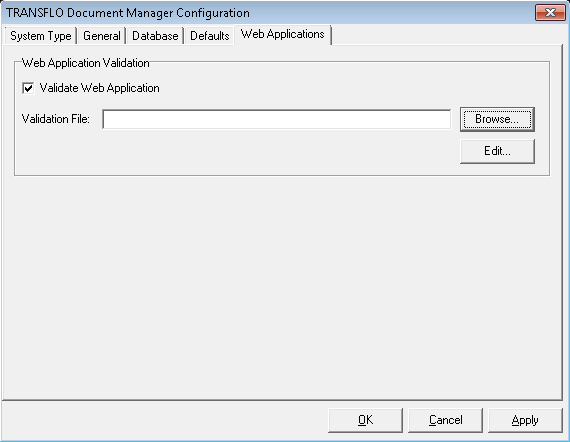
Note: For applications that only use the default web application specified on the Defaults tab, the validation of the web application is not necessary.
2. Check the Validate Web Application check box.
3. Enter the path and file name of the validation text file in the Validation File box or click the Browse… button to navigate to it.
4. Click the Edit… button to open the validation text file and make changes to it.
5. Click OK to save your changes and to close the TRANSFLO® Document Manager Configuration application.
Gauss AS/400 Revision Control Configuration
In order for Document Manager to access your Document Classes in Gauss on the AS/400 you must configure Revision Control for each Document Class.
To configure Revision Control for Gauss on the AS/400:
1. Log in to the AS/400 machine that has Gauss installed on it.
2. Enter the command STRSPY and press the Enter key.
3. Select Work with VIP Report Viewer (Option 1).
4. Select View Report Types (Option 6).
5. Select the Document Class from the menu (e.g. option 2 for “BILLING” Document Class), and press the Enter key.
6. Change the Revisions allowed/locktype to “*READ”. Press the Enter key.
7. Press the Enter key.