Scan and Send Load Documents
With the Transflo Mobile+ app, drivers can scan load documents anywhere, anytime. The mobile app allows drivers to snap a picture of their documents and submit high-quality images with optional electronic signatures and industry-leading document compression protocols that use less data than a social media post! The easy-to-use functionality allows drivers to submit multiple documents at one time while ensuring carriers, shippers, and brokers receive high quality images that can go directly into billing workflows.
Tip: Drivers sometimes ask, "What is the last day of the week to submit signed BOLs for delivery confirmation?" Some drivers submit their load documents immediately after each delivery; others wait and submit documents one time each week. Each company has its own cut-off policy for documents to be submitted, processed, and reflected in weekly or bi-weekly paychecks. Contact your supervisor. For example, a cut-off deadline might be Tuesday by 4:00 pm to show up in a paycheck on Friday of the following week.
Important! If your Fleet ID is Label1, the Scan Documents feature might not work as expected until you apply a workaround. See the following new October 16, 2024 KB article: Known Issue: Blank Screen, No Scan Option, Cannot Scan Documents.
Tip: If you believe your device is still running an older release with the original classic document photo scanning features (dating back before R6.3), see Scan and Send Load Documents in Older App Releases.
Only a summary of the steps is given below; for a longer version with full details, see the next section. Release 6.0 of the mobile app (summer 2023) included a new document scanning redesign to improve the way your device detects, scans, uploads, and submits load documents. The new screen examples below show standard user interface elements on a typical mobile phone. Similar steps apply to smart phones and tablets (including Microsoft Surface Pro devices) running Apple iOS, Google Android, or Microsoft Windows.
-
On your Transflo Mobile+ app dashboard, tap Scan Documents or Scanning. The label can be customized at each company fleet.

-
To add photos of documents already saved on your mobile device, tap ADD EXISTING IMAGE.
-
Search or swipe up, down, left, or right to locate your existing document. Options vary by device. You can select one document file at a time to add to your temporary list of load documents you are about to send. (Release 6.5 of the app removed the single file limit. You can now upload multiple pre-existing scanned documents all at the same time. See New! Upload Multiple Load Documents and PDF Files.)
-
You can make many of the same edits to your added images as described below for new photos such as crop, rotate, or adjust brightness.
-
Tap Next after each step.
-
-
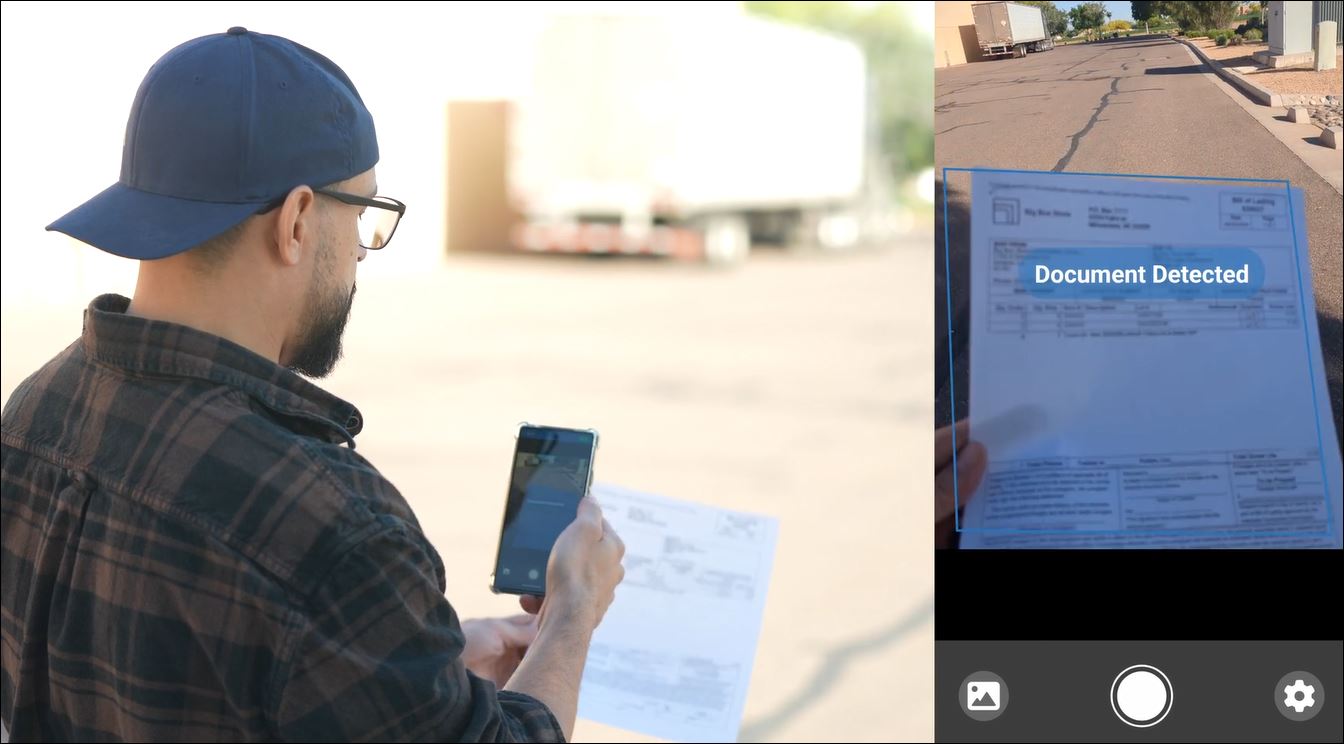
To take a new photo of a document, fill the screen with your paper document. Keep your hands steady.
-
Wait for the blue Document Detected message and then take the picture yourself or let Auto Snap take it for you.
-
Tap the white circle to take a photo of the current page. If Auto Detect and Auto Snap are ON, the app detects and captures the photo for you. To remind you Auto Snap is ON, the white TAKE PHOTO circle changes to blue.
-
Tap the green checkmark or tap Delete (the trash can) and try again.
-
-
You can crop the detected preview of a live photo now (when you first capture the image) or crop it later. You can also crop an existing photo of a document you already scanned and are now adding. Tap Next.
-
You can make any of the following optional adjustments:
-
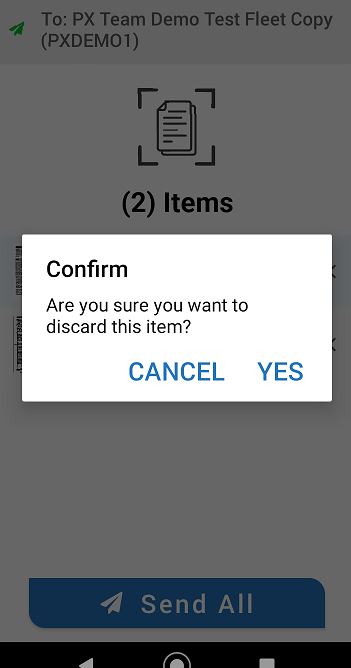
Discard: Confirm your decision to trash this item and start over, or cancel to keep it.
-
Rotate: To rotate your page 90 degrees clockwise, tap Rotate.
-
Brightness: To make an image or text more clear, lighter, or darker, tap the Brightness button at the bottom of the screen.
-
Crop: To crop your image, tap Crop.
-
Format: Choose Black and White, Grayscale , or Color.
-
When you are done with any optional changes, tap Next.
-
-
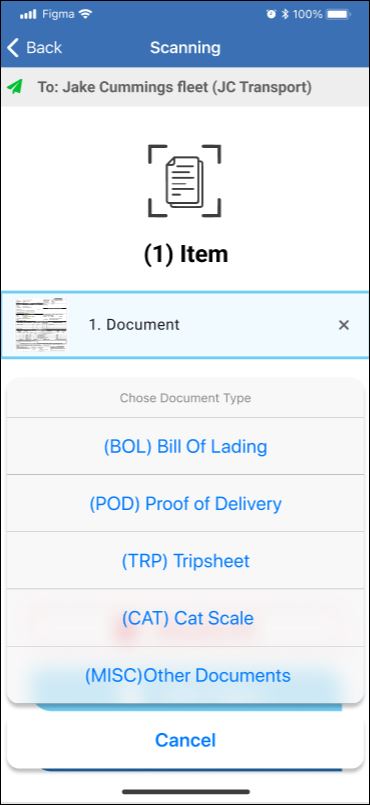
On the Choose Document Type screen, tap the type of document you just scanned or added.
To change a document type, you can tap on its name in the list and then tap Edit DocType. Select a different document type. On some devices, you might have to tap Back or swipe left or right to go back to the list.
-
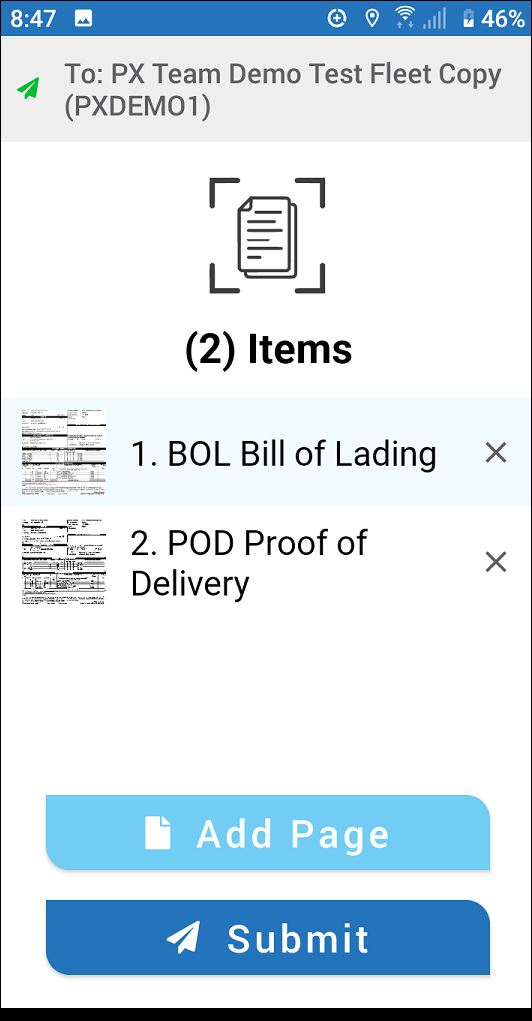
To add more document pages to send in this same batch for one or more loads, tap the Add Page button and repeat the steps above for adding existing documents or using the camera to capture new documents.
-
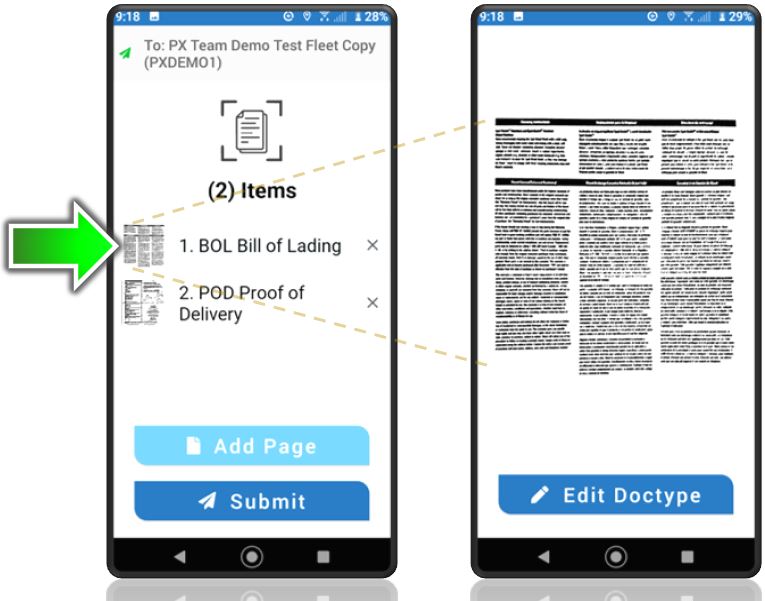
To view a larger Preview of each item in the list, tap its small thumbnail image. You can also edit the document type one more time on the Preview screen. To go back to the list, tap Back.
-
To remove an item from the list, tap X Remove.
-
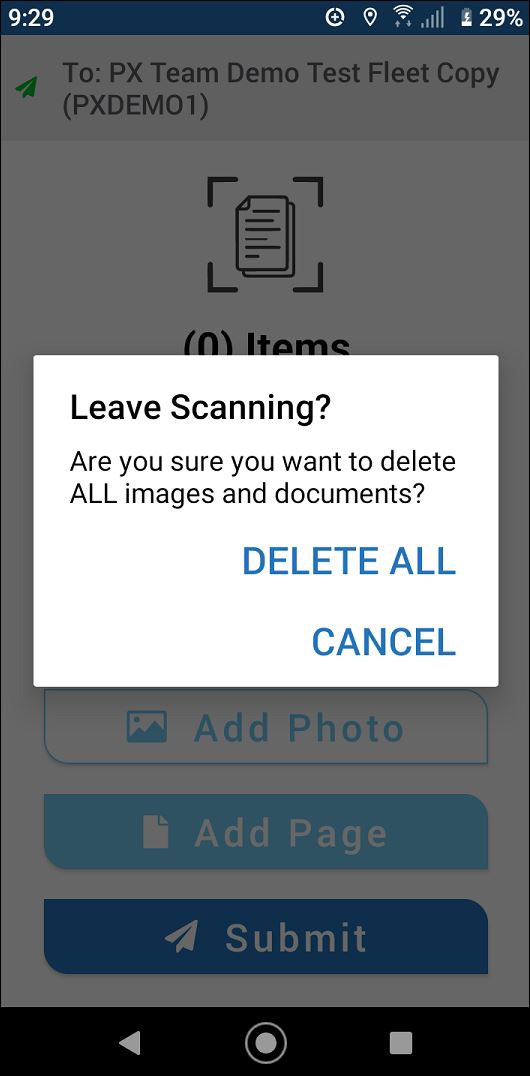
If you need to cancel all documents, exit the app. Exercise caution when using this feature. You might still have your existing images saved on your device but any recent items you just captured are deleted when you tap DELETE ALL. If you have the paper originals or copies, you can send them later.
-
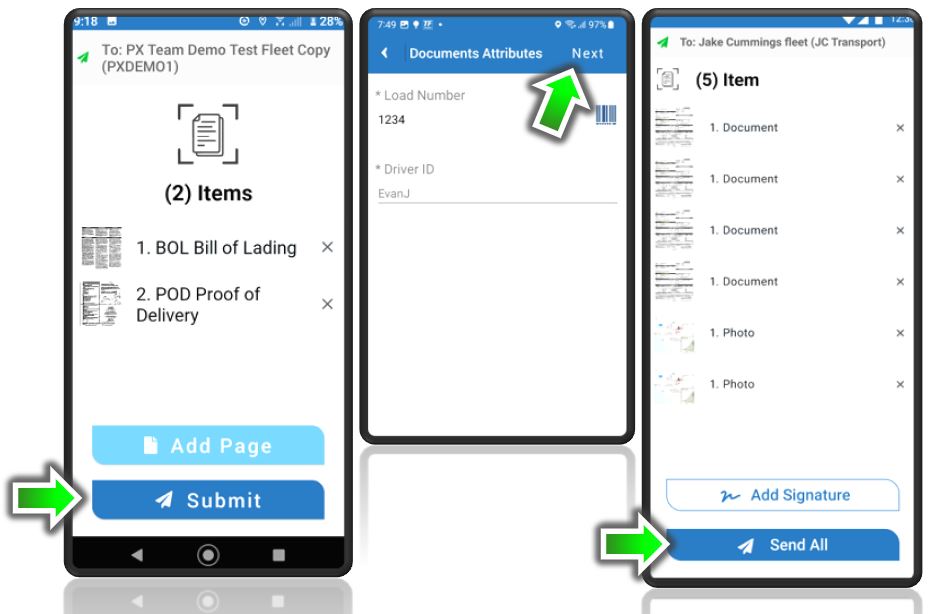
To submit your documents, tap Submit:
-
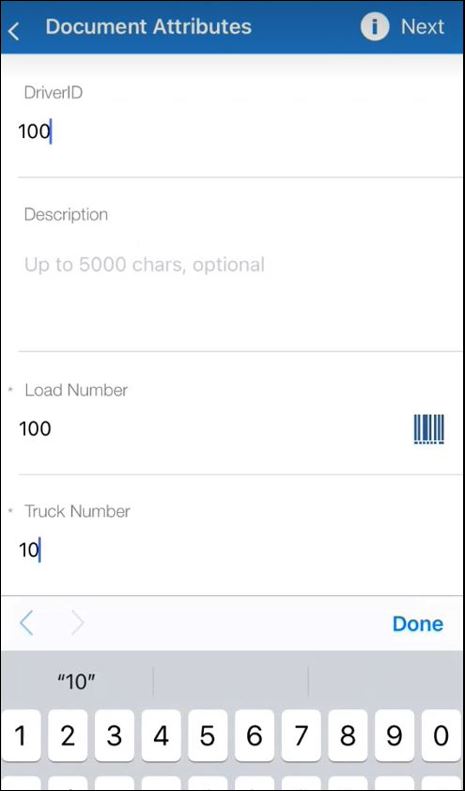
A Document Attributes screen might ask you to enter your driver ID, description, load or BOL number, and truck number. In some configurations, your driver ID is entered for you. Tap Next.
-
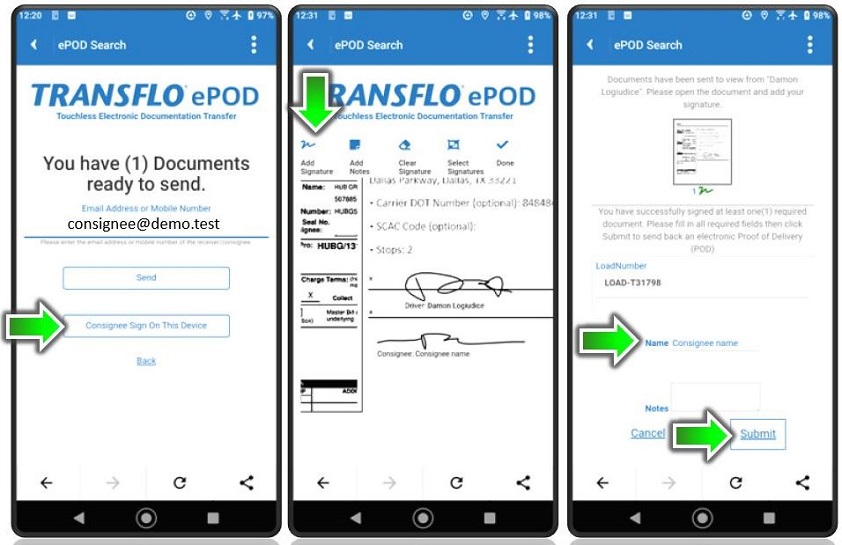
If your company requires signatures, tap Add Signatures. You might be asked to sign your name or physically hand your device to someone else to sign a document on-screen writing with a stylus or just a finger.
-
When all documents are ready, tap Send All.
-
-
Your batch confirmation number appears. You can make a note of it now or refer to the text message, e-mail, or in-app notification you receive later.
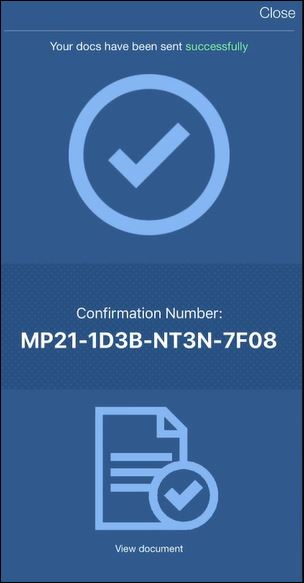
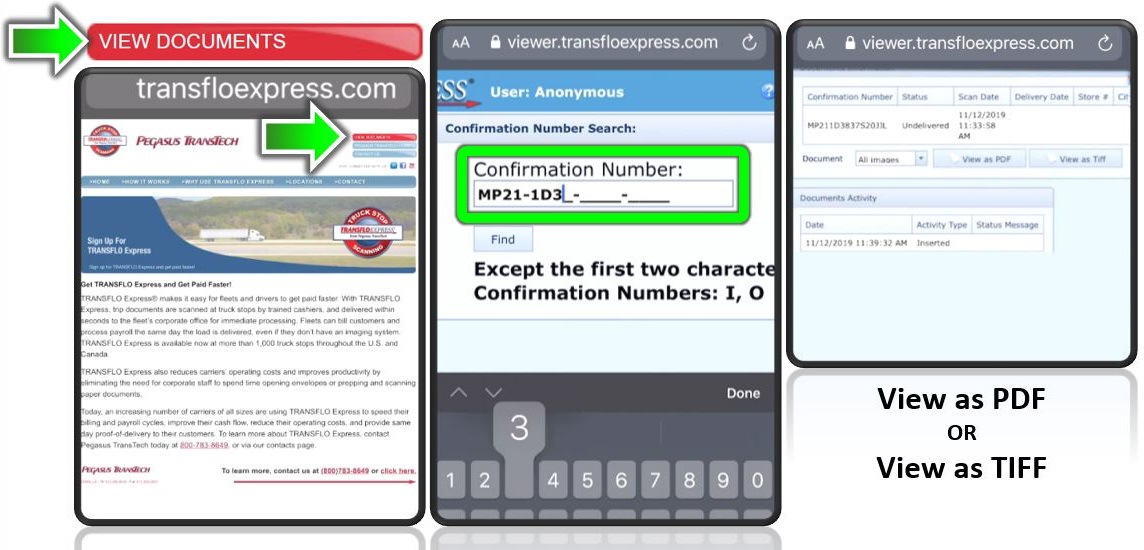
To view those documents again later (over the next 14 days), go to transfloexpress.com and enter the confirmation number.
-
Tap Close in the top right corner of the screen to go back to the dashboard.
-
If you perform the steps above and tap Send All and then get the following message, it means your documents were almost ready to be sent but you lost your 4G/5G cellular data or Wi-Fi network connection:
Unable to upload. Would you like to add to the upload queue or cancel and try again?
We recommend that you tap Add to Document Queue and then allow time for your device to re-establish a data or Wi-Fi connection.
Release 6.0 of the mobile app in August 2023 included a document scanning redesign to improve the way you can detect, scan, and submit load documents. In 2024-2025, additional 6.x releases continue to enhance the product. The new screen examples below show standard user interface elements on a typical mobile phone. Similar steps apply to smart phones and tablets running Apple iOS, Google Android, or Microsoft Surface Pro devices running Microsoft Windows.
-
On the dashboard, tap Scan Documents, Scanning, or the custom menu item for document capture in your edition of the Transflo Mobile+ app running on your device (feature names and UI labels vary by fleet organization).
-
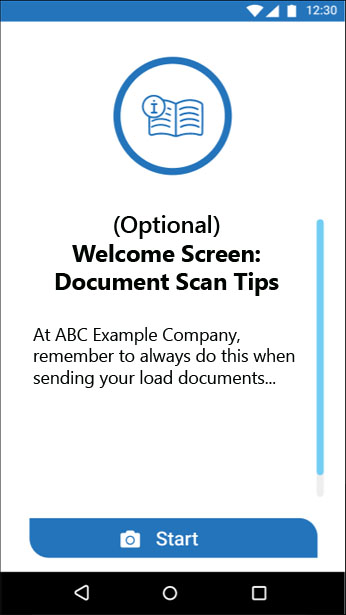
(Optional) Review any custom instructions provided by your organization and then tap Start. If you do not see this screen, ignore this step.
-
Decide if you want to ADD AN EXISTING PHOTO or TAKE A NEW PHOTO. You can add a photo image of a document you already captured on your phone or take a new photo of each load document. This option is up to you or your company requirements. The batch of documents you send can be a mix of existing document image files and new live document photos. If you cannot decide, do what is most convenient for you:
-
Use Your Own Camera App: Some drivers like to take photos and save electronic documents on their phone or tablet over the span of hours or days at each stop and then send them all in one batch later.
-
Use Built-in Transflo Mobile+ Document Capture: Others wait until final delivery to take all their new photo scans of documents for a load at the same time and then immediately send them.
-
Use Both Methods: For example, you pickup a load in Denver and save a PNG image file of the eBOL. You drive to Cleveland and receive a PDF of the signed ePOD. You also receive a paper unloading (lumper) receipt. When you send your documents for this load, you take a live photo of the paper receipt and add the eBOL (PNG) and ePOD (JPG) files you already saved on your phone.
-
-
To add existing images or photos of documents that you already saved on your mobile device, tap the ADD EXISTING FILE button.
-
Search or swipe up, down, left, or right to locate your existing document. Options vary by device. You can select one document file at a time to add to your temporary list of load documents you are about to send. (Release 6.5 of the app removed the single file limit. You can now upload multiple pre-existing scanned documents all at the same time. See New! Upload Multiple Load Documents and PDF Files.)
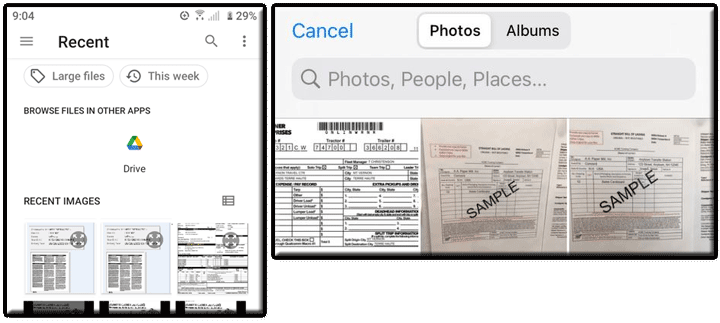

Tip: Consider using a consistent naming convention to save yourself time. If you snap a photo of an eBOL for load number 1234 and save it as 1234.png, you can easily find it when you are ready to submit all docs for load 1234.
-
You can make many of the same edits to your photos as described below for new photos such as crop, rotate, or adjust brightness.
-
Tap Next after each step.
-
-
To take a new photo of a document, follow these sub-steps:
-
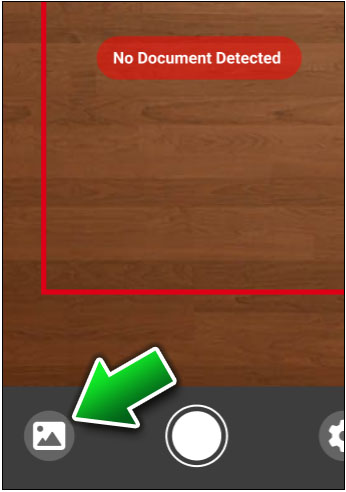
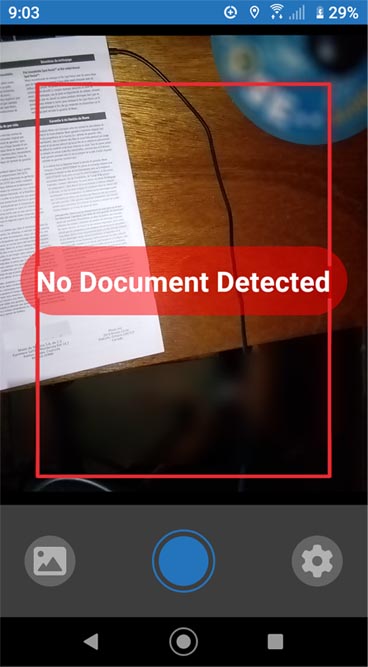
A No Document Detected message might appear.
-
Allow yourself time to place your document on a flat surface and get your camera phone into position.
-
Place your paper document on a flat, dark, or contrasting non-glare surface with bright indirect surrounding light.
-
Bright light and flash are generally recommended for poor-quality documents, multi-part carbon copy forms, or documents on colored paper.
-
If the document is on glossy paper or a shiny surface, we recommend that you turn OFF the camera flash feature.
-
-
If prompted, tap Open Settings to open your mobile device operating system settings to allow camera access permissions for the Transflo Mobile app.
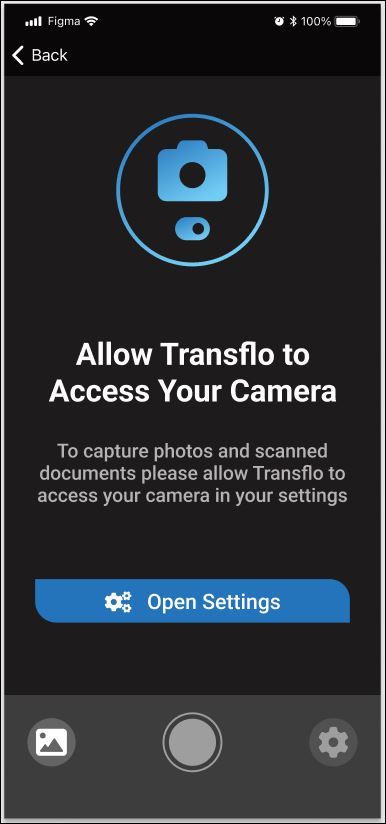
Tip: If you are frustrated by these settings, you are not alone. Just bear in mind these are not Transflo app settings. The settings in this step are standard privacy and security settings on your mobile device for all apps and you are in control by design. Transflo cannot control these settings for you.
-
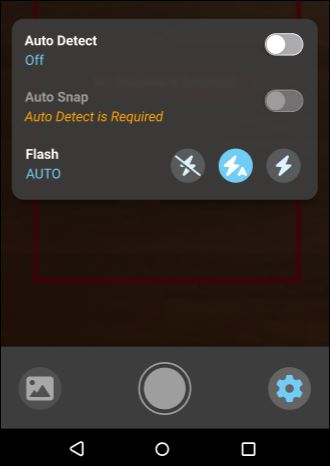
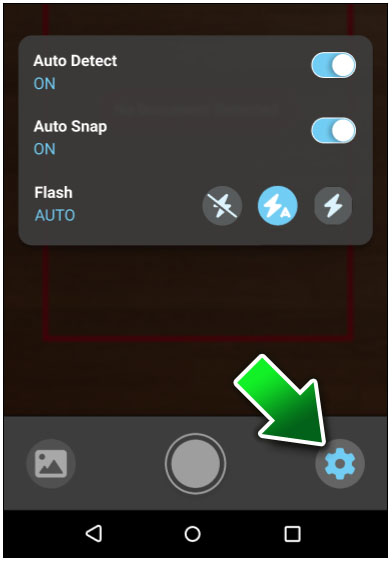
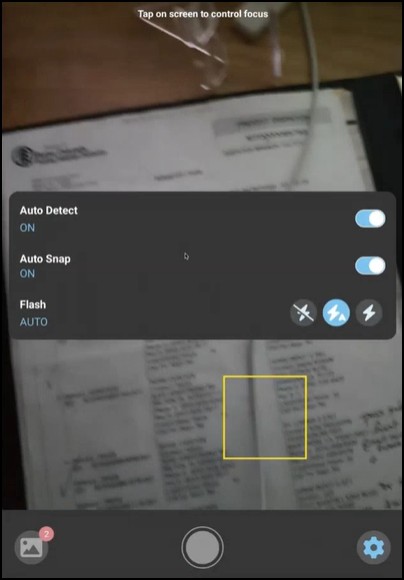
Tap the app Settings button in the lower right corner and choose your camera preferences (the camera settings in this step apply only to the Transflo app):
-
Auto Detect: This smart feature automatically detects the edges or borders of pages.
-
Auto Snap: This time-saving feature automatically takes the photo for you when it detects your document. If you want to take your own photos, you can turn Auto Snap OFF.
Tip: To turn Auto Snap ON, you must also turn the Auto Detect setting ON. If you forget, a message appears to remind you.
-
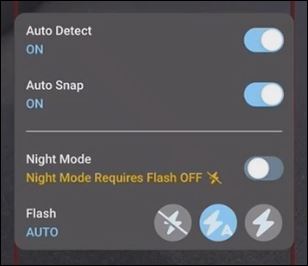
Night Mode or HDR: Added in 6.1.4 (June 2024), this setting can be turned ON or OFF. On supported models, your mobile device camera can use Night Mode to capture more detail and brighten your document photos in low-light situations. Also known as High Dynamic Range (HDR), Night Sight, or NightScape, Night Mode can help you take better photos in low-light conditions without the need for a flash (in fact, on the Transflo app, flash must be OFF). When you turn Night Mode ON, your camera can capture multiple images with different exposures and merge them into a single image to optimize brightness and minimize blur. If motion is detected, Night Mode can assist the capture process to minimize blur caused by shaky hands.
If you turn Night Mode ON, the app turns OFF any flash settings you might have previously set.
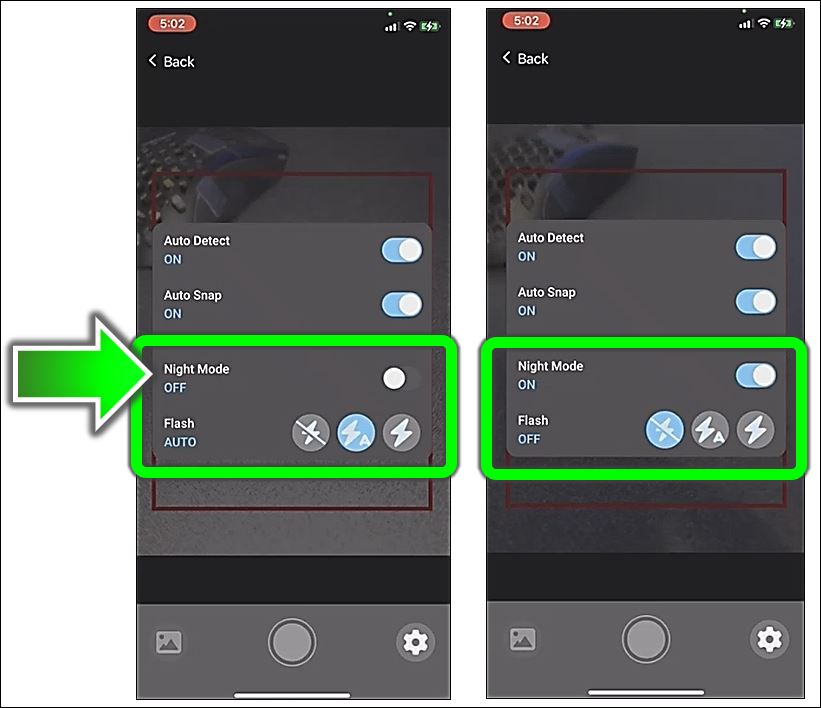
Similarly, if Night Mode is ON but then you set Flash to AUTO or ON, the app obeys your flash choice but turns Night Mode OFF for you with a reminder that Night Mode Requires Flash OFF. Decide which allowable choices work best for your current needs.
-
Flash: Tap Settings and then tap your camera flash preference. From left to right, you can choose: OFF (no flash), AUTO (flash automatically lights up when needed in low-light conditions), or ON (the camera uses flash for every photo you take).
-
-
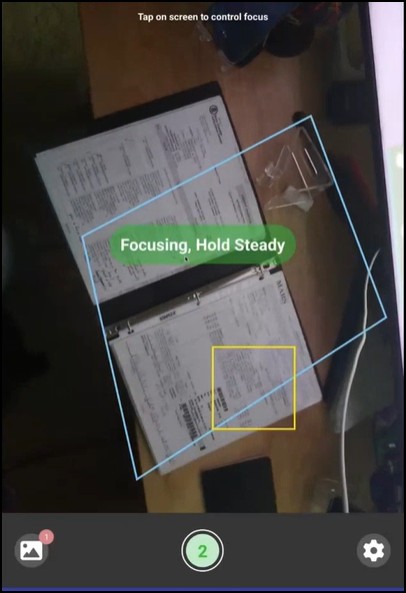
Fill the entire screen with the document. Keep your hands steady and try to remain completely motionless when taking the picture. If you are in-cab, turn off your engine to eliminate vibration.
-
To make barcodes more readable, hold your phone camera lens about 14 inches away.
-
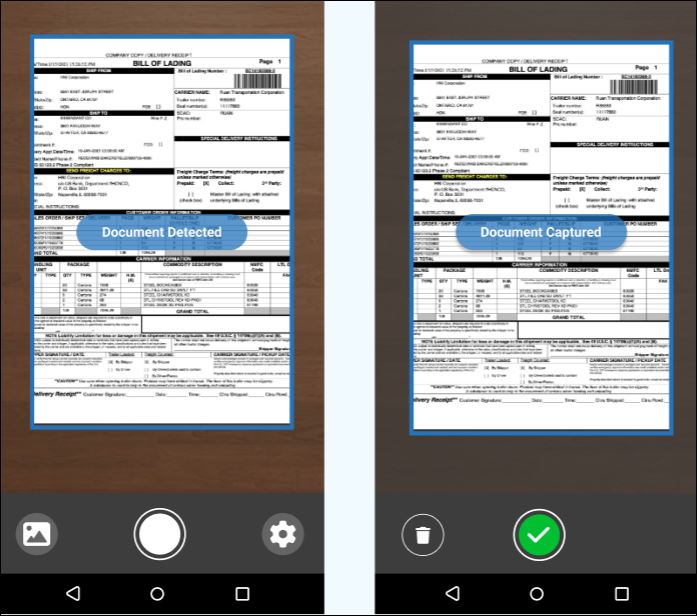
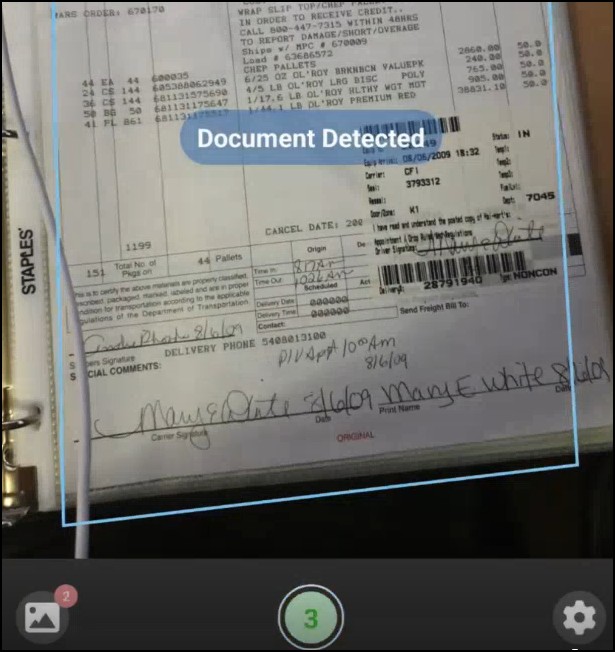
To get the best focus, wait for the blue Document Detected message to appear and then take the picture yourself or let Auto Snap take it for you.
-
The future 6.7 release and in-cab release 6.5.8 will introduce a new 3-second countdown timer centered at the bottom of your screen to help you remain steady until your photo is captured.
You are not required to wait for the countdown timer. You can snap your photo at any time.
-
In some configurations, you can also tap the screen to trigger an auto-focus square and then take the picture. The auto-focus square is configurable based on your fleet settings, so it may or may not appear.
-
-
Tap the white circle to take a photo of the document (or page 1 of a multi-page document). If Auto Detect and Auto Snap are ON, the app detects and captures the photo for you. To remind you Auto Snap is ON, the white TAKE PHOTO circle changes to a blue circle.
-
If you are satisfied with the captured preview image, tap the green checkmark.
-
If you are not satisfied with the captured preview image, tap Delete (the trash can) and try again.
-
-
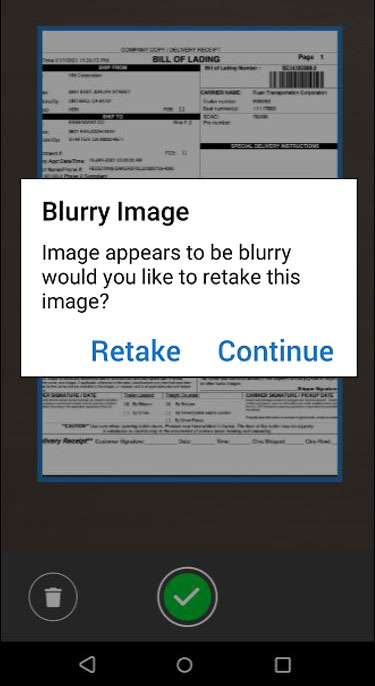
If the app detects a blurry image, you are prompted to keep it and continue or retake the photo.
Blurry Image: Image appears to be blurry. Would you like to retake this image?
-
To replace the blurry image with a new one, tap Retake.
-
If you think the blurry image is acceptable or the best you can do for now, tap Continue.
-
-
If you are satisfied with the image, tap Next.
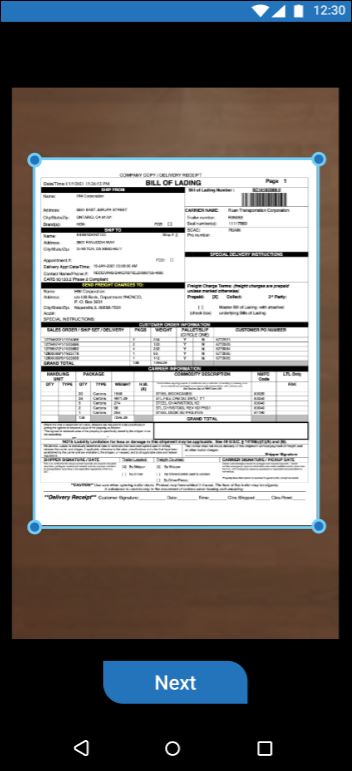
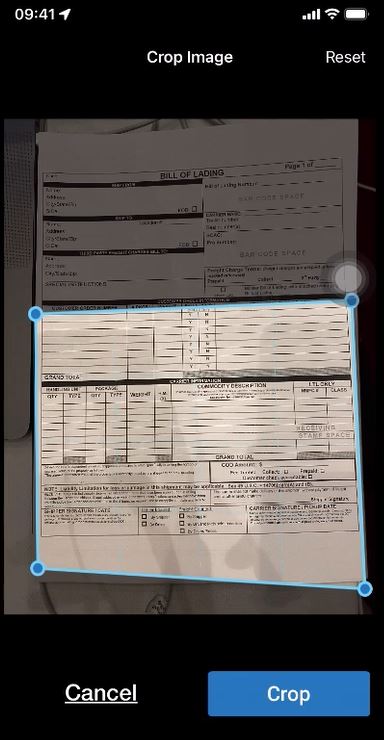
(Optional:) You can crop the detected preview of a live photo now (when you first capture the image) or crop it later. You can also crop an existing photo of a document you already scanned. To crop out unnecessary parts of the page, drag the blue dots or grab handles around the document at each corner to crop the image down to the exact size you want. As you move each corner, the area is enlarged in a preview circle for optimum precision.
When finished, tap Next.
-
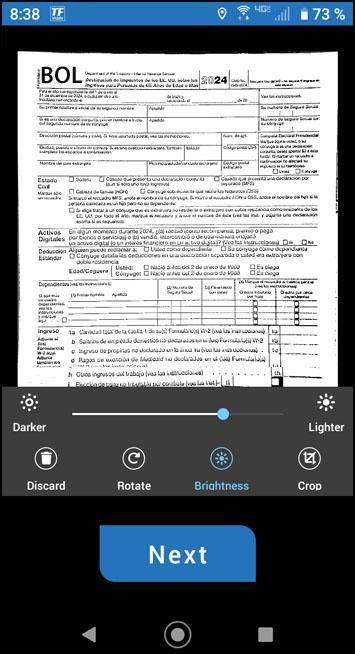
You can make any of the following optional adjustments (or, skip all adjustments and accept the current document as it is by tapping Next):

-
Discard: To revert any changes you made and restore the original image, tap Discard. You can then confirm your decision to trash this item and start over, or cancel to keep it.
-
Rotate: To rotate your page 90 degrees clockwise, tap Rotate.
-
Brightness: To make light text more clear, tap the Brightness feature at the bottom of the screen. Darken can be tapped multiple times to continue darkening the text. If the page becomes too dark, tap the Lighter option, to reverse the changes. New in this release is the ability to simply drag the line to adjust the brightness level.
Tip: The brightness setting applies to black and white or grayscale images but not color images. Adjusting the brightness of full-color documents and photos is planned as a future feature.
-
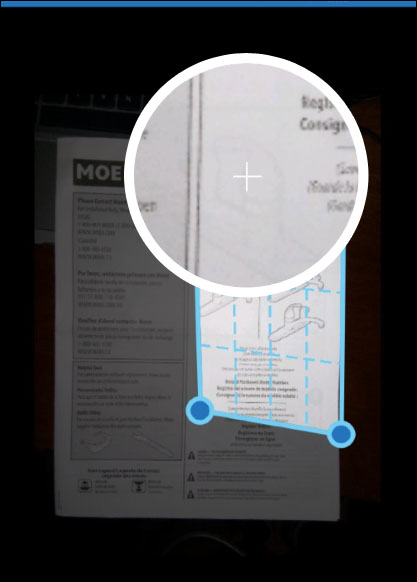
Crop: To crop your image (if you didn't already crop it), tap Crop.
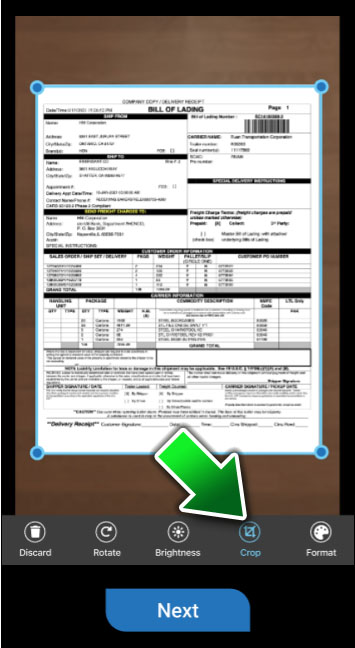
When you upload one image at a time, the app attempts to apply your last saved cropping region to each document (R6.0.1 behavior). When you upload multiple images, the crop resets to the edges of each page (R6.6 crop behavior). To crop out a different unwanted region of the page, drag the blue dots or grab handles around the document at each corner to crop the image down to the exact area you want (the rest is cropped or hidden from view). As you move each corner, the area is enlarged in a magnified preview circle for optimum precision.
New in 6.0.1 is the ability to choose from the following three (3) Crop Image options:
-
Crop: To apply your current crop region to the document, tap Crop.
-
Reset: If you adjusted the last saved cropping region (you moved the blue dots) but want to discard your changes and go back to the last saved crop region, tap Reset.
-
Cancel: To cancel any crop adjustments, revert to the un-cropped original document, and go back to the Scan Adjustments screen, tap Cancel.
-
-
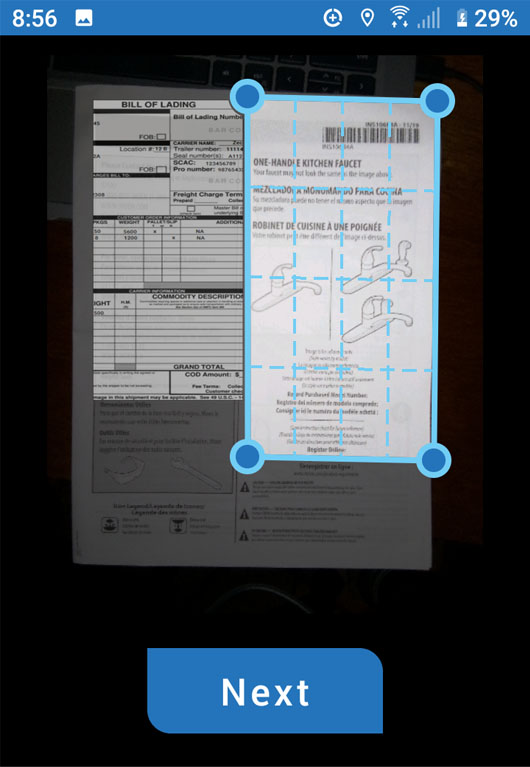
Crop Behavior: When you upload separate image files, the same crop shape behavior listed above for 6.0.1 applies (left). When you upload one or more PDF pages, you get the new 6.6 cropping behavior where the app auto detects the edges of each page in the PDF or image files (right).

-
Format: You can often reduce the data size of load documents which can speed performance and save time. For example, tap Format and then decide if you can reduce your image to Black and White without sacrificing quality. If not, tap Grayscale as an acceptable common ground for the majority of documents. Tap Color only if your document requires color to be viewed (for example, a color photograph of people, products, equipment, a map, or a page that uses colors such as red, yellow, or green to indicate status).
Example: In the following example, the user adjusted the format to black and white and reduced the brightness so the black text was darker. Typically, these adjustments are made separately; however, in this specific scenario, both the format and brightness controls appear at the same time.
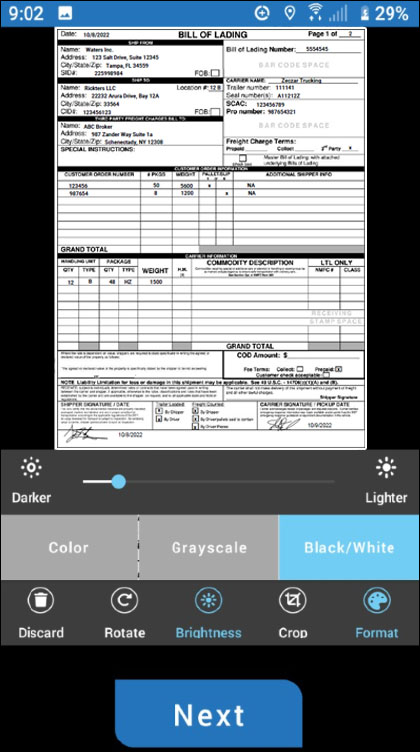
Tip 1: Many fleets take advantage of a global Transflo feature that automatically sets the document format based on the document type. For example, all invoices might be set to color and all BOLs might be set to black and white. In these environments, the Format button is hidden and you can safely continue to the next step.
-
To keep your changes, tap Next.
-
-
-
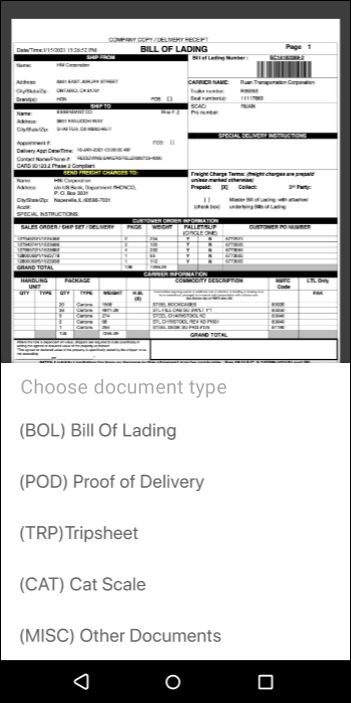
On the Choose Document Type screen, tap the type of document you just scanned.
 List of Common Doc Types
The choices that appear in your app are set by your fleet manager:
- Bill of Lading (BOL)
- Citation (CIT)
- Customs (CUS)
- Detention (DET)
- Expense (EXP)
- Fuel Receipt (FUL)
- Invoice (INV)
- Lumper (LUM)
- Maintenance (MNT)
- Miscellaneous (MSC)
- Notice of Assignment (NOA)
- Overage Shortage and Damage (OSD)
- Proof of Delivery (POD)
- Permits (PRM)
- Rate Confirmation (RCF)
- Repair Receipts (REP)
- Scale Weight Ticket (SCL)
- Toll Receipt (TOL)
- Trip Sheet (TRP)
- Vehicle Inspection Report (VIR)
- Truck Wash (WSH)
-
(Optional) To change a document type later, you can tap on its name in the list and then tap Edit DocType or expand an item in the list. Select a different document type. On some devices, you might have to tap Back or swipe left or right to go back to the list.

-
To add more document pages to send in this same batch for one load, tap the Add Page button and repeat the steps above for adding existing documents or using the camera to capture new documents.
-
To view a larger Preview of each item in the list, tap its small thumbnail image. You can also edit the document type one more time on the Preview screen. To go back to the list, tap Back.
-
To remove an item from the list, tap X Remove.
-
(Optional) If you need to cancel all documents, exit the app. Exercise caution when using this feature. You might still have your existing images saved on your device but any recent items you just captured are deleted when you tap DELETE ALL. If you have the paper originals or copies, you can send them later.
-
When you are ready to submit your documents, tap Submit. The steps you take next vary by company:
-
A Document Attributes screen might appear where you can complete any fields configured by your fleet to make sure the documents you send are associated with the right matching data. For example, in your app, the screen might ask you to enter your driver ID, description, load or BOL number, and truck number. In some configurations, your driver ID is entered for you.
-
Tap Next.
-
If your company requires signatures, tap Add Signatures. If you are prompted, tap OK and then tap Add Signature.
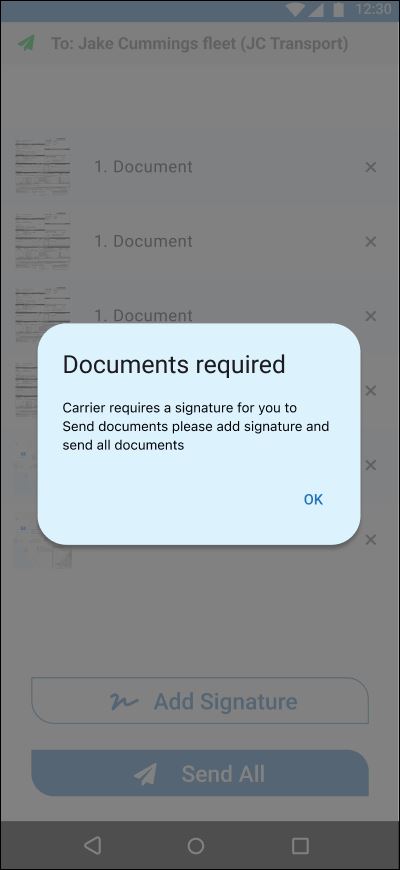
You might be asked to sign your name or physically hand your device to someone else to sign a document. Sign directly on the screen with a stylus or finger and then tap Next.

In some Transflo configurations, you can electronically send a signature request to someone, an authorized person can sign, and you receive the signed document back all electronically (no paper documents to scan).
-
When all documents are ready, tap Send All.
-
-
Your batch confirmation number appears. You can make a note of it now or refer to the text message, e-mail, or in-app notification you receive later.
-
To view those documents again later (over the next 14 days), go to transfloexpress.com and enter the confirmation number.
-
Tap Close in the top right corner of the screen to go back to the dashboard.
-
If you perform the steps above and tap Send All and then get the following message, it means your documents were almost ready to be sent but you lost your 4G/5G cellular data or Wi-Fi network connection:
Unable to upload. Would you like to add to the upload queue or cancel and try again?
We recommend that you tap Add to Document Queue and then allow time for your device to re-establish a data or Wi-Fi connection.
To learn more about this new offline scanning feature, see the following section below.
![]() View a demonstration of these steps in one or more Transflo videos:
View a demonstration of these steps in one or more Transflo videos:
Keywords: wifi wi-fi BOL load documents scan photo scan optimize document queue que review documents take pic send bol to employer LastDocumentsSent Last Document Sent Recent Documents transfer picture Where is transfer que como tomar una foto send in bill of lading upload invoice bills camera cam