New! Upload Multiple Load Documents and PDF Files
Release 6.5 in March 2025 introduced an optional new Multi-Page Upload feature that provides a way to upload multiple existing scanned documents, edit them if needed, and then send them as a batch. You can even capture new live photos with your camera and add both existing scanned documents and new scanned photos and send them together in one new complete batch for a load. Release 6.6 in June 2025 added support for PDF documents with one or more pages.
Tip: When uploading scanned documents, in general, a page and an image mean the same thing. You can multi-select up to ten (10) image files at a time.
-
Use your favorite photo app and your built-in camera on your mobile device to snap photos of your load documents and save them to your device or cloud storage. You can lay down multiple pages and scan one photo and crop each page later or you can snap a separate photo for each document, it is up to you.
-
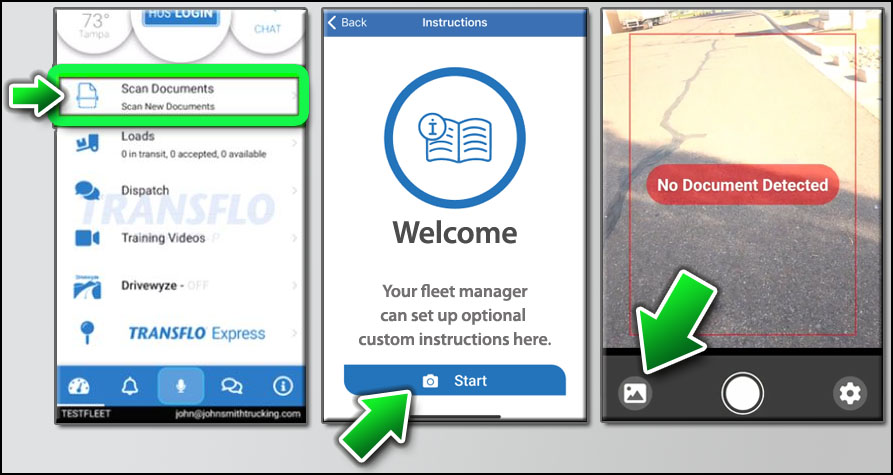
In the Transflo Mobile+ app, tap Scan Documents (your exact tile or menu name might vary).
-
Read any fleet-specific instructions on the optional Welcome screen and then tap Start.
-
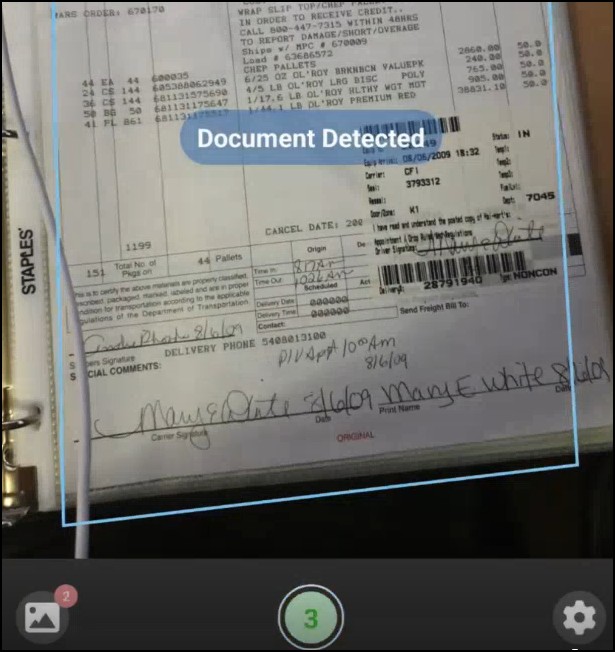
The mobile app shows No Document Detected. This KB article is about uploading multiple pre-captured image files; however, you can also take multiple live photos. You can switch between taking live photos and uploading pre-saved files and send them all together in one batch.
The future 6.7 release and in-cab release 6.5.8 will introduce a new 3-second countdown timer centered at the bottom of your screen to help you remain steady until your photo is captured. Then you can take your next photo without starting over.
-
To use the Multi-Page Upload feature, tap the Add Existing Photos button in the lower left corner.
The Add or Upload Existing Files icon also shows the number of documents you have selected.
-
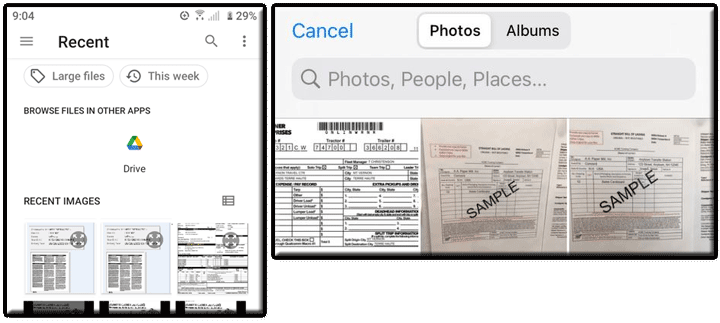
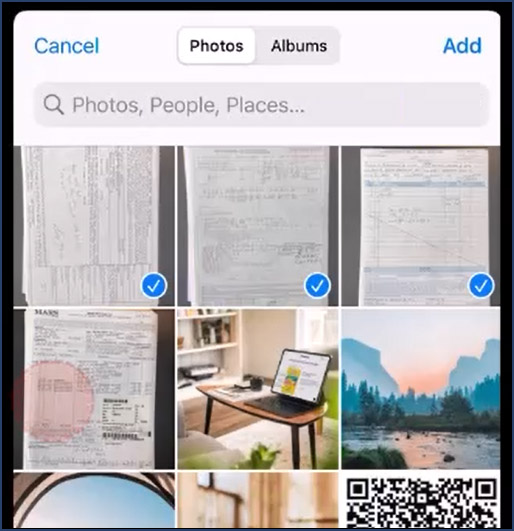
Your Android (left) or Apple iOS device (right) shows your recent photo images from Step 1.
-
(Optional) On Android devices, you can tap the ≡Options menu and choose one of the following folders to find your existing scanned files:
-
Recent
-
Images
-
Files
-
Downloads
On Apple iOS devices, you can tap the the ≡Options menu and choose
-
Files
-
Photo Gallery
-
Close
-
-
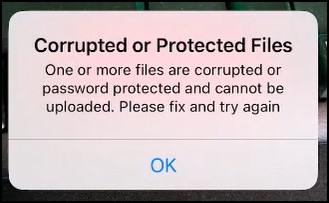
Select one or more image files such as a JPEG or PNG file. PDF files are also supported in Release 6.6 or newer. Your PDF files cannot be password-protected, encrypted, or corrupted.
-
If they are locked with a password or corrupted, you might see the following message: Corrupted or Protected Files: One or more files are corrupted or password protected and cannot be uploaded. Please fix and try again.
Tap OK.
-
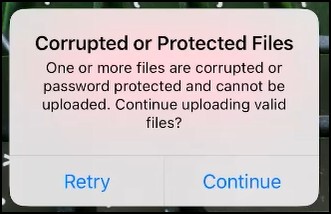
A similar message appears when you are about to upload a mix of good valid files and at least one bad apple. Corrupted or Protected Files: One or more files are corrupted or password protected and cannot be uploaded. Continue uploading valid files? In this scenario, choose one:
-
Continue: The corrupt or protected file is excluded and you can continue to upload the good images you already selected.
-
Retry: Choose Retry to go back to your local phone files or gallery to change the files you selected for upload.
-
-
-
Tap Add or Open or Select or Done (the labels for UI elements can vary by device and mobile OS).
-
A red circle shows the number of separate images you are about to upload. A PDF file can have multiple pages. Each page can be uploaded as a separate image along with any other image files you have or new photos you take.
Example: You select 1 PNG image file, a PDF with two (2) pages, and a PDF with four (4) pages. The red circle shows seven (7).

-
Tap Next at top right. If you forgot one, tap < Back, upload it, and then tap Next again. To browse your temporary series of images, swipe right-to-left or left-to-right.
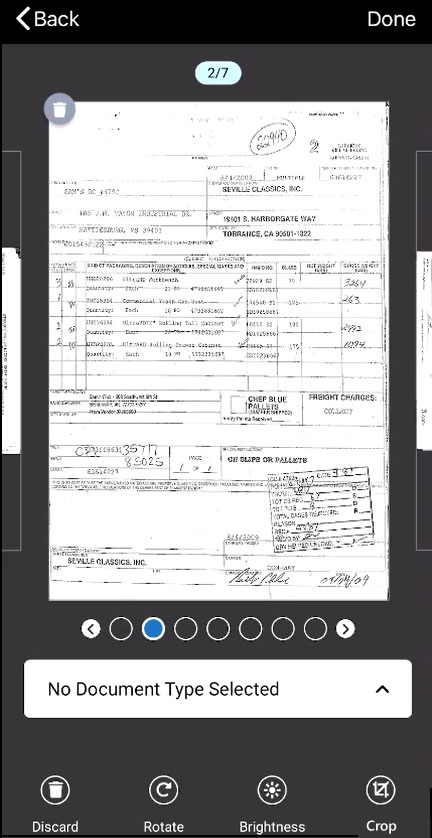
Example: The following example shows you are on page 1 of 7. Page 2 is just off-screen on the right.
Example: The following example shows a user swiping page 2 into view.
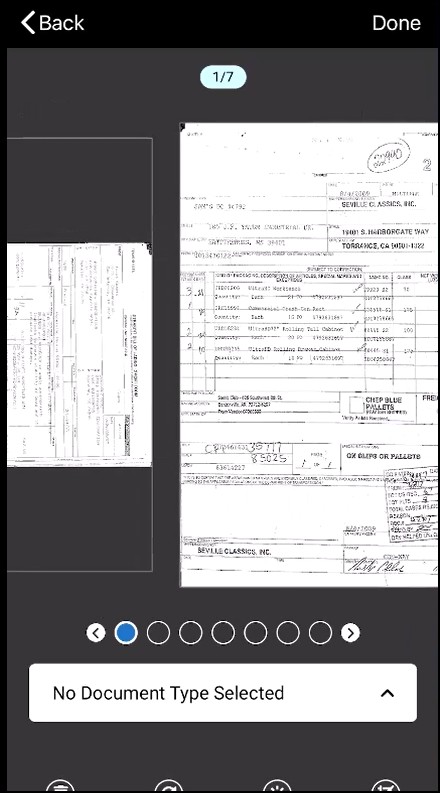
Example: The following example shows you are on page 2 of 7. Page 1 is just off-screen on the left. Page 3 is just off-screen on the right.
To remove an image or page, tap Delete (the trash can icon at top left).
-
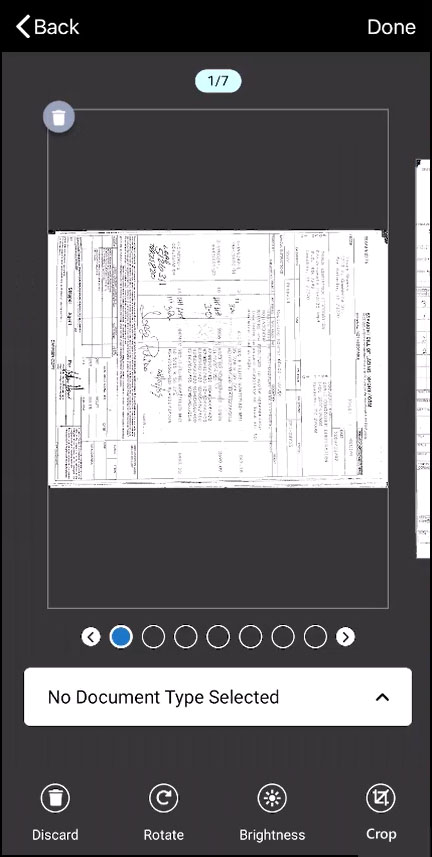
Your selected images appear in sequence in a temporary staging area with the following user interface elements:
-
Page Counter: For example, page (or image) 1 of 3 (1/3), 2 of 3 (2/3), and so on.
-
Page Navigation: Tap < Back or Next >. The icons show the current page (blue), pages with errors (exclamation point ! on a yellow triangle), and additional pages (solid circle). Three (3) pages will show three (3) circles. Seven (7) pages will show seven (7) pages.
-
Delete Page: To remove the image from this staging area, tap Remove (the trash can icon at top left).
-
Page Adjustments: Tap Rotate, Brightness, Crop, or Format. (The available options vary for each carrier fleet.)
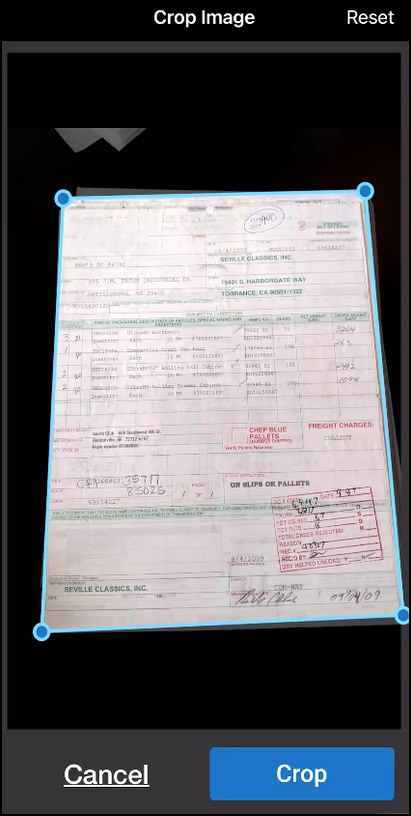
Example: You want to crop page 2. Tap Crop.
The app auto-detects borders. You can drag the blue dots to adjust the parts of the page that are IN and OUT of the crop zone. Tap Reset to undo your changes and start over with the default page edges detected by the app. To go back, tap Cancel. To keep your cropped page, tap Crop.
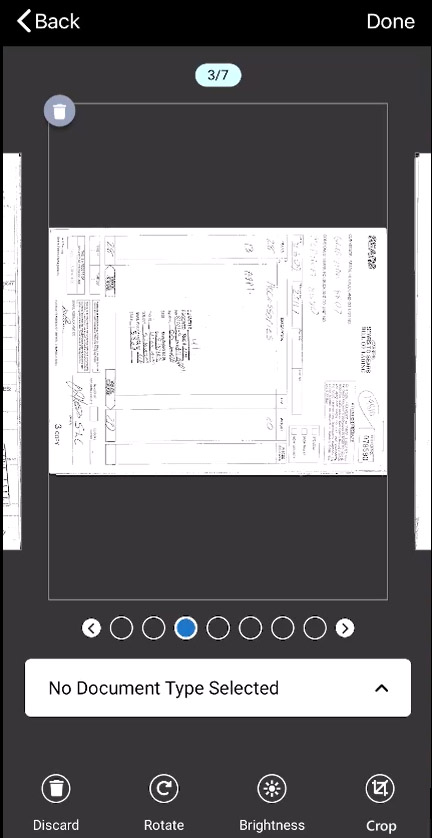
You are now on the next page and can decide what you want to do with this image.
-
To revert your changes, tap Discard (the trash can icon at bottom left). This will undo what you changed when you tapped one of the adjustment buttons: Rotate, Brightness, Crop, or Format.
-
To remove an image, tap Delete (the trash can icon at top left).
-
-
If an image is blurry or bad, you can tap Retake to capture a replacement image. If you tap Ignore, you can allow a blurry image (your upstream back-office processing team might or might not be able to read your blurry image). Bad images cannot be ignored; you must either retake them (replace with a new photo) or tap Delete to remove them from this temporary staging screen.

-
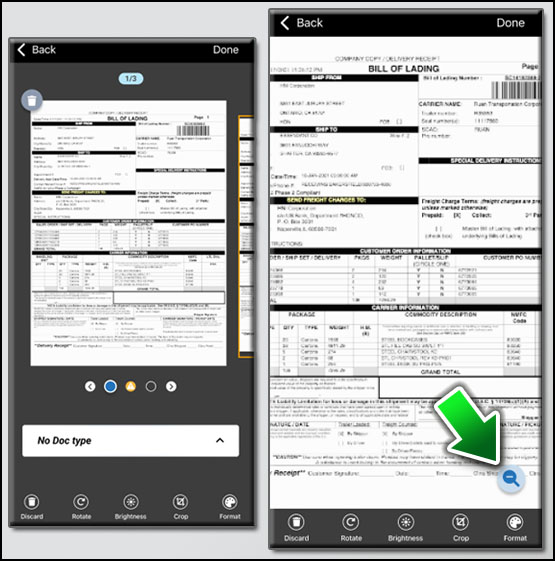
To magnify your view of an image (to zoom in), tap the center of each thumbnail page (left side below). To zoom back out, tap the Zoom Out button (right side below).
-
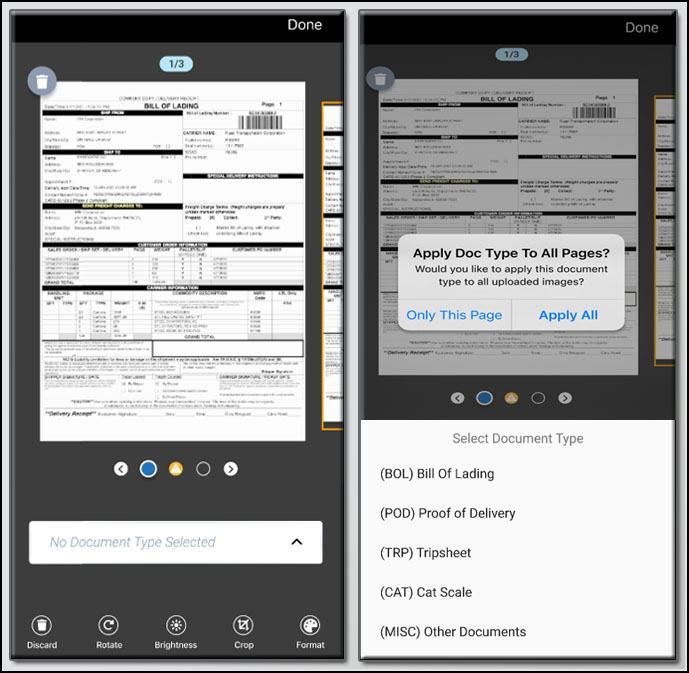
- Select the type of document (doc type) for each image. You can apply your choice of doc type to just the current page, for example page 1/3 (tap Only This Page) or to all images in your series (tap Apply All).
-
When you are finished assigning a doc type to each page and done making any adjustments, tap Next or Done.
-
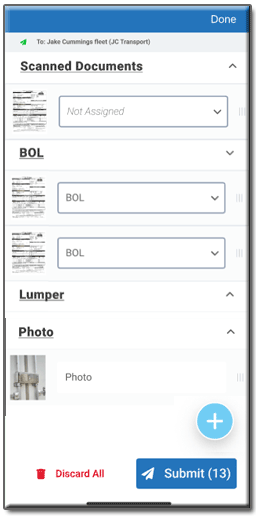
Review your documents on the final Summary page:
-
Expand each section. Verify every document has a valid doc type. If Not Assigned appears, choose a doc type.

-
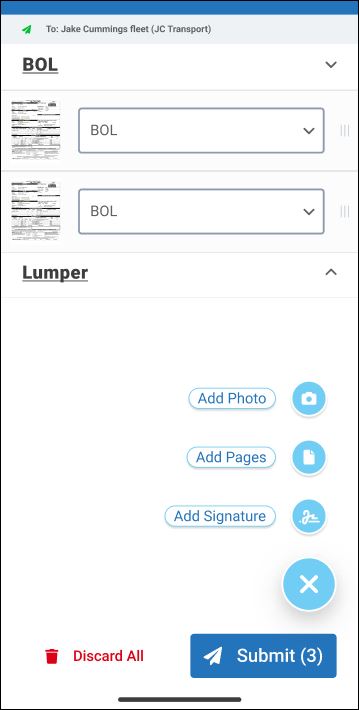
Toggle additional options. Tap + Additional Options to show more options.
-
To add a live or stored photo, tap Add Photo.
-
To add a live or stored document, tap Add Pages.
-
To add a signature, tap Add Signature.
-
To close the additional options, tap X Close.
-
-
To remove all pages, images, and adjustments, tap Discard All. Your changes are erased and you can start over.
-
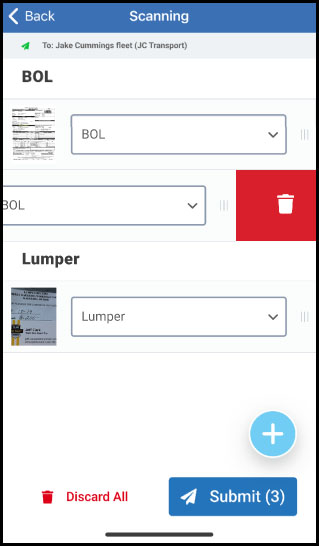
To remove a document or photo, swipe left and then tap Delete.
-
-
When ready, tap Next. The total number of items (pages or photos) appears in parentheses on the Submit button.
-
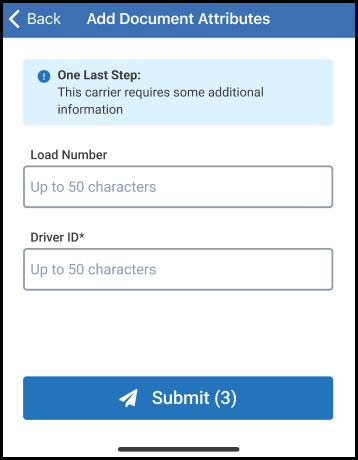
If configured by your carrier, enter any load attributes to help classify, identify, or audit this batch of documents. For example, enter a load ID or your driver ID. If an issue arises later, your office staff can contact the appropriate driver and trace the proper invoice and payment against the load ID. Tap Done.
-
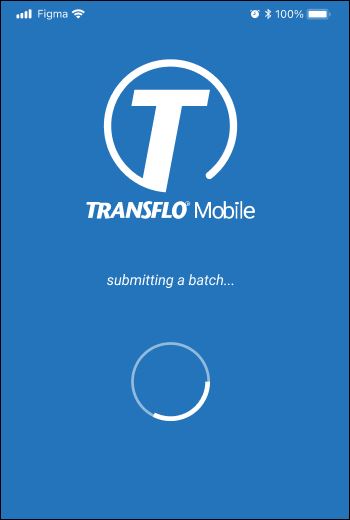
Tap Submit.
-
Depending on the speed of your current data or Wi-Fi connection, you might see a spinning progress circle on the Submitting a batch... screen.
-
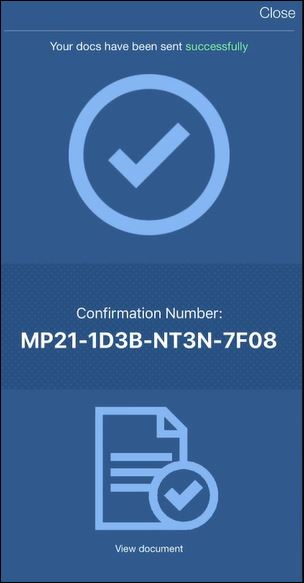
Your batch confirmation number appears. You can make a note of it now or refer to the text message, e-mail, or in-app notification you receive later.
-
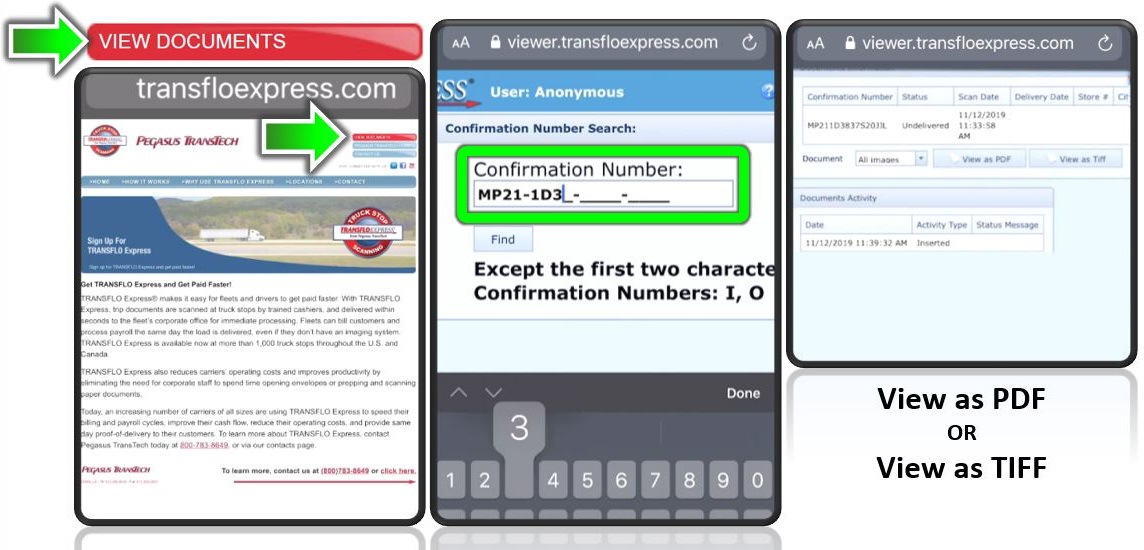
To view those documents again later (over the next 14 days), go to transfloexpress.com and enter the confirmation number. The Status column shows Delivered when all load documents have been submitted.
-
Tap Close in the top right corner of the screen to go back to the dashboard.
-
If you perform the steps above and tap Submit and then get the following message, it means your documents were almost sent but you lost your 4G/5G cellular data or Wi-Fi network connection:
Unable to upload. Would you like to add to the upload queue or cancel and try again?
We recommend that you tap Add to Document Queue and then allow time for your device to re-establish a data or Wi-Fi connection. To learn more about this new offline scanning feature, see Scan Offline with Document Queue.
Tip for Fleet Administrators: The new feature that supports stored image multi-select and live document multi-capture is an opt-in feature (isMultiDocEnabled). If you are interested in having this feature enabled, contact your Transflo Customer Success Manager (CSM) or Transflo Support (call, e-mail, or live chat). If your fleet disables this feature, your drivers can still upload multiple load document images in a single batch; however, they simply have to upload each image or capture each live photo for one document at a time. As a driver, if you cannot upload or capture multiple images (up to 10 at a time), it likely means your fleet has not enabled the isMultiDocEnabled feature setting.