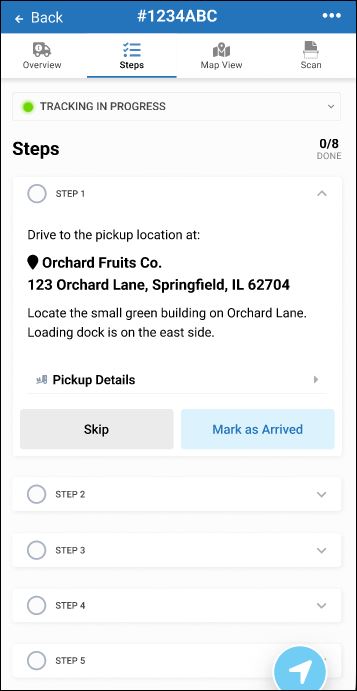
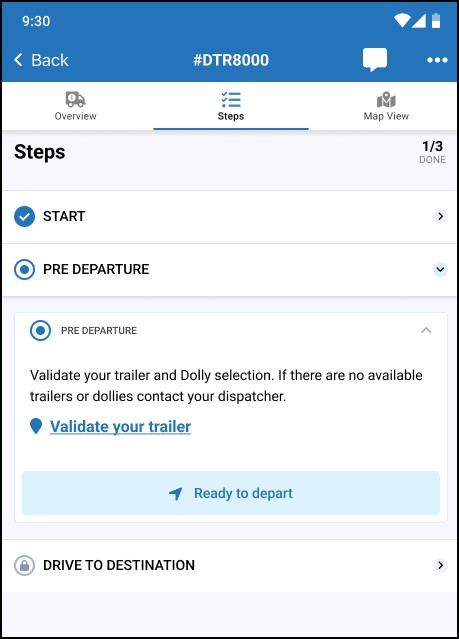
Steps
To simplify your life as a busy truck driver, each load can be broken down into steps. One by one, complete each step. The Steps screen divides the segments or legs of your load delivery into tasks or action items. This screen gives you an easy to-do list for each load.
Tip: Steps are not the same as stops. Stops are physical locations on a map. Steps are simply a group of steps and actions you need to take to successfully do your job.
As a driver, you know your job is more than just delivering the load. Follow the instructions in each step to deliver the load as required. Complete each step in order. Step 1, Step 2, and so on so the cargo is safe and the customer is happy with you and your company.
-
Open a load and tap the Steps tab at the top.
-
Expand each step so you understand the whole load. Then, just focus on Step 1.
-
Follow the instructions and perform the required actions. When finished, tap the empty circle to mark each step complete. In some load workflows, smart steps will automatically mark themselves complete for you!
-
Go to step 2 and then the next step, and so on. You can jump ahead and preview each step so you get a better idea of what action is required, where, and when.
-
Your fleet manager can design these steps based on sophisticated conditional logic. As a driver, you are in charge of completing the configured load segments, steps, and actions.
-
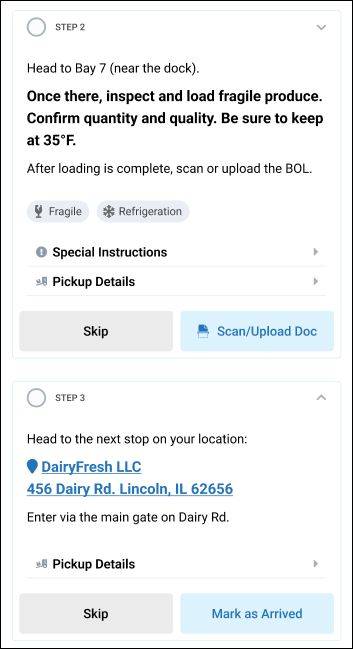
If a step is not required, you might be able to tap Skip.
-
If a step is required, you might not be able to go to the next step until you complete the previous step.
Tip: With automatic geo-fencing, your arrival at a warehouse or yard is automatically detected. Without geo-fencing features enabled, you might have to tap Mark as Arrived.
-
-
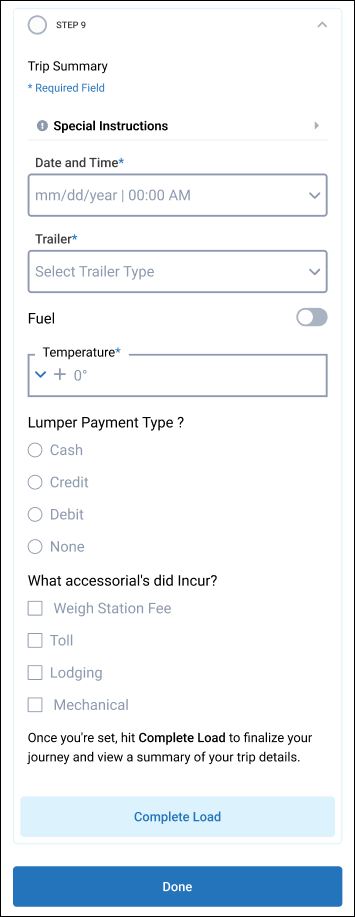
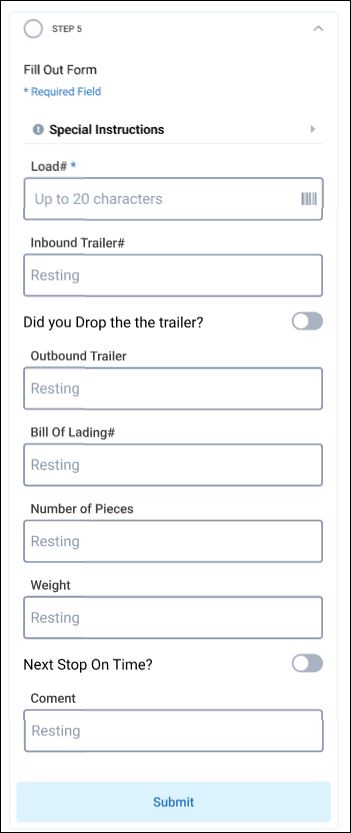
You might be required to enter specific data in a field before advancing to the next step. For example, if a step asks How many loaded wrapped pallets did you deliver?, you might tap a field or box and then enter 5.
-
Keep driving and working down the list of steps for each load. Each step shows one of the following status values to your fleet manager:
-
Not started
-
Active
-
Skipped (only for optional steps; you cannot skip required steps)
-
Completed
-
Pending (for the rare scenario where the system could not get the status of a step due to a network, server, or other technical delay)
-
-
If a step is important enough, your fleet manager can design the load delivery workflow to remind you to complete it. A pop-up chat message prompt, notification alert, or a standard SMS text message might appear. Your response might be mandatory.
-
Each fleet you drive for can change the name of a field to whatever standard naming conventions they want to use. Over time, you will become familiar with fleet-specific field labels. For example, one fleet calls it a Load Number, another fleet calls it a Load ID.
-
Some fields might already show a default value to try to help you save time. If it is not accurate, you might be able to change it.
-
Some fields might require that you enter at least so many letters or digits (minimum) or no more than so many letters or digits (maximum). For example, if Fleet ABC wants you to enter the 6-digit driver ID they assigned to you, you have to make your answer 6-digits. Likewise, you might have to abbreviate to reduce your long response to make it fit in a field with a 50-character limit.
-
Some fields accept only letters (ABC), others only numbers (123), and some allow you to type both.
-
Some fields allow special characters such as % or #. Others might not.
-
Some fields allow you to select a value from a drop-down list.
-
Some fields allow one value, some accept multiple values.
-
Some fields require you to enter a date or time or a range of dates or times.
-
For some loads, you might be prompted to enter a temperature reading such as 38°F with small UP and DOWN buttons you tap to adjust the temperature higher or lower based on actual sensor readings you verify during load delivery.
Example Form A:
-
Some forms ask you to answer a question with a simple YES or NO by sliding a small circular switch left or right.
-
Some fields show a barcode icon and allow you to enter a value by scanning a barcode.
Example Form B:
-
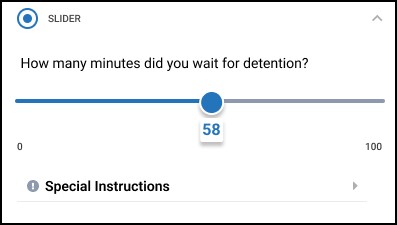
Some forms might display a slider bar that allows you to specify a number based on the percentage of the bar covered.
Example Form C:
-
Some forms might display a slider bar that allows you to rate or score your opinion about something by tapping one (1) star or up to five (5) stars.
Example Form C:

Tip: Don't feel overwhelmed. Let the app guide you from field to field and step to step. This KB article just lets you know all the possible options so you have a better idea about what you can expect and aren't surprised by any of the functionality.
The following field data is fairly common for almost all loads. Contact your supervisor if you are prompted to enter any of the following information and you don't know it. Depending on your fleet configuration, the source of this load data can be found on your electronic or printed load paperwork, eBOL data, JSON code, or an API:
-
Admin
-
BOL Number
-
Broker Load Number
-
Carrier Name
-
Delivery Date
-
Driver ID
-
External Carrier ID
-
Invoice Date, Number, and Amount Due
-
Load Number
-
Motor Carrier Code
-
Order Number
-
Rate Confirmation Number
-
Ship Date
-
ZIP Code
The following list shows some examples of actions you might be able to launch inside one or more steps you complete when delivering a load:
-
Accept or Decline a Load: If enabled by your fleet manager, you can accept or decline a load offer. Some fleets don't give drivers these options and instead they simply assign you to your next load.
-
Review Stops: Stop actualization provides a way for drivers to review specific parts of the workflow relating to stops.
-
Send Checkcall: Send checkcall will send the current driver, vehicle, trailer, or device location data including timestamps to one or more management systems. As a driver, you might be prompted to tap a button to send this data or it might be sent automatically when needed.
-
Open HOS or Launch Geotab: Launches Geotab or web view within the workflow without having to exit. This button shows Geotab ELD, HOS, and telematics features in the Transflo Mobile+ app. For example, you might have to verify your HOS logs. (This telematics feature is not integrated into the SDK).
-
Mark as Arrived or Mark as Departed: If your company does not use the automatic Transflo geo-fence feature, you can manually tap a button inside a step to indicate when you have arrived at a stop or departed from a location.
-
Launch CoPilot: Tap this button to launch Copilot within the workflow without having to exit.
-
Scan/Upload Doc: As a driver, tap Scan/Upload Doc to launch the Transflo Mobile+ app image scanning and upload feature. For scanning tips, see Scan and Send Load Documents. If your company does not use Mobile+ for documents, another upload and scanning feature can be configured by your fleet to open instead.
Example:
-
Launch Email app: Launches the default email application with the clicked on email address pre-filled in the recipient (to) address.
-
Launch SMS: Launches the default SMS text application with a phone number pre-filled in the recipient (to) line.
-
Launch Phone app: Launches the default phone app or directly call from the link in the workflow.
-
Barcode Scanner: Launches the existing barcode scanner from within the TFM+ Scan SDK.
-
Trigger Geofences: As a driver, you don't have to do anything special to trigger a geofence event. Just be aware that these invisible fences might be detected automatically as you drive and in some cases you might get an alert such as Approaching Terminal C in 2,000 feet. Triggering a geofence is based on crossing a region defined by a preset radius of a circle or by special polygons in the workflow configuration or customer location data. Geofences can trigger other actions to occur within the same step.
-
Timer/Stopwatch: As a driver, you might see a timer that starts counting up once the trigger occurs. Trigger could be a geo-fence location event, a button, or an input field. For example, a timer might count the 180 seconds (3 minutes) you were held in detention time at a warehouse dock.
-
Generate or Receive an Alert: A method for generating a push alert to the mobile application at different points in the workflow. As a driver you might get one or more alerts or notifications on your device.
-
Generate or Receive an email from Transflo: A method to send an email from Transflo systems to a specified email address with pre-filled content relating to the workflow. As a driver, just be aware that the system is very smart and might be communicating through e-mail or SMS text messages for you, saving you time.
-
Generate SMS from Transflo: A method to send a text message from Transflo systems to a specified phone number with pre-filled content relating to the workflow. As a driver, just be aware that the system is very smart and might be communicating through e-mail or SMS text messages for you, saving you time.
-
Get Device location: A method to tie the tablet or phone location to specific events in the workflow. As a driver, it is important to enable location tracking permissions so these automated location-based data points can be captured.
-
Get ELD Location: An API call to geotab to retrieve user location based on the ELD (electronic logging device) location.
-
Launch Webview: A web view that loads the linked website or an option to launch the default browser. As a driver, you might see a step in your load that takes you to a web form you have to complete and press Send. Make sure your device has a live data or Wi-Fi network connection.
Tip: Don't feel overwhelmed. Let the app guide you from step to step. This KB article just lets you know all the possible options so you have a better idea about what you can expect and aren't surprised by any of the functionality.